Rendering large lists with React Virtualized
Rendering large lists with React Virtualized 관련


Editor’s note
This article was last updated on 1 March 2023 to upgrade React and other library versions, re-write examples in functional components, and extend the tutorial with Grid, Collection, and UI/UX improvement examples.
A common requirement in web applications is displaying lists of data. Or tables with headers and scrolls. You have probably done it hundreds of times.
But what if you need to show thousands of rows at the same time?
And what if the pagination technique is not an option (or maybe it is but you still have to show a lot of information)? The infinite scrolling technique only limits rendering future elements and renders all previous rows, causing performance issues for very large lists.
In this article, I’ll show you how to use bvaughn/react-virtualized to display a large amount of data efficiently.
First, you’ll see the problems with rendering a huge data set. Then, you’ll learn how React Virtualized solves those problems and how to efficiently render the list of the first example using the List and Autosizer components.
You’ll also learn about two other helpful components: CellMeasurer, to dynamically measure the width and height of the rows, and ScrollSync, to synchronize scrolling between two or more virtualized components.
Why use react-virtualized?
React developers typically use the map function and render lists with multiple rows. If they use that approach for rendering thousands of rows, the web browser will always create thousands of DOM elements even though a scrollbar typically hides overflowing content. Rendering a new DOM element needs physical memory and consumes CPU and GPU hardware when DOM element positions get changed with user events, such as scrolling. So, if we directly render large lists in web apps, the browser heavily uses the computer memory and increases CPU/GPU usage while rendering (especially with initial rendering phases).
As a result, the app’s framerate gets reduced, becomes slow, and is no longer not user-friendly. You can experiment with this scenario in this GitHub repository (codezri/react-large-list-demo). Look at the following preview and see how directly-rendered large lists affect app performance:
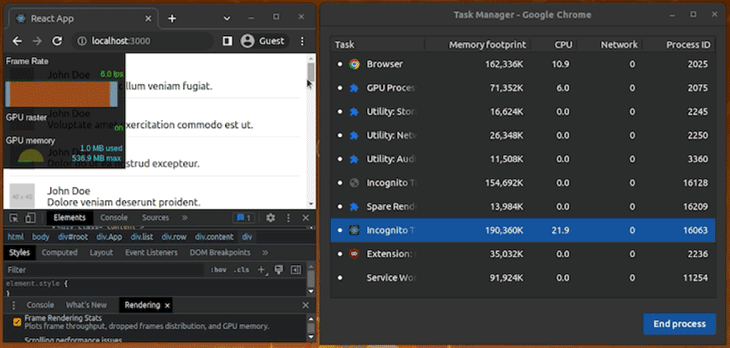
In less powerful devices or with more complex layouts, this could freeze the UI or even crash the browser, affecting app usability.
So how can we display thousands of rows in an efficient way?
One way is by using a library like react-virtualized, which renders large lists in a performance-friendly technique called virtual rendering. This library typically renders only visible rows in a large list and creates fewer DOM elements to reduce the performance overhead in apps. In other words, this library presents only the required rows and indicates the presence of other hidden rows virtually via CSS styles.
Let’s study how it works internally!
How does react-virtualized work?
The main concept behind virtual rendering is rendering only what is visible.
There are 1,000 comments in the app, but it only shows around ten at any moment (the ones that fit on the screen), until you scroll to show more.
So it makes sense to load only the elements that are visible and unload them when they are not by replacing them with new ones.
react-virtualized implements virtual rendering with a set of components that basically work in the following way:
- They calculate which items are visible inside the area where the list is displayed (the viewport) based on the scrollbar positions and the viewport size
- They use a container (
div) with relative positioning to absolute position the children elements inside of it by controlling its top, left, width, and height style properties
The above implementation strategy helps render large lists efficiently by rendering only elements that need to be presented to the user. For example, if you render a list of 10,000 movies with react-virtualized, it won’t create 10,000 DOM nodes instantly. Instead, it will indicate that you have many movies with a small-sized scrollbar and render a few (maybe 10 or 20) DOM nodes for visible movies when the user scrolls. Unlike the infinite scroll strategy, this implementation doesn’t keep past DOM elements in the DOM tree when the user scrolls down.
The react-virtualized library offers five main components:
- Grid (
bvaughn/react-virtualized): Renders tabular data along the vertical and horizontal axes - List (
bvaughn/react-virtualized): Renders a list of elements using aGridcomponent internally - Table (
bvaughn/react-virtualized): Renders a table with a fixed header and vertically scrollable body content. It also uses aGridcomponent internally - Masonry (
bvaughn/react-virtualized): Renders dynamically-sized, user-positioned cells with vertical scrolling support - Collection (
bvaughn/react-virtualized): Renders arbitrarily positioned and overlapping data
These components extend from React.PureComponent, which means that when comparing objects, it only compares their references to increase performance. You can read more about this here ().
On the other hand, react-virtualized also includes some HOC components:
- ArrowKeyStepper (
bvaughn/react-virtualized): Decorates another component so it can respond to arrow-key events - AutoSizer (
bvaughn/react-virtualized): Automatically adjusts the width and height of another component - CellMeasurer (
bvaughn/react-virtualized): Automatically measures a cell’s contents by temporarily rendering it in a way that is not visible to the user - ColumnSizer (
bvaughn/react-virtualized): Calculates column-widths for grid cells - InfiniteLoader (
bvaughn/react-virtualized): Manages the fetching of data as a user scrolls a list, table, or grid - MultiGrid (
bvaughn/react-virtualized): Decorates aGridcomponent to add fixed columns and/or rows - ScrollSync (
bvaughn/react-virtualized): Synchronizes scrolling between two or more components - WindowScroller (
bvaughn/react-virtualized): Enables aTableorListcomponent to be scrolled based on the window’s scroll positions
Now let’s see how to use the List component to virtualize the 5,000 comments example.
Virtualizing a list
First, create a new React project:
npx create-react-app react-virtualized-demo
Install dependencies as follows:
yarn add react-virtualized lorem-ipsum
npm install react-virtualized lorem-ipsum
N.B.
If you get an npm peer dependency resolution error, you can use the legacy-peer-deps option to fix it. If react-virtualized maintainers release this commit (bvaughn/react-virtualized) to npm, this peer dependency error will disappear.
Next, in src/App.js, import the List component from react-virtualized and do all necessary setups:
import './App.css';

import { loremIpsum } from 'lorem-ipsum';
import { List } from 'react-virtualized';

const rowCount = 5000;
const listHeight = 400;
const rowHeight = 50;
const rowWidth = 700;

const list = Array(rowCount).fill().map((val, idx) => {
  return {
    id: idx,
    name: 'John Doe',
    image: 'http://via.placeholder.com/40',
    text: loremIpsum({
      count: 1,
      units: 'sentences',
      sentenceLowerBound: 4,
      sentenceUpperBound: 8
    })
  }
});
Let’s use the List component to render the list in a virtualized way. Add the following code after the above setup:
function renderRow({ index, key, style }) {
  return (
    <div key={key} style={style} className="row">
      <div className="image">
        <img src={list[index].image} alt="" />
      </div>
      <div className="content">
        <div>{list[index].name}</div>
        <div>{list[index].text}</div>
      </div>
    </div>
  );
}

function App() {
  return (
    <div className="App">
      <div className="list">
        <List
          width={rowWidth}
          height={listHeight}
          rowHeight={rowHeight}
          rowRenderer={renderRow}
          rowCount={list.length}
          overscanRowCount={3} />
      </div>
    </div>
  );
}

export default App;
Then, add the following styling definitions to src/App.css:
.App {
  text-align: center;
}

.list {
  padding: 10px;
}

.row {
  border-bottom: 1px solid #ebeced;
  text-align: left;
  margin: 5px 0;
  display: flex;
  align-items: center;
}

.image {
  margin-right: 10px;
}

.content {
  padding: 10px;
}
Notice two things.
First, the List component requires you to specify the width and height of the list. It also needs the height of the rows so it can calculate which rows are going to be visible.
The rowHeight property takes either a fixed row height or a function that returns the height of a row given its index.
Second, the component needs the number of rows (the list length) and a function to render each row. It doesn’t take the list directly.
For this reason, the implementation of the renderRow method needs to change.
This method won’t receive an object of the list as an argument anymore. Instead, the List component will pass it an object with the following properties (bvaughn/react-virtualized):
function rowRenderer({
  index, // Index of row
  isScrolling, // The List is currently being scrolled
  isVisible, // This row is visible within the List (eg it is not an overscanned row)
  key, // Unique key within array of rendered rows
  parent, // Reference to the parent List (instance)
  style, // Style object to be applied to row (to position it);
}) {
  // ...
}
We’ve implemented the renderRow function as follows:
function renderRow({ index, key, style }) {
  return (
    <div key={key} style={style} className="row">
      <div className="image">
        <img src={list[index].image} alt="" />
      </div>
      <div className="content">
        <div>{list[index].name}</div>
        <div>{list[index].text}</div>
      </div>
    </div>
  );
}
Note how the index property is used to access the element of the list that corresponds to the row that is being rendered. Also, make sure to add the incoming style to the div element to position rows correctly during scrolling (the library dynamically applies the CSS top property in this case).
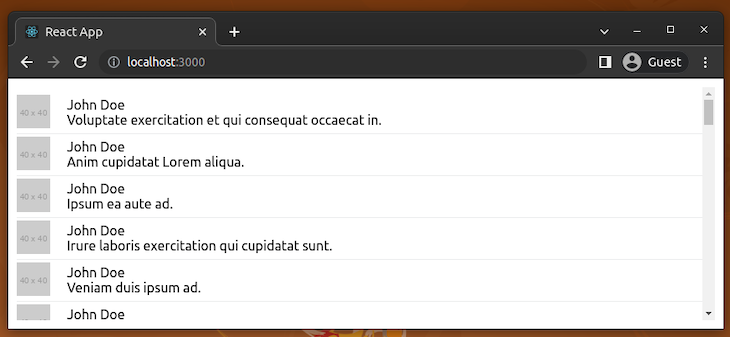
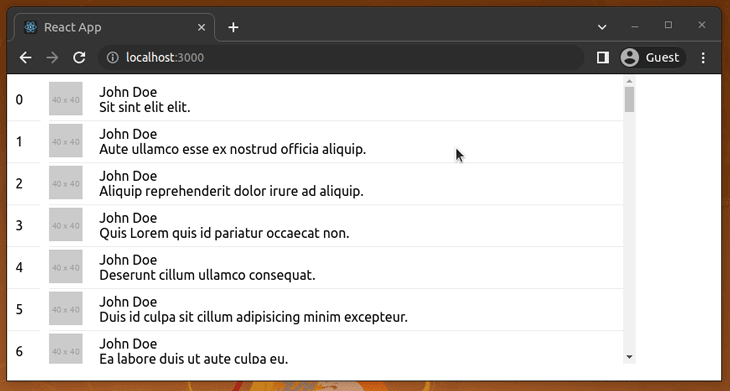
If you run the app, you’ll see something like this:
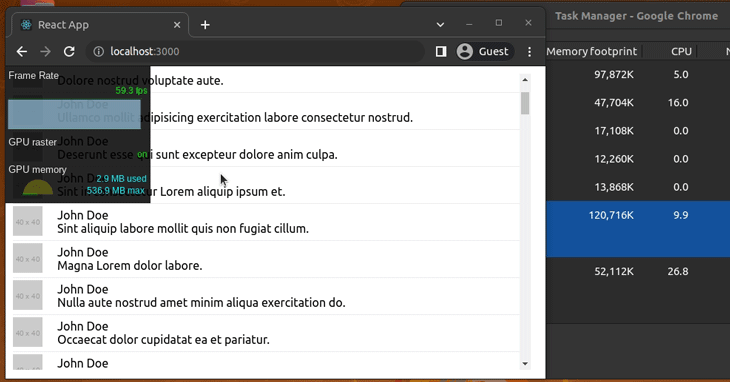
If you repeat the frame rate test, this time you’ll see a constant rate of 59/60 fps, low RAM usage, and no CPU/GPU usage spikes. If we look at the elements of the page in the developer tools tab, you’ll see that now the rows are placed inside two additional div elements:
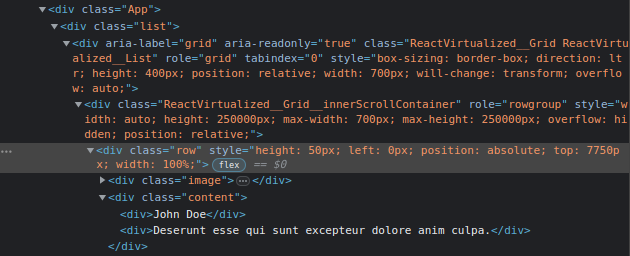
The outer div element (the one with the CSS class ReactVirtualized__GridReactVirtualized__List) has the width and height specified in the component (700px and 400px, respectively), and has a relative position and the value auto for overflow (to add scrollbars).
The inner div element (the one with the CSS class ReactVirtualized__Grid__innerScrollContainer) has a max-width of 700px but a height of 250,000px, the result of multiplying the number of rows (5,000) by the height of each row (50). It also has a relative position but a hidden value for overflow.
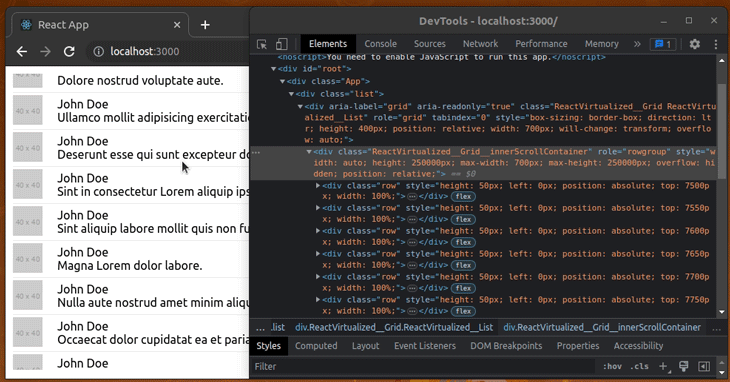
All the rows are children of this div element, and this time, there are not 5,000 elements. However, there are not eight or nine elements either; there are approximately ten more.
That’s because the List component renders additional elements to reduce the chance of flickering due to fast scrolling.
The number of additional elements is controlled with the overscanRowCount (bvaughn/react-virtualized) property. For example, if I set 3 as the value of this property:
<List
  width={rowWidth}
  height={listHeight}
  rowHeight={rowHeight}
  rowRenderer={renderRow}
  rowCount={list.length}
  overscanRowCount={3} />
The number of elements I’ll see in the Elements tab will be around twelve.
Also, take a look at how the elements and their top style is updated dynamically:
The downside is that you have to specify the width and height of the list as well as the height of the row. Luckily, you can use the AutoSizer and CellMeasurer components to solve this.
Let’s start with AutoSizer.
Autoresizing a virtualized list
Components like AutoSizer use a pattern named function as child components.
As the name implies, instead of passing a component as a child:
<AutoSizer>
  <List
  ...
  />
</AutoSizer>
You have to pass a function. In this case, one that receives the calculated width and height:
<AutoSizer>
  {
    ({ width, height }) => {}
  }
</AutoSizer>
This way, the function will return the List component configured with the width and height:
<AutoSizer>
  {
    ({ width, height }) => (<List
        width={width}
        height={height}
        rowHeight={rowHeight}
        rowRenderer={renderRow}
        rowCount={list.length}
        overscanRowCount={3} />
    )
  }
</AutoSizer>
The AutoSizer component will fill all of the available space of its parent so if you want to fill all the space after the header, in src/App.css, you can add the following line to the list class:
.list {
  /*...*/
  height: calc(100vh - 20px);
}
The vh unit corresponds to the height of the viewport (the browser window size), so 100vh is equivalent to 100% of the height of the viewport. 20px are subtracted because of the padding that the list class adds (10px x 2).
Import the AutoSizer component if you haven’t already:
import { List, AutoSizer } from 'react-virtualized';
And when you run the app, you should see something like this:
If you resize the window, the list height and width should adjust automatically:

Calculating the height of a row automatically
The app generates a short sentence that fits in one line, but if you change the settings of the lorem-ipsum generator to something like this:
text: loremIpsum({
  count: 2,
  units: 'sentences',
  sentenceLowerBound: 2,
  sentenceUpperBound: 100
})
Everything becomes a mess:
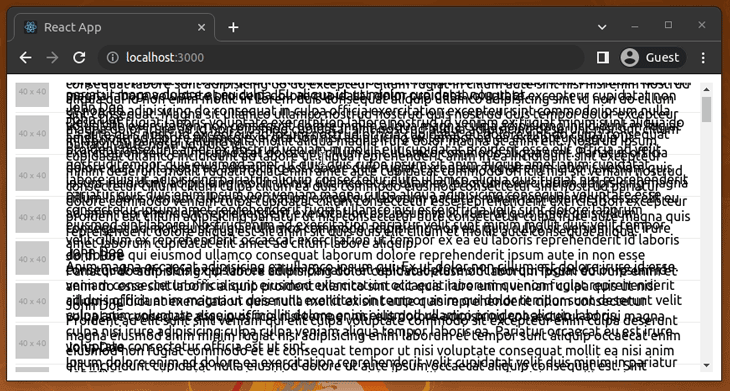
That’s because the height of each cell has a fixed value of 50. If you want to have dynamic height, you have to use the CellMeasurer component.
This component works in conjunction with CellMeasurerCache (bvaughn/react-virtualized), which stores the measurements to avoid recalculating them all the time.
To use these components, first import them:
import { List, AutoSizer, CellMeasurer, CellMeasurerCache } from 'react-virtualized';
Next, create an instance of CellMeasurerCache in the constants section (after all imports and const list…):
const cache = new CellMeasurerCache({
  fixedWidth: true,
  defaultHeight: 100
});
Because the width of the rows doesn’t need to be calculated, the fixedWidth property is set to true.
Next, we need to update the renderRow function with CellMeasurer as follows:
function renderRow({ index, key, style, parent }) {
  return (
    <CellMeasurer
      key={key}
      cache={cache}
      parent={parent}
      columnIndex={0}
      rowIndex={index}>
      {({registerChild}) => (
        <div style={style} className="row" ref={registerChild}>
          <div className="image">
            <img src={list[index].image} alt="" />
          </div>
          <div className="content">
            <div>{list[index].name}</div>
            <div>{list[index].text}</div>
          </div>
        </div>
      )}
    </CellMeasurer>
  );
}
Notice the following about CellMeasuer:
- This component is the one that is going to take the key to differentiate the elements
- It takes the cache configured before
- It takes the parent component (
List) where it’s going to be rendered, so you also need this parameter - Renders the content section via the function as a component strategy with the
registerChildref to avoidfindDOMNode(bvaughn/react-virtualized) API error (bvaughn/react-virtualized)
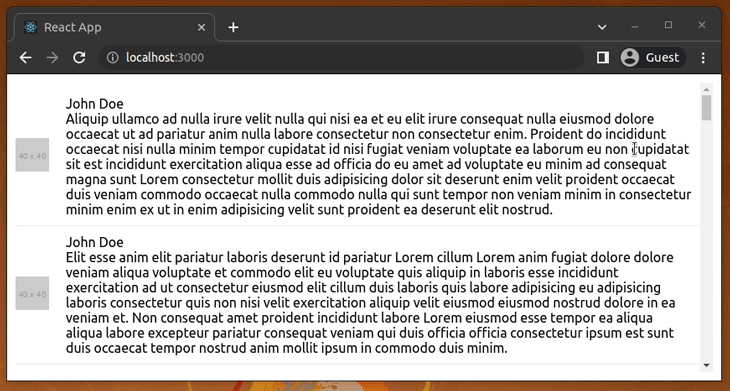
Finally, you only need to modify the List component so it uses the cache and gets its height from that cache:
<AutoSizer>
  {
    ({ width, height }) => (<List
        width={width}
        height={height}
        deferredMeasurementCache={cache}
        rowHeight={cache.rowHeight}
        rowRenderer={renderRow}
        rowCount={list.length}
        overscanRowCount={3} />
    )
  }
</AutoSizer>
Now, when you run the app, everything should look fine:
Syncing scrolling between two lists
Another useful component is ScrollSync.
For this example, you’ll need to return to the previous configuration that returns one short sentence:
text: loremIpsum({
  count: 1,
  units: 'sentences',
  sentenceLowerBound: 4,
  sentenceUpperBound: 8
})
The reason is that you cannot share a CellMeausure cache between two components, so you can’t have dynamic heights for the two lists I’m going to show next, like in the previous example. At least not in an easy way.
If you want to have dynamic heights for something similar to the example of this section, it’s better to use the MultiGrid component.
Moving on, import ScrollSync First, undo the code and remove the dynamic height feature. Or, use the following code in src/App.js:
import './App.css';

import { loremIpsum } from 'lorem-ipsum';
import { List, AutoSizer } from 'react-virtualized';

const rowCount = 5000;
const listHeight = 400;
const rowHeight = 50;
const rowWidth = 700;

const list = Array(rowCount).fill().map((val, idx) => {
  return {
    id: idx,
    name: 'John Doe',
    image: 'http://via.placeholder.com/40',
    text: loremIpsum({
      count: 1,
      units: 'sentences',
      sentenceLowerBound: 4,
      sentenceUpperBound: 8
    })
  }
});

function renderRow({ index, key, style }) {
  return (
    <div key={key} style={style} className="row">
      <div className="image">
        <img src={list[index].image} alt="" />
      </div>
      <div className="content">
        <div>{list[index].name}</div>
        <div>{list[index].text}</div>
      </div>
    </div>
  );
}

function App() {
  return (
    <div className="App">
      <div className="list">
        <AutoSizer>
          {
            ({ width, height }) => (<List
                width={width}
                height={height}
                rowHeight={rowHeight}
                rowRenderer={renderRow}
                rowCount={list.length}
                overscanRowCount={3} />
            )
          }
        </AutoSizer>
      </div>
    </div>
  );
}

export default App;


import { List, AutoSizer, ScrollSync } from 'react-virtualized';
And in the render statement, wrap the div element with the list class in a ScrollSync component like this:
<ScrollSync>
  {({ onScroll, scrollTop, scrollLeft }) => (
    <div className="list">
      <AutoSizer>
      {
        ({ width, height }) => {
          return (
            <List
              width={width}
              height={height}
              rowHeight={rowHeight}
              onScroll={onScroll}
              rowRenderer={renderRow}
              rowCount={list.length}
              overscanRowCount={3} />
          )
        }
      }
      </AutoSizer>
    </div>
  )
}
</ScrollSync>
ScrollSync also takes a function as a child to pass some parameters. Perhaps the ones that you’ll use most of the time are: onScroll. A function that will trigger updates to the scroll parameters to update the other components, so it should be passed to at least one of the child components. scrollTop. The current scroll-top offset, updated by the onScroll function. scrollLeft. The current scroll-left offset, updated by the onScroll function.
If you put a span element to display the scrollTop and scrollLeft parameters…
// ...
<ScrollSync>
  {({ onScroll, scrollTop, scrollLeft }) => (
    <div className="list">
       <span>{scrollTop} - {scrollLeft}</span>
      <AutoSizer>
      {
// ...
…and run the app, you should see how the scrollTop parameter is updated as you scroll the list:
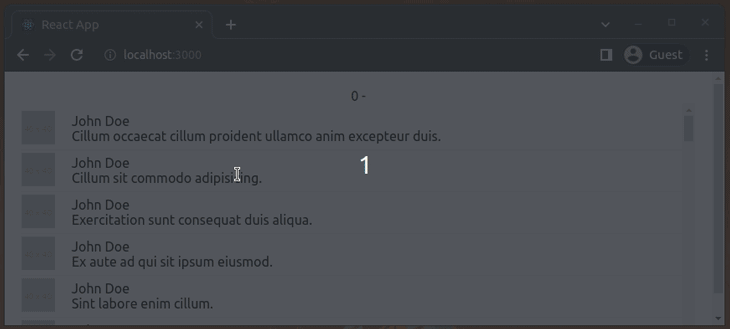
Because the list doesn’t have a horizontal scroll, the scrollLeft parameter doesn’t have a value.
Now, for this example, you’ll add another list that will show the ID of each comment and its scroll will be synchronized to the other list.
So let’s start by adding another render function for this new list:
function renderColumn({ index, key, style }) {
  return (
    <div key={key} style={style} className="row">
      <div className="content">
        <div>{list[index].id}</div>
      </div>
    </div>
  );
}
Next, in the AutoSizer component, disable the width calculation:
<AutoSizer disableWidth>
{
   ({ height }) => {
     ...
   }
}
</AutoSizer>
You don’t need it anymore because you’ll set a fixed width to both lists and use absolute position to place them next to each other.
Something like this:
<div className="list">
  <AutoSizer disableWidth>
  {
    ({ height }) => (
      <div>
        <div
          style={{
            position: 'absolute',
            top: 0,
            left: 0,
          }}>
            <List
              className="leftSide"
              width={40}
              height={height}
              rowHeight={rowHeight}
              scrollTop={scrollTop}
              rowRenderer={renderColumn}
              rowCount={list.length}
              overscanRowCount={3}  />
        </div>
        <div
          style={{
            position: 'absolute',
            top: 0,
            left: 50,
          }}>
            <List
              width={700}
              height={height}
              rowHeight={rowHeight}
              onScroll={onScroll}
              rowRenderer={renderRow}
              rowCount={list.length}
              overscanRowCount={3}  />
        </div>
      </div>
      )
  }
  </AutoSizer>
</div>
Notice that the scrollTop parameter is passed to the first list so its scroll can be controlled automatically, and the onScroll function is passed to the other list to update the scrollTop value.
The leftSide class of the first list just hides the scrolls (because you won’t be needing it):
.leftSide {
  overflow: hidden !important;
}
Finally, if you run the app and scroll the right-side list, you’ll see how the other list is also scrolled:
Improving UI/UX of large lists
Implementing UI/UX improvements helps us enhance the quality of web apps. Large lists typically look complex, but we can use several UI/UX concepts to reduce the complexity and make them minimal for users.
Adding clickable elements (links and buttons) to rows
We can simplify a complex list or grid by moving content to another page, popup, or browser window with a link or button. Look at the following example source:
import './App.css';

import { loremIpsum } from 'lorem-ipsum';
import { List, AutoSizer } from 'react-virtualized';

const rowCount = 5000;
const listHeight = 400;
const rowHeight = 80;
const rowWidth = 700;

const list = Array(rowCount).fill().map((val, idx) => {
  return {
    id: idx,
    name: 'The book',
    image: 'http://via.placeholder.com/40',
    text: loremIpsum({
      count: 1,
      units: 'sentences',
      sentenceLowerBound: 4,
      sentenceUpperBound: 8
    }),
    description: loremIpsum({
      count: 5,
      units: 'sentences',
      sentenceLowerBound: 4,
      sentenceUpperBound: 8
    })
  }
});

function renderRow({ index, key, style }) {
  return (
    <div key={key} style={style} className="row">
      <div className="image">
        <img src={list[index].image} alt="" />
      </div>
      <div className="content">
        <div>{list[index].name}</div>
        <div>{list[index].text}</div>
        <button
          style={{marginTop: '8px'}}
          onClick={() => alert(list[index].name + '\n\n' + list[index].description)}
        >Read more...</button>
      </div>
    </div>
  );
}

function App() {
  return (
    <div className="App">
      <div className="list">
        <AutoSizer>
          {
            ({ width, height }) => (<List
                width={width}
                height={height}
                rowHeight={rowHeight}
                rowRenderer={renderRow}
                rowCount={list.length}
                overscanRowCount={3} />
            )
          }
        </AutoSizer>
      </div>
    </div>
  );
}

export default App;
The code above shows a button that displays more details about a row as follows:
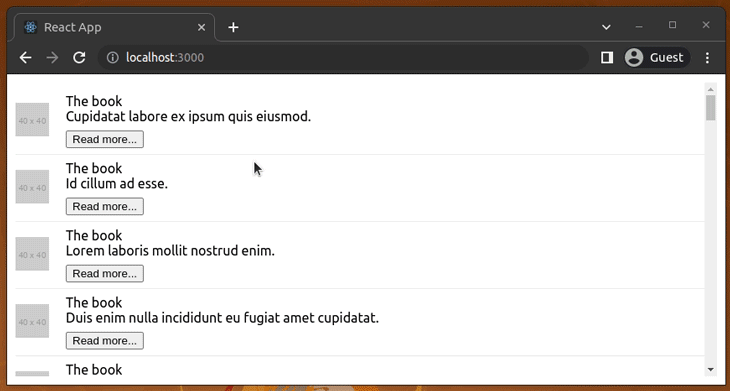
Similarly, you can add links and even make the entire row clickable!
Creating a virtualized collapsible list
Making list rows collapsible is another option to hide complex details without using links or buttons to open popups. This time we need to use CellMeasurer as follows because collapsible elements dynamically change the row height. Add the following code to your src/App.js file:
import './App.css';

import React, { useState, useEffect } from 'react';
import { loremIpsum } from 'lorem-ipsum';
import { List, AutoSizer, CellMeasurer, CellMeasurerCache } from 'react-virtualized';

const rowCount = 5000;

const list = Array(rowCount).fill().map((val, idx) => {
  return {
    id: idx,
    name: 'John Doe',
    image: 'http://via.placeholder.com/40',
    text: loremIpsum({
      count: 10,
      units: 'sentences',
      sentenceLowerBound: 4,
      sentenceUpperBound: 8
    })
  }
});


const cache = new CellMeasurerCache({
  fixedWidth: true,
  defaultHeight: 100
});

function Collapsible({ children, title, onChange }) {
  const [expanded, setExpanded] = useState(false);
  useEffect(() => {
    onChange && onChange();
  }, [expanded, onChange]);
  return (
    <>
      <div className="accordHeader" onClick={() => setExpanded(!expanded)}>{title}</div>
      { expanded &&
        <>
          {children}
        </>
      }
    </>
  );
}

function renderRow({ index, key, style, parent }) {
  return (
    <CellMeasurer
      key={key}
      cache={cache}
      parent={parent}
      columnIndex={0}
      rowIndex={index}>
      {({registerChild, measure}) => (
        <div style={style} className="row" ref={registerChild}>
          <Collapsible title={list[index].name} onChange={measure}>
            <div className="image">
              <img src={list[index].image} alt="" />
            </div>
            <div className="content">
              <div>{list[index].name}</div>
              <div>{list[index].text}</div>
            </div>
          </Collapsible>
        </div>
      )}
    </CellMeasurer>
  );
}

function App() {
  return (
    <div className="App">
      <div className="list">
        <AutoSizer>
          {
            ({ width, height }) => (<List
                width={width}
                height={height}
                deferredMeasurementCache={cache}
                rowHeight={cache.rowHeight}
                rowRenderer={renderRow}
                rowCount={list.length}
                overscanRowCount={3} />
            )
          }
        </AutoSizer>
      </div>
    </div>
  );
}

export default App;
Note that here we call the measure function to adjust the cell size via CellMeasurer when the expandable state changes.Next, use the following content for src/App.css:
.App {
  text-align: center;
}

.list {
  padding: 10px;
  height: calc(100vh - 20px);
}

.row {
  border-bottom: 1px solid #ebeced;
  text-align: left;
  margin: 5px 0;
  display: flex;
  align-items: center;
  flex-wrap: wrap;
}

.image {
  margin-right: 10px;
}

.content {
  padding: 10px;
  flex: 1;
}

.accordHeader {
  background: #ddd;
  width: 100%;
  padding: 8px;
  cursor: pointer;
  margin-bottom: 4px;
}
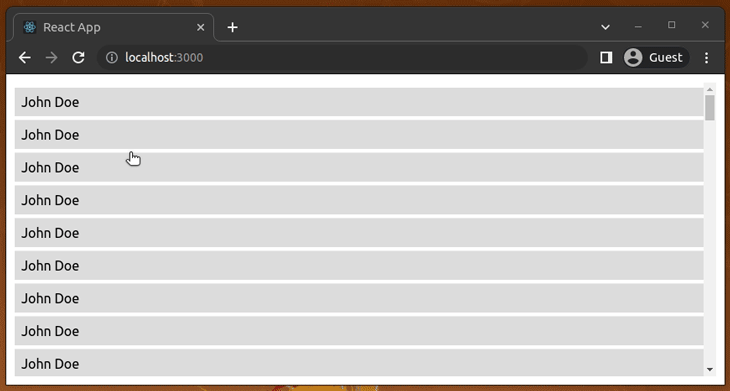
Now, you will see a virtual expandable list as follows:
Virtualizing a grid
In the above code examples, we primarily used the List component to render a large list. In some scenarios, we need to render large data grids in our apps. For example, you may need to create a large tabular structure to display product orders with hundreds of order attributes and thousands of order records.
List offered a way to create a 1D data grid because we only had the vertical scrollbar. The Grid lets you create a 2D grid where you can have both vertical and horizontal scrollbars. So, you can efficiently render elements in the x-axis and y-axis with scroll events.
To demonstrate this component, we can list down comments in a grid. First, add the following code to your src/App.js file:
import './App.css';

import { loremIpsum } from 'lorem-ipsum';
import { Grid, AutoSizer } from 'react-virtualized';

const columnCount = 100;
const rowCount = 1000;
const columnWidth = 400;
const rowHeight = 50;

const grid = Array(rowCount).fill().map((val, idx) => (
    Array(columnCount).fill().map((val, idx) => ({
      id: idx,
      name: 'John Doe',
      image: 'http://via.placeholder.com/40',
      text: loremIpsum({
        count: 4,
        units: 'word'
      })
    }))
));

function renderCell({ columnIndex, key, rowIndex, style }) {
  return (
    <div key={key} style={style} className="row">
      <div className="image">
        <img src={grid[rowIndex][columnIndex].image} alt="" />
      </div>
      <div className="content">
        <div>{grid[rowIndex][columnIndex].name}</div>
        <div>{grid[rowIndex][columnIndex].text}</div>
      </div>
    </div>
  );
}

function App() {
  return (
    <div className="App">
      <div className="list">
        <AutoSizer>
          {
            ({width, height}) => (
            <Grid
              width={width}
              height={height}
              rowHeight={rowHeight}
              columnWidth={columnWidth}
              cellRenderer={renderCell}
              rowCount={grid.length}
              columnCount={grid[0].length}/>
            )
          }
        </AutoSizer>
      </div>
    </div>
  );
}

export default App;
In the app, you will now see a grid of comments:
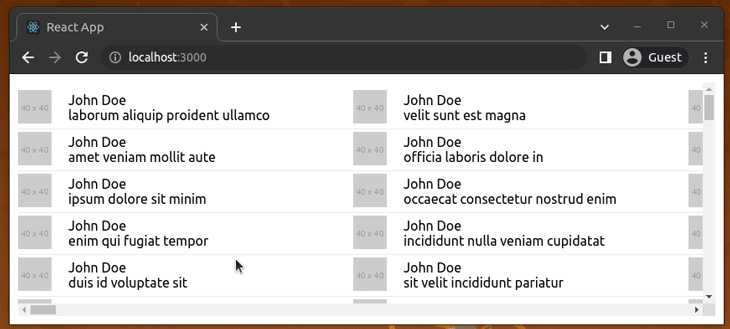
Window resizing events also update the grid size because we’ve used the AutoSizer component.
Virtualizing a collection
The Grid component typically displays checkboard-style data. So, it needs a perfect grid with all x-axis and y-axis data records. In other words, our input 2D array should contain equal-sized inner arrays because we use both rowIndex and columnIndex.
The Collection component let’s you render a grid-like structure without a perfect 2D array. So, you can use this component to activate both scrollbars with a 1D object array. Moreover, Collection lets you position elements programmatically with a callback function, unlike Grid.
Look at the following example:
import './App.css';

import { loremIpsum } from 'lorem-ipsum';
import { Collection, AutoSizer } from 'react-virtualized';

const cellCount = 5000;
const cellWidth = 400;
const cellHeight = 50;

const list = Array(cellCount).fill().map((val, idx) => ({
  id: idx,
  name: 'John Doe',
  image: 'http://via.placeholder.com/40',
  text: loremIpsum({
    count: 4,
    units: 'word'
  })
}));

function renderCell({ index, key, style }) {
  return (
    <div key={key} style={style} className="row">
      <div className="image">
        <img src={list[index].image} alt="" />
      </div>
      <div className="content">
        <div>{list[index].name}</div>
        <div>{list[index].text}</div>
      </div>
    </div>
  );
}

function App() {
  function cellSizeAndPositionGetter({ index }) {
    return {
      height: cellHeight,
      width: cellWidth,
      y: index * cellHeight,
      x: Math.floor(Math.random() * 10) * cellWidth
    }
  }

  return (
    <div className="App">
      <div className="list">
        <AutoSizer>
          {
            ({width, height}) => (
            <Collection
              width={width}
              height={height}
              cellRenderer={renderCell}
              cellCount={list.length}
              cellSizeAndPositionGetter={cellSizeAndPositionGetter}/>
            )
          }
        </AutoSizer>
      </div>
    </div>
  );
}

export default App;
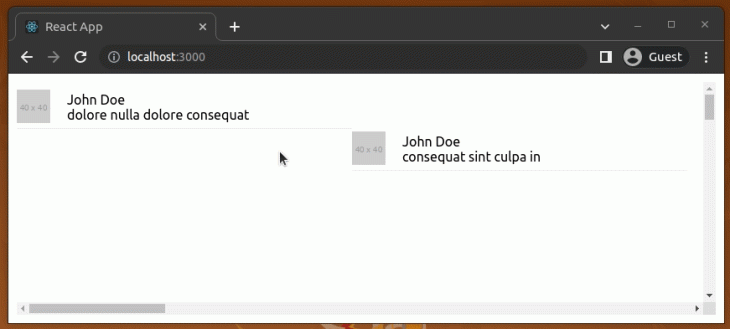
Here we used the cellSizeAndPositionGetter function to define a position for each cell with index and Math.random. The above code renders a grid with arbitary-positioned data elements, as shown in the following preview:
Try to create a simple photo collection with this component. You can get an idea (and browse the source) from this demo app.
Conclusion
This article, showed you how to use react-virtualized to render a large list, grid, and data collection in an efficient way.
Of course, there are other libraries built for the same purpose, but react-virtualized has a lot of functionality and is well maintained. Plus, there is a Gitter chat and a StackOverflow tag to ask the community questions.