Room setup in Kotlin Multiplatform (KMP) with Koin
Room setup in Kotlin Multiplatform (KMP) with Koin 관련


In this article, we’ll explore the recommended approach for implementing Room in Kotlin Multiplatform (KMP) with Koin for dependency injection and the motivations behind each decision.
To visualise the Room implementation, we’ll build a screen using Compose Multiplatform (CMP) and launch the app on Android and iOS.
Getting started
To begin, we add the required dependencies to ourlibs.versions.tomlfile.
[versions]
room = "2.7.0-alpha13"
ksp = "2.1.10-1.0.29"
sqlite = "2.4.0"
koin = "4.0.0"

[libraries]
androidx-room-compiler = { group = "androidx.room", name = "room-compiler", version.ref = "room" }
androidx-room-runtime = { group = "androidx.room", name = "room-runtime", version.ref = "room" }
sqlite-bundled = { module = "androidx.sqlite:sqlite-bundled", version.ref = "sqlite" }

koin-android = { module = "io.insert-koin:koin-android", version.ref = "koin" }
koin-core = { module = "io.insert-koin:koin-core", version.ref = "koin" }
koin-compose = { module = "io.insert-koin:koin-compose", version.ref = "koin" }
koin-compose-viewmodel = { module = "io.insert-koin:koin-compose-viewmodel", version.ref = "koin" }

[plugins]
ksp = { id = "com.google.devtools.ksp", version.ref = "ksp" }
room = { id = "androidx.room", version.ref = "room" }
We then use these dependencies in ourbuild.gradle.ktsfile, alongside using the Room plugin to declare the database schema directory.
plugins {
    alias(libs.plugins.room)
    alias(libs.plugins.ksp)
}

kotlin {
    sourceSets {
        androidMain.dependencies {
            implementation(compose.preview)
            implementation(libs.androidx.activity.compose)
            implementation(libs.koin.android)
        }
        commonMain.dependencies {
            implementation(libs.androidx.room.runtime)
            implementation(libs.sqlite.bundled)
            api(libs.koin.core)
            implementation(libs.koin.compose)
            implementation(libs.koin.compose.viewmodel)
        }
    }
}

dependencies {
    add("kspAndroid", libs.androidx.room.compiler)
    add("kspIosSimulatorArm64", libs.androidx.room.compiler)
    add("kspIosX64", libs.androidx.room.compiler)
    add("kspIosArm64", libs.androidx.room.compiler)
}

room {
    schemaDirectory("$projectDir/schemas")
}
Room setup
In common code, we create an entity to define the structure of the database table. In this article, we’re storing a list of movies.
@Entity
data class Movie(
    @PrimaryKey(autoGenerate = true)
    val id: Long = 0L,

    val name: String,
)
Next, we set up aMovieDaoto interact with the database. UsingFlowmakes the movie list reactive, andsuspendfunctions ensure we don’t block the UI thread during database operations.
@Dao
interface MovieDao {
    @Query("SELECT * FROM movie")
    fun getMovies(): Flow<List<Movie>>

    @Insert
    suspend fun insert(movie: Movie)

    @Query("DELETE FROM movie")
    suspend fun deleteMovies()
}
Still in common code, we create anabstractclass that extendsRoomDatabaseand incorporates the entity and DAO. We also define a database constructor and link this to the database using the@ConstructedByannotation.
@Database(entities = [Movie::class], version = 1)
@ConstructedBy(MovieDatabaseConstructor::class)
abstract class MovieDatabase: RoomDatabase() {
    abstract fun getMovieDao(): MovieDao
}

// Room compiler generates the `actual` implementations
@Suppress("NO_ACTUAL_FOR_EXPECT")
expect object MovieDatabaseConstructor : RoomDatabaseConstructor<MovieDatabase> {
    override fun initialize(): MovieDatabase
}
The Room compiler will generate theactualimplementations of the database constructor for us, so we add a@Suppressannotation to ignore any warnings related to this.
Database builder
The database requires a builder, and this is the only component in Room for KMP that requires platform-specific logic.
InandroidMain, we create a function that takes in an AndroidContextto define a database path and uses this to return a database builder.
fun getDatabaseBuilder(context: Context): RoomDatabase.Builder<MovieDatabase> {
    val appContext = context.applicationContext
    val dbFile = appContext.getDatabasePath("movie_database.db")

    return Room.databaseBuilder<MovieDatabase>(
        context = appContext,
        name = dbFile.absolutePath,
    )
}
Similarly, iniosMainwe create a function that usesNSFileManagerandNSDocumentDirectoryto define a database path and return a database builder.
fun getDatabaseBuilder(): RoomDatabase.Builder<MovieDatabase> {
    val dbFilePath = documentDirectory() + "/movie_database.db"
    return Room.databaseBuilder<MovieDatabase>(
        name = dbFilePath,
    )
}

@OptIn(ExperimentalForeignApi::class)
private fun documentDirectory(): String {
    val documentDirectory = NSFileManager.defaultManager.URLForDirectory(
        directory = NSDocumentDirectory,
        inDomain = NSUserDomainMask,
        appropriateForURL = null,
        create = false,
        error = null,
    )

    return requireNotNull(documentDirectory?.path)
}
Database creation
Back incommonMain, we define a function that takes in the platform-specific database builders and creates the database. For the database driver, we use theBundledSQLiteDriver— this is therecommended driver for Room KMP as it provides the most consistent and up-to-date version of SQLite across all platforms. TheBundledSQLiteDriveralso has the benefit of being usable in common code, which means we don’t have to specify a driver for each platform.
fun getMovieDatabase(builder: RoomDatabase.Builder<MovieDatabase>): MovieDatabase {
    return builder
        .setDriver(BundledSQLiteDriver())
        .setQueryCoroutineContext(Dispatchers.IO)
        .build()
}
We also configure the database to useDispatchers.IOfor executing asynchronous queries, which is therecommendedDispatcherfor database IO operations and ensures the queries won’t block the UI thread.
Koin setup
The final part of this Room KMP setup is using Koin to tie everything together. To start, we create acommonModuleincommonMainto manage shared dependencies.
fun commonModule(): Module = module {
    single<MovieDao> { get<MovieDatabase>().getMovieDao() }
}
For platform-specific dependencies, we create aplatformModuleincommonMainusing theexpect/actualmechanism.
expect fun platformModule(): Module
We implement thisplatformModuleinandroidMainusing a providedContextvalue to create the database.
actual fun platformModule(): Module = module {
    single<MovieDatabase> {
        val builder = getDatabaseBuilder(context = get())
        getMovieDatabase(builder)
    }
}
Implementing theplatformModuleiniosMainis simpler since it does not require aContextvalue.
actual fun platformModule(): Module = module {
    single<MovieDatabase> {
        val builder = getDatabaseBuilder()
        getMovieDatabase(builder)
    }
}
Initialising Koin
Next, we define functions to initialise Koin on both platforms in our common code. As seen above, our AndroidplatformModulerequires aContextfor the database builder. To provide this, we add aKoinAppDeclarationparameter to ourinitKoinfunction. We use this inside thestartKoinfunction, which gives Koin modules access to theContextvalue.
fun initKoin(appDeclaration: KoinAppDeclaration = {}) {
    startKoin {
        appDeclaration()
        modules(
            commonModule() + platformModule()
        )
    }
}
We then create a new class inandroidMainthat extendsApplicationand calls theinitKoinfunction, passing the AndroidContext in.
class MainApplication : Application() {
    override fun onCreate() {
        super.onCreate()

        initKoin(
            appDeclaration = { androidContext(this@MainApplication) },
        )
    }
}
To use this newMainApplicationclass, we are required to update theAndroidManifest.xmlfile.
<?xml version="1.0" encoding="utf-8"?>
<manifest xmlns:android="http://schemas.android.com/apk/res/android">

  <application
    android:name=".MainApplication"
    <!-- Rest of manifest -->
  </application>

</manifest>
Now we can define a function to initialise Koin for iOS, which doesn’t require aContextvalue. We encounter a quirk in KMP here, as function default values do not work in native iOS code, so we can’t simply call theinitKoinfunction. To solve this, we define aninitKoinIosfunction that passes in an empty lambda value for theappDeclarationparameter.
fun initKoinIos() = initKoin(appDeclaration = {})
TheinitKoinIosfunction has to be called in native Swift code. To do this, we use the file name of the function and the function name with thedovalue prepended. We also importComposeAppto give the Swift code access to the function.
import SwiftUI
import ComposeApp

@main
struct iOSApp: App {
    init() {
        KoinKt.doInitKoinIos()
    }

    var body: some Scene {
        WindowGroup {
            ContentView()
        }
    }
}
Complete Room
That’s it! We can now inject theMovieDaoin common code, giving us access to our Room database on both platforms.
Crafting a UI
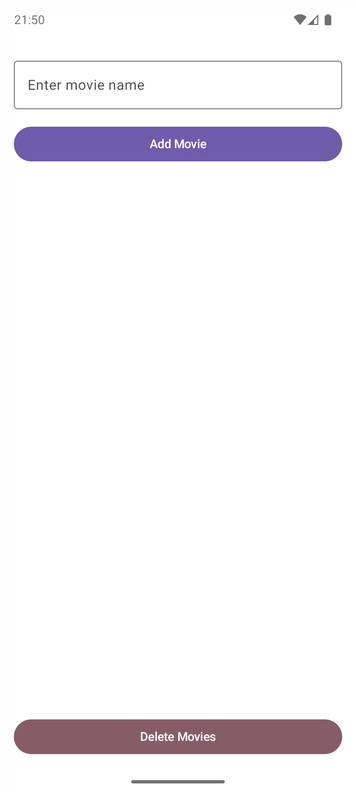
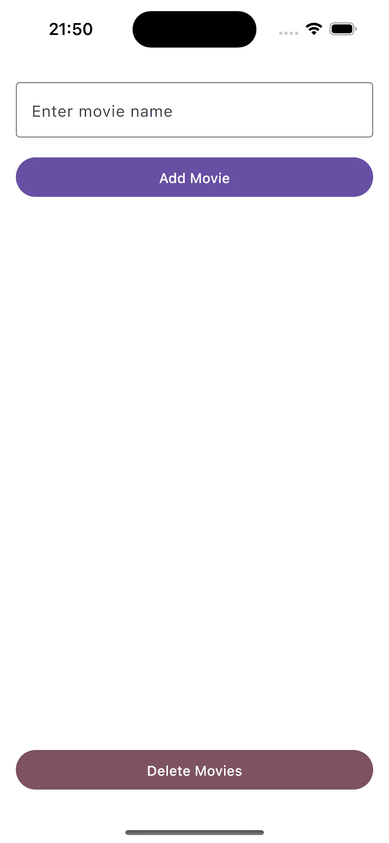
To visualise the Room implementation, we’ll build a movie list screen using Compose Multiplatform and launch the app on both Android and iOS, all within our common code.
We start by defining aMovieUiStatefor the screen, which holds a movie name the user can enter, and a list of movies to display. For the movie name, we use therecommended (proandroiddev)TextFieldValueinstead of a simpleStringvalue.
data class MovieUiState(
    val movieName: TextFieldValue = TextFieldValue(""),
    val movies: List<Movie> = emptyList()
)
Next, we create aMovieViewModeland inject ourMovieDaoin. TheMovieDaois injected straight into theViewModelhere to keep things simple for this article. In production code, the app layering would be more robust, and theMovieDaowould be injected into a repository or a data source.
We also add a privateMutableStateFlowbacking field to store the movie name value.
class MovieViewModel(private val movieDao: MovieDao): ViewModel() {

    private val _movieName = MutableStateFlow(TextFieldValue(""))
}
State production
To produce the UI state, we combine theFlowlist of movies with theMutableStateFlowmovie name field.
class MovieViewModel(private val movieDao: MovieDao): ViewModel() {

    private val _movieName = MutableStateFlow(TextFieldValue(""))

    val uiState: StateFlow<MovieUiState> = combine(
        movieDao.getMovies(),
        _movieName
    ) { movies, movieText ->
        MovieUiState(movieName = movieText, movies = movies)
    }.stateIn(
        scope = viewModelScope,
        started = SharingStarted.WhileSubscribed(5000),
        initialValue = MovieUiState()
    )
}
ThestateInoperator is therecommendedway to produce UI state from reactive streams. A key reason for this is because it allows state production to start only when collection begins in the UI, instead of occurring as soon as theViewModelis created if theinit{}function is used. This gives you more control over theViewModelanduiState, making it easier to test.
ThestateInoperator also gives us finer-grained control over the state production behaviour through thestartedparameter. This can be set to eitherSharingStarted.WhileSubscribedif the state should only be active when the UI is visible, orSharingStarted.Lazilyif the state should be active as long as the user may return to the UI.
Finalising the ViewModel
To complete theViewModel, we provide three functions to update the state.
class MovieViewModel(private val movieDao: MovieDao): ViewModel() {

    // ...

    fun updateMovieName(newText: TextFieldValue) {
        _movieName.value = newText
    }

    fun insertMovie(movieName: String) {
        viewModelScope.launch {
            movieDao.insert(Movie(name = movieName))
        }
    }

    fun deleteMovies() {
        viewModelScope.launch {
            movieDao.deleteMovies()
        }
    }
}
We also add theViewModelto our KoincommonModule, allowing us to inject it into our screen.
fun commonModule(): Module = module {
    single<MovieDao> { get<MovieDatabase>().getMovieDao() }
    singleOf(::MovieViewModel)
}
Movie screen
With theViewModelset up, the next step is to create the screen. It isrecommended practiceto create both astatefuland astatelessversion of each screen in your app, as it makes them more reusable, easier to test, and simpler to preview.
We first create thestatefulscreen by injecting theViewModelusing Koin and collecting the UI state. We then pass the UI state and the state updating functions into thestatelessscreen.
@Composable
fun MovieScreen(viewModel: MovieViewModel = koinViewModel()) {
    val uiState by viewModel.uiState.collectAsStateWithLifecycle()

    MovieScreen(
        movies = uiState.movies,
        movieName = uiState.movieName,
        onUpdateMovieName = viewModel::updateMovieName,
        onAddMovie = viewModel::insertMovie,
        onDeleteMovies = viewModel::deleteMovies
    )
}
We then create thestatelessscreen, using aScaffoldto ensure proper inset padding.
@Composable
fun MovieScreen(
    movies: List<Movie>,
    movieName: TextFieldValue,
    onUpdateMovieName: (TextFieldValue) -> Unit,
    onAddMovie: (String) -> Unit,
    onDeleteMovies: () -> Unit
) {
    Scaffold(modifier = Modifier.fillMaxSize()) { scaffoldPadding ->
        Column(
            verticalArrangement = Arrangement.spacedBy(16.dp),
            modifier = Modifier
                .padding(scaffoldPadding)
                .padding(16.dp)
        ) {
            // ...
        }
    }
}
Inside theColumn, we add two Composables that enable the user to add a movie to the Room database.
OutlinedTextField(
    value = movieName,
    onValueChange = { onUpdateMovieName(it) },
    label = { Text(text = "Enter movie name") },
    modifier = Modifier.fillMaxWidth()
)

Button(
    onClick = {
        if (movieName.text.isNotBlank()) {
            onAddMovie(movieName.text)
            onUpdateMovieName(TextFieldValue(""))
        }
    },
    modifier = Modifier.fillMaxWidth()
) {
    Text(text = "Add Movie")
}
To display the movies, we define aMovieItemand use this within aLazyColumnto create a scrollable list of movies.
@Composable
fun MovieItem(
    movie: Movie,
    modifier: Modifier = Modifier
) {
    Card(
        modifier = modifier
            .fillMaxWidth()
            .padding(4.dp),
        elevation = CardDefaults.cardElevation(4.dp)
    ) {
        Text(
            text = movie.name,
            modifier = Modifier.padding(16.dp)
        )
    }
}
LazyColumn(modifier = Modifier.weight(1f)) {
    items(movies) { movie ->
        MovieItem(movie)
    }
}
To clear the movies list, we create a button and hook this up to theonDeleteMoviesfunction.
Button(
    onClick = onDeleteMovies,
    colors = ButtonDefaults.buttonColors(
        containerColor = MaterialTheme.colorScheme.tertiary,
    ),
    modifier = Modifier.fillMaxWidth()
) {
    Text(text = "Delete Movies")
}
To make theMovieScreenreachable within the app, we simply add it to the baseAppComposable. In a production app, you would instead integrate thisMovieScreeninto your existing navigation logic.
@Composable
fun App() {
    MaterialTheme {
        MovieScreen()
    }
}
App deployment
Conclusion
That wraps up this article — I hope it has given you a better understanding of how to use Room in Kotlin Multiplatform with Koin.
You can find my app projects onGitHub (shorthouse)— feel free to reach out with any questions or feedback.
Happy coding!
Info
This article is previously published on proandroiddev.com (proandroiddev)
