
JavaScript Async/Await Tutorial - Learn Callbacks, Promises, and Async/Await in JS by Making Ice Cream 🍧🍨🍦
JavaScript Async/Await Tutorial - Learn Callbacks, Promises, and Async/Await in JS by Making Ice Cream 🍧🍨🍦 관련

Today we're going to build and run an ice cream shop and learn asynchronous JavaScript at the same time. Along the way, you'll learn how to use:
- Callbacks
- Promises
- Async / Await
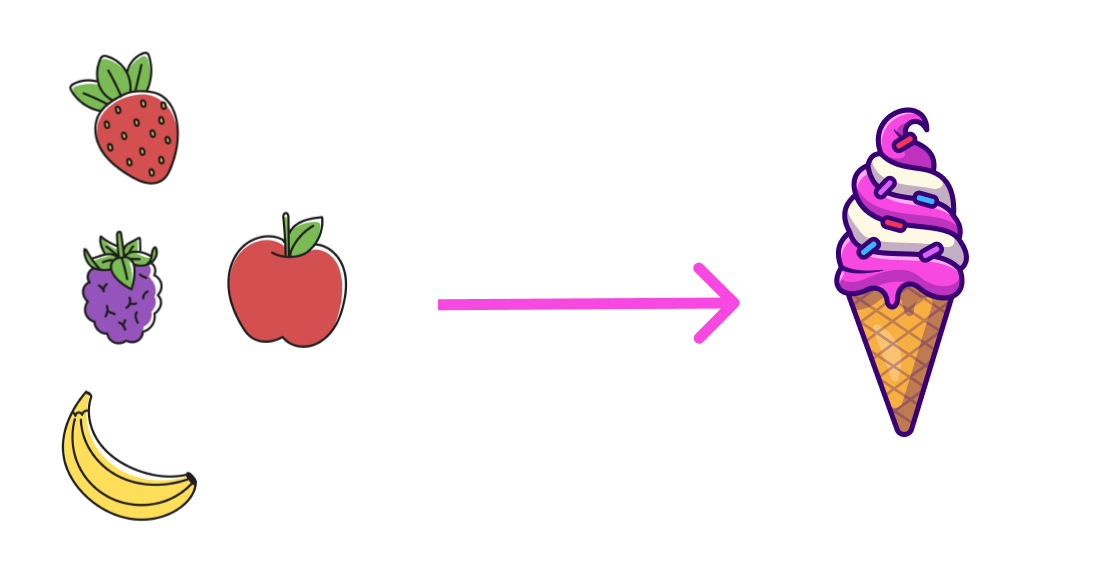
Here's what we'll cover in this article:
- What is Asynchronous JavaScript?
- Synchronous vs Asynchronous JavaScript
- How Callbacks Work in JavaScript
- How Promises Work in JavaScript
- How Async / Await Works in JavaScript
So let's dive in!
What is Asynchronous JavaScript?
If you want to build projects efficiently, then this concept is for you.
The theory of async JavaScript helps you break down big complex projects into smaller tasks.
Then you can use any of these three techniques - callbacks, promises or Async/await - to run those small tasks in a way that you get the best results.
Let's dive in!🎖️
Synchronous vs Asynchronous JavaScript
What is a Synchronous System?
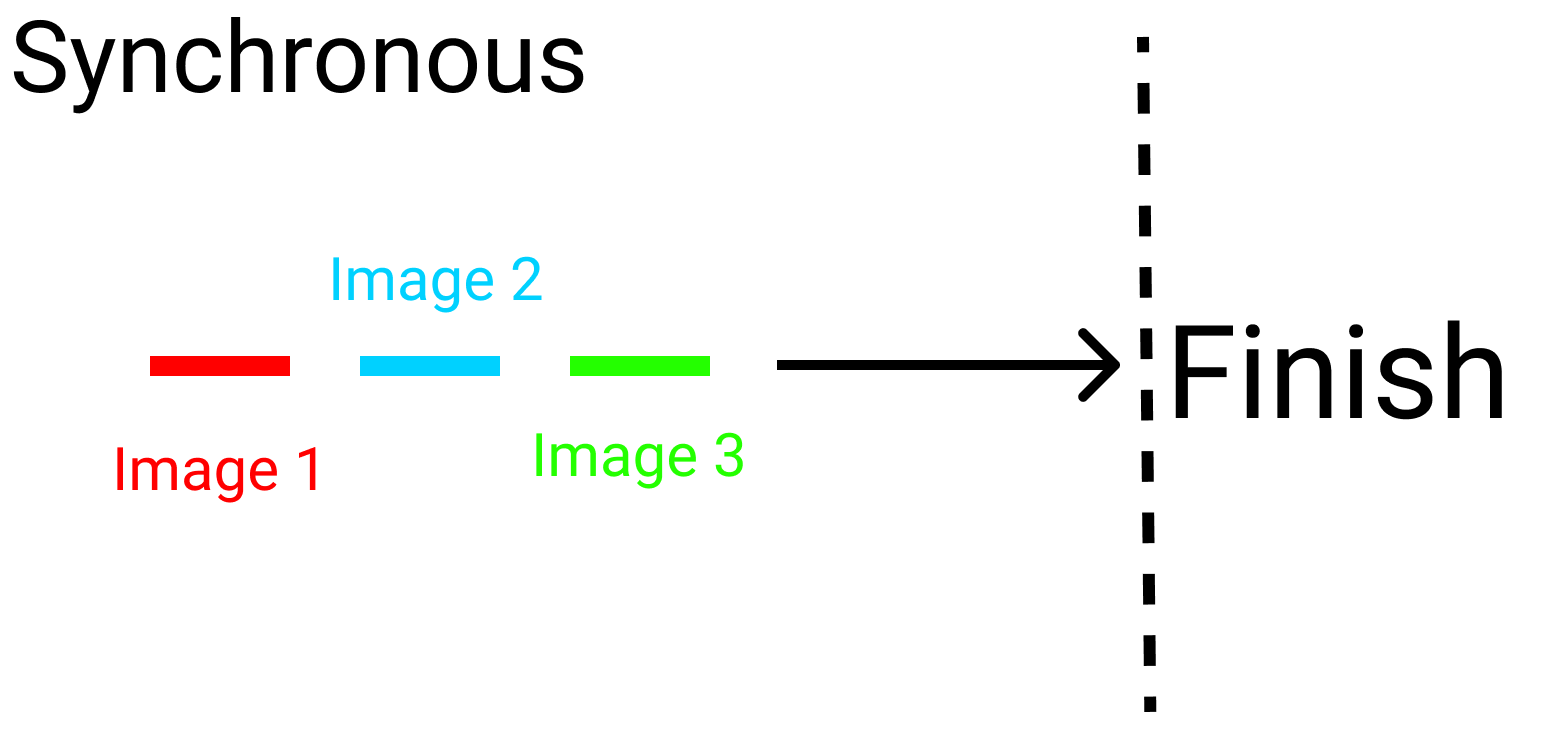
In a synchronous system, tasks are completed one after another.
Think of this as if you have just one hand to accomplish 10 tasks. So, you have to complete one task at a time.
Take a look at the GIF 👇 - one thing is happening at a time here:

You'll see that until the first image is loaded completely, the second image doesn't start loading.
Well, JavaScript is by default Synchronous [single threaded]. Think about it like this - one thread means one hand with which to do stuff.
What is an Asynchronous System?
In this system, tasks are completed independently.
Here, imagine that for 10 tasks, you have 10 hands. So, each hand can do each task independently and at the same time.
Take a look at the GIF 👇 - you can see that each image loads at the same time.

Again, all the images are loading at their own pace. None of them is waiting for any of the others.
To Summarize Synchronous vs Asynchronous JS
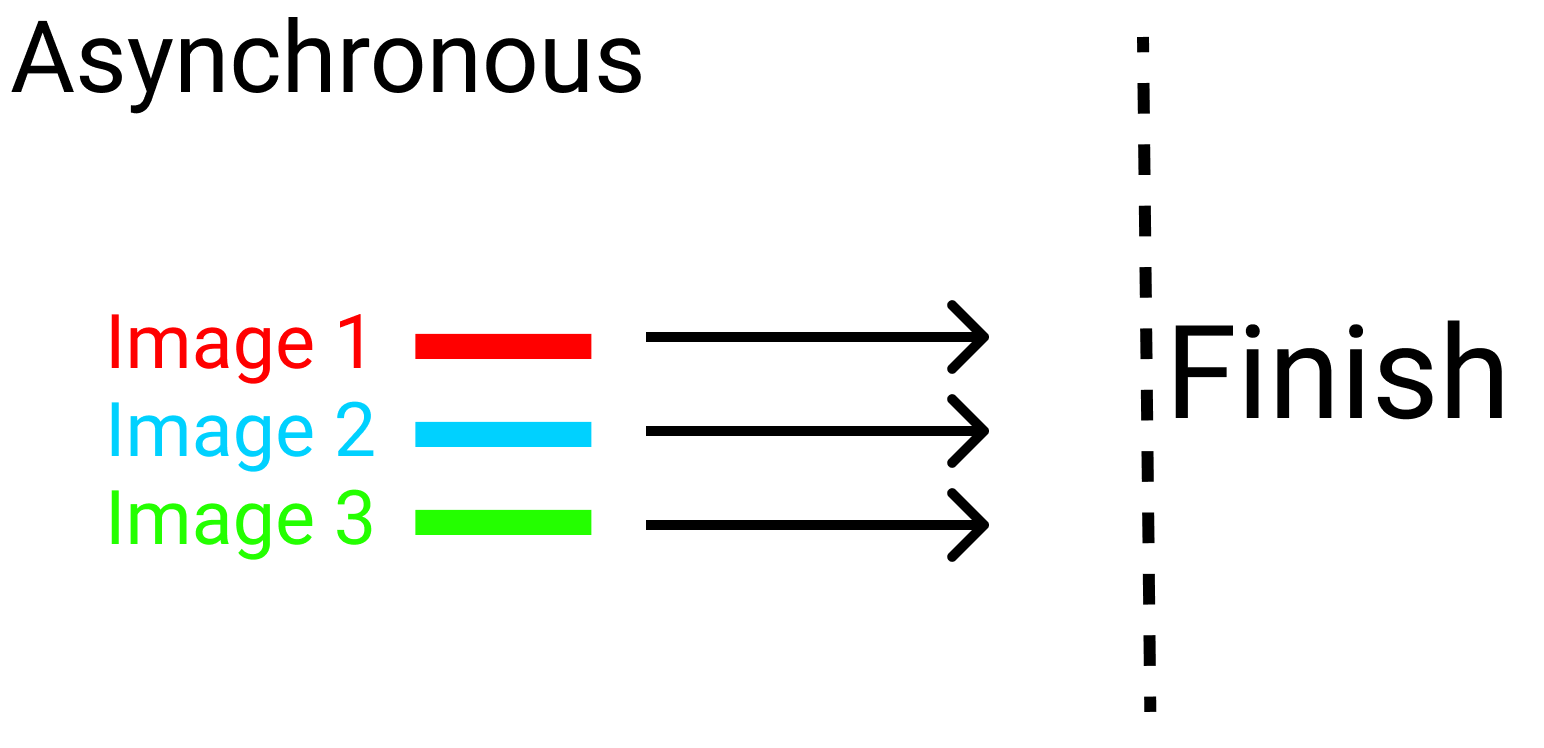
When three images are on a marathon, in a:
- Synchronous system, three images are in the same lane. One can't overtake the other. The race is finished one by one. If image number 2 stops, the following image stops.
- Asynchronous system, the three images are in different lanes. They'll finish the race on their own pace. Nobody stops for anybody:
Synchronous and Asynchronous Code Examples

Before starting our project, let's look at some examples and clear up any doubts.
Synchronous Code Example
To test a synchronous system, write this code in JavaScript:
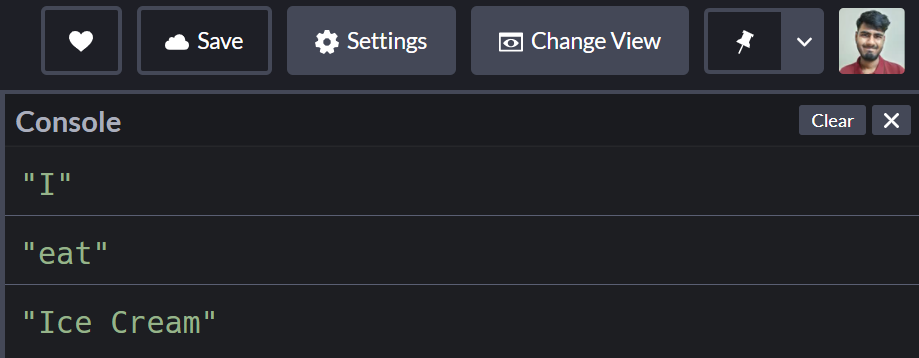
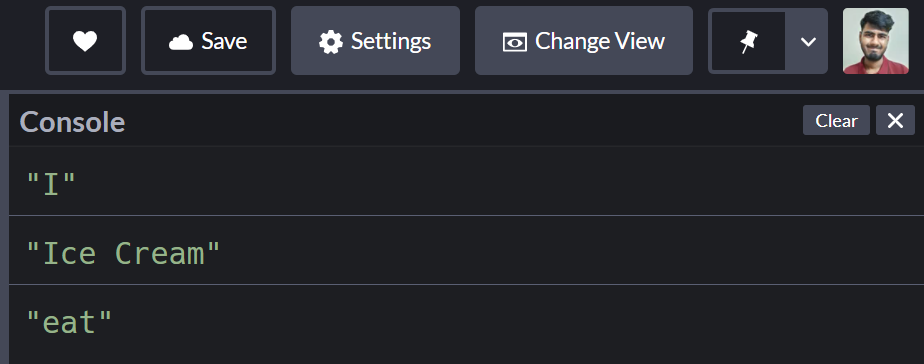
console.log(" I ");

console.log(" eat ");

console.log(" Ice Cream ");
Here's the result in the console: 👇
Asynchronous code example
Let's say it takes two seconds to eat some ice cream. Now, let's test out an asynchronous system. Write the below code in JavaScript.
Note
Don't worry, we'll discuss the setTimeout() function later in this article.
console.log("I");

// This will be shown after 2 seconds

setTimeout(()=>{
  console.log("eat");
},2000)

console.log("Ice Cream")
Now that you know the difference between synchronous and async operations, let's build our ice cream shop.
How to Setup our Project
For this project you can just open Codepen.io and start coding. Or, you can do it in VS code or the editor of your choice.
Open the JavaScript section, and then open your developer console. We'll write our code and see the results in the console.
What are Callbacks in JavaScript?
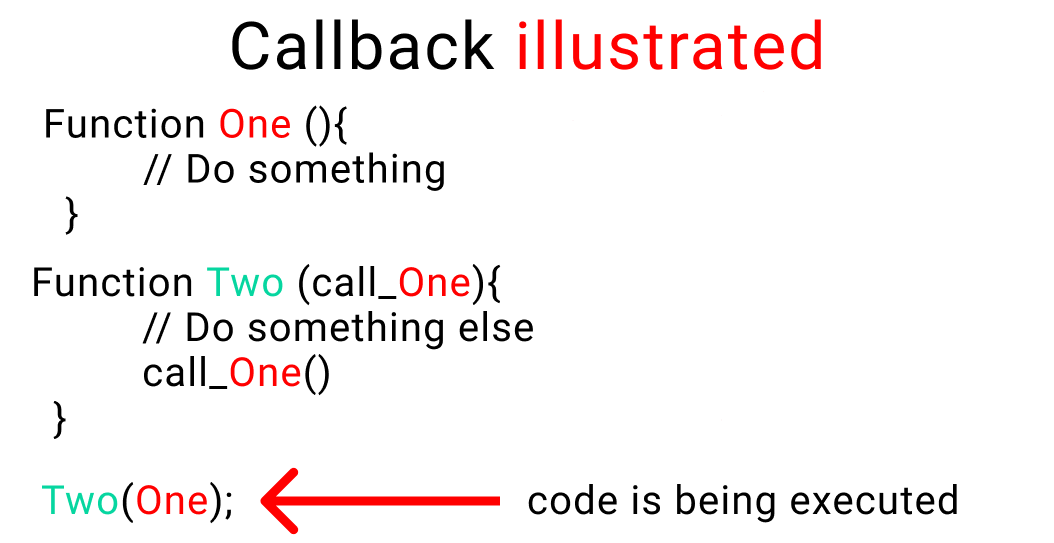
When you nest a function inside another function as an argument, that's called a callback.
Here's an illustration of a callback:
Don't worry, we'll see some examples of callbacks in a minute.
Why do we use callbacks?
When doing a complex task, we break that task down into smaller steps. To help us establish a relationship between these steps according to time (optional) and order, we use callbacks.
Take a look at this example:👇
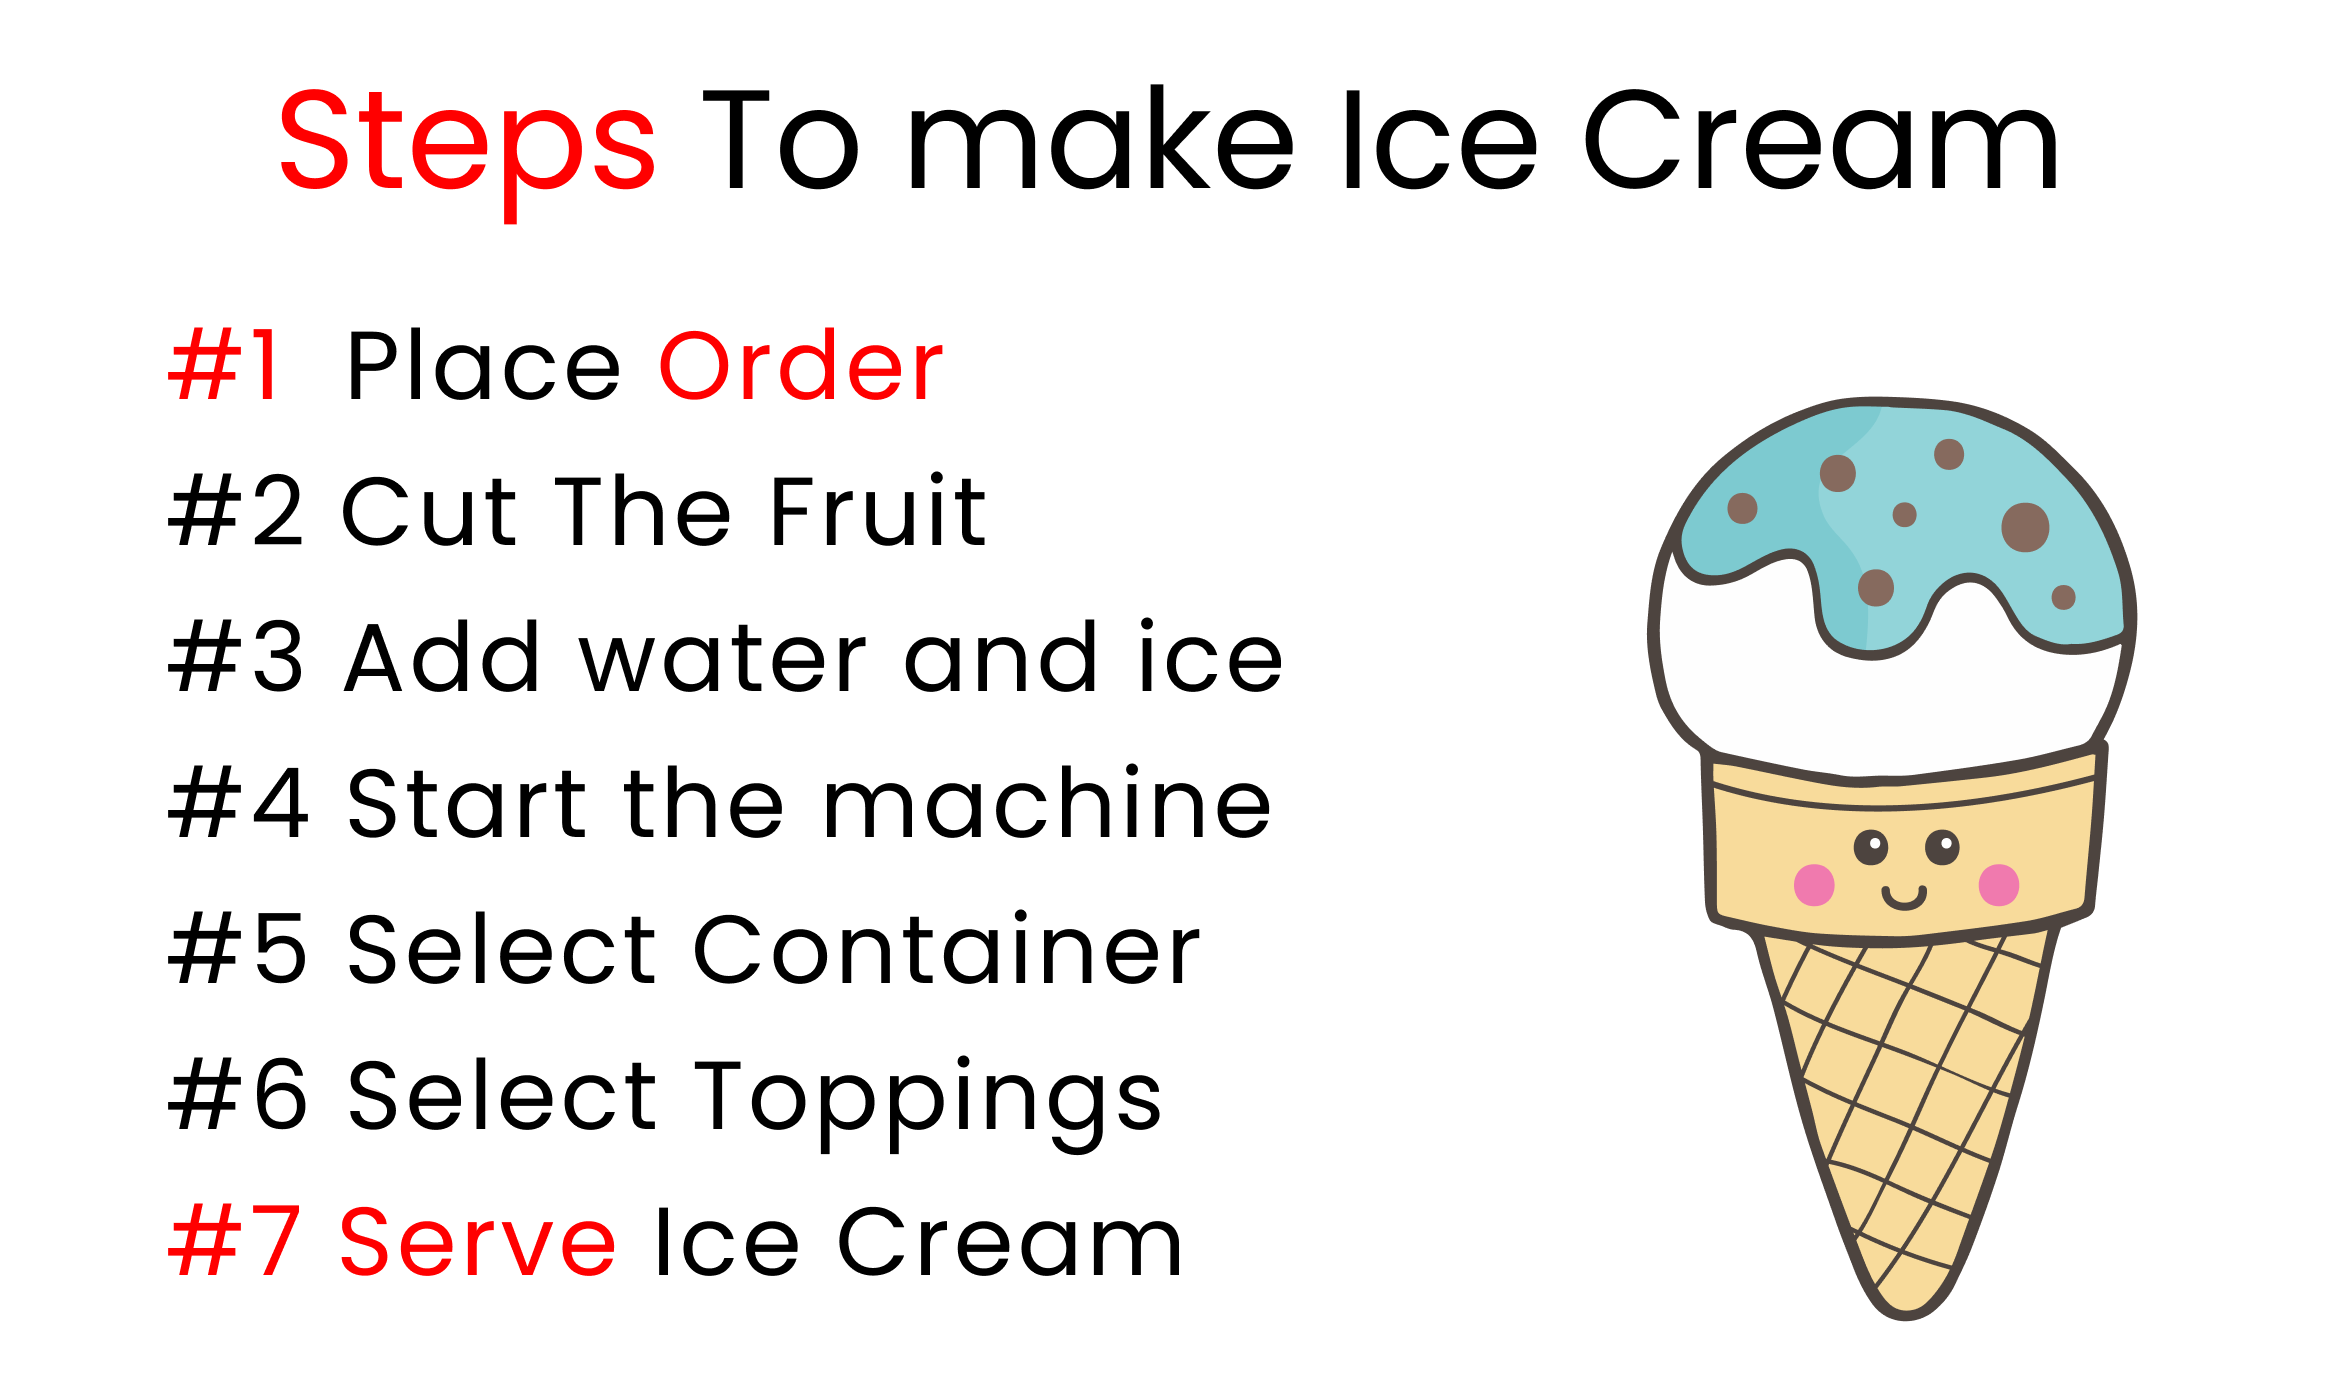
These are the small steps you need to take to make ice cream. Also note that in this example, the order of the steps and timing are crucial. You can't just chop the fruit and serve ice cream.
At the same time, if a previous step is not completed, we can't move on to the next step.

To explain that in more detail, let's start our ice cream shop business.
But Wait...
The shop will have two parts:
- The storeroom will have all the ingredients [Our Backend]
- We'll produce ice cream in our kitchen [The frontend]

Let's store our data
Now, we're gonna store our ingredients inside an object. Let's start!
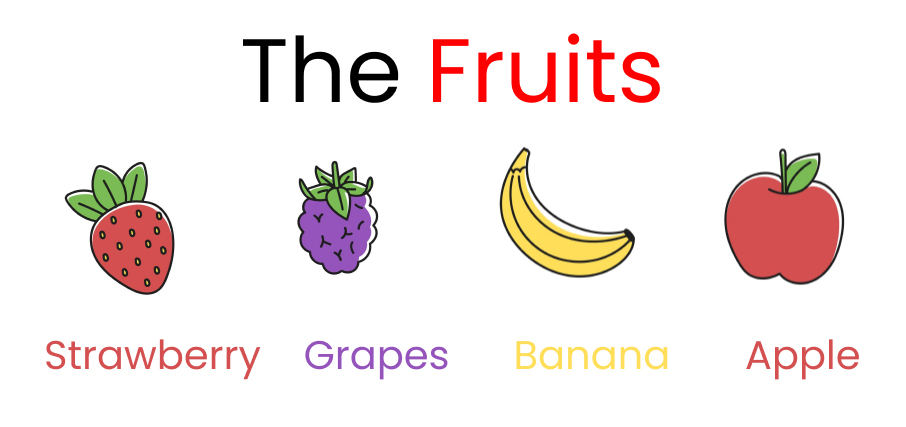
You can store the ingredients inside objects like this: 👇
let stocks = {
    Fruits : ["strawberry", "grapes", "banana", "apple"]
 }
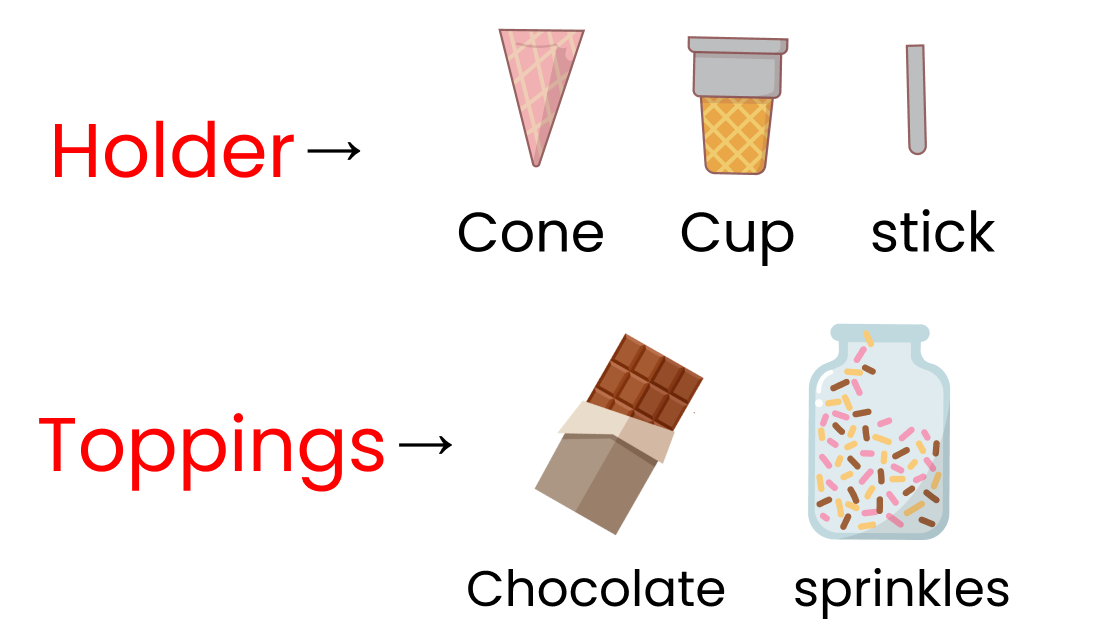
You can store these other ingredients in JavaScript objects like this: 👇
let stocks = {
    Fruits : ["strawberry", "grapes", "banana", "apple"],
    liquid : ["water", "ice"],
    holder : ["cone", "cup", "stick"],
    toppings : ["chocolate", "peanuts"],
 };
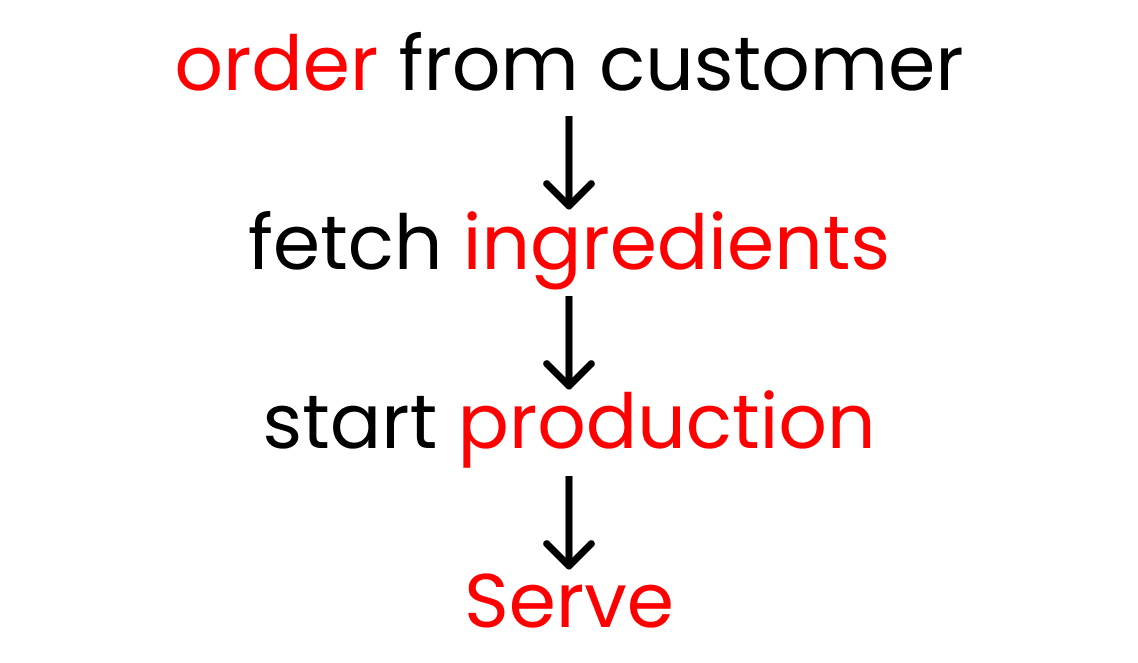
The entire business depends on what a customer orders. Once we have an order, we start production and then we serve ice cream. So, we'll create two functions ->
orderproduction
This is how it all works: 👇
Let's make our functions. We'll use arrow functions here:
let order = () =>{};

let production = () =>{};
Now, let's establish a relationship between these two functions using a callback, like this: 👇
let order = (call_production) =>{

  call_production();
};

let production = () =>{};
Let's do a small test
We'll use the console.log() function to conduct tests to clear up any doubts we might have regarding how we established the relationship between the two functions.
let order = (call_production) =>{

console.log("Order placed. Please call production")

// function 👇 is being called
  call_production();
};

let production = () =>{

console.log("Production has started")

};
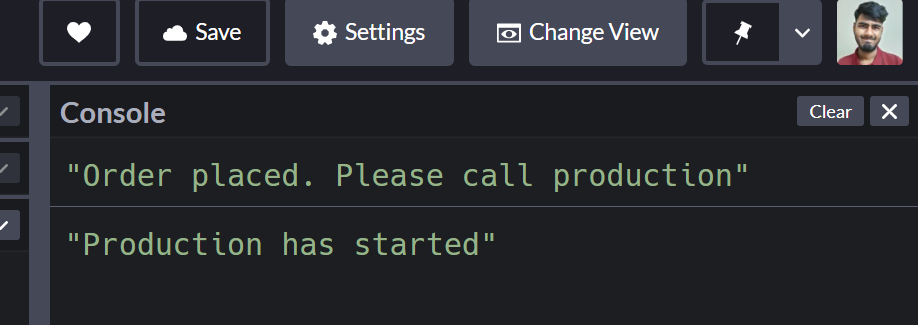
To run the test, we'll call the order function. And we'll add the second function named production as its argument.
// name 👇 of our second function
order(production);
Here's the result in our console 👇
Take a break
So far so good - take a break!

Clear out the console.log
Keep this code and remove everything [don't delete our stocks variable]. On our first function, pass another argument so that we can receive the order [Fruit name]:
// Function 1

let order = (fruit_name, call_production) =>{

  call_production();
};

// Function 2

let production = () =>{};


// Trigger 👇

order("", production);
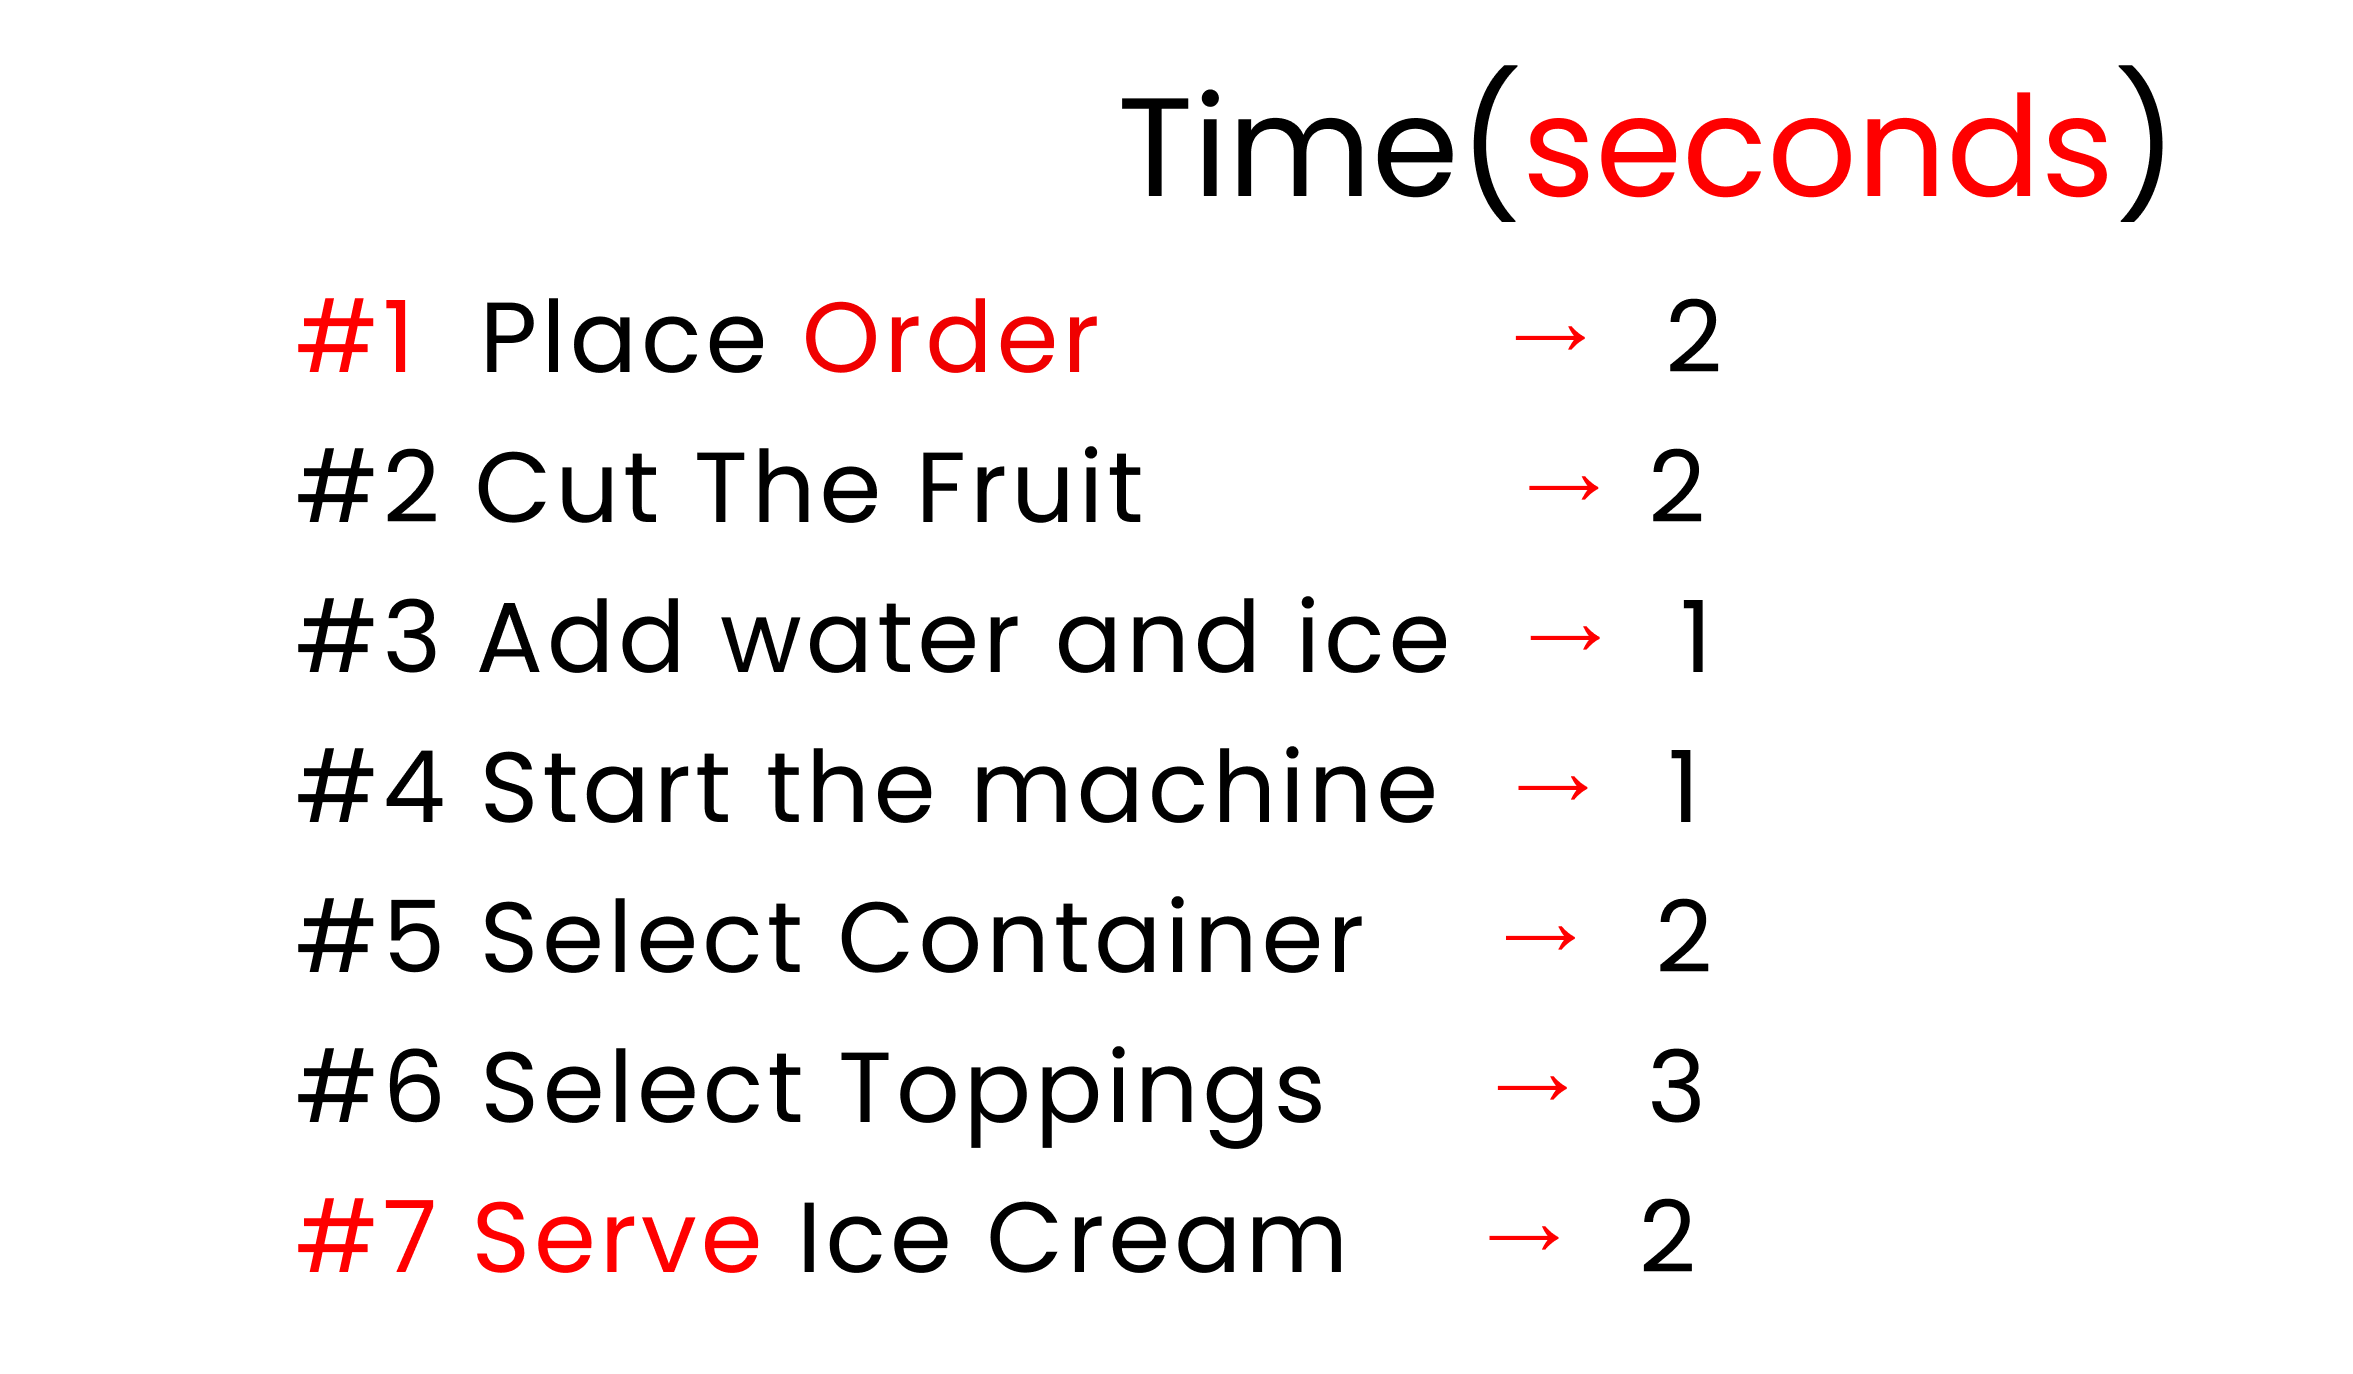
Here are our steps, and the time each step will take to execute.
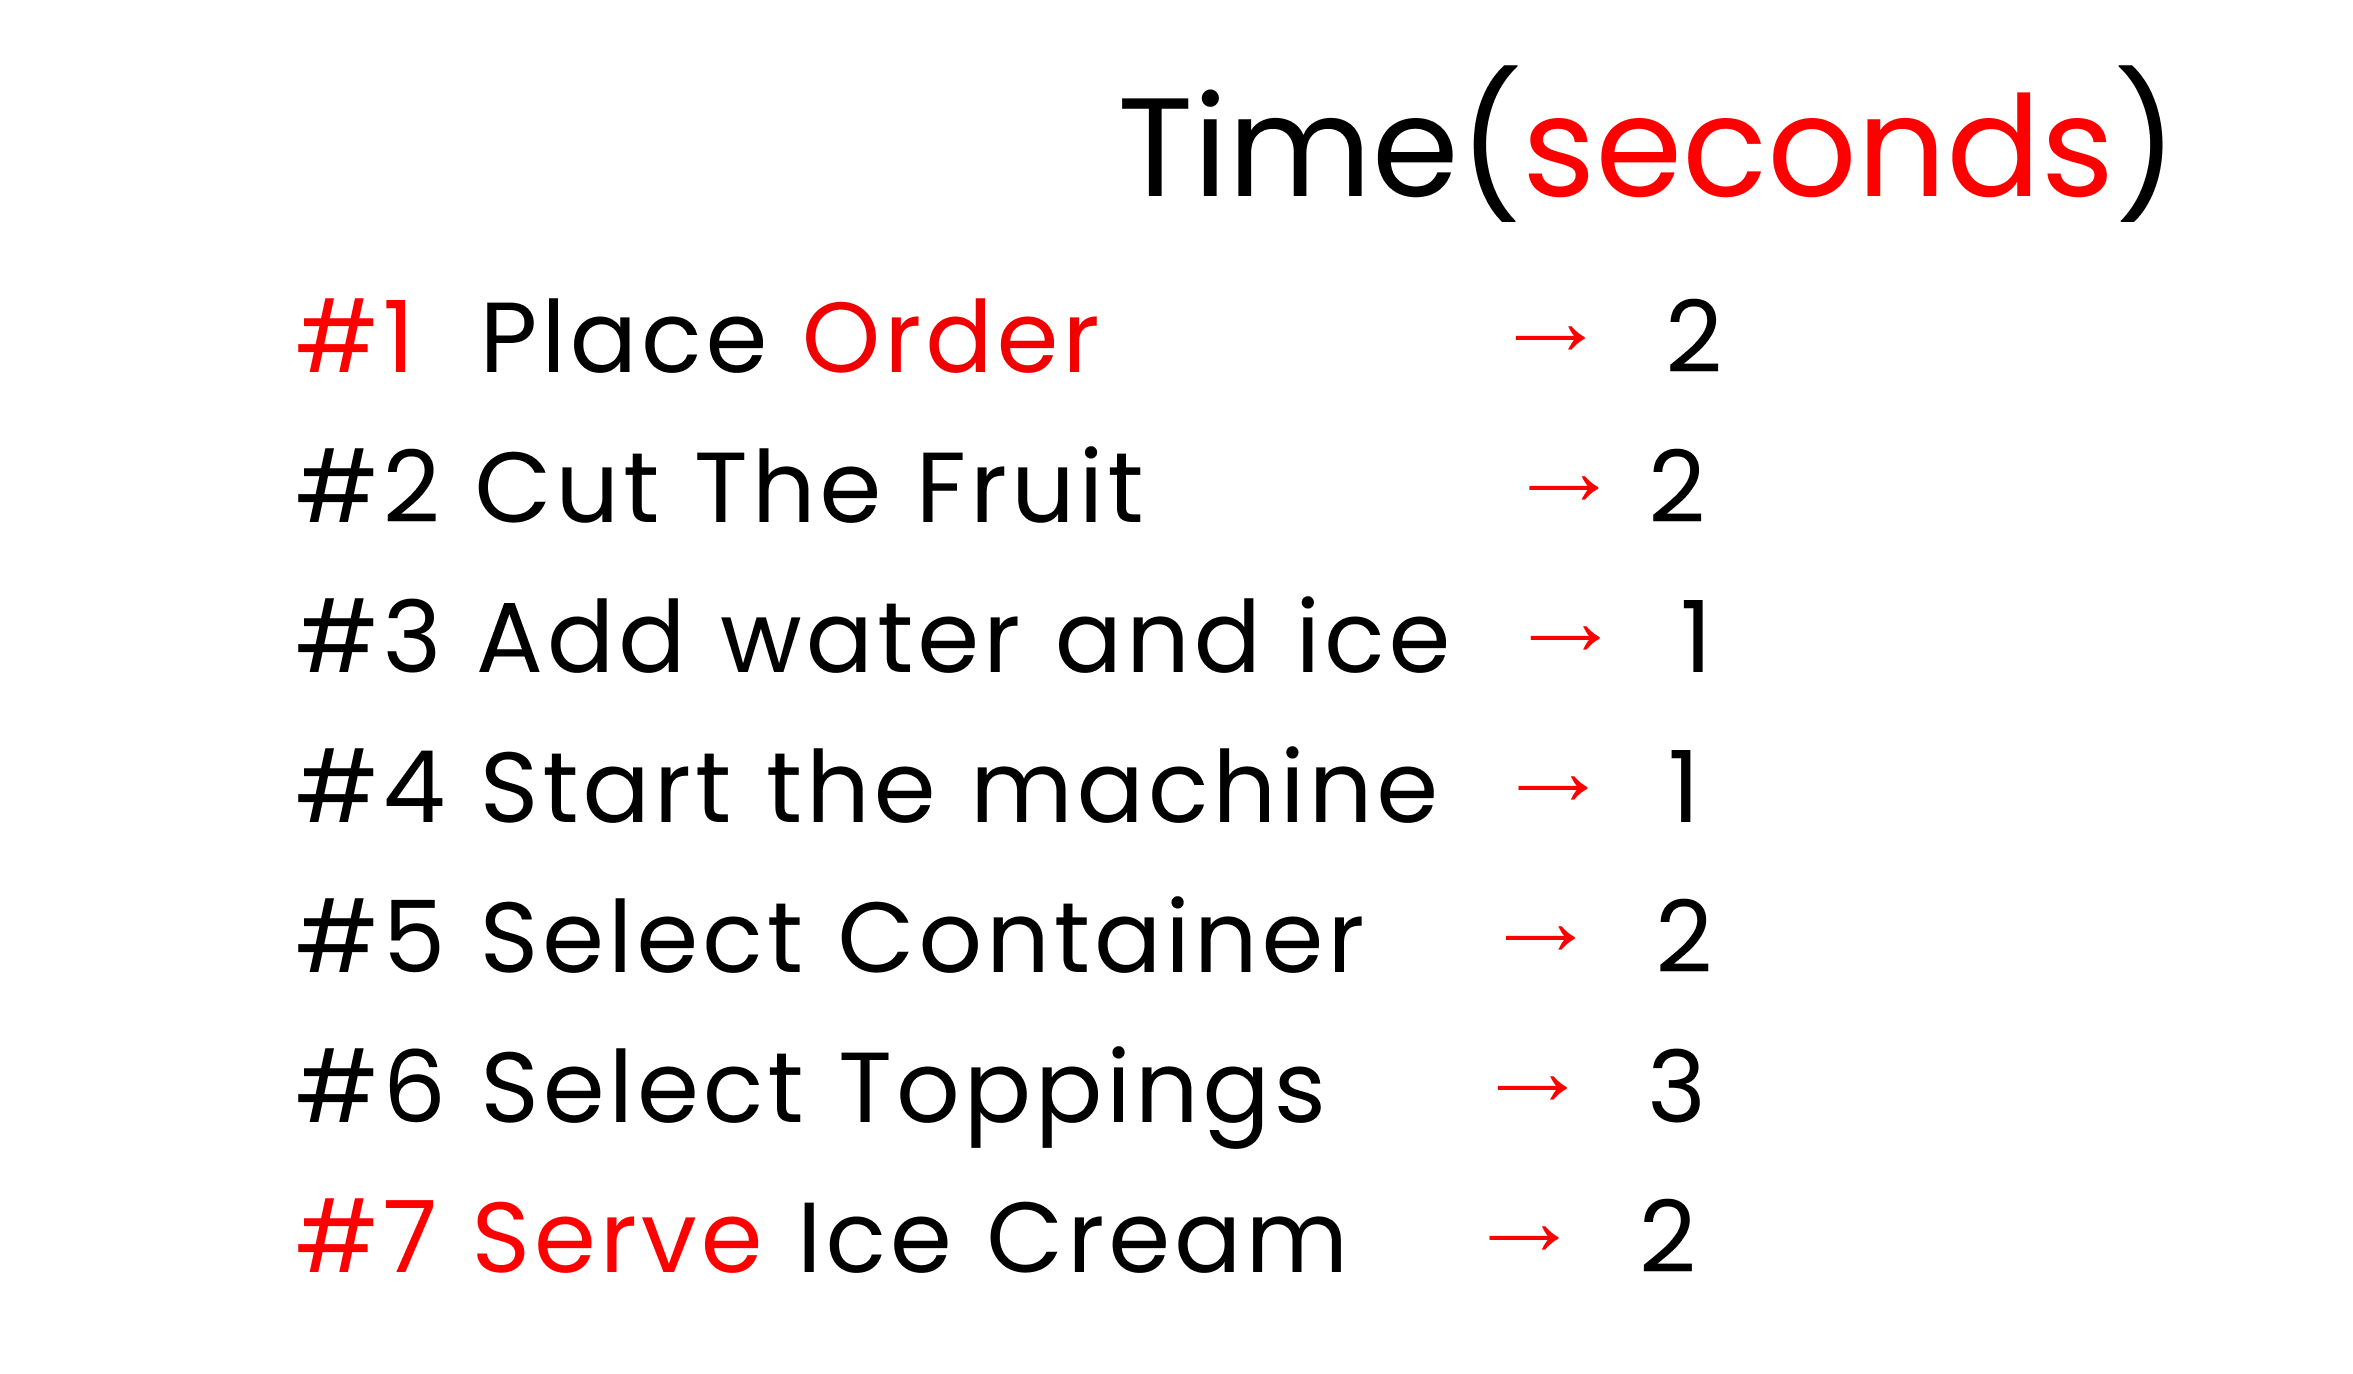
In this chart, you can see that step 1 is to place the order, which takes 2 seconds. Then step 2 is cut the fruit (2 seconds), step 3 is add water and ice (1 second), step 4 is to start the machine (1 second), step 5 is to select the container (2 seconds), step 6 is to select the toppings (3 seconds) and step 7, the final step, is to serve the ice cream which takes 2 seconds.
To establish the timing, the function setTimeout() is excellent as it is also uses a callback by taking a function as an argument.
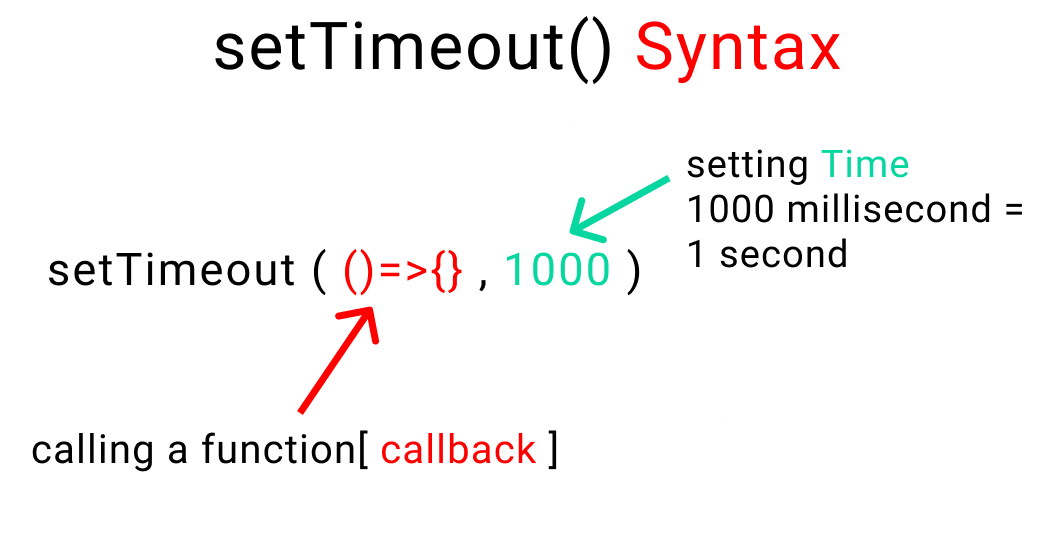
setTimeout() functionNow, let's select our fruit and use this function:
// 1st Function

let order = (fruit_name, call_production) =>{

  setTimeout(function(){

    console.log(`${stocks.Fruits[fruit_name]} was selected`)

// Order placed. Call production to start
   call_production();
  },2000)
};

// 2nd Function

let production = () =>{
  // blank for now
};

// Trigger 👇
order(0, production);
And here's the result in the console: 👇
Note
the result is displayed after 2 seconds.

If you're wondering how we picked strawberry from our stock variable, here's the code with the format 👇

Don't delete anything. Now we'll start writing our production function with the following code.👇 We'll use arrow functions:
let production = () =>{
  setTimeout(()=>{
    console.log("production has started")
  },0000)
};

We'll nest another setTimeout function in our existing setTimeout function to chop the fruit. Like this: 👇
let production = () =>{

  setTimeout(()=>{
    console.log("production has started")


    setTimeout(()=>{
      console.log("The fruit has been chopped")
    },2000)


  },0000)
};
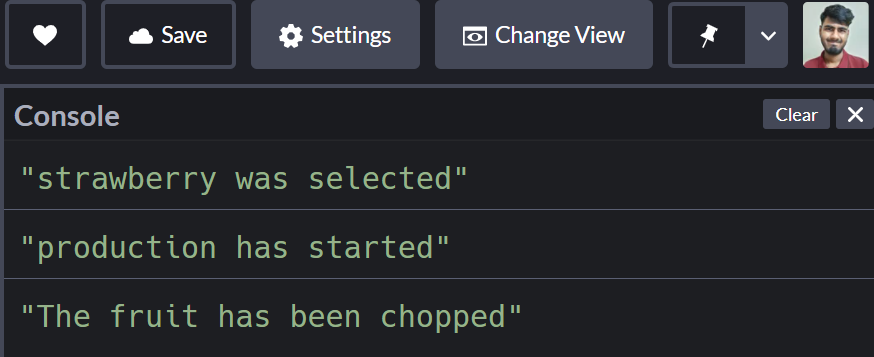
If you remember, here are our steps:

Let's complete our ice cream production by nesting a function inside another function - this is also known as a callback, remember?
let production = () =>{

  setTimeout(()=>{
    console.log("production has started")
    setTimeout(()=>{
      console.log("The fruit has been chopped")
      setTimeout(()=>{
        console.log(`${stocks.liquid[0]} and ${stocks.liquid[1]} Added`)
        setTimeout(()=>{
          console.log("start the machine")
          setTimeout(()=>{
            console.log(`Ice cream placed on ${stocks.holder[1]}`)
            setTimeout(()=>{
              console.log(`${stocks.toppings[0]} as toppings`)
              setTimeout(()=>{
                console.log("serve Ice cream")
              },2000)
            },3000)
          },2000)
        },1000)
      },1000)
    },2000)
  },0000)

};
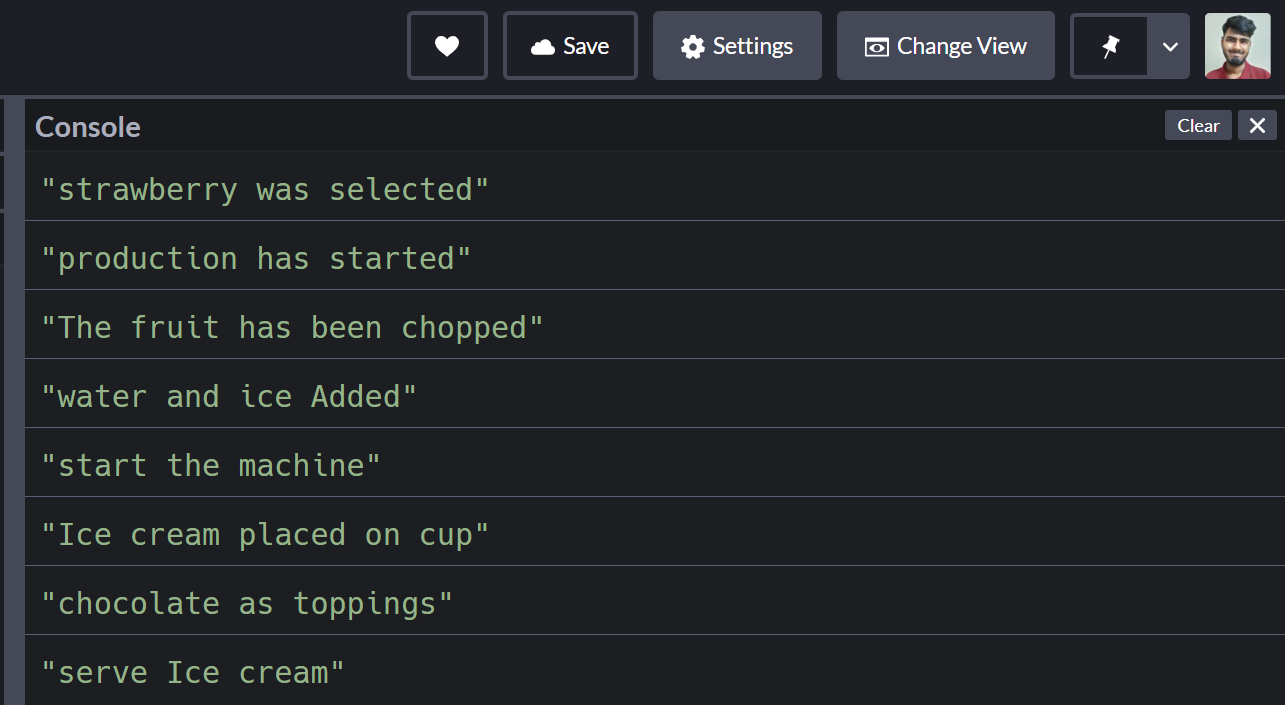
Feeling confused?
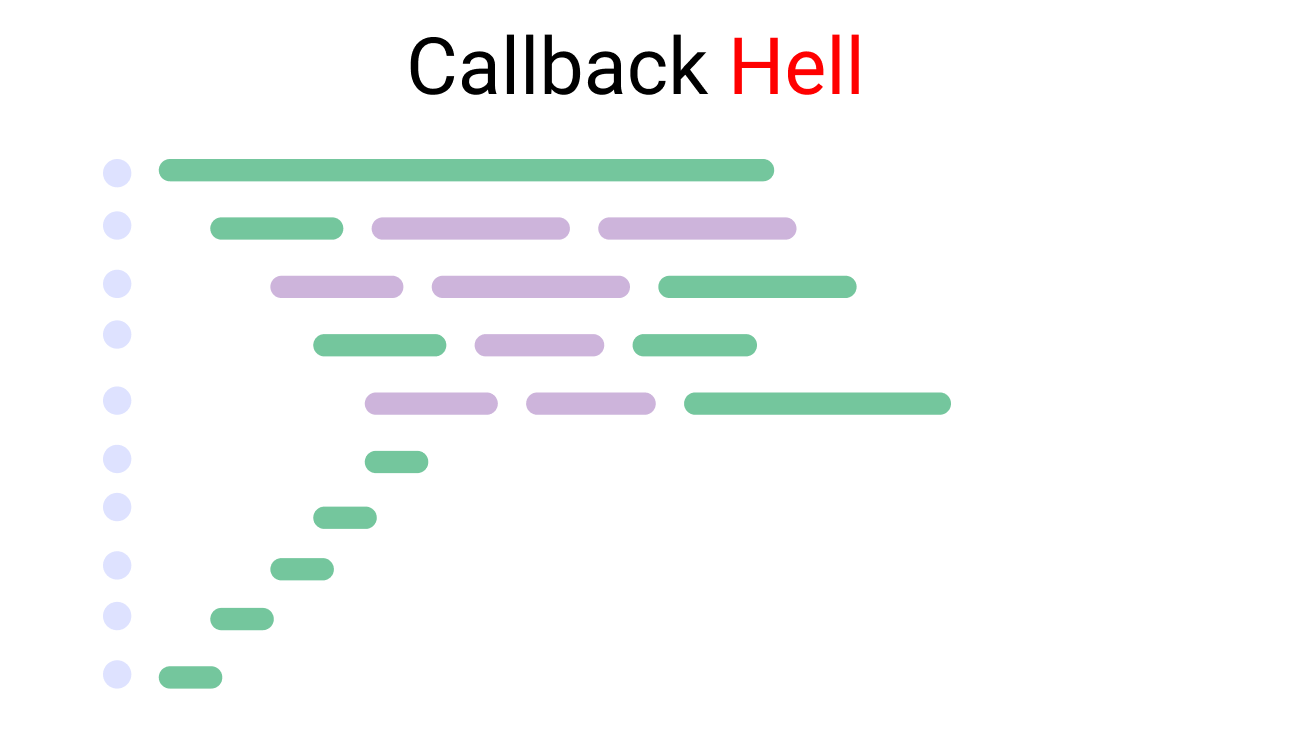
This is called callback hell. It looks something like this (remember that code just above?): 👇
What's the solution to this?
How to Use Promises to Escape Callback Hell
Promises were invented to solve the problem of callback hell and to better handle our tasks.
Take a break
But first, take a break!

This is how a promise looks:
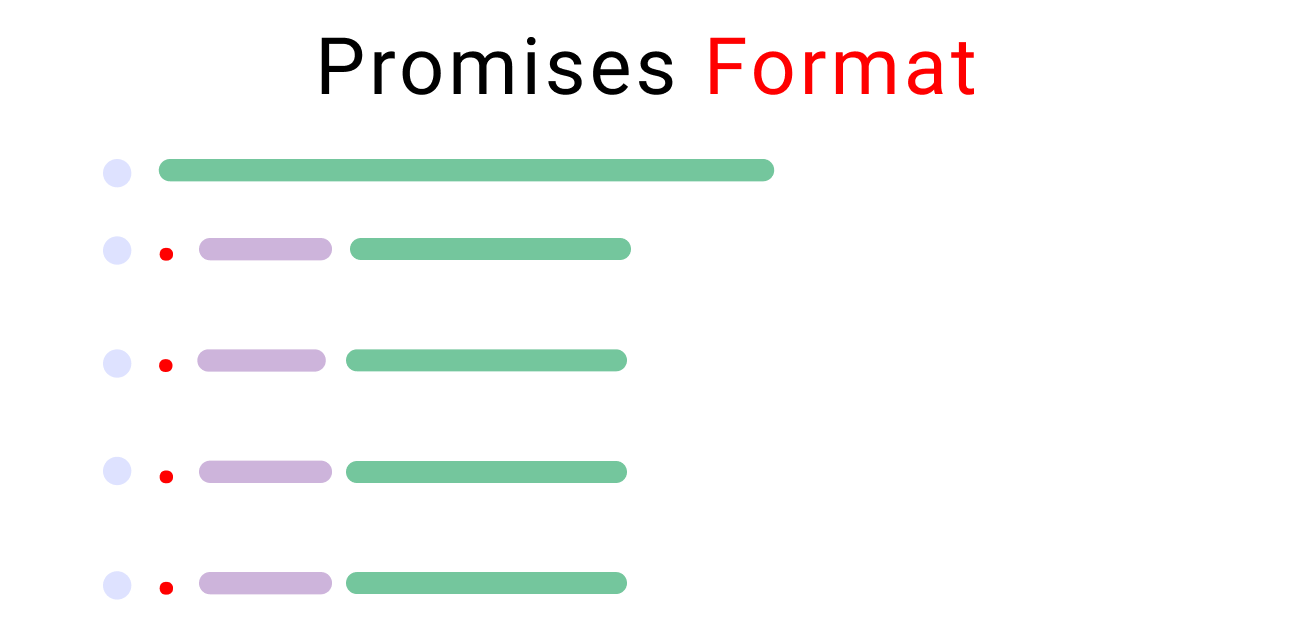
Let's dissect promises together.
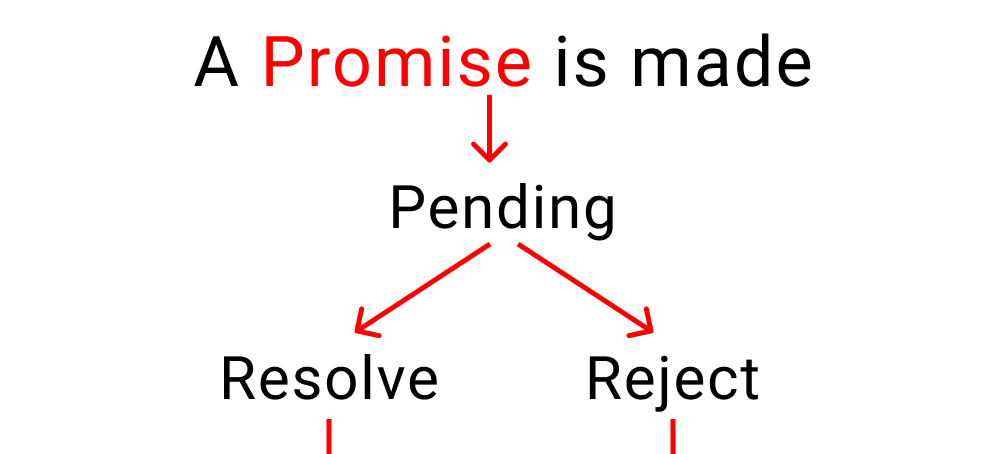

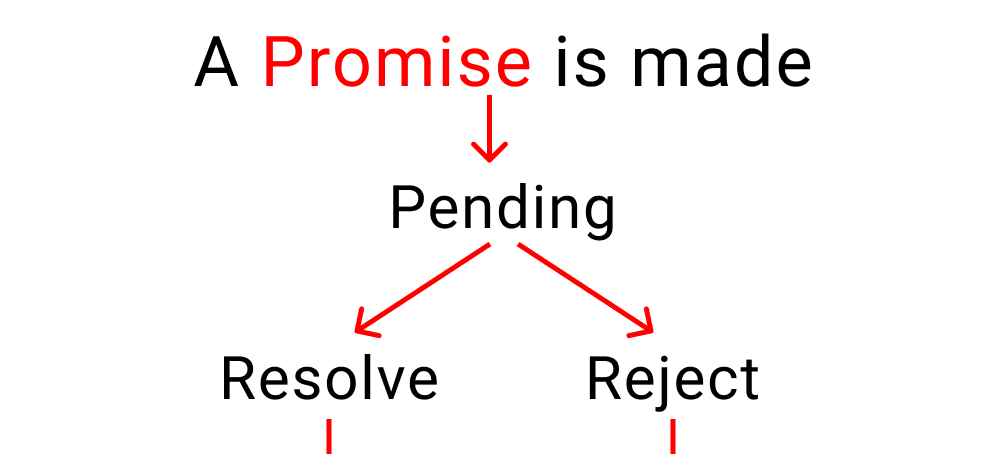
As the above charts show, a promise has three states:
- Pending: This is the initial stage. Nothing happens here. Think of it like this, your customer is taking their time giving you an order. But they haven't ordered anything yet.
- Resolved: This means that your customer has received their food and is happy.
- Rejected: This means that your customer didn't receive their order and left the restaurant.
Let's adopt promises to our ice cream production case study.
But wait...

We need to understand four more things first ->
- Relationship between time and work
- Promise chaining
- Error handling
- The
.finallyhandler
Let's start our ice cream shop and understand each of these concepts one by one by taking baby steps.
Relationship between time and work
If you remember, these are our steps and the time each takes to make ice cream"

For this to happen, let's create a variable in JavaScript: 👇
let is_shop_open = true;
Now create a function named order and pass two arguments named time, work:
let order = ( time, work ) =>{

  }
Now, we're gonna make a promise to our customer, "We will serve you ice-cream" Like this ->
let order = ( time, work ) =>{

  return new Promise( ( resolve, reject )=>{ })

  }
Our promise has 2 parts:
- Resolved [ ice cream delivered ]
- Rejected [ customer didn't get ice cream ]
let order = ( time, work ) => {

  return new Promise( ( resolve, reject )=>{

    if( is_shop_open ){

      resolve( )

    }

    else{

      reject( console.log("Our shop is closed") )

    }

  })
}
Let's add the time and work factors inside our promise using a setTimeout() function inside our if statement. Follow me 👇
Note
In real life, you can avoid the time factor as well. This is completely dependent on the nature of your work.
let order = ( time, work ) => {

  return new Promise( ( resolve, reject )=>{

    if( is_shop_open ){

      setTimeout(()=>{

       // work is 👇 getting done here
        resolve( work() )

// Setting 👇 time here for 1 work
       }, time)

    }

    else{
      reject( console.log("Our shop is closed") )
    }

  })
}
Now, we're gonna use our newly created function to start ice-cream production.
// Set 👇 time here
order( 2000, ()=>console.log(`${stocks.Fruits[0]} was selected`))
//    pass a ☝️ function here to start working
The result 👇 after 2 seconds looks like this:

Good job!

Promise chaining
In this method, we defining what we need to do when the first task is complete using the .then handler. It looks something like this 👇
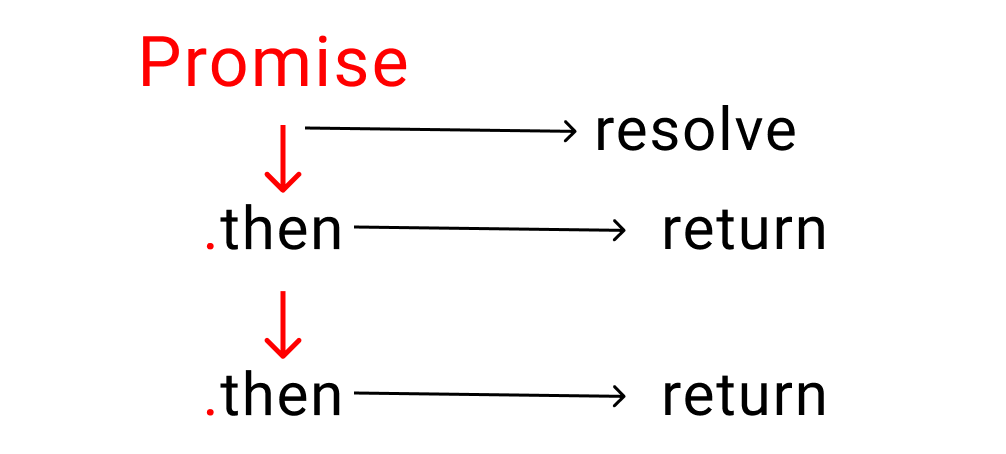
.then handlerThe .then handler returns a promise when our original promise is resolved.
Here's an Example:
Let me make it simpler: it's similar to giving instructions to someone. You tell someone to " First do this, then do that, then this other thing, then.., then.., then..." and so on.
- The first task is our original promise.
- The rest of the tasks return our promise once one small bit of work is completed
Let's implement this on our project. At the bottom of your code write the following lines. 👇
Note
don't forget to write the return word inside your .then handler. Otherwise, it won't work properly. If you're curious, try removing the return once we finish the steps:
order(2000,()=>console.log(`${stocks.Fruits[0]} was selected`))

.then(()=>{
  return order(0000,()=>console.log('production has started'))
})
And here's the result: 👇

Using the same system, let's finish our project:👇
// step 1
order(2000,()=>console.log(`${stocks.Fruits[0]} was selected`))

// step 2
.then(()=>{
  return order(0000,()=>console.log('production has started'))
})

// step 3
.then(()=>{
  return order(2000, ()=>console.log("Fruit has been chopped"))
})

// step 4
.then(()=>{
  return order(1000, ()=>console.log(`${stocks.liquid[0]} and ${stocks.liquid[1]} added`))
})

// step 5
.then(()=>{
  return order(1000, ()=>console.log("start the machine"))
})

// step 6
.then(()=>{
  return order(2000, ()=>console.log(`ice cream placed on ${stocks.holder[1]}`))
})

// step 7
.then(()=>{
  return order(3000, ()=>console.log(`${stocks.toppings[0]} as toppings`))
})

// Step 8
.then(()=>{
  return order(2000, ()=>console.log("Serve Ice Cream"))
})
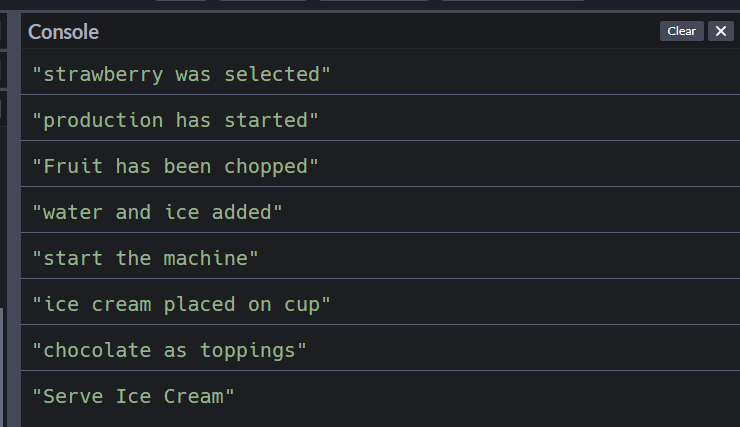
Here's the result: 👇
Error handling
We need a way to handle errors when something goes wrong. But first, we need to understand the promise cycle:

To catch our errors, let's change our variable to false.
let is_shop_open = false;
Which means our shop is closed. We're not selling ice cream to our customers anymore.
To handle this, we use the .catch handler. Just like .then, it also returns a promise, but only when our original promise is rejected.
A small reminder here:
.thenworks when a promise is resolved.catchworks when a promise is rejected
Go down to the very bottom and write the following code:👇
Just remember that there should be nothing between your previous .then handler and the .catch handler.
.catch(()=>{
  console.log("Customer left")
})
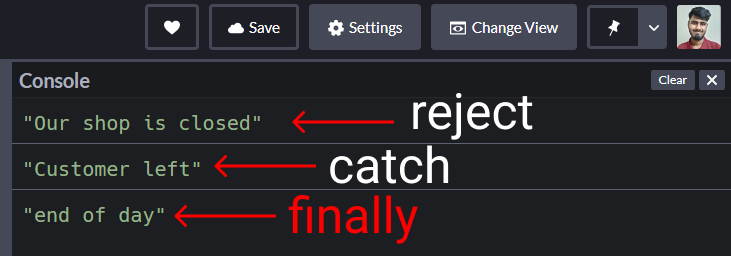
Here's the result:👇

A couple things to note about this code:
- The 1st message is coming from the
reject()part of our promise - The 2nd message is coming from the
.catchhandler
How to use the .finally() handler
There's something called the finally handler which works regardless of whether our promise was resolved or rejected.
For example
whether we serve no customers or 100 customers, our shop will close at the end of the day
If you're curious to test this, come at very bottom and write this code: 👇
.finally(()=>{
  console.log("end of day")
})
The result:👇
Everyone, please welcome Async / Await~
How Does Async / Await Work in JavaScript?
This is supposed to be the better way to write promises and it helps us keep our code simple and clean.
All you have to do is write the word async before any regular function and it becomes a promise.
But first, take a break

Let's have a look:👇
Promises vs Async/Await in JavaScript
Before async/await, to make a promise we wrote this:
function order(){
   return new Promise((resolve, reject) =>{

    // Write code here
   })
}
Now using async/await, we write one like this:
//👇 the magical keyword
 async function order() {
    // Write code here
 }
But wait......

You need to understand ->
- How to use the
tryandcatchkeywords - How to use the await keyword
How to use the Try and Catch keywords
We use the try keyword to run our code while we use catch to catch our errors. It's the same concept we saw when we looked at promises.
Let's see a comparison. We'll see a small demo of the format, then we'll start coding.
Promises in JS -> resolve or reject
We used resolve and reject in promises like this:
function kitchen(){

  return new Promise ((resolve, reject)=>{
    if(true){
       resolve("promise is fulfilled")
    }

    else{
        reject("error caught here")
    }
  })
}

kitchen()  // run the code
.then()    // next step
.then()    // next step
.catch()   // error caught here
.finally() // end of the promise [optional]
Async / Await in JS -> try, catch
When we're using async/await, we use this format:
//👇 Magical keyword
async function kitchen(){

   try{
// Let's create a fake problem
      await abc;
   }

   catch(error){
      console.log("abc does not exist", error)
   }

   finally{
      console.log("Runs code anyways")
   }
}

kitchen()  // run the code
Don't panic, we'll discuss the await keyword next.
Now hopefully you understand the difference between promises and Async / Await.
How to Use JavaScript's Await Keyword

The keyword await makes JavaScript wait until a promise settles and returns its result.
How to use the await keyword in JavaScript
Let's go back to our ice cream shop. We don't know which topping a customer might prefer, chocolate or peanuts. So we need to stop our machine and go and ask our customer what they'd like on their ice cream.
Notice here that only our kitchen is stopped, but our staff outside the kitchen will still do things like:
- doing the dishes
- cleaning the tables
- taking orders, and so on.
An Await Keyword Code Example
Let's create a small promise to ask which topping to use. The process takes three seconds.
function toppings_choice (){
  return new Promise((resolve,reject)=>{
    setTimeout(()=>{

      resolve( console.log("which topping would you love?") )

    },3000)
  })
}
Now, let's create our kitchen function with the async keyword first.
async function kitchen(){

  console.log("A")
  console.log("B")
  console.log("C")

  await toppings_choice()

  console.log("D")
  console.log("E")

}

// Trigger the function

kitchen();
Let's add other tasks below the kitchen() call.
console.log("doing the dishes")
console.log("cleaning the tables")
console.log("taking orders")
And here's the result:
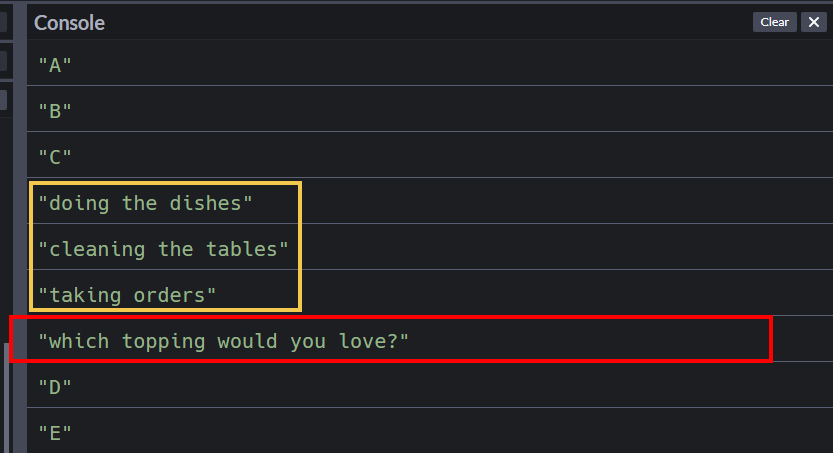
We are literally going outside our kitchen to ask our customer, "what is your topping choice?" In the mean time, other things still get done.
Once, we get their topping choice, we enter the kitchen and finish the job.
Small note
When using Async/ Await, you can also use the .then, .catch, and .finally handlers as well which are a core part of promises.
Let's open our Ice cream shop again

We're gonna create two functions ->
kitchen: to make ice creamtime: to assign the amount of time each small task will take.
Let's start! First, create the time function:
let is_shop_open = true;

function time(ms) {

   return new Promise( (resolve, reject) => {

      if(is_shop_open){
         setTimeout(resolve,ms);
      }

      else{
         reject(console.log("Shop is closed"))
      }
    });
}
Now, let's create our kitchen:
async function kitchen(){
   try{

     // instruction here
   }

   catch(error){
    // error management here
   }
}

// Trigger
kitchen();
Let's give small instructions and test if our kitchen function is working or not:
async function kitchen(){
   try{

// time taken to perform this 1 task
     await time(2000)
     console.log(`${stocks.Fruits[0]} was selected`)
   }

   catch(error){
     console.log("Customer left", error)
   }

   finally{
      console.log("Day ended, shop closed")
    }
}

// Trigger
kitchen();
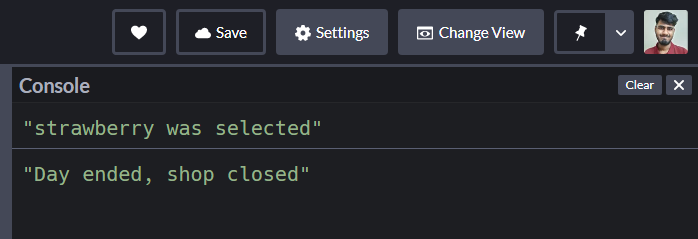
The result looks like this when the shop is open: 👇
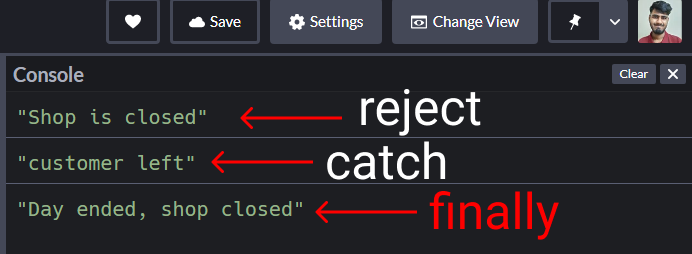
The result looks like this when the shop is closed: 👇
So far so good.

Let's complete our project.
Here's the list of our tasks again: 👇
First, open our shop
let is_shop_open = true;
Now write the steps inside our kitchen() function: 👇
async function kitchen(){
    try{
    await time(2000)
    console.log(`${stocks.Fruits[0]} was selected`)

    await time(0000)
    console.log("production has started")

    await time(2000)
    console.log("fruit has been chopped")

    await time(1000)
    console.log(`${stocks.liquid[0]} and ${stocks.liquid[1]} added`)

    await time(1000)
    console.log("start the machine")

    await time(2000)
    console.log(`ice cream placed on ${stocks.holder[1]}`)

    await time(3000)
    console.log(`${stocks.toppings[0]} as toppings`)

    await time(2000)
    console.log("Serve Ice Cream")
    }

    catch(error){
     console.log("customer left")
    }
}
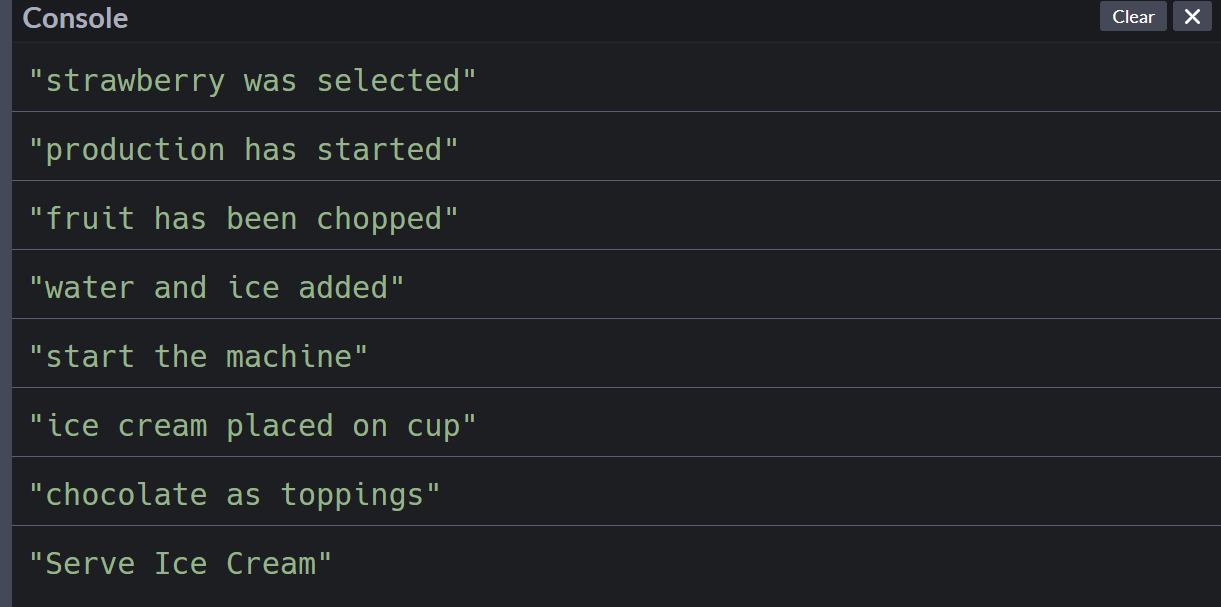
And here's the result: 👇
Conclusion
Congratulations for reading until the end! In this article you've learned:
- The difference between synchronous and asynchronous systems
- Mechanisms of asynchronous JavaScript using 3 techniques (callbacks, promises, and Async/ Await)
Here's your medal for reading until the end. ❤️
