How to Retrieve System Information Using The CPUID Instruction
How to Retrieve System Information Using The CPUID Instruction 관련

When developing a bootloader/kernel, understanding the underlying architecture is crucial for optimizing performance and compatibility between software and hardware.
One important yet sometimes overlooked tool available to engineers for querying and retrieving system information is the CPUID instruction.
What is the CPUID Instruction?
The CPUID instruction is a low level instruction, inside the heart of every modern x86 and x86-64 processor that allows the software to query the CPU for information about the processor and its supported features.
By invoking this instruction, you can gather information such as the processor’s model, family, internal cache sizes, and supported features like SIMD or hardware virtualization. This can help you optimize performance and dynamically enable or disable supported features.
For bootloader or kernel developers, understanding what features a processor supports—such as hardware virtualization, cache sizes, or SIMD instructions—can ensure that the system runs efficiently and that the code you write is compatible across different CPUs. By utilizing the CPUID instruction, you can dynamically adjust your kernel’s behavior based on the specific processor it is running on.
In this article you will learn how to check if the CPUID instruction is available for your system, how it works and what information you can get from using it.
Prerequisites
- Some knowledge of assembly language (for this example I use FASM)
- Some knowledge of operating systems/kernels
- Access to low-level debugging tools (for example, GDB) or hardware emulators like QEMU to test your bootloader/kernel on various platforms.
Step 1: Check for CPUID Availability
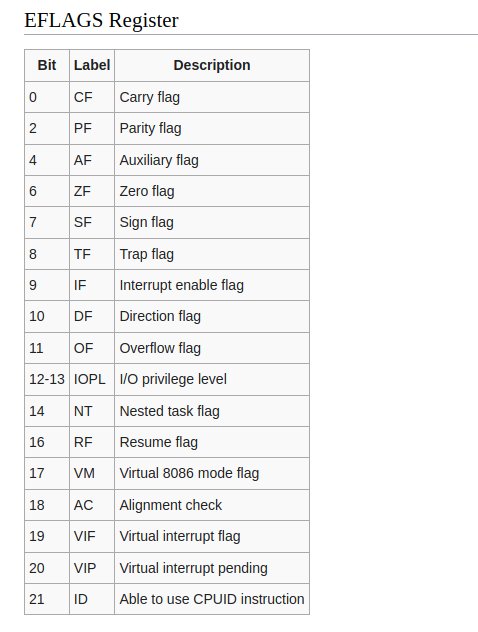
Before executing the CPUID instruction, it's important to determine whether the processor supports it, as not all CPUs are guaranteed to have this functionality. The following code checks the availability of the CPUID instruction by modifying and testing the ID bit (bit 21) in the EFLAGS register.
Here’s a picture from wiki.osdev.org that shows each bit of the EFLAGS register:

If the processor allows this bit to be toggled, CPUID is supported; otherwise, it is not. Here's how the detection process works:
(most people think that in Real mode 32 registers are not accessible. That is not true. All 32bit registers are usable)
cpuid_check:
    pusha                                ; save state
    pushfd                               ; Save EFLAGS
    pushfd                               ; Store EFLAGS
    xor dword [esp],0x00200000           ; Invert the ID bit in stored EFLAGS
    popfd                                ; Load stored EFLAGS (with ID bit inverted)
    pushfd                               ; Store EFLAGS again (ID bit may or may not be inverted)
    pop eax                              ; eax = modified EFLAGS (ID bit may or may not be inverted)
    xor eax,[esp]                        ; eax = whichever bits were changed
    popfd                                ; Restore original EFLAGS
    and eax,0x00200000                   ; eax = zero if ID bit can't be changed, else non-zero
    cmp eax,0x00
    je .cpuid_instruction_not_is_available
.cpuid_instruction_is_available:
    ;handle CPUID exists
.cpuid_instruction_not_is_available:
    ;handle CPUID isn't supported
.cpuid_check_end:
    popa                                  ; restore state
    ret
pusha: Saves all the general purpose registers to ensure the original state can be restored at the end.pushfd: Saves the current EFLAGS register.pushfd: Stores a copy of the EFLAGS.xor dword [esp], 0x00200000: The code flips the ID bit (21) of the EFLAGS using the XOR operator.popfd: Restores the modified EFLAGS with the ID bit inverted.pushfd: Pushes the modified EFLAGS back to the stack.pop eax: Puts the modified EFLAGS (ID bit may or may not be inverted) in the EAX register.xor eax, [esp]: After the XOR operation, the EAX will contain the bits that were changed.popfd: Restores the original EFLAGS.and eax, 0x00200000: Theandoperation isolates the 21st bit (ID bit) by masking all other bits. After this operation the EAX register will contain either 0x00200000 (if 21 bit was changed which means CPUID is supported) or 0×00 (21 bit hasn’t changed, CPUID not supported).cmp eax, 0x00: The CMP instruction checks the result of the previous operation. If EAX equals 0×00, it means that the ID bit cannot be modified and the processor doesn’t support the CPUID instruction. If it is not zero, it means that the ID bit was flipped and your processor supports the CPUID instruction.
Step 2: How to Use The CPUID Instruction
Get CPU Features
The CPUID instruction will return different information with different values in the EAX register.
mov eax, 0x1
cpuid
With EAX set to 1, the CPUID will return a bitfield in EDX, which will contain the following values. Different brands may give different meaning to these (source https://wiki.osdev.org/CPUID)
enum {
    CPUID_FEAT_ECX_SSE3         = 1 << 0,
    CPUID_FEAT_ECX_PCLMUL       = 1 << 1,
    CPUID_FEAT_ECX_DTES64       = 1 << 2,
    CPUID_FEAT_ECX_MONITOR      = 1 << 3,
    CPUID_FEAT_ECX_DS_CPL       = 1 << 4,
    CPUID_FEAT_ECX_VMX          = 1 << 5,
    CPUID_FEAT_ECX_SMX          = 1 << 6,
    CPUID_FEAT_ECX_EST          = 1 << 7,
    CPUID_FEAT_ECX_TM2          = 1 << 8,
    CPUID_FEAT_ECX_SSSE3        = 1 << 9,
    CPUID_FEAT_ECX_CID          = 1 << 10,
    CPUID_FEAT_ECX_SDBG         = 1 << 11,
    CPUID_FEAT_ECX_FMA          = 1 << 12,
    CPUID_FEAT_ECX_CX16         = 1 << 13,
    CPUID_FEAT_ECX_XTPR         = 1 << 14,
    CPUID_FEAT_ECX_PDCM         = 1 << 15,
    CPUID_FEAT_ECX_PCID         = 1 << 17,
    CPUID_FEAT_ECX_DCA          = 1 << 18,
    CPUID_FEAT_ECX_SSE4_1       = 1 << 19,
    CPUID_FEAT_ECX_SSE4_2       = 1 << 20,
    CPUID_FEAT_ECX_X2APIC       = 1 << 21,
    CPUID_FEAT_ECX_MOVBE        = 1 << 22,
    CPUID_FEAT_ECX_POPCNT       = 1 << 23,
    CPUID_FEAT_ECX_TSC          = 1 << 24,
    CPUID_FEAT_ECX_AES          = 1 << 25,
    CPUID_FEAT_ECX_XSAVE        = 1 << 26,
    CPUID_FEAT_ECX_OSXSAVE      = 1 << 27,
    CPUID_FEAT_ECX_AVX          = 1 << 28,
    CPUID_FEAT_ECX_F16C         = 1 << 29,
    CPUID_FEAT_ECX_RDRAND       = 1 << 30,
    CPUID_FEAT_ECX_HYPERVISOR   = 1 << 31,

    CPUID_FEAT_EDX_FPU          = 1 << 0,
    CPUID_FEAT_EDX_VME          = 1 << 1,
    CPUID_FEAT_EDX_DE           = 1 << 2,
    CPUID_FEAT_EDX_PSE          = 1 << 3,
    CPUID_FEAT_EDX_TSC          = 1 << 4,
    CPUID_FEAT_EDX_MSR          = 1 << 5,
    CPUID_FEAT_EDX_PAE          = 1 << 6,
    CPUID_FEAT_EDX_MCE          = 1 << 7,
    CPUID_FEAT_EDX_CX8          = 1 << 8,
    CPUID_FEAT_EDX_APIC         = 1 << 9,
    CPUID_FEAT_EDX_SEP          = 1 << 11,
    CPUID_FEAT_EDX_MTRR         = 1 << 12,
    CPUID_FEAT_EDX_PGE          = 1 << 13,
    CPUID_FEAT_EDX_MCA          = 1 << 14,
    CPUID_FEAT_EDX_CMOV         = 1 << 15,
    CPUID_FEAT_EDX_PAT          = 1 << 16,
    CPUID_FEAT_EDX_PSE36        = 1 << 17,
    CPUID_FEAT_EDX_PSN          = 1 << 18,
    CPUID_FEAT_EDX_CLFLUSH      = 1 << 19,
    CPUID_FEAT_EDX_DS           = 1 << 21,
    CPUID_FEAT_EDX_ACPI         = 1 << 22,
    CPUID_FEAT_EDX_MMX          = 1 << 23,
    CPUID_FEAT_EDX_FXSR         = 1 << 24,
    CPUID_FEAT_EDX_SSE          = 1 << 25,
    CPUID_FEAT_EDX_SSE2         = 1 << 26,
    CPUID_FEAT_EDX_SS           = 1 << 27,
    CPUID_FEAT_EDX_HTT          = 1 << 28,
    CPUID_FEAT_EDX_TM           = 1 << 29,
    CPUID_FEAT_EDX_IA64         = 1 << 30,
    CPUID_FEAT_EDX_PBE          = 1 << 31
};
A brief explanation of the CPU features above:
PCLMUL, AES: Cryptographic instruction sets for fast encryption and decryption.VMX, SMX: Virtualization support for running virtual machines.SSE3, SSSE3, SSE4.1, SSE4.2, AVX: SIMD instruction sets for faster multimedia, math, and vector processing.FMA: Fused Multiply-Add, improves performance in floating-point calculations.RDRAND: Random number generator.X2APIC: Advanced interrupt handling in multiprocessor systems.PCID: Optimizes memory management during context switches.FPU: Hardware floating-point unit for faster math operations.PAE: Physical Address Extension, allows addressing more than 4 GB of memory.HTT: Allows a single CPU core to handle multiple threads.PAT, PGE: Memory management features for controlling caching and page mapping.MMX, SSE, SSE2: Older SIMD instruction sets for multimedia processing.
Get CPU Vendor String
If you want to get the CPU vendor string, EAX should be set to 0×0 before invoking the CPUID instruction.
mov eax, 0x0
cpuid
The vendor string is a unique identifier that CPU vendors like AMD and Intel use. Examples are: GenuineIntel (for Intel processors) or AuthenticAMD (for AMD processors). It basically specifies the manufacturer of the CPU.
The vendor string allows the kernel to identify the CPU manufacturer which is very useful because different manufacturers implement certain features differently. Also, software or drivers can interact differently based on the CPU manufacturer to ensure compatibility.
When used like this, the vendor id string will be returned in EBX, EDX, ECX registers. You can write them to a buffer and get the full 12 character string.
Example code:
Step 1: The Buffer
Create a buffer that can hold 12 bytes:
buffer: db 12 dup(0), 0xA, 0xD, 0
Step 2: Print the Buffer
We start by creating a string printing function.
This assembly code reads a string character by character and prints it to the screen using BIOS interrupt 0x10. The print function loops through the string and uses the lodsb instruction to load each character in the al register.
Then the print_char function uses the interrupt 0×10 to print it on the screen. When the code reaches the end of the string (null terminator), the loop ends.
print_string:
    call print
    ret
print:
.loop:
    lodsb   ;read character to al and then increment
    cmp al ,0 ;check if we reached the end
    je .done  ;we reached null terminator, finish
    call print_char ;print character
    jmp .loop   ;jump back into the loop
.done:
    ret
print_char:
    mov ah, 0eh
    int 0x10
    ret
Step 3: Fill the Buffer and Print it
Here, after saving the current state using the pusha instruction and calling cpuid with 0×0 passed in the EAX register, we can store the contents of ebx, edx, ecx to the buffer. Then we call print_string to print it.
get_cpu_vendor:
    pusha
    mov eax, 0x0
    cpuid
    mov [buffer], ebx
    mov [buffer + 4], edx
    mov [buffer + 8], ecx
    mov si, buffer
    call print_string
    popa
    ret
A video from my YouTube channel where I implement and explain the code above in detail
More information about what information CPUID instruction can give you according to the value passed in the EAX register, can be found here: https://gitlab.com/x86-cpuid.org/x86-cpuid-db
Epilogue
By understanding and using the CPUID instruction, you can make your bootloader/kernel more adaptable to a wide range of processors. Knowing how to detect the instruction's availability and retrieve crucial system information—such as CPU features, cache sizes, and supported technologies—can significantly enhance performance and compatibility.
After reading this article, you should have the tools and knowledge to start exploring the CPUID instruction and how you can use it in your own project!
Happy coding!