05D. Spring Boot Docker 이미지와 디플로이먼트 생성하기
05D. Spring Boot Docker 이미지와 디플로이먼트 생성하기 관련

이제 Spring Boot Docker 이미지를 생성하겠습니다. Spring Boot 프로젝트 생성 부분은 다음 문서를 참조하기 바랍니다.
소스 코드는 다음 GitHub 저장소에서 받을 수 있습니다.
소스 코드를 받은 뒤 Unit05/initial 폴더로 이동하여 Docker 이미지를 생성합니다.
- GitHub Packages 레지스트리를 사용한다고 했으므로 태그를 다음과 같은 형식으로 지정합니다.
ghcr.io/<GitHub 계정>/spring-boot
cd jHLsKubernetes/Unit05/initial
sudo docker build --tag ghcr.io/<GitHub 계정>/spring-boot .
cd jHLsKubernetes/Unit05/initial
docker build --tag ghcr.io/<GitHub 계정>/spring-boot .
그리고 docker push 명령으로 이미지를 GitHub Packages 레지스트리에 푸시합니다.
sudo docker push ghcr.io/<GitHub 계정>/spring-boot:latest
다음 내용을 spring-boot-deployment.yaml 파일로 저장합니다.

spring-boot-deployment.yamlapiVersion: apps/v1
kind: Deployment
metadata:
name: spring-boot
spec:
replicas: 1
selector:
matchLabels:
app: spring-boot
template:
metadata:
labels:
app: spring-boot
spec:
containers:
- name: spring-boot
image: ghcr.io/<GitHub 계정>/spring-boot:latest
ports:
- containerPort: 8080
env:
- name: MYSQL_HOST
value: mysql
imagePullSecrets:
- name: ghcr-cred
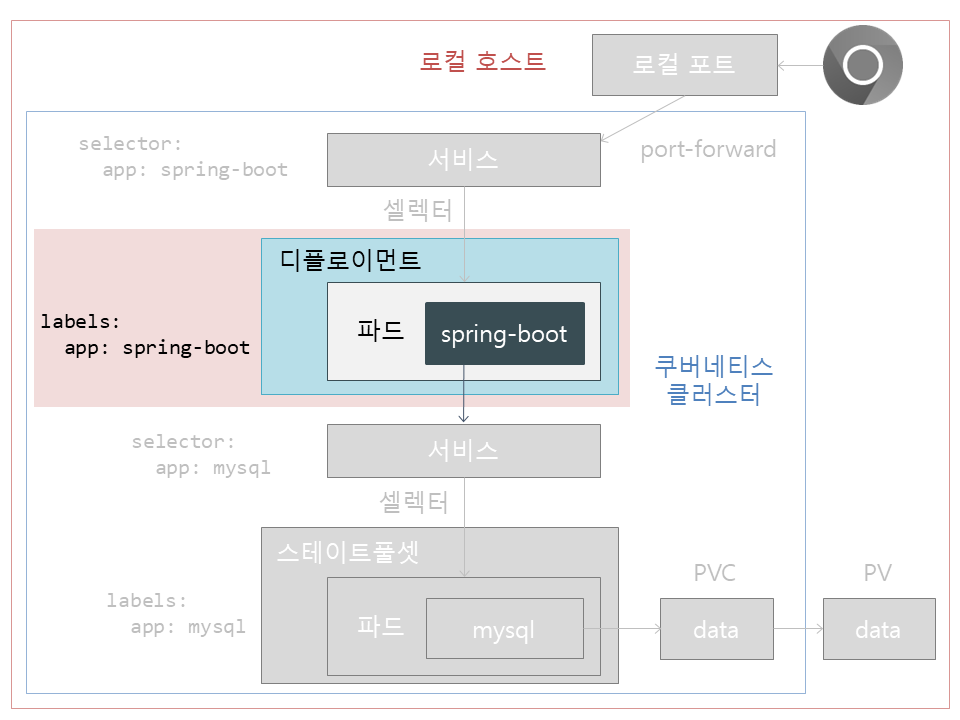
.apiVersion: 현재 디플로이먼트의 버전은apps/v1입니다..kind: 디플로이먼트를 생성하므로Deployment를 지정합니다..metadata.name: 현재 디플로이먼트의 이름입니다. 여기서는spring-boot를 설정합니다..spec.replicas: 파드를 1개만 생성합니다..spec.selector: 디플로이먼트가 관리할 파드를 찾는 방법을 정의합니다. 여기서는matchLabels에spring-boot로 설정했으므로 키가app, 값이spring-boot로 정확히 일치하는 파드를 찾습니다..spec.template: 여기서부터 파드 설정입니다.metadata:labels에 키-값을 설정하여 디플로이먼트가 찾을 수 있도록 합니다. 여기서는app: spring-boot를 설정했습니다.spec: 파드의spec입니다. 파드에는 컨테이너가 여러 개 들어갈 수 있어서containers로 되어있고, 그 아래에는-를 사용하여 배열(Array)로 값을 설정합니다.containers:name에는 컨테이너의 이름을 설정합니다. 여기서는spring-boot로 설정했지만 셀렉터와는 상관이 없습니다.image에는 컨테이너를 실행할 Docker 이미지를 설정합니다.<이미지>:<태그>형식이며 여기서는ghcr.io/<GitHub 계정>/spring-boot:latest을 설정했습니다. <GitHub 계정> 부분은 반드시 본인의 GitHub 계정으로 수정해줍니다.ports: 배열 형태로containerPort를 설정합니다.containerPort는 컨테이너에서 개방할 포트 번호를 뜻합니다. 여기서는 Spring Boot의 포트인 8080을 설정했습니다.env: 환경 변수입니다. 배열 형태로 설정하며name,value형식입니다. 여기서는MYSQL_HOST에mysql를 설정하여 스테이트풀셋에 연결된 서비스에 접근하도록 합니다.
imagePullSecrets: GitHub Packages 레지스트리에 접근하기 위한 시크릿입니다.ghcr-cred시크릿은 뒤에서 만들겠습니다.
이제 다음 명령으로 ghcr-cred 시크릿을 생성합니다.
kubectl create secret docker-registry ghcr-cred \
--docker-server=ghcr.io \
--docker-username=<GitHub 계정> \
--docker-password=<Personal Access Token>
시크릿 생성이 끝났으면 Spring Boot 디플로이먼트를 생성해봅니다.
kubectl create -f spring-boot-deployment.yaml
kubectl get all 명령으로 오브젝트 목록을 출력해보면 디플로이먼트, 레플리카셋, 파드가 생성된 것을 볼 수 있습니다.
kubectl get all
#
# NAME                               READY   STATUS    RESTARTS   AGE
# pod/mysql-0                        1/1     Running   0          4h51m
# pod/spring-boot-85cc99859d-mpq28   1/1     Running   0          5s
#
# NAME                 TYPE        CLUSTER-IP   EXTERNAL-IP   PORT(S)    AGE
# service/kubernetes   ClusterIP   10.96.0.1    <none>        443/TCP    6d2h
# service/mysql        ClusterIP   None         <none>        3306/TCP   6h30m
#
# NAME                          READY   UP-TO-DATE   AVAILABLE   AGE
# deployment.apps/spring-boot   1/1     1            1           6s
#
# NAME                                     DESIRED   CURRENT   READY   AGE
# replicaset.apps/spring-boot-85cc99859d   1         1         1       6s
#
# NAME                     READY   AGE
# statefulset.apps/mysql   1/1     4h51m
이제 Spring Boot 서비스입니다. 다음 내용을 spring-boot-service.yaml 파일로 저장합니다.
spring-boot-service.yamlapiVersion: v1
kind: Service
metadata:
name: spring-boot
spec:
selector:
app: spring-boot
ports:
- protocol: TCP
port: 8080
targetPort: 8080
type: ClusterIP
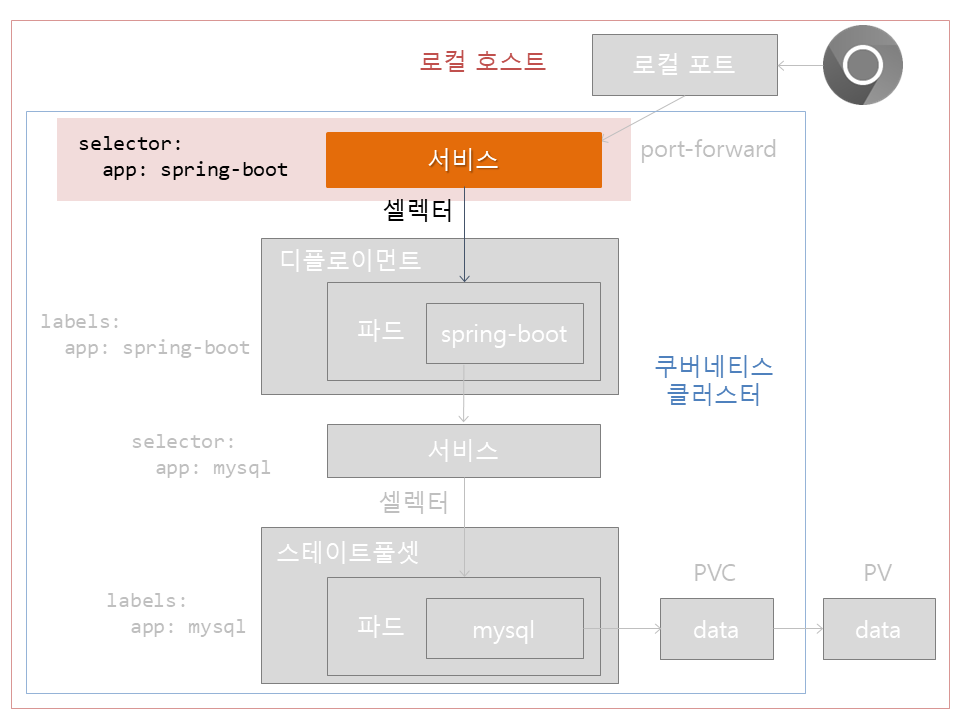
.apiVersion: 현재 서비스의 버전은v1입니다..kind: 여기서는 서비스를 작성하므로Service를 지정합니다..metadata.name: 현재 서비스의 이름입니다. 여기서는spring-boot를 설정합니다..spec.selector: 서비스가 트래픽을 전달할 파드를 선택합니다. 여기서는app: spring-boot을 설정했으므로 키가app, 값이spring-boot인 파드를 찾습니다..spec.ports:protocol은 TCP,port는 서비스가 개방할 포트이며 8080으로 설정합니다.targetPort는 파드에 열려 있는 포트를 의미합니다. 따라서 8080을 설정합니다..spec.type: 서비스의type은 여러 가지가 있지만 여기서는ClusterIP를 설정하여 쿠버네티스 네트워크 안에서만 포트를 노출하도록 합니다.
다음 명령으로 Spring Boot 서비스를 생성합니다.
kubectl create -f spring-boot-service.yaml
kubectl get all 명령으로 오브젝트 목록을 출력해보면 서비스가 생성된 것을 볼 수 있습니다.
kubectl get all
#
# NAME                               READY   STATUS    RESTARTS   AGE
# pod/mysql-0                        1/1     Running   0          5h
# pod/spring-boot-85cc99859d-mpq28   1/1     Running   0          9m17s
#
# NAME                  TYPE        CLUSTER-IP       EXTERNAL-IP   PORT(S)    AGE
# service/kubernetes    ClusterIP   10.96.0.1        <none>        443/TCP    6d3h
# service/mysql         ClusterIP   None             <none>        3306/TCP   6h39m
# service/spring-boot   ClusterIP   10.111.229.189   <none>        8080/TCP   6s
#
# NAME                          READY   UP-TO-DATE   AVAILABLE   AGE
# deployment.apps/spring-boot   1/1     1            1           9m18s
#
# NAME                                     DESIRED   CURRENT   READY   AGE
# replicaset.apps/spring-boot-85cc99859d   1         1         1       9m18s
#
# NAME                     READY   AGE
# statefulset.apps/mysql   1/1     5h
그럼 kubectl의 port-forward 기능을 사용해서 서비스에 접근해보겠습니다.
kubectl port-forward service/spring-boot 8080:8080
#
# Forwarding from 127.0.0.1:8080 -> 8080
# Forwarding from [::1]:8080 -> 8080
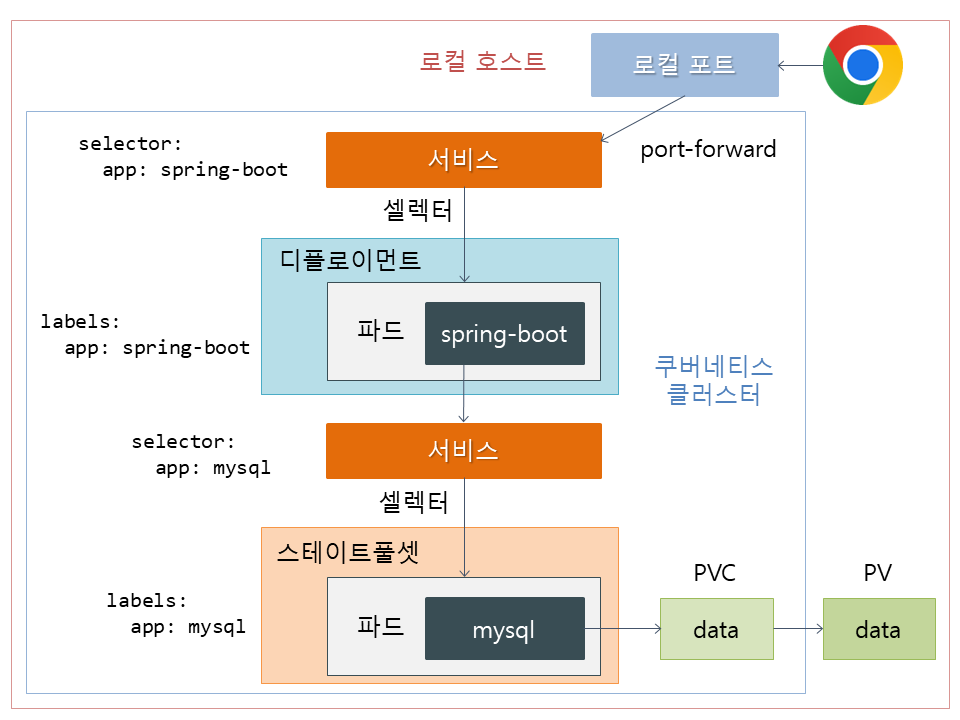
웹 브라우저를 열고 http://127.0.0.1:8080에 접속하면 다음과 같은 내용이 표시됩니다(새로 고침하면 데이터가 계속 누적되서 표시될 것입니다).
[{"id":1,"name":"hello","email":"hello@world.com"}]
이렇게 MySQL 스테이트풀셋을 생성하고 Spring Boot 디플로이먼트(파드)에서 데이터를 읽고 쓰는 방법을 알아보았습니다.
Minikube 클러스터 정지, 삭제
MiniKube 클러스터를 정지하려면 minikube stop 명령을 실행합니다.
minikube stop
정지된 Minikube 클러스터는 minikube start 명령으로 다시 시작할 수 있습니다.
minikube start
클러스터를 삭제하고 싶다면 minikube delete 명령을 실행하면 됩니다.
minikube delete
참고로 윈도우에서 위 명령을 실행하려면 PowerShell 또는 명령 프롬프트를 관리자 권한으로 실행하여야 합니다.