
Sandbox 관련
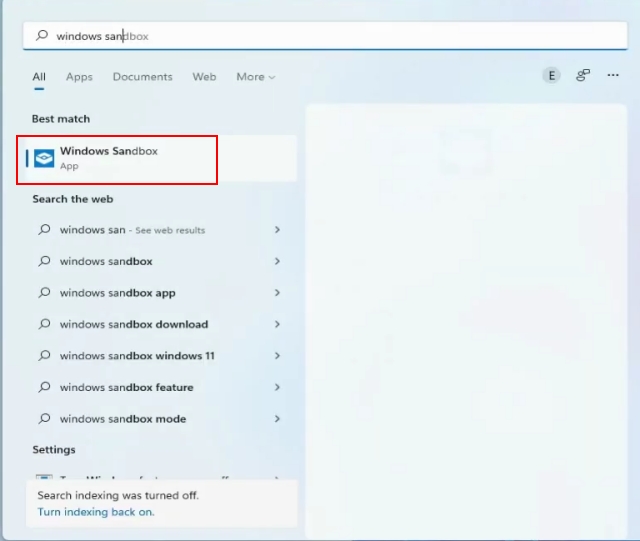
Enable and Use Windows Sandbox on Windows 11 Home Edition
Important
If you are running Windows 11 Pro Edition, you can directly skip to this step and enable the required features to start using the Windows Sandbox virtual environment on your PC.
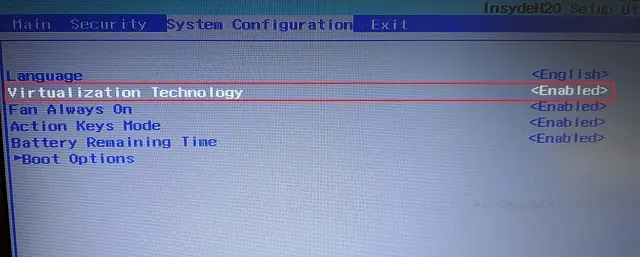
Before anything, you need to enable virtualization in the BIOS or UEFI menu. For that, you need to boot into the BIOS/ UEFI menu on your Windows 11 PC and look for "Virtualization", or "SVM Mode". Now, enable it and restart your PC.
Note
If you wish to learn about what is UEFI in detail and understand why modern computers are moving away from BIOS, read the linked article.
After logging into your PC, open Notepad and paste the below content.
@ECHO off
ECHO Checking for permissions
>nul 2>&1 "%SYSTEMROOT%\system32\cacls.exe" "%SYSTEMROOT%\system32\config\system"
ECHO Permission check result: %errorlevel%
:: --> If error flag set, we do not have admin.
IF '%errorlevel%' NEQ '0' (
ECHO Requesting administrative privileges...
GOTO UACPrompt
) ELSE ( GOTO gotAdmin )
:UACPrompt
ECHO Set UAC = CreateObject^("Shell.Application"^) > "%temp%\getadmin.vbs"
ECHO UAC.ShellExecute "%~s0", "", "", "runas", 1 >> "%temp%\getadmin.vbs"
ECHO Running created temporary "%temp%\getadmin.vbs"
TIMEOUT /T 2
"%temp%\getadmin.vbs"
exit /B
:gotAdmin
if exist "%temp%\getadmin.vbs" ( del "%temp%\getadmin.vbs" )
pushd "%CD%"
CD /D "%~dp0"
ECHO Batch was successfully started with admin privileges
ECHO .
CLS
Title Sandbox Installer
pushd "%~dp0"
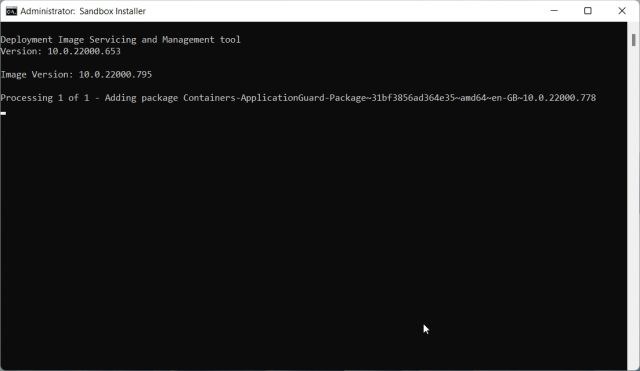
dir /b %SystemRoot%\servicing\Packages\*Containers*.mum >sandbox.txt
for /f %%i in ('findstr /i . sandbox.txt 2^>nul') do dism /online /norestart /add-package:"%SystemRoot%\servicing\Packages\%%i"
del sandbox.txt
Dism /online /enable-feature /featurename:Containers-DisposableClientVM /LimitAccess /ALL
pause
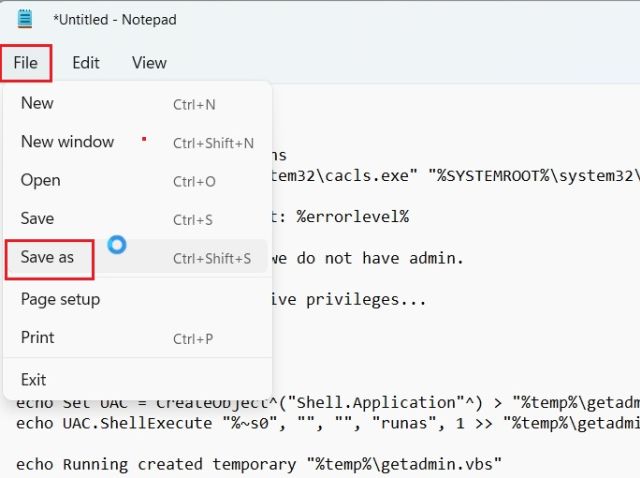
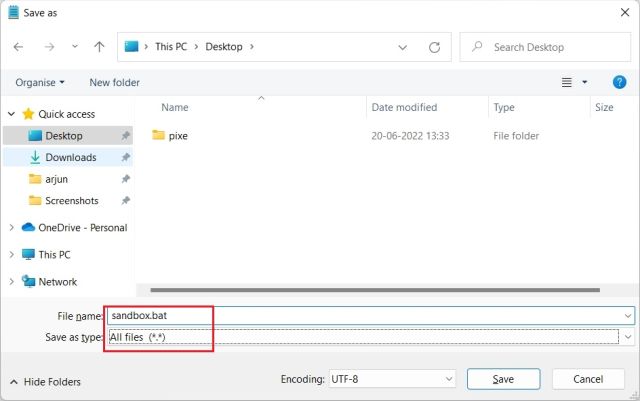
.bat extension at the end to save it as a batch file. Make sure there is no .txt or other file extension at the end. Finally, click on "Save".
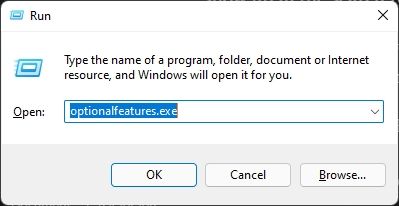
optionalfeatures.exe and hit Enter.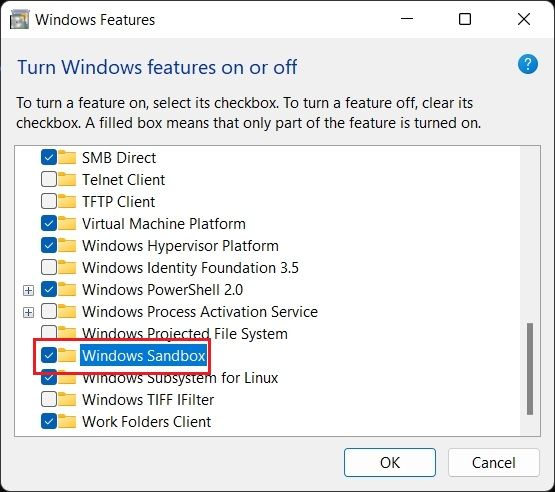
윈도우11 Home에서 Hyper-V 설치 및 활성화 방법
https://geekorea.com/how-to-enable-hyper-v-windows11-home/
이 가이드는 Windows 11 Home에서 Hyper-V 설치 및 활성화 방법에 대해 설명합니다.
Windows 11 환경 뿐만 아니라 Linux 등 다양한 버전의 운영 체제를 사용하는 사용자라면 가상 머신 플랫폼은 없어서는 안될 중요한 기능입니다.
Hyper-V는 Windows에서 가상화 기능을 사용하기 위해 Microsoft에서 개발한 하드웨어 기반 하이퍼바이저입니다.
안타깝게도 많은 분들이 사용하고 있는 Windows 11 Home 버전에서는 사용할 수 없습니다.
물론 가상화 기능을 지원하는 타사 도구를 선택할 수 있으며, 사용자 측면에서 Hyper-V는 기능적인 부분은 다소 부족하게 느껴질 수 있습니다.
그러나 Hyper-V는 대부분의 드라이버가 하드웨어 계층과 독립적으로 실행되므로 가상 환경을 유지 관리하는데 드는 오버헤드가 적어 속도가 빠릅니다.
다행히 Windows 11 Home 버전에서도 Hyper-V를 활성화할 수 있는 방법이 있습니다.
Hyper-V 설치 스크립트 생성
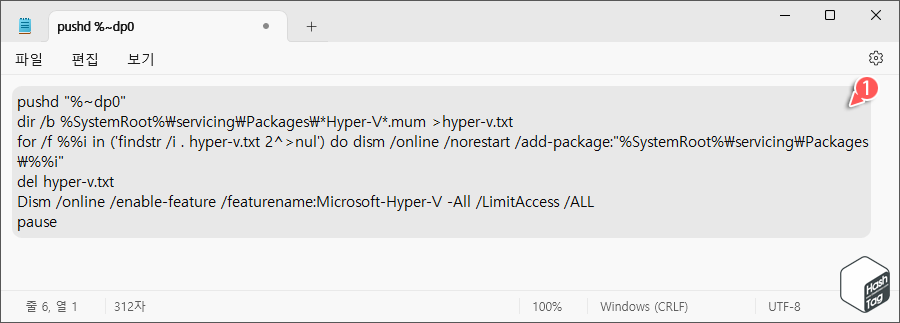
notepad 입력 후 Enter 키를 눌러 메모장을 실행합니다.이제 메모장에 다음 스크립트를 복사하여 붙여넣습니다.
PUSHD "%~dp0"

DIR /b %SystemRoot%\servicing\Packages\*Hyper-V*.mum >hyper-v.txt

FOR /f %%i in ('findstr /i . hyper-v.txt 2^>nul') do dism /online /norestart /add-package:"%SystemRoot%\servicing\Packages\%%i"

del hyper-v.txt

Dism /online /enable-feature /featurename:Microsoft-Hyper-V -All /LimitAccess /ALL
PAUSE
![스크립트 입력 후 메뉴에서 **[파일 > 다른 이름으로 저장]**을 선택하거나 단축키 <kbd>Ctrl</kbd>+<kbd>Shift</kbd>+<kbd>S</kbd> 키를 눌러 파일을 저장합니다.](https://geekorea.com/wp-content/uploads/2024/01/03.enable_hyper-v_win11_home.png)
파일을 저장할 때 ‘파일 형식’은 "모든 파일(.)"을 선택하고 파일 이름을 지정합니다.
예를 들어 파일 이름을 "Hyper-v"로 변경 후 ".bat" 확장자를 추가하여 배치 파일로 저장합니다.