
How to inset the safe area with custom content
How to inset the safe area with custom content 관련

Updated for Xcode 15
New in iOS 15
SwiftUI provides a safeAreaInset() modifier that lets us place content outside the device's safe area, while also having other views adjust their layout so their content remains visible – it effectively shrinks the safe area to ensure all content can be seen as intended. This is different from ignoresSafeArea(), which merely extends a view's edges so they go edge to edge.
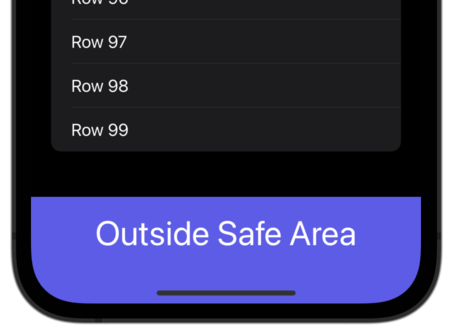
For example, a list would normally scroll to the very end of the screen, but we could place something outside the safe area at the bottom and have the list automatically adjust its insets so all its contents are visible when we scroll to its end:
NavigationStack {
    List(0..<100) { i in
        Text("Row \(i)")
    }
    .navigationTitle("Select a row")
    .safeAreaInset(edge: .bottom) {
        Text("Outside Safe Area")
            .font(.largeTitle)
            .foregroundStyle(.white)
            .frame(maxWidth: .infinity)
            .padding()
            .background(.indigo)
    }
}
Important
Before iOS 15.2 this worked only with ScrollView, but from 15.2 and later this also works with List and Form.
If you need extra space between your content and the safe area inset content, add a spacing parameter like this: .safeAreaInset(edge: .bottom, spacing: 20).
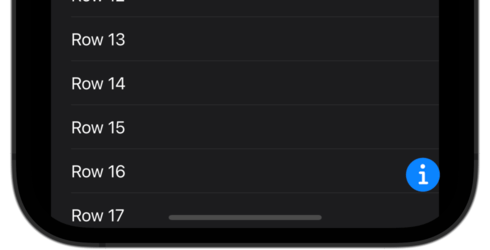
You can also add an alignment to your safe area inset content, which is useful for times when it doesn't take up the full amount of available space. For example, we could place an information button in the bottom trailing corner like this:
NavigationStack {
    List(0..<100) { i in
        Text("Row \(i)")
    }
    .navigationTitle("Select a row")
    .safeAreaInset(edge: .bottom, alignment: .trailing) {
        Button {
            print("Show help")
        } label: {
            Image(systemName: "info.circle.fill")
                .font(.largeTitle)
                .symbolRenderingMode(.multicolor)
                .padding(.trailing)
        }
        .accessibilityLabel("Show help")
    }
}
Tips
You can apply safeAreaInset() multiple times if needed, and each inset will take into account the previous insets.
Similar solutions…
