Fetch API
Fetch API 관련

🏝 1. What is the Fetch API
1.1 Introduction
The Fetch API is a modern JavaScript API for making web requests. It provides a cleaner, more flexible way to send and receive data and replaces the traditional XMLHttpRequest. The Fetch API uses Promise objects to handle asynchronous operations, making handling web requests more intuitive and easy to use.
1.2 Use Case
The Fetch API is mainly used to fetch data from the server, send data to the server or communicate with remote APIs. It supports various types of web requests, such as fetching text, JSON, XML or binary data, as well as sending form data or uploading files.
The Fetch API is widely used in modern front-end development, especially for building single-page applications, interacting with data using RESTful APIs, implementing asynchronous data loading, and other scenarios.
🎨 2.How to use the Fetch API
Using the Fetch API is very simple and intuitive. The following is a basic usage example showing how to send a GET request and handle the response:
fetch("https://api.example.com/data")
  .then((response) => response.json())
  .then((data) => {
    console.log(data);
  })
  .catch((error) => {
    console.error(error);
  });
In this code, we use the fetch() function to send a GET request to the specified URL and then use the .then() method to process the returned response. In the first .then(), we call response.json() to convert the response to JSON formatted data. In the second .then(), we can access the fetched data and process it.
If there is an error in the request, we can use the .catch() method to catch and handle the error.
In addition to GET requests, the Fetch API also supports other types of requests such as POST, PUT, DELETE, etc. You can send different types of requests by setting the request method, header information, and request body. For more information about the usage and parameter settings of the Fetch API, please refer to the official documentation: Fetch API - MDN Web Docs
🧭 3. Examples of the Fetch API
The Fetch API has a wide range of uses in real-world applications. The following are some common real-world application scenarios:
3.1 Data fetching and displaying
The Fetch API allows you to fetch data from the server and present it on the page. You can fetch data in JSON, XML, or other formats and present it to the user.
fetch("https://api.example.com/data")
  .then((response) => response.json())
  .then((data) => {
    // Process the acquired data and display it on the page
    const container = document.getElementById("data-container");
    data.forEach((item) => {
      const element = document.createElement("p");
      element.textContent = item.name;
      container.appendChild(element);
    });
  })
  .catch((error) => {
    // Handling request errors
    console.error(error);
  });
The above code fetches data from the server through the Fetch API and displays it on the page. Assuming there is a container element with id data-container on the page, the fetched data is itemized to create <p> elements and added to the container for display.
3.2 Form Submission and Validation
The Fetch API can be used to send user-entered form data to the server for processing. You can use the Fetch API to send POST requests and have the data validated and processed on the server side.
3.3 File Uploads
Using the Fetch API, you can send requests containing files to enable file uploads. This is useful for building applications such as image uploads, file storage, etc.
const fileInput = document.getElementById("file-input");
const uploadButton = document.getElementById("upload-button");
uploadButton.addEventListener("click", () => {
  const file = fileInput.files[0];
  const formData = new FormData();
  formData.append("file", file);
  fetch("https://api.example.com/upload", {
    method: "POST",
    body: formData,
  })
    .then((response) => {
      if (response.ok) {
        // File uploaded successfully
        console.log("File uploaded successfully");
      } else {
        // File upload failed
        console.error("File upload failed");
      }
    })
    .catch((error) => {
      // Handling request errors
      console.error(error);
    });
});
The above code implements the file upload function through the Fetch API. It listens to the click event of the upload button, gets the file selected by the user and sends the file to the server’s upload interface in the form of FormData. Note that the URL https://api.example.com/upload and the ids file-input and upload-button of the form elements in the above code are only schematic, you need to replace them with the actual upload interface and page elements.
3.4 Asynchronous data loading
The asynchronous nature of the Fetch API makes it ideal for asynchronous data loading. You can use the Fetch API to request data while the page is loading to avoid blocking page rendering and to process the data accordingly once it has finished loading.
// Loading data asynchronously
fetch("https://api.example.com/data")
  .then((response) => response.json())
  .then((data) => {
    // Processing the acquired data
    console.log(data);
  })
  .catch((error) => {
    // Handling request errors
    console.error(error);
  });
The above code uses the Fetch API to load data asynchronously and process it accordingly once it is fetched. Assuming that the data returned by the server is in JSON format, we parse the response data into JavaScript objects by calling the response.json() method.
3.5 Cross-domain requests
The Fetch API has built-in support for cross-domain requests, so it can easily handle cross-domain requests. This is useful when interacting with data from servers in different domains.
// Sending cross-domain requests
fetch("https://api.example.com/data", {
  mode: "cors",
  headers: {
    "Content-Type": "application/json",
    "Access-Control-Allow-Origin": "https://example.com",
  },
})
  .then((response) => response.json())
  .then((data) => {
    // Handling fetched cross-domain data
    console.log(data);
  })
  .catch((error) => {
    // Handling request errors
    console.error(error);
  });
This code snippet shows how to send a cross-domain request. In the request parameters, we set mode: 'cors' to indicate that cross-domain requests are allowed, and we specify the domain name for which cross-domain access is allowed by setting the 'Access-Control-Allow-Origin' field in the request header. Note that the success of a cross-domain request is also limited by the server-side configuration, and the server needs to set the correct response headers to allow cross-domain requests.
The above are just some common application scenarios of the Fetch API, in fact, it is used in front-end development in a wide range of applications, covering a variety of data interaction and network request needs.
📋 4. Compatibility and advantages and disadvantages
4.1 Compatibility
The following are the compatibility profiles of the Fetch API in common modern browsers:
- Chrome 40+ ✅
- Firefox 39+ ✅
- Safari 10.1+ ✅
- Edge 14+ ✅
For Internet Explorer (IE), the Fetch API is not supported in IE11 and earlier.
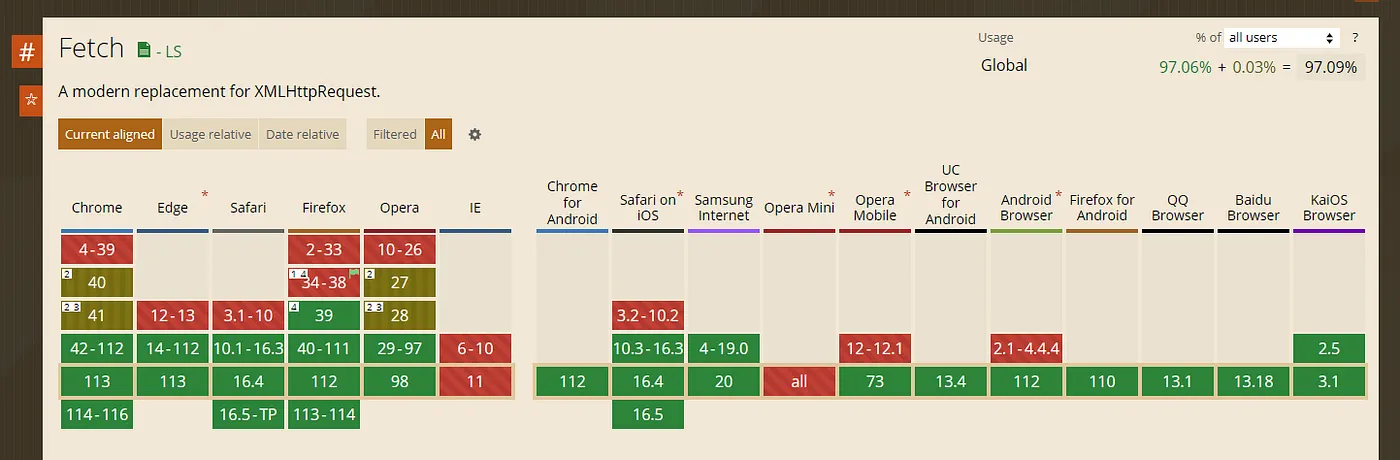
For detailed compatibility information, please visit Can I use Fetch.
4.2 Pros and Cons
The Fetch API brings many advantages, but there are also some limitations and disadvantages: Pros:
- Simplicity and ease of use: The Fetch API provides a concise syntax and chained calls that make sending and processing network requests more intuitive and easy to understand.
- Support for Promise: The Fetch API uses Promise objects to handle asynchronous operations, making it more flexible and convenient to handle requests and responses.
- Built-in cross-domain request support: The Fetch API supports cross-domain requests by default, with no additional configuration required.
- Streaming data support: The Fetch API supports handling streaming data, making it more efficient to handle large data or streaming data.
Disadvantages:
- No support for synchronous requests: The Fetch API only supports asynchronous requests, not synchronous ones. This means that in some specific scenarios, it may be necessary to use other ways to handle the need for synchronous requests.
- Compatibility issues: Some older browsers do not support the Fetch API, and compatibility issues need to be considered and downgraded accordingly.
4.3 Tool recommendations
The following are some third-party libraries based on the Fetch API wrapper:
- axios: 100k⭐, A Promise-based HTTP client that provides a clean and easy to use API.
- SuperAgent: 16.3k⭐, A lightweight Ajax client library with support for chain calls and promises.
- Fetch API Polyfill: 26k⭐, A polyfill library for Fetch API, provides compatibility support in browsers that do not support Fetch API.
- isomorphic-fetch: 7k ⭐, A library providing compatibility support for Fetch API in browsers and environments such as Node.js.
👍 5. Usage suggestions and considerations
The following are some recommendations and considerations when using the Fetch API:
1. Exception Handling
Use the ₩ method to catch errors that may occur during the request and handle them appropriately, such as displaying an error message to the user or performing an alternate action.
2. Cross-domain requests
When making a cross-domain request, make sure that the response headers (e.g. CORS) are configured on the server side to allow cross-domain access. Otherwise, cross-domain requests may be limited.
3. Request and Response Processing
Set the request method, header information and request body as needed, and use appropriate methods (e.g. response.json(), response.text(), etc.) in the response to parse and process the returned data.
4. Data format processing
According to the data format returned by the server, use the corresponding methods (such as response.json(), response.text()) to parse the response data.
5. Compatibility considerations
If the Fetch API needs to be used in older browsers, consider using polyfill or using the legacy XMLHttpRequest for compatibility.
6. Performance optimization
When sending requests, you can use request header information, request methods and cache settings to optimize request performance and network resource utilization.
🍭 6. Summary
The Fetch API is a powerful tool for making network requests in modern JavaScript. It provides a clean and easy-to-use syntax and Promise support that makes handling network requests intuitive and convenient.
By understanding the concepts, usage, and real-world scenarios of the Fetch API, you can have more flexibility in front-end development to handle data interaction, asynchronous data loading, and communication with the server.
🎯 7. Extensions
If you want to dive deeper into more of the Fetch API, you can refer to the following resources:
- Fetch API — MDN Web Docs: MDN Web Docs provides detailed documentation of the Fetch API, including usage examples and parameter descriptions.
- Using Fetch — Google Developers: Google Developers provides a detailed introduction and examples of using Google Developers provides a detailed introduction and examples of using the Fetch API.
- Fetch API Polyfill: If you need to use the Fetch API in an older browser, consider using the Fetch API Polyfill.
- Ajax vs Fetch: Which Should You Choose: This article compares traditional Ajax requests and the Fetch API to help you understand when to choose to use the Fetch API.
- Fetch API vs Axios: Which Should You Choose: This article compares the Fetch API and Axios, two popular web request tools, to help you choose the right tool for your project.