Loading Core Data objects using NSFetchRequest and NSSortDescriptor
Loading Core Data objects using NSFetchRequest and NSSortDescriptor 관련

This is where Core Data starts to become interesting and perhaps – gasp! – even fun. Yes, I know it's taken quite a lot of work to get this far, but I did warn you, remember?
Step four is where we finally get to put to use all three previous steps by showing data to users. After the huge amount of work you've put in, particularly in the previous step, I'm sure you'll be grateful to see everything pay off at last!
In our project, we know we're using Commit objects to represent individual GitHub commits, so we need to store those objects in an array property. Add this to the ViewController class now:
var commits = [Commit]()
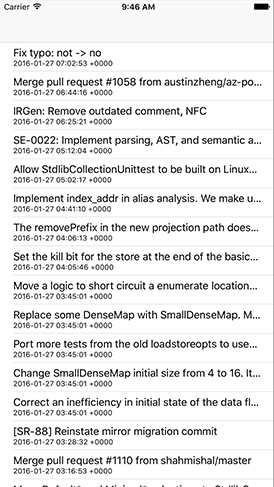
We now need to write the usual table view methods, numberOfRowsInSection and cellForRowAt. The former will just return the size of the commits array, and the latter will place each commit’s message and date into the cell’s textLabel and detailTextLabel. There are lots of ways to convert dates to and from strings – you already saw ISO8601DateFormatter, for example – but here we’re just going to use the simplest: every Date object has a description property that converts it to a human-readable string.
For a change, we’re also going to write a third method that reports how many sections are in the table view. This returns 1 by default, and our new method will also return 1, but this will become useful later on.
Add these three methods now:
override func numberOfSections(in tableView: UITableView) -> Int {
    return 1
}

override func tableView(_ tableView: UITableView, numberOfRowsInSection section: Int) -> Int {
    return commits.count
}

override func tableView(_ tableView: UITableView, cellForRowAt indexPath: IndexPath) -> UITableViewCell {
    let cell = tableView.dequeueReusableCell(withIdentifier: "Commit", for: indexPath)

    let commit = commits[indexPath.row]
    cell.textLabel!.text = commit.message
    cell.detailTextLabel!.text = commit.date.description

    return cell
}
With that change made, we need to write one new method in order to make our entire app spring into life. But before we jump into the code, you need to learn about one of the most important classes in Core Data: NSFetchRequest. This is the class that performs a query on your data, and returns a list of objects that match.
We're going to use NSFetchRequest in a really basic form for now, then add more functionality later. In this first version, we're going to ask it to give us an array of all Commit objects that we have created, sorted by date descending so that the newest commits come first.
The way fetch requests work is very simple: you create one from the NSManagedObject subclass you’re using for your entity, then pass it to managed object context’s fetch() method. If the fetch request worked then you'll get back an array of objects matching the query; if not, an exception will be thrown that you need to catch.
The sorting is done through a special data type called NSSortDescriptor, which is a trivial wrapper around the name of what you want to sort (in our case "date"), then a boolean setting whether the sort should be ascending (oldest first for dates) or descending (newest first). You pass an array of these, so you can say "sort by date descending, then by message ascending," for example.
OK, time for some code, and I hope you'll be pleasantly surprised by how easy it is:
func loadSavedData() {
    let request = Commit.createFetchRequest()
    let sort = NSSortDescriptor(key: "date", ascending: false)
    request.sortDescriptors = [sort]

    do {
        commits = try container.viewContext.fetch(request)
        print("Got \(commits.count) commits")
        tableView.reloadData()
    } catch {
        print("Fetch failed")
    }
}
So, that creates the NSFetchRequest, gives it a sort descriptor to arrange the newest commits first, then uses the fetch() method to fetch the actual objects. That method returns an array of all Commit objects that exist in the data store. Once that's done, it's just a matter of calling reloadData() on the table to have the data appear.
To make the app work, we need to call this new loadSavedData() method in two places. First, add a call at the end of the viewDidLoad() method. Second, add a call in the fetchCommits() method, just after where we have self.saveContext(). You will, of course, need to use self.loadSavedData() in that instance.
Again, I've written a simple print() statement when errors occur, but in your own production apps you will need to show something useful to your user.
Good news: that completes all four basic bootstrapping steps for Core Data. We have defined our model, loaded the data store and managed object context, fetched some example data and saved it, and loaded the resulting objects. You should now be able to run your project and see it all working!