
01. Setup
01. Setup 관련
Project Setup
Once you have checked off the list of prerequisites, it's time to create a new Quarkus project. There are multiple ways to do this, but for simplicity, I will use the Quarkus project configurator. This tool empowers you to quickly assemble a complete build file with the necessary dependencies.
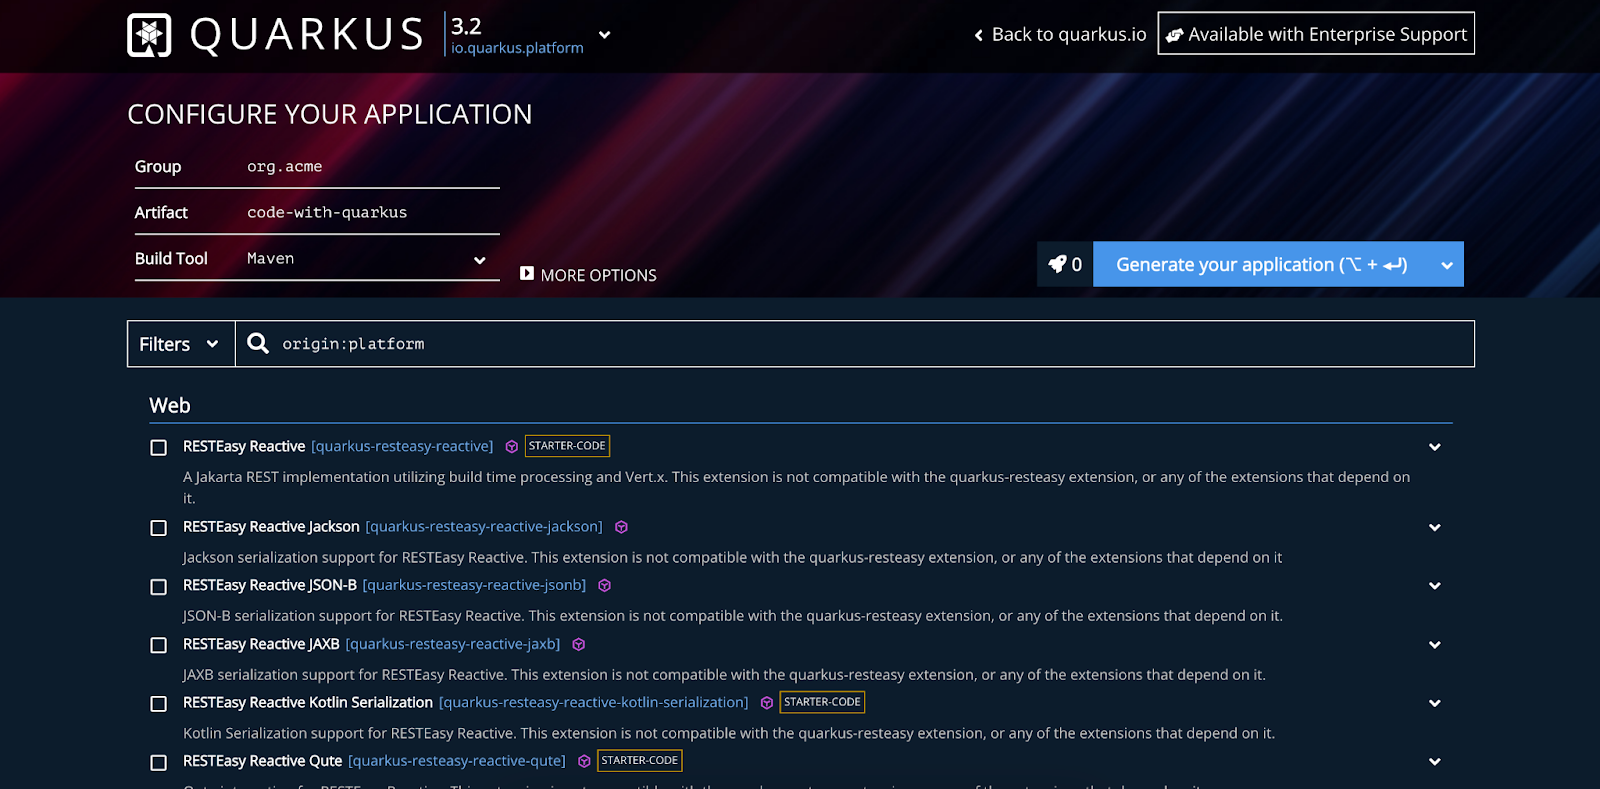
Start by selecting a Quarkus version at the top of the page. I recommend using the latest version or selecting a LTS release, e.g. 3.2 (the latest at the time of writing). After naming your project appropriately go ahead and select the following dependencies:
- Hibernate ORM with Panache: Handles database interactions
- JPAStreamer: Hibernate extension for intuitive and type-safe queries
- SmallRye OpenAPI: Enables Swagger UI for sending test requests
- RESTEasy Reactive Jackson: Facilitates easy setup REST endpoints
- JDBC Driver - MySQL: Our database driver
Then simply press “Generate your application” to download a project ZIP-file.
You can download a Quarkus starter with my exact settings via this link.
From here, open up the project in your IDE of choice. Taking a quick look at the project structure, you'll notice that Quarkus has organized the project in a familiar Maven structure, with a pom.xml file for dependencies and project configuration.
quarkus-tutorial
     |- src
     |   |- main
     |   |   |- java
     |   |   |- resources
     |- src
If you peek into the pom.xml file you’ll find the selected dependencies. Also note that JUnit was automatically added for the continuous testing phase later.
Database Setup
As I dive into the realm of new technologies, I often include Oracle's sample database Sakila in my development playground as it is easily available as a Docker image. This project is no exception.
Sakila models an old-fashioned video rental store, the kind where you'd eagerly await a film on tape or DVD. Naturally, the core of this database centers around the Film table, complemented by various supporting tables – think Inventory, Customer, and Payment. For this demo, our focus will be on serving information about films and the actors starring in those films. The Film and Actor tables share a Many-to-Many relationship – a film can boast many actors, and conversely, an actor can star in numerous films.
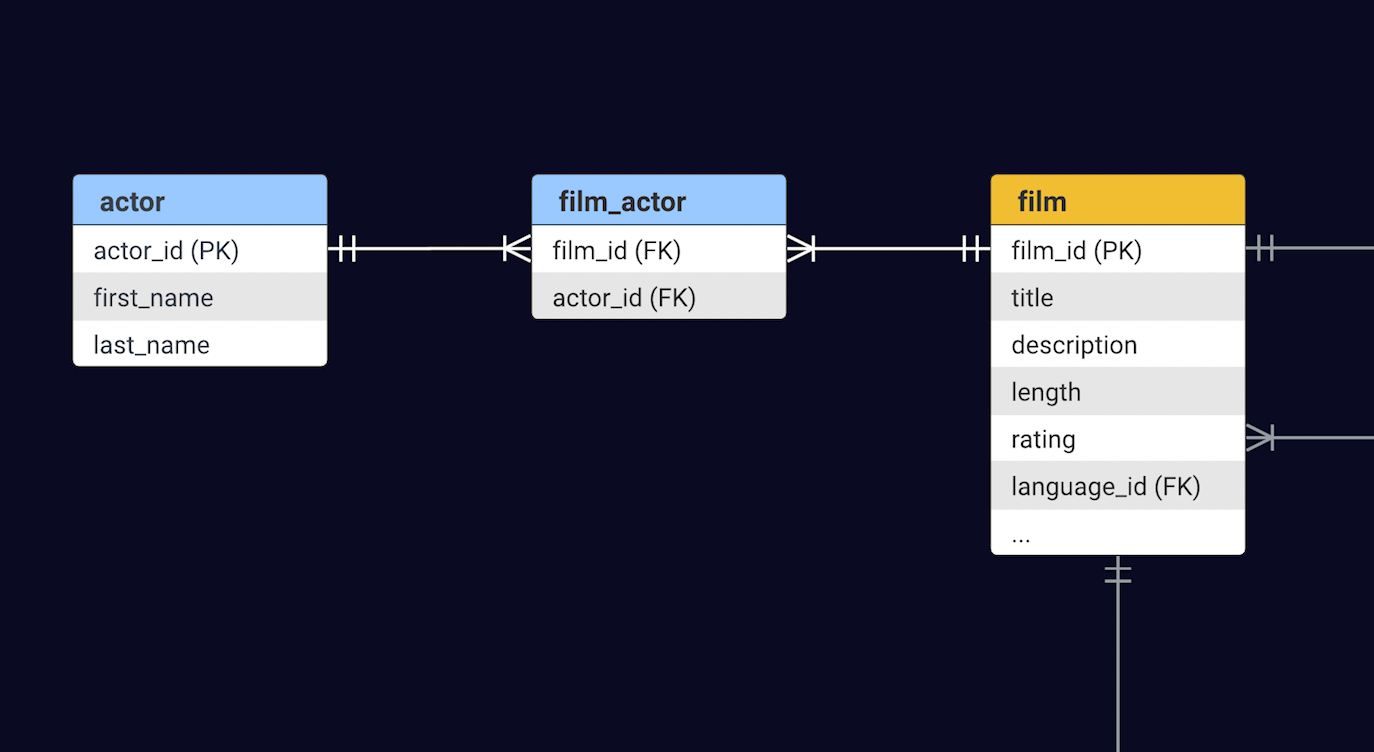
film, actor and film_actor table.Sakila Database
jOOQ/sakila is a nicely normalised database modelling a DVD rental store (for those of you old enough to remember what that is). Its design includes a few nice features:
- Many to many relationships
- Multiple paths between entities (e.g. film-inventory-rental-payment vs film-inventory-store-customer-payment) to practice joins
- Consistent naming of columns
- Primary keys are called
[tablename]_[id] - Foreign keys are called like their referenced primary key, if possible. This allows for using
JOIN .. USINGsyntax where supported - Relationship tables do not have any surrogate keys but use composite primary keys
- Every table has a
last_updateaudit column - A generated data set of a reasonable size is available
- Primary keys are called
To download and initiate the database on port 3306, use the Docker CLI.
docker run --platform linux/amd64 \
  -d -it \
  --name sakila \
  --publish 3306:3306 \
  restsql/mysql-sakila:latest
#
# Unable to find image 'restsql/mysql-sakila:latest' locally
# latest: Pulling from restsql/mysql-sakila
# d54efb8db41d: Download complete
# f8b845f45a87: Download complete
# e8db7bf7c39f: Download complete
# 9654c40e9079: Download complete
# 6d9ef359eaaa: Download complete
# 9fc85a5d43a6: Download complete
# 095c073d31fa: Download complete
# 3aba1b8904c8: Download complete
# 253ef57834ca: Download complete
# b771e54105b2: Download complete
# Digest: sha256:8510e8f1957548d7acb942456f4469bbfd7680da2afdbce0be9819281cc9fd7f
# Status: Downloaded newer image for restsql/mysql-sakila:latest
# 5f73bcc57e2b9514e657a711f3a9234db3f0b44b26763d6bd4347c66c42be647
The --platform flag instructs Docker to accept the Sakila Linux AMD64 image regardless of the local platform. In my experience, it runs fine on other platforms.
Upon running this command, you should observe the image being downloaded and launched.
Hibernate Setup
To facilitate database interactions via Hibernate, a bit of setup is required. While Hibernate in the Quarkus domain behaves much like standard Hibernate in any Java application, you will configure Hibernate in the application.configuration file. Secondly we will generate the JPA boilerplate with assistance from IntelliJ.
Configuring Hibernate
The application.configuration file is located in the /resources folder of the project template you initially downloaded. This file serves as a hub, catering to various potential Quarkus dependencies and extensions. This means our database configuration will not be Hibernate-specific; any framework needing database interaction can make use of this configuration.
Yet, the setup is similar to regular Hibernate database configuration. Assuming you are running the Sakila database as instructed, you need to define the MySQL JDBC driver, specify the JDBC URL for localhost on port 3306, and provide the username ‘root’ and password ‘sakila’.
quarkus.datasource.jdbc.driver=com.mysql.cj.jdbc.Driver
quarkus.datasource.jdbc.url=jdbc:mysql://localhost:3306/sakila
quarkus.datasource.username=root
quarkus.datasource.password=sakila
Additionally, I recommend setting hibernate-orm.log.sql to true, as this will ensure that all Hibernate queries are logged, simplifying the inspection of JPAStreamer queries later.
quarkus.hibernate-orm.log.sql=true
Creating the JPA Metamodel
To manipulate the data, you will need a JPA model with an Entity representing each table. As this is not an in-depth Hibernate guide, I will advise you to take a shortcut and generate some JPA boilerplate that only needs slight modifications to fit your needs. If you are using IntelliJ you can follow in my footsteps, otherwise, you will have to consult the documentation of your IDE.
Start by connecting to the database in IntelliJ by navigating to [File] > [New] > [Data Source] and selecting a MySQL instance. Then populate the fields of the dialog with the same connection URL, username, and password as in the previous section Configuring Hibernate.
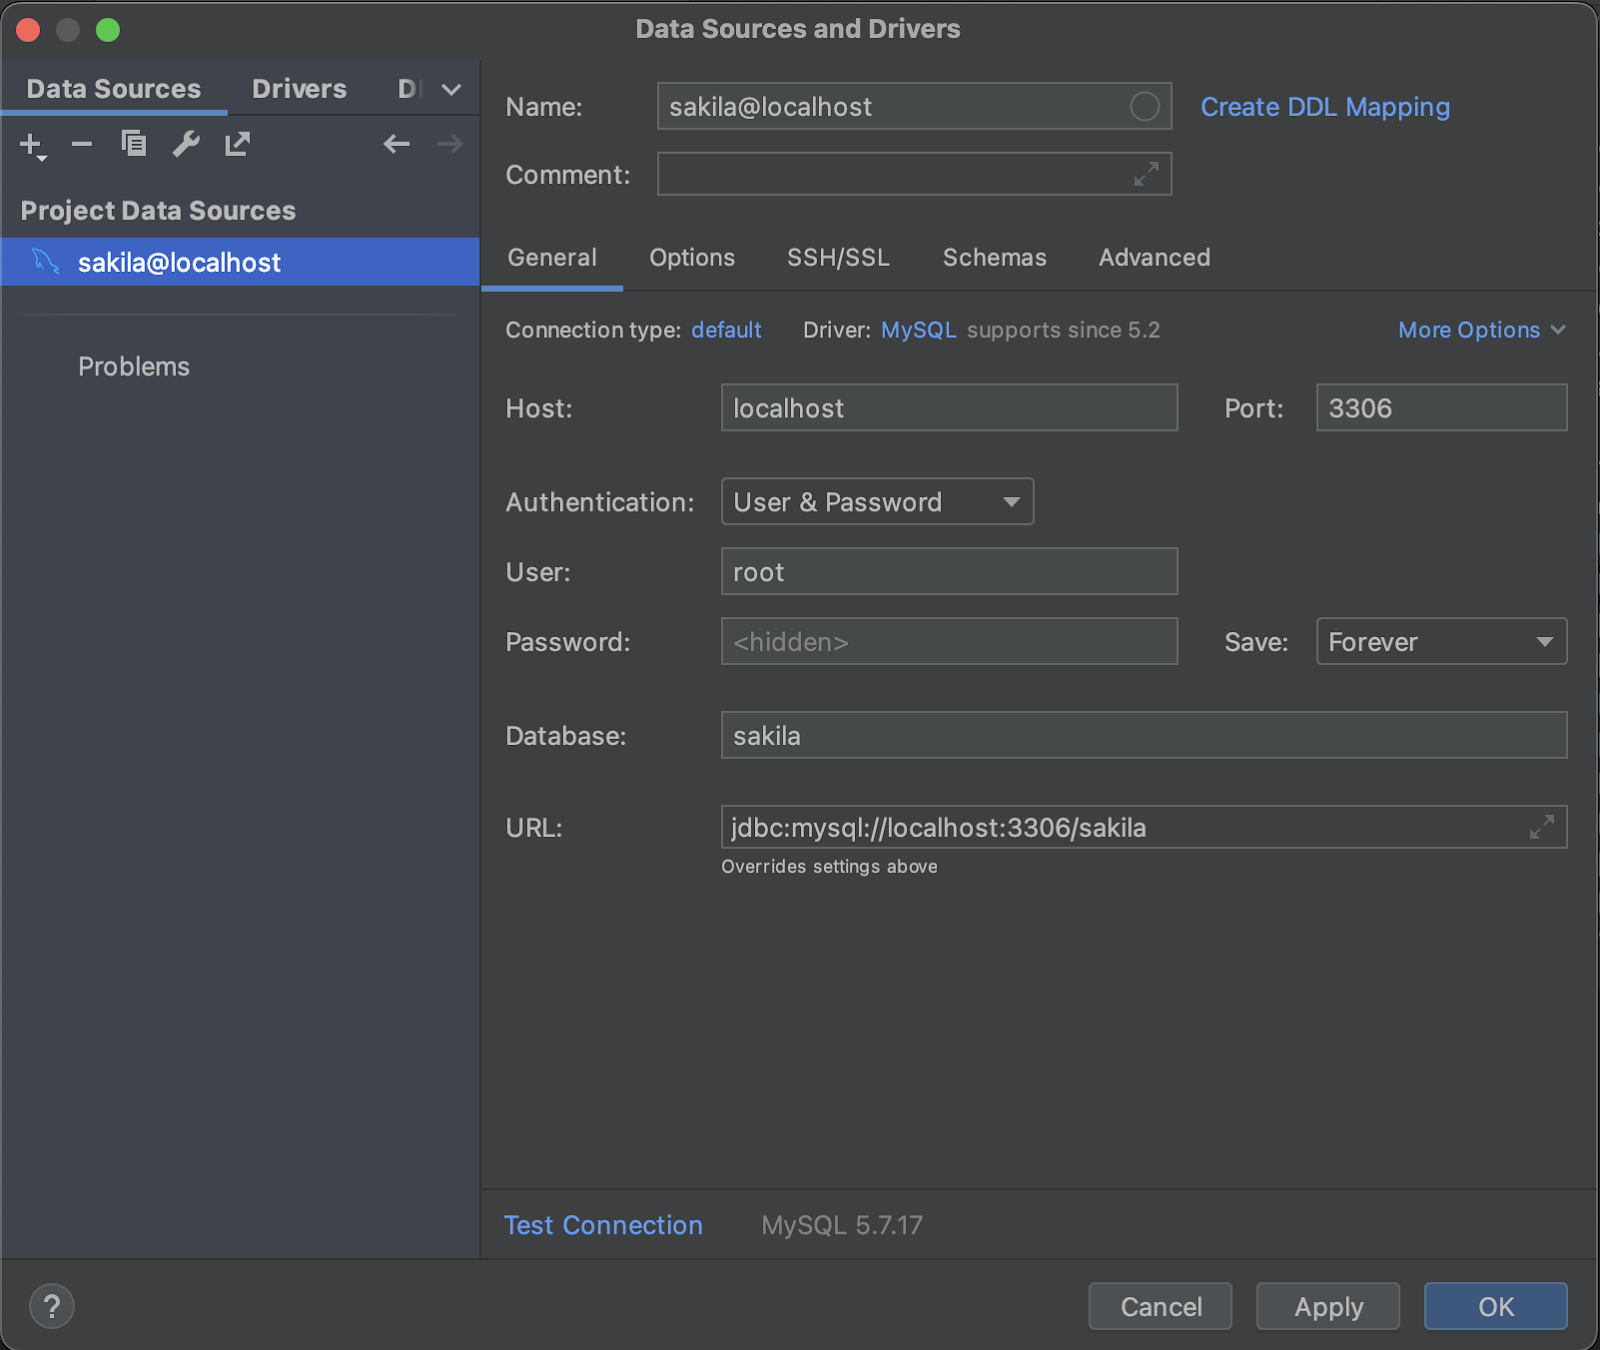
The database connection dialog, with database settings applied. After pressing OK, you should be able to view the contents of the database to confirm that the connection was established correctly. If the database appears empty despite it connecting, trigger a database reload to ensure that the table data is fetched correctly.
Now that our database is linked to IntelliJ, generating entities is straightforward. A simple right-click on the connected database leads you to "[Generate Persistence Mapping.]" Select where to place your generated entities (a package), and deselect all tables apart from Film and Actor as these are the only ones we will be working with. Click [OK] again, and the JPA entities for these tables are generated in a blink.
Next, you need to make a few modifications to the generated classes. JPA offers a myriad of annotations for fine-tuning these mappings, but I will only cover what is necessary for the purposes of this application.
Start by declaring which table and schema the two generated classes map to like this:
@Table(name = "film", schema = "sakila")
public class Film { … }
@Table(name = "actor", schema = "sakila")
public class Actor { … }
Then either remove the fields rating and special_features from the Film.class, or improve the mappings to impose some restraints on the values as follows:
@Basic
@Column(name = "rating", columnDefinition = "enum('G','PG','PG-13','R','NC-17')")
private String rating;
@Basic
@Column(name = "special_features", columnDefinition = "set('Trailers', 'Commentaries', 'Deleted Scenes', 'Behind the Scenes')")
private String specialFeatures;
You also need to manually define the Many-to-Many relationship between the Film and Actor table. This requires some updates to both classes.
First, the Film entity requires a field named "actors," intended to house references to the actors featured in a specific film. This linkage is established through the @ManyToMany mapping and @JoinTable annotation that describes the join. Recall the name of the join_table and the foreign keys from the schema in the database introduction above.
@ManyToMany(cascade = { CascadeType.PERSIST, CascadeType.MERGE })
@JoinTable(
	name = "film_actor",
	joinColumns = { @JoinColumn(name = "film_id") },
	inverseJoinColumns = { @JoinColumn(name = "actor_id") }
)
private List<Actor> actors = new ArrayList<>();
Likewise, the Actor class need a field films to house the set of films that the actor starred in. As you have already described the join in the Actor class, this field merely needs a reference to the above mapping as follows:
@ManyToMany(mappedBy = "actors")
private Set<Film> films = new HashSet<>();
As a final step, go ahead and generate getters and setters for all the fields in both the Film and Actor class. You chose if you do it manually or generate them with IntelliJ.
JPAStreamer Setup
JPAStreamer empowers you to craft complex Java Stream queries. To seamlessly convert these Streams into SQL queries upon execution, JPAStreamer utilizes its dedicated metamodel to create intelligible predicates. Although a standard lambda might serve for filtering, it lacks the details required for JPAStreamer to convert the Stream pipeline into a query.
In the prior example, you'll notice the use of an entity named Film$. This entity belongs to the JPAStreamer metamodel and allows you to articulate these straightforward predicates that JPAStreamer comprehends.
List<Film> films = jpaStreamer.stream(Film.class)
	.filter(Film$.title.startsWith("A")
		.and(Film$.length.greaterThan(60))
	.limit(10)
	.collect(Collectors.toList());
Thankfully, the JPAStreamer metamodel is created automatically for you once you have a JPA metamodel in place. Thus simply go ahead and rebuild your application.
The metamodel finds its place in the target directory, meaning it won’t be detected as source code by default. To remedy this, you need to designate the generated-sources folder as a ["Generated Sources Root"] by right-clicking it. If all went well, your generated-sources folder should contain a Film$.class and Actor$.class.
Beware that if you modify your JPA model at any point, you will need to rebuild the project to synchronize changes with the JPAStreamer metamodel. It's also worth mentioning that the name and location of the generated metamodel can be tailored using environment variable properties. You can see how that is done in the JPAStreamer docs.
