
02. Getting Started
02. Getting Started 관련
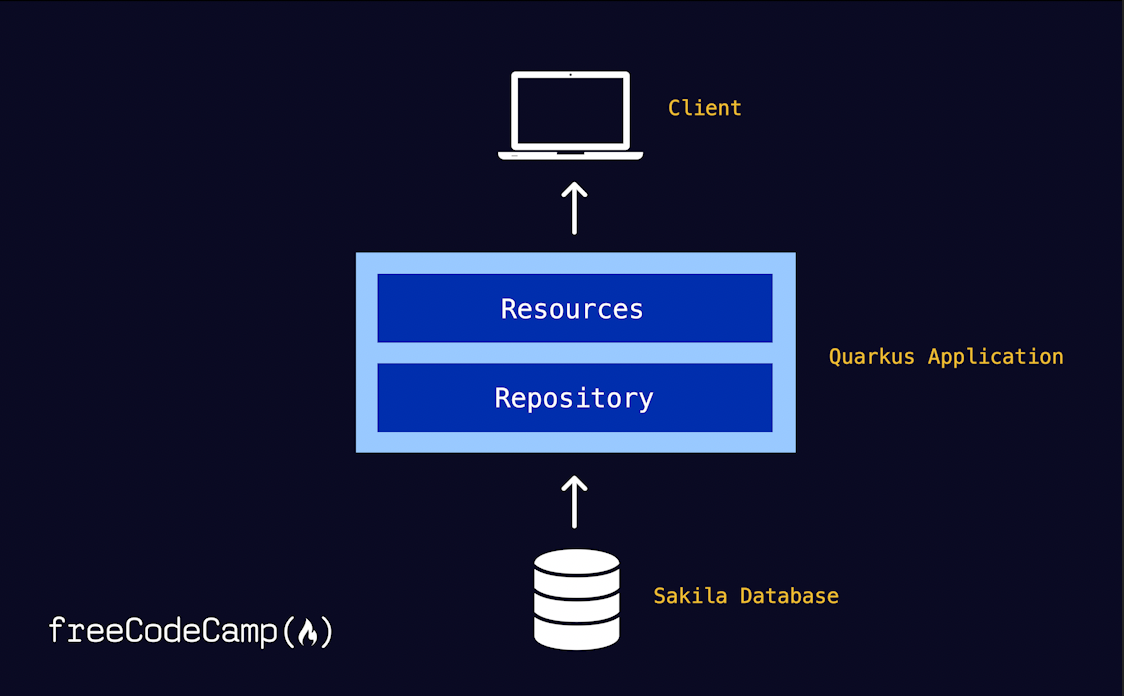
It is now time to look at the application architecture. The objective is to establish endpoints that serve film-related information to clients. For the sake of clarity and separation of concerns, I've chosen to adopt a straightforward Repository Pattern.
Below is a snapshot of how the architectural pieces will fit together when you are done. The Resources class takes on the responsibility of delivering database-derived content to clients. However, this class refrains from conducting the actual database interactions; instead, this task is entrusted to the Repository. This architectural approach neatly segregates the data layer from the other facets of our application.
quarkus-tutorial
	|- src
	|   |- main
	|   |   |- java
	|   |   |	   |- com.freecodecamp.app
	|   |   |	   |   |- FilmResource.java
	|   |   |	   |   |- model
	|   |   |	   |      |- Film.java
	|   |   |	   |      |- Actor.java
	|   |   |	   |   |- repository
	|   |   |	   |   	|- FilmRepository.java
	|   |   |- resources
	|   |   |	   |   |- application.properties
|- src
Hello World!
To grasp the rhythm of development with Quarkus, let's begin with crafting a classic "Hello World" endpoint.
Start by establishing the FilmResource class, positioned a tier above your data model package:
@Path("/")
public class FilmResource {

	@GET
	@Path("/hello")
	@Produces(MediaType.TEXT_PLAIN)
	public String helloWorld() {
		return "Hello world!";
	}
}
The @Path annotation ensures that your Resteasy servlet is kick-started as the application launches and open the endpoint /hello for requests.
Running in Quarkus Dev Mode
With a simple endpoint in place, I suggest you start the application to validate the functionality and enjoy the experience of the Quarkus dev mode. Use the following command to fire up the app in your terminal:
quarkus dev
gradlew quarkusDev
mvn quarkus:dev
When your application starts you should be greeted by the Quarkus prompt, indicating that your app is running on the default port 8080 and that live coding has been activated.
Listening for transport dt_socket at address: 5005
__  ____  __  _____   ___  __ ____  ______
 --/ __ \/ / / / _ | / _ \/ //_/ / / / __/
 -/ /_/ / /_/ / __ |/ , _/ ,< / /_/ /\ \
--\___\_\____/_/ |_/_/|_/_/|_|\____/___/
2023-08-14 14:14:01,731 INFO  [io.quarkus] (Quarkus Main Thread) quarkus-tutorial 1.0.0-SNAPSHOT on JVM (powered by Quarkus 3.1.3.Final) started in 2.210s. Listening on: http://localhost:8080
2023-08-14 14:14:01,733 INFO  [io.quarkus] (Quarkus Main Thread) Profile dev activated. Live Coding activated.
You can now visit http://localhost:8080/hello to confirm that you are greeted by the expected response “Hello world!”.
If this is your first time using the Quarkus dev mode seize the opportunity and make a duplicate of your first endpoint. A minor tweak, even as small as a single character, will suffice to set it apart from the original. Next, tap the s key in your terminal to swiftly restart the application. The restart takes place in the blink of an eye, granting you access to your new endpoint moments later in the browser. @tab This dynamic approach prevents the dreaded scenario of accumulating changes only to realize that the application is non-operational upon compiling. You also no longer need to endure lengthy compilation times when iterating over small tweaks to algorithms or code snippets. It's a really swift and agile method for interactive development.
Before we move on, here are a few basic commands that are good to know:
[s] - Force restart
[h] - Display help
[q] - Quit
