Installing and Starting JupyterLab
Installing and Starting JupyterLab 관련

The cleanest way of installing JupyterLab on a computer is to use a virtual environment. This will ensure that your JupyterLab work doesn't interfere with any other Python projects or environments that you may already have. For this tutorial, you'll create a new virtual environment named jl_venv. Select your operating system to get JupyterLab up and running:
Powershell
If you haven't already done so, download and install Python on your Windows computer. Then fire up a Windows PowerShell(Admin) or Terminal(Admin) prompt depending on the version of Windows that you're using. Now type in the following commands:
mkdir jupyterlab_projects
cd jupyterlab_projects
python -m venv jl_venv
jl_venv\Scripts\activate
python -m pip install jupyterlab
To keep things neat, you first create a new jupyterlab_projects folder for all of your JupyterLab work. Later you'll create individual subfolders for each of your projects to keep everything organized.
Next, you create a virtual environment named jl_venv within this folder, which you then activate. If the activation is successful, then the virtual environment's name will precede your Powershell prompt. If not, see the alert box below. Finally, you install JupyterLab into this virtual environment.
Note
When you run the activation script, you may receive an error stating that your system can't run the script. Modern versions of Windows don't allow you to run scripts downloaded from the Internet. This is a security feature.
To fix this, you need to type the command Set-ExecutionPolicy RemoteSigned, then answer Y to the question. Your computer will now run scripts that Microsoft has verified. Once you've done this, retry the jl_venv\Scripts\activate command, which should now work.
As you can see above, you have a PowerShell prompt that's preceded by (jl_venv). This means anything you do from this point forward will stay in this environment and remain separate from any other Python work that you may have elsewhere.
Finally, for neatness, you'll create a new folder named tutorial_project. This will serve as a working area for this tutorial. Then you start up JupyterLab from within it:
mkdir tutorial_project
cd tutorial_project
jupyter lab
Linux
To install JupyterLab, fire up a terminal and run the following commands:
mkdir jupyterlab_projects
cd jupyterlab_projects
python3 -m venv jl_venv
source jl_venv/bin/activate
python -m pip install jupyterlab
To keep things neat, you first create a new jupyterlab_projects directory for all of your JupyterLab work. Later you can create individual subdirectories for each of your projects to keep things organized.
Next, you create a virtual environment named jl_venv. If this command fails, see the alert box below. You then activate your virtual environment by running its activation script. Once the virtual environment is activated, its name precedes your terminal prompt. You install JupyterLab into this virtual environment.
Note
To create a virtual environment on Linux, you need to have the python3-venv package installed on your computer. If you don't have this, then run the command sudo apt-get install python3-venv before running the python3 -m venv jl_venv command once more.
Your terminal prompt now shows that (jl_venv) is the active environment. This means anything you do from this point forward will happen in this environment and remain separate from any other Python work that you may have elsewhere.
Finally, for neatness, you'll create a new directory named tutorial_project and then start up JupyterLab from within it:
mkdir tutorial_project
cd tutorial_project
jupyter lab
macOS
To install JupyterLab, fire up a terminal and run the following commands:
mkdir jupyterlab_projects
cd jupyterlab_projects
python -m venv jl_venv
source jl_venv/bin/activate
python -m pip install jupyterlab
To keep things neat, you first create a new jupyterlab_projects folder for all of your JupyterLab work. Later you can create individual subfolders for each of your projects to keep things organized.
Next, you create a virtual environment named jl_venv. You then activate your virtual environment by running its activation script. Once the virtual environment is activated, its name precedes your terminal prompt. You install JupyterLab into this virtual environment.
Finally, for neatness, you'll create a new folder named tutorial_project and then start up JupyterLab from within it:
mkdir tutorial_project
cd tutorial_project
jupyter lab
Of course, once you've finished this tutorial, you can delete tutorial_project and add in your own project-specific folders instead.
Note
If you wish, you could create a Samples subfolder within tutorial_project and save this tutorial's downloadable files into it. These include completed versions of the notebooks that you'll create later on, as well as some other files. This will also give you some files to play around with and will allow you to fully participate in the tutorial.
JupyterLab will start in your web browser, all ready for you to use. But before you dive in, you might want to know how to end your session:
- To shut JupyterLab down, make sure everything is saved, and then use File → Shut Down to close the application before closing your browser. This will close everything down cleanly. Closing the browser alone doesn't close the server, while crashing the server may cause data loss.
- To restart, open either Powershell or your terminal, navigate to your
jupyterlab_projectsfolder, then activatejl_venv. Finally, create or enter your specific project's folder then start JupyterLab as before. - To deactivate your virtual environment, use the
deactivatecommand. Your command prompt will return to normal.
Once you've installed and started JupyterLab, its server will start, along with a web browser connection to it. It may take a moment, but soon you'll be looking at its main interface:

Because this is your first time running JupyterLab, the front screen shown above contains only a single Launcher window. This is where you can access everything else that's on offer.
Note
Before you start using JupyterLab, you may like to change its appearance to make it easier for you to use. There are several options available to you:
- You can hide or display various screen regions using View → Appearance. This is useful if you have a small monitor.
- You can change the overall theme of the interface by opening Settings → Theme. Themes may help you see more clearly.
- You can also increase and decrease various font sizes using the options under Settings and Settings → Theme. These may help clarify text.
You can even use your favorite coding font by accessing Settings → Settings Editor and then scrolling down the list of settings on the left until you reach Notebook. Once you're there, fill out the font family and font size according to your preferences. Then close the Settings tab:
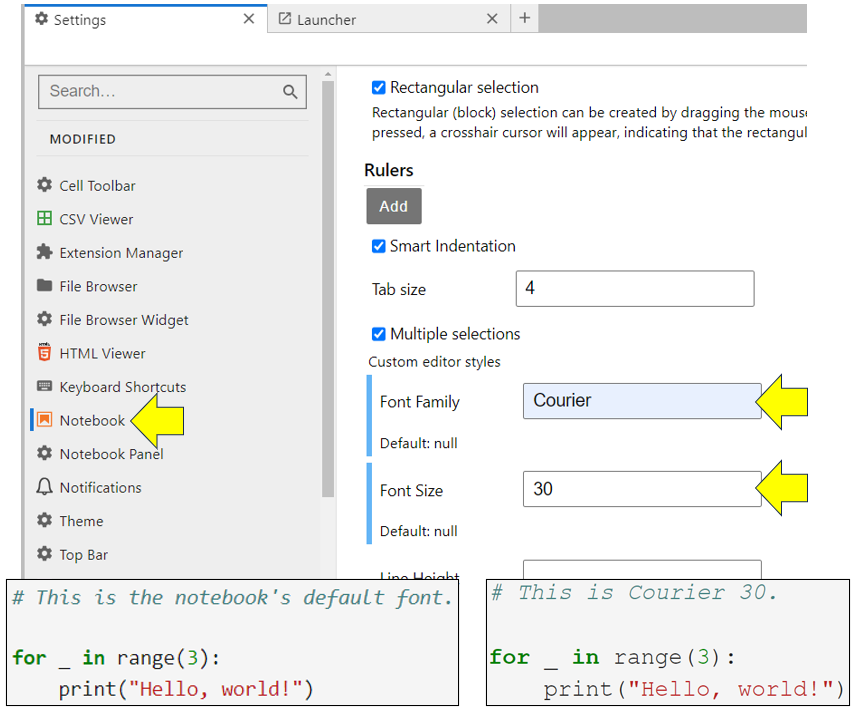
As you can see from the screenshot, you've updated the font within your notebooks. If you don't like your adjustments, then click the big red Restore to Defaults button that appears at the top-right of the Settings screen, and no harm done.
In the upcoming sections, you'll perform a range of tasks highlighting how JupyterLab's tools enhance the capability of notebooks. You'll also see some other interesting features as well.