
How to create a segmented control and read values from it
About 2 min
How to create a segmented control and read values from it 관련

SwiftUI by Example
Back to Home
How to create a segmented control and read values from it | SwiftUI by Example
How to create a segmented control and read values from it
Updated for Xcode 15
Updated for iOS 15
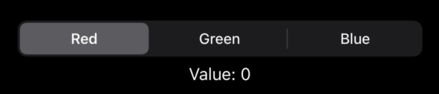
SwiftUI's Picker can also be used to create segmented controls equivalent to UISegmentedControl from UIKit, although it needs to be bound to some state and you must ensure to give each segment a tag so it can be identified. Segments can be text or pictures; anything else will silently fail.
As an example, this creates a segmented control that works with a favoriteColor state property, and adds a text view below that shows whichever value was selected:
struct ContentView: View {
    @State private var favoriteColor = 0

    var body: some View {
        VStack {
            Picker("What is your favorite color?", selection: $favoriteColor) {
                Text("Red").tag(0)
                Text("Green").tag(1)
                Text("Blue").tag(2)
            }
            .pickerStyle(.segmented)

            Text("Value: \(favoriteColor)")
        }
    }
}
Important
If you're using Xcode 12 you need to use SegmentedPickerStyle() rather than .segmented.
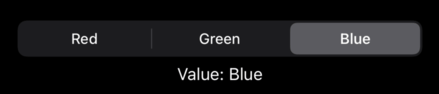
In this instance, though, it's better to create an array to store the various colors, then use ForEach to create the text view inside using a loop:
struct ContentView: View {
    @State private var favoriteColor = "Red"
    var colors = ["Red", "Green", "Blue"]

    var body: some View {
        VStack {
            Picker("What is your favorite color?", selection: $favoriteColor) {
                ForEach(colors, id: \.self) {
                    Text($0)
                }
            }
            .pickerStyle(.segmented)

            Text("Value: \(favoriteColor)")
        }
    }
}
Similar solutions…
How to create a date picker and read values from it | SwiftUI by Example
How to create a date picker and read values from it
How to create a picker and read values from it | SwiftUI by Example
How to create a picker and read values from it
How to create a slider and read values from it | SwiftUI by Example
How to create a slider and read values from it
How to read the red, green, and blue values from a Color | SwiftUI by Example
How to read the red, green, and blue values from a Color
How to create a stepper and read values from it | SwiftUI by Example
How to create a stepper and read values from it
