
12 Clean Code Design Patterns for Building Agile Applications ⚖️
12 Clean Code Design Patterns for Building Agile Applications ⚖️ 관련

If your code doesn’t follow these modern clean code design patterns, you could be creating a ticking time bomb. These patterns are your tools. Master them and enjoy the success of your projects. Let me show you one by one.
🌿 Use Names That Mean Something
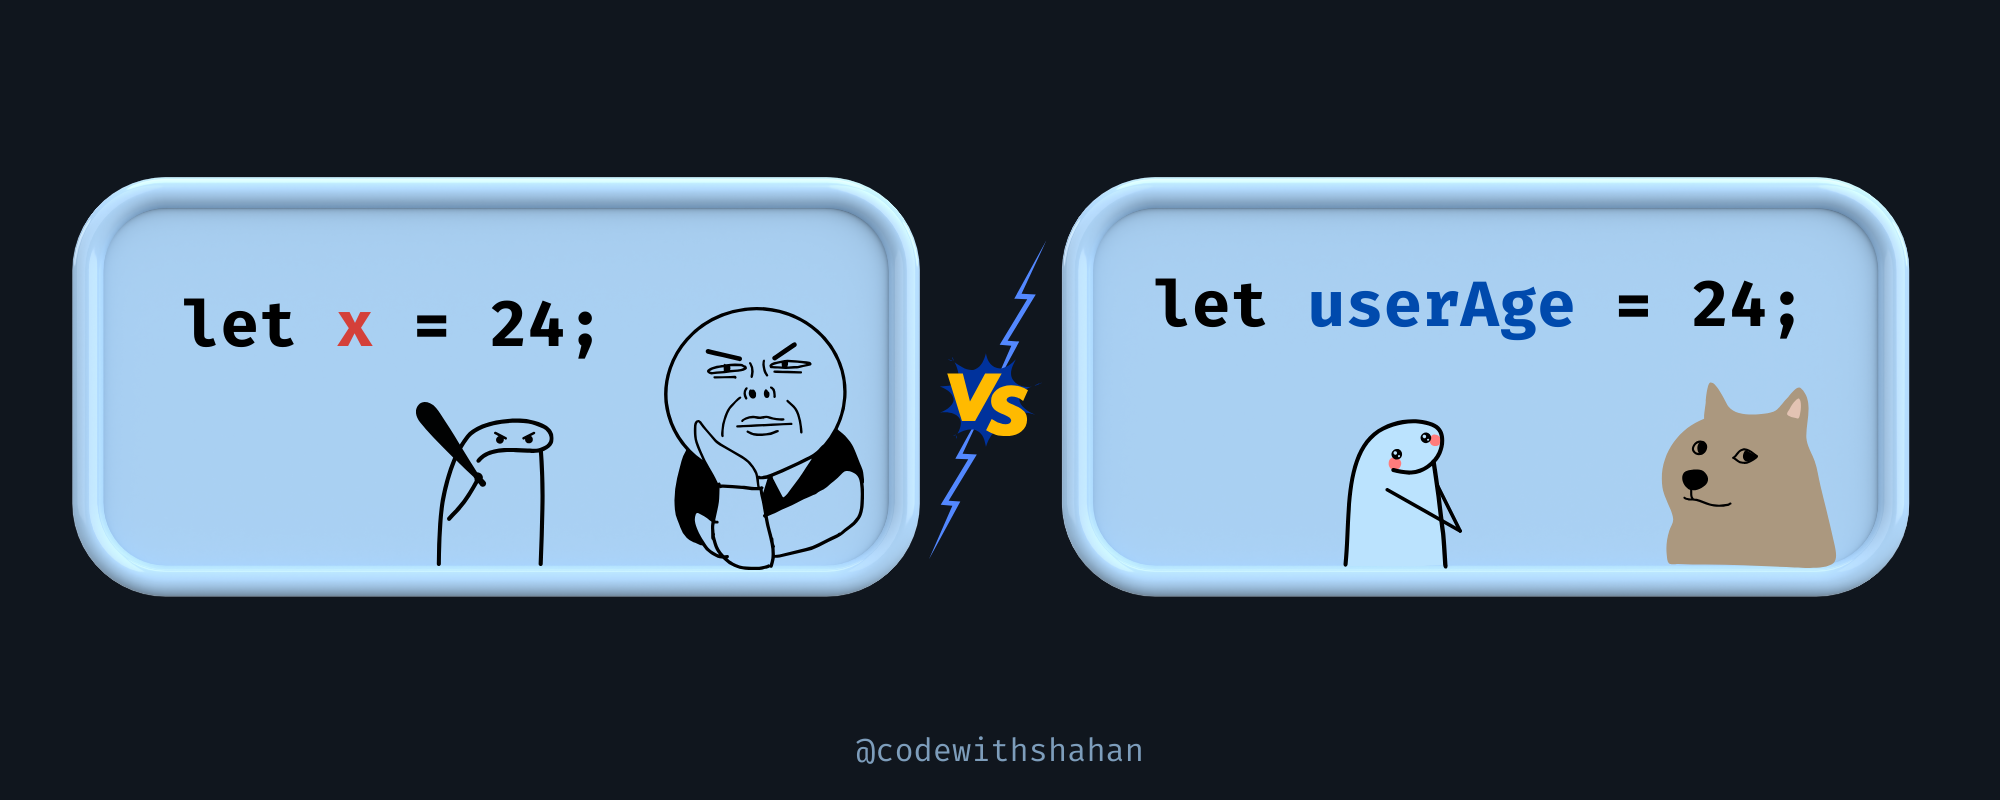
Naming your variables or functions b or x is not helpful. Call them what they are so they’re easier to understand. Here’s an example of both a bad and good variable name:
// Weak and vague
let b = 5;

// Strong and clear
let numberOfUsers = 5;
People who write unclear names don’t want to own their mistakes. Don’t be that person.
🔨 Keep Functions Laser-Focused (SRP)
A function should do one thing—and do it perfectly. This is called the Single Responsibility Principle (SRP).
Good code is like a hammer. It hits one nail, not ten. For example, if you are hiring someone to do everything in your company — finance, sales, marketing, janitorial work, and so on — they’ll likely fail miserably because they can’t focus one one thing. The same goes for your classes in code.
🚧 When a class or function does more than one thing, it becomes a tangled mess. Debugging it feels like solving a puzzle upside down. If your class handles both user input and database operations, for example, it’s not multitasking — it’s madness. Break it up. One method, one job.
🔥 My Rule
Your code works for you. Keep it sharp, focused, and controllable, or it’s going to control you. Here is how to make that happen:
// Clean: One job, one focus
function calculateTotal(a, b) {
    return a + b;
}

function logTotal(user, total) {
    console.log(`User: ${user}, Total: ${total}`);
}

// Messy: Trying to do EVERYTHING
function calculateAndLogTotal(a, b, user) {
    let total = a + b;
    console.log(`User: ${user}, Total: ${total}`);
}
🪧 When you mix tasks, you mix in confusion. As simple as that.
🚪 Use Comments Thoughtfully
There is a great saying among professional developers:
“ Code speaks for itself. ”
You don’t explain what a door does every time someone walks into a room, do you? Your code should work the same way.
Comments aren’t bad, but if your code can’t stand on its own, then you may have a problem.
🪧 A good comment should tell “why” not “how or what”. If a developer doesn’t understand “how” something works, then they likely aren’t going to understand “why” either.
Here are some short examples of good comments vs bad comments. I’ll also show you a real-world project for writing clean comments.
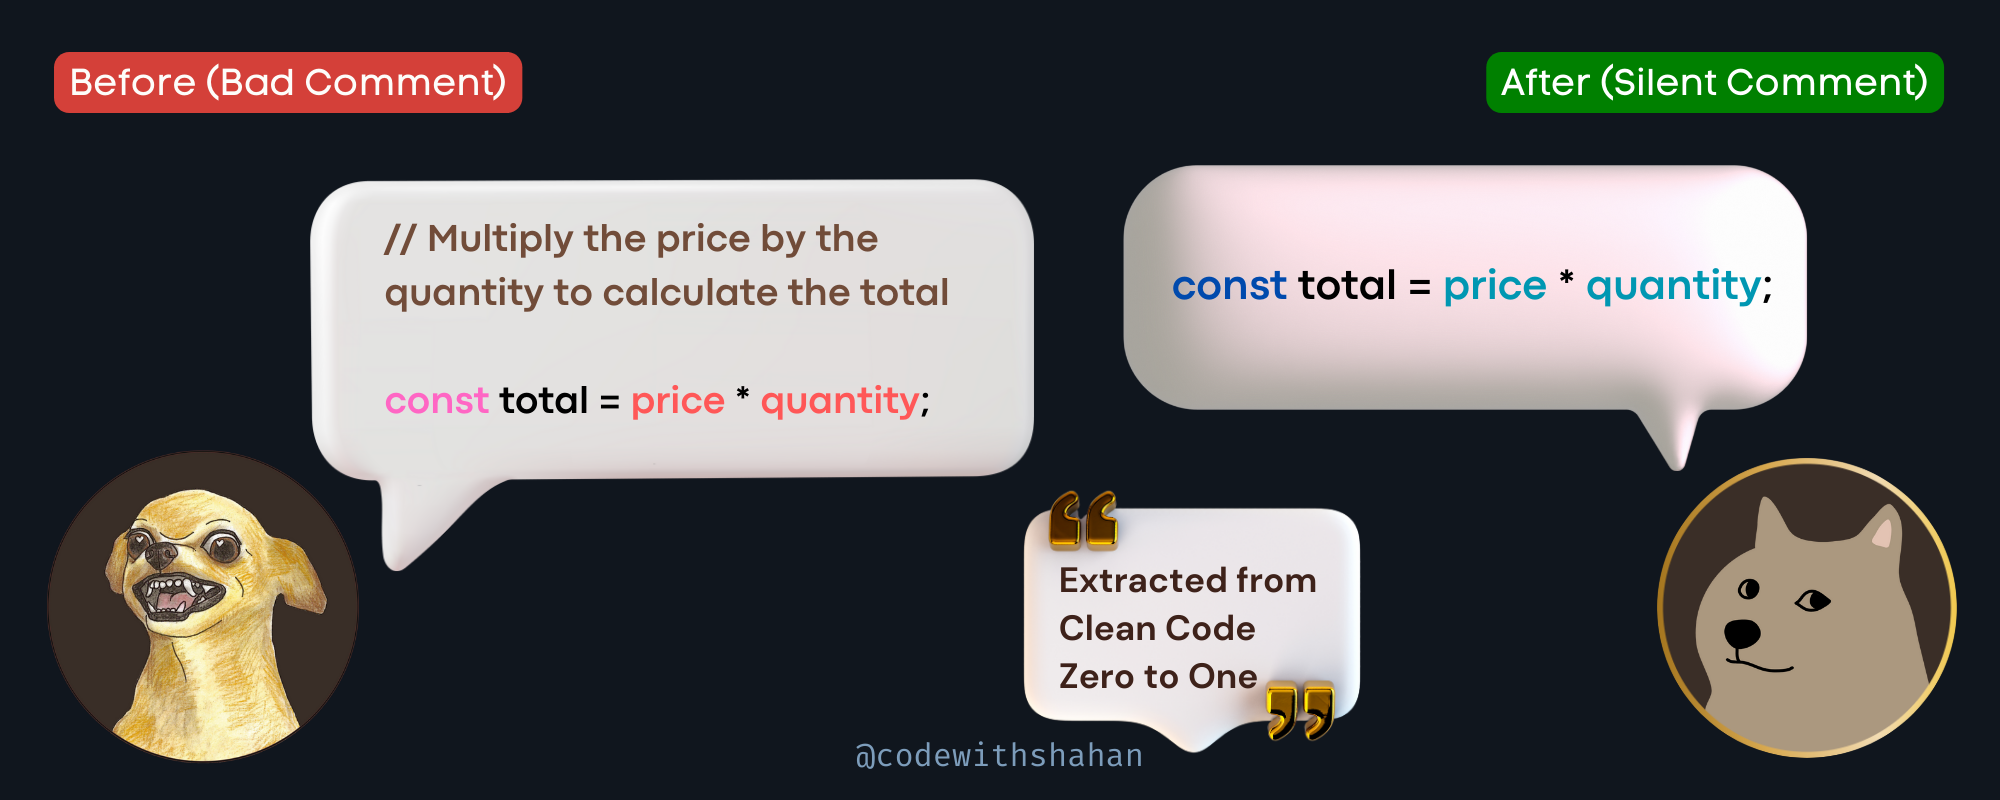
Example 1
Bad Comment 👎
// Multiply the price by the quantity to calculate the total
const total = price * quantity;
This is a bad comment because it simply repeats what the code already says. The code price * quantity is self-explanatory, so the comment doesn’t add anything useful.
Good Comment: 👍
If the code is clear and simple, you don’t need a comment.
const total = price * quantity;
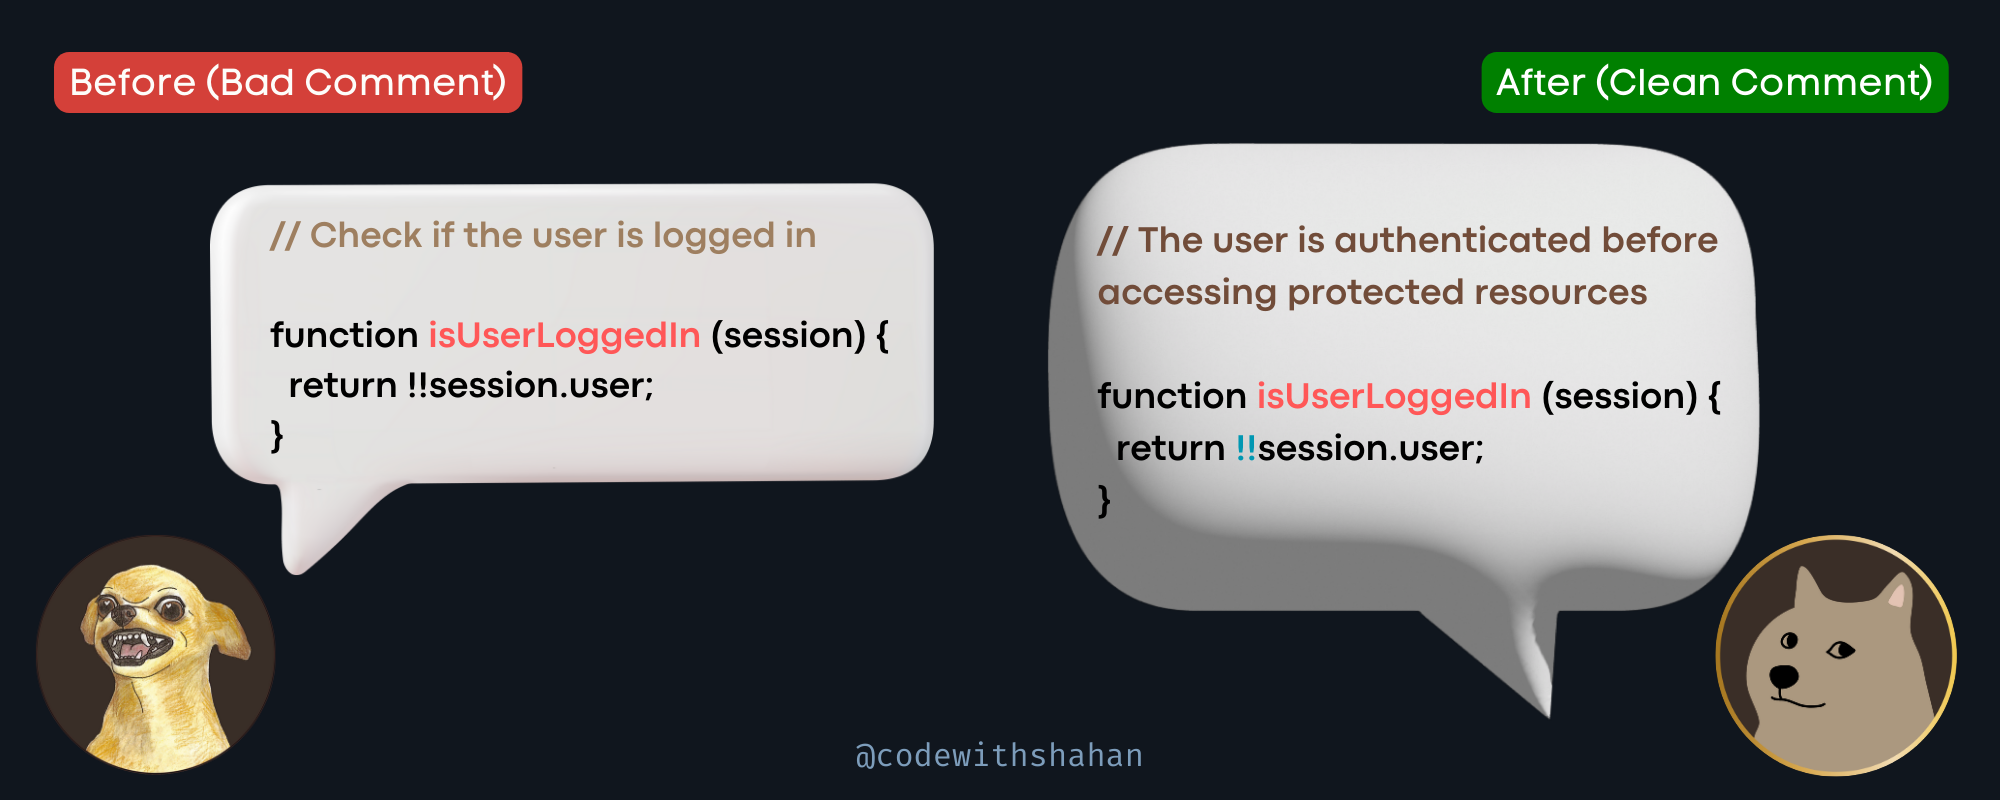
Example 2
Bad Comment 👎
// Check if the user logged in
function isUserLoggedIn(session) {
    return !!session.user;
}
This comment is bad because it doesn’t explain why the isUserLoggin() exists. It just explains what happens. But we already know that this is an auth function. This comment is a waste of time.
Good Example 👍
// The user is authenticated before accessing protected resources
function isUserLoggedIn(session) {
    return !!session.user;
}
This is a good comment because it explains why the code exists. It tells us that the function checks if the user is authenticated before allowing access to sensitive parts of the app. It focuses on the bigger picture.
⚡ Best Practices for Writing Good Comments
1. Explain the “Why,” not the “What”
Write comments to explain the purpose or context of the code, not what the code is doing.
2. Avoid obvious comments
Don’t write comments for things the code already makes clear.
3. Keep them short and precise
Write concise comments that are easy to read and directly explain the purpose.
4. Update comments regularly
Outdated comments can mislead developers, so always update them when the code changes.
Real-World Example (with Good Comments) 🛒
Let’s implement these practices into a real-world project: a large e-commerce application. One function calculates shipping costs based on the order details. Here's the full code, I will explain each comment below:
// Shipping rules:
// - Free shipping for orders over $100
// - Standard shipping ($10) for orders below $100
// - Additional $5 for international orders

function calculateShipping(order) {
    let shippingCost = 0;

    // Check if the order qualifies for free shipping
    if (order.total >= 100) {
        shippingCost = 0; // Free shipping
    } else {
        shippingCost = 10; // Standard shipping cost
    }

    // Add additional cost for international orders
    if (order.isInternational) {
        shippingCost += 5;
    }

    return shippingCost;
}

// Example usage
const order1 = { total: 120, isInternational: false };
const order2 = { total: 80, isInternational: true };

console.log(calculateShipping(order1)); // Output: 0
console.log(calculateShipping(order2)); // Output: 15
At the start of the function, we include a comment explaining the rules for shipping costs. This gives the reader an overview of the logic without needing to read the full code.
// Shipping rules:
// - Free shipping for orders over $100
// - Standard shipping ($10) for orders below $100
// - Additional $5 for international orders
Then, the first condition checks if the order total is greater than or equal to $100. A comment here clarifies why free shipping is applied.
// Check if the order qualifies for free shipping
if (order.total >= 100) {
    shippingCost = 0; // Free shipping
}
The second condition applies an additional charge for international shipping. The comment explains why the extra cost is added.
// Add additional cost for international orders
if (order.isInternational) {
    shippingCost += 5;
}
Why are these comments good?
Imagine you’re working in a team of 20 developers. Someone reads the calculateShipping function six months later. Without these comments, they might waste time guessing why international orders have an extra fee. Good comments clarify the why and save hours of frustration.
🧩 Make Your Code Readable
If someone reading your code feels like they’re solving a riddle, you’ve already become a troublemaker. Here is the proof:
// Clean: Reads like a story
if (isLoggedIn) {
    console.log("Welcome!");
} else {
    console.log("Please log in.");
}

// Messy: Feels like chaos
if(isLoggedIn){console.log("Welcome!");}else{console.log("Please log in.");}
If your code is messy and hard to read, it will confuse others—and even yourself later! Imagine coming back to your own code after six months and feeling like you’re reading a foreign language. Readable code saves time, reduces bugs, and makes everyone’s life easier.
🍵 Why is Readability Important?
- For yourself: When you revisit your code after weeks or months, clean code helps you pick up where you left off without wasting time figuring out what you did.
- For your team: If someone else reads your code, they shouldn’t have to solve a puzzle. Clean code makes teamwork smoother and prevents miscommunication.
- Fewer bugs: Clear code is easier to debug because you can quickly spot mistakes.
🧙♂️ How to Write Readable Code
Let’s build a simple program to manage books in a library. We’ll make it clean and readable and then I will break down this code below:
// A class to represent a book
class Book {
    constructor(title, author, isAvailable) {
        this.title = title;
        this.author = author;
        this.isAvailable = isAvailable;
    }

    borrow() {
        if (this.isAvailable) {
            this.isAvailable = false;
            console.log(`You borrowed "${this.title}".`);
        } else {
            console.log(`Sorry, "${this.title}" is not available.`);
        }
    }

    returnBook() {
        this.isAvailable = true;
        console.log(`You returned "${this.title}".`);
    }
}

// A function to display available books
function displayAvailableBooks(books) {
    console.log("Available books:");
    books.forEach((book) => {
        if (book.isAvailable) {
            console.log(`- ${book.title} by ${book.author}`);
        }
    });
}

// Example usage
const book1 = new Book("The Clean Coder", "Robert Martin", true);
const book2 = new Book("You Don’t Know JS", "Kyle Simpson", false);
const book3 = new Book("Eloquent JavaScript", "Marijn Haverbeke", true);

const library = [book1, book2, book3];

displayAvailableBooks(library); // Show available books
book1.borrow(); // Borrow a book
displayAvailableBooks(library); // Show available books again
book1.returnBook(); // Return the book
displayAvailableBooks(library); // Final list
We created a Book class to represent each book. It has properties like title, author, and isAvailable to track its status.
- The
borrowmethod checks if the book is available. If yes, it marks it as unavailable and prints a message. - The
returnBookmethod makes the book available again. - The
displayAvailableBooksfunction loops through the library and prints only the books that are available. - We create three books (
book1,book2,book3) and store them in alibraryarray. - We borrow and return books, showing how the list of available books changes.
As you can see, readable code is not just about style. It saves time, prevents bugs, and preserves your code as useful for years to come.
🏌️ Test Everything You Write
If you don’t take the time to write tests, you shouldn’t be surprised if your code breaks. If you do want to write tests, follow this unit testing strategy to catch problems ahead.
What Is Unit Testing?
Concretely, unit testing checks individual parts of your code (like functions or classes) to ensure they work correctly. Just like checking each brick of your house for soundness before building the walls.
Let me give you an example of how unit testing works:
class Calculator {
    add(a, b) { return a + b; }
    subtract(a, b) { return a - b; }
}

// Test it (Unit Test)
const calculator = new Calculator();
console.assert(calculator.add(2, 3) === 5, "Addition failed");
console.assert(calculator.subtract(5, 3) === 2, "Subtraction failed");
Here’s what’s going on in this code:
First, we create the calculator class:
class Calculator {
    add(a, b) { return a + b; }
    subtract(a, b) { return a - b; }
}
The Calculator class has two methods: add and subtract.
add(a, b)takes two numbers and returns their sum.subtract(a, b)takes two numbers and returns their difference.
Next, we set up the tests:
const calculator = new Calculator();
Here, we’re creating an instance of the Calculator class to test its methods.
Then we write test cases:
console.assert(calculator.add(2, 3) === 5, "Addition failed");
console.assert(calculator.subtract(5, 3) === 2, "Subtraction failed");
console.assert(condition, message) checks if the condition is true. If it’s false, the message ("Addition failed" or "Subtraction failed") is displayed in the console.
- First test:
calculator.add(2, 3) === 5- Calls the
addmethod with2and3. - Checks if the result is
5.
- Calls the
- Second test:
calculator.subtract(5, 3) === 2- Calls the
subtractmethod with5and3. - Checks if the result is
2.
- Calls the
So what happens if something breaks? It’s pretty simple to solve any issues that arise here. In this case, if the add or subtract method doesn’t work correctly, the test will fail. For example:
console.assert(calculator.add(2, 3) === 6, "Addition failed");
- The condition
calculator.add(2, 3) === 6isfalse. - The console will display:
"Addition failed".
Real-World Example: Testing a Login System 👥
Let’s test a simple login system to see how unit testing works in a real-world scenario.
class Auth {
    login(username, password) {
        return username === "admin" && password === "1234";
    }
}

// Test the Auth class
const auth = new Auth();
console.assert(auth.login("admin", "et5t45#@") === true, "Login failed for valid credentials");
console.assert(auth.login("user", "wrongpassword") === false, "Login succeeded for invalid credentials");
First, create the Auth class:
class Auth {
    login(username, password) {
        return username === "admin" && password === "1234";
    }
}
The login method checks if the username is "admin" and the password is "1234". If both match, it returns true - otherwise, false.
Next, set up the tests:
const auth = new Auth();
Create an instance of the Auth class. Then write the test cases:
console.assert(auth.login("admin", "1234") === true, "Login failed for valid credentials");
console.assert(auth.login("user", "wrongpassword") === false, "Login succeeded for invalid credentials");
- First test: Checks if valid credentials (
"admin","1234") succeed. If not,"Login failed for valid credentials"is displayed. - Second test: Checks if invalid credentials (
"user","wrongpassword") fail. If not,"Login succeeded for invalid credentials"is displayed.
🌱 Why testing results in clean code:
- You naturally write smaller, more focused functions to make your code testable
- Tests verify that your code behaves as expected under different conditions.
- With tests in place, you can confidently update your code, knowing the tests will catch any mistakes.
💉 Use Dependency Injection
Hardcoding dependencies is like tattooing someone’s name on your forehead — it’s permanent, can be abrasive, and locks you in.
So, what does Dependency Injection do? It lets you manage your code's relationships by passing dependencies as arguments. It’s flexible, adaptable, and maintainable.
To demonstrate how it works, here I’m using the Nodemailer dependency for sending emails to users:
// Dependency: Sending emails with Nodemailer
const nodemailer = require('nodemailer');
function sendEmail(to, subject, message) {
    const transporter = nodemailer.createTransport({ /* config */ });
    return transporter.sendMail({ from: "programmingwithshahan@gmail.com", to, subject, text: message });
}
Warning
To save yourself from risk, make sure to avoid hardcoding dependencies. Use abstraction or configuration files for secure maintenance.
This is just one example. As a developer, you may use hundreds of libraries or dependencies.
I’m not saying you shouldn’t rely on dependencies/libraries at all, as nowadays it is hard to avoid them. But you should be very careful before installing them in your coding projects.
You should check the security, performance, quality, or functionality of an organization's software systems. Because they sometimes contain risks that can ruin your entire project.
Note
Always control your tools, don't let them control you.
📂 Clean Project Structures
A well-organized project is the difference between a trash heap and a high-end boutique.
Here is how each folder should be organized:

If your codebase looks like a junk drawer, you’ve already caused trouble for your future self.
Let’s go through the clean project structure you can see above to better understand it:
1. myProjet/src
This is the main container for your entire application. Everything your app needs is stored inside this folder. It has subfolders to keep things tidy and managed in one place.
2. components
This is where you keep all the reusable pieces of your app. You can use these components in multiple places without building them again.
3. services
This is the "brain" of your app. It handles all the work behind the scenes for both the frontend and backend. emailService.js, userService.js and productService.js are some of the example files for your services folder.
4. utils
This contains all the small, handy tools you need to make your application run smoothly and make your life easier. For example, formatedate.js, validateEmail.js and generateId.js are some of the common utils files to make reusable pieces of components for your entire project.
5. test
Conventionally, test files are typically located outside the src folder, at the project root level. This keeps your production code (src) separate from your test code (tests), making it cleaner and easier to manage. Have a look:
myProject/
├── src/              # Production code
│   ├── components/
│   ├── services/
│   └── utils/
├── tests/            # Test files
│   ├── components/
│   ├── services/
│   └── utils/
├── package.json      # Project configuration
└── README.md         # Documentation
Some developers may prefer creating one testing file inside the test folder to test everything in one place. Unfortunately, it may feel clean at first, but as your project grows, you’ll have to find and search for specific code blocks. It’s ugly and can produce unexpected testing results. So breaking them into multiple testing files inside the tests folder is highly recommended.
Real-world example 📧
So let me create a clean, durable project structure for you to apply in any future projects you might work on. Needless to say, clean project structure is the foundation of building a maintainable project.
From our previous email sending application example, we will write a clean project structure for this app. We want to build an application that sends emails to users. Your clean project structure for this app should look like this:

As you can see, I packed every subfolder and file inside the src folder which is the main container of our application. Inside the src folder, we created components, services, utiles. Finally, we have a manageable test folder outside the src folder to test each component independently. This test folder has nothing to do with our production code that is located inside the src folder.
🤹♂️ Be Consistent with Formatting
Don’t write code like you’re 10 different people. Be consistent with your formatting.
Use tools like Prettier or ESLint to enforce a consistent style. If every file looks different, you’re creating chaos that no one wants to fix.
I would say that consistency in formatting is one of the most important aspects of writing clean code.
Have a look...

// Always use 2 spaces for indentation
function calculateArea(width, height) {
  if (width <= 0 || height <= 0) {
    throw new Error("Dimensions must be positive numbers.");
  }
  return width * height;
}

// Add meaningful whitespace for readability
const rectangle = {
  width: 10,
  height: 20,
};

// Clear separation of logic
try {
  const area = calculateArea(rectangle.width, rectangle.height);
  console.log(`Area: ${area}`);
} catch (error) {
  console.error(error.message);
}
Let’s examine some of the aspects of this code that make it clean:
1️⃣ Consistent Indentation
Why 2 or 4 spaces? It’s clean, minimal, and universally accepted in many JavaScript style guides. It doesn’t overwhelm the eyes, and the code structure stands out clearly. When you mix inconsistent indentation (2 spaces here, 4 spaces there), you confuse people—and confused people make mistakes.
2️⃣ Meaningful Whitespace: Giving Code Room to Breathe
That extra line break between the rectangle definition and the try block is like a pause in a sentence — it gives the reader time to process.
3️⃣ Clear Separation of Logic: Modular Thinking
try {
  const area = calculateArea(rectangle.width, rectangle.height);
  console.log(`Area: ${area}`);
} catch (error) {
  console.error(error.message);
}
Look at how the logic is divided into clear sections:
- First, the calculation (
calculateAreafunction). - Then, the output (
console.log). - Finally, error handling (
catchblock).
Each task has its own space and purpose.
4️⃣ Readable Error Handling
When you throw errors or log messages, you format them cleanly. No vague or cryptic messages here. A developer seeing this will immediately know the problem.
throw new Error("Dimensions must be positive numbers.");
🐦⬛ General tips for consistent formatting:
- Use 2 or 4 spaces for indentation consistently throughout your codebase. Avoid tabs to maintain uniformity across different editors.
- Keep lines to a maximum of 100-120 characters to prevent horizontal scrolling and improve readability.
- Group related logic together and separate blocks of code with blank lines to highlight their purpose.
- Finally, avoid over-aligning code. Instead, let indentation naturally guide the flow of logic.
✋ Stop Hardcoding Values
Hardcoding values is a lazy way to code. Here is the proof:
// Bad: Hardcoded and rigid
function createUser() {
    const maxUsers = 100;
    if (currentUsers >= maxUsers) throw "Too many users!";
}

// Clean: Dynamic and flexible
const MAX_USERS = 100;
function createUser() {
    if (currentUsers >= MAX_USERS) throw "Too many users!";
}
You see, changing this variable won’t surprise you in the future. You know exactly where to find it to change uncertain values.
Its best to store your fixed values in the global configuration (config) file.
🪧 So, avoid hardcoding values at all costs. Hardcoding is the shortcut that may drive your future self (or others) crazy.
🤏 Keep Functions Short
If your function is longer than 20 lines, it’s probably trying to do too much*.*
Short functions are sharp functions. They hit their mark every time.
Long, bloated functions are messy and hard to read, but short functions are clear and focused. Here is how your large functions should break down:
function updateCart(cart, item) {
  addItemToCart(cart, item);
  let total = calculateTotal(cart);
  logTransaction(item, total);
  return total;
}

function addItemToCart(cart, item) {
  cart.items.push(item);
}
Let me explain this code so you understand why breaking down large functions is a winning strategy.
1. The Main Function
updateCart() calls smaller helper functions to handle specific tasks like:
- Adds the item to the cart.
- Calculates the total price.
- Logs the details of the transaction.
- Finally, it returns the total price.
Instead of one long block of code that tries to do everything, it delegates tasks to helper functions.
2. Helper Function
addItemToCart() This function only handles adding the item to the cart. if you need to change how items are added (for example, checking for duplicates). You could just edit this small function instead of digging through a giant block of code in updateCart. That’s how you write clean code functions that’s a joy to read and easy to maintain.
What Happens If Functions Are Too Long? 💤
Let’s say you didn’t break down the updateCart function. Here’s what it might look like:
function updateCart(cart, item) {
    cart.items.push(item);
    let total = 0;
    for (let i = 0; i < cart.items.length; i++) {
        total += cart.items[i].price;
    }
    console.log(`Added ${item.name}. Total is now $${total}.`);
    return total;
}
What are the problems here?
- It’s trying to do everything.
- It’s hard to read, especially if it grows bigger.
- If something breaks, you’ll waste time figuring out which part is the problem.
Now the choice is yours: stick with the messy all-in-one approach or practice the clean one function one job mindset.
⛺ Follow the Boy Scout Rule
Always leave your campsite cleaner than you found it.
Let me break it down for you. You don’t just use something and leave it worse than before. That’s inconsiderate behavior. Real professionals leave things better than they found them.
In coding terms, every time you touch the codebase, make it better. Clean it up, refactor messy parts, and improve readability. If you don’t, you’re just piling on garbage that will eventually collapse on your head.
Here is an example. Instead of improving it, we’re just adding more layers of complexity:
// Original code: Hard to read, poorly named variables
function calc(a, b) {
  let x = a + b;
  let y = x * 0.2;
  return y;
}

// We're adding to it but not cleaning it up
function calcDiscount(a, b, discountRate) {
  let total = calc(a, b);
  let final = total - discountRate;
  return final;
}
After: it gets better every time. Here’s how a disciplined coder works — they improve as they go:
// Improved code: Clear names, refactored for clarity
function calculateSubtotal(price, quantity) {
  return price * quantity;
}

function calculateDiscountedTotal(price, quantity, discountRate) {
  const subtotal = calculateSubtotal(price, quantity);
  const discount = subtotal * discountRate;
  return subtotal - discount;
}
Now, anyone can tell what’s happening at a glance. Because we’ve broken down the code into smaller, more focused functions. Thus, adding new features won’t break existing functionality. 🏕️
🏟️ Follow the Open/Closed Principle
This design principle suggests your code should be designed to allow extensions without changing the existing foundation.
You want to add features — not rip it apart every time you upgrade*.* Modifying old code to fit new requirements is exactly like trying to rebuild your house every time you buy new furniture. It’s not sustainable.
Let’s see how you can build smarter, scalable code that lets you add features without breaking everything else.
Before: Violating the principle
You’ve got a class to handle payments — simple enough. At first, it just handles credit cards.
But then your boss shows up and says, “Hey, now we need PayPal support.”
And because you didn’t bother learning clean code, your code looks like a spaghetti monster straight out of a legacy enterprise system from 1995. Here’s the masterpiece you’ve crafted:
class PaymentProcessor {
  processPayment(paymentType, amount) {
    if (paymentType === "creditCard") {
      console.log(`Processing credit card payment of $${amount}`);
    } else if (paymentType === "paypal") {
      console.log(`Processing PayPal payment of $${amount}`);
    } else {
      throw new Error("Unsupported payment type");
    }
  }
}

const paymentProcessor = new PaymentProcessor();
paymentProcessor.processPayment("creditCard", 100);
paymentProcessor.processPayment("paypal", 200);
Alas! Every new payment type (like Apple Pay, Google Pay, and so on) requires modifying the processPayment method. Needless to say, you risk breaking existing functionality while adding new features. If you had learned this principle, you might not be in this mess.
Don’t worry: I’ll help you to fix this. First, we need to refactor the code. Instead of modifying the existing class, we’ll extend its functionality using polymorphism:
javascriptCopy code// Base class
class PaymentProcessor {
  processPayment(amount) {
    throw new Error("processPayment() must be implemented");
  }
}

// Credit card payment
class CreditCardPayment extends PaymentProcessor {
  processPayment(amount) {
    console.log(`Processing credit card payment of $${amount}`);
  }
}

// PayPal payment
class PayPalPayment extends PaymentProcessor {
  processPayment(amount) {
    console.log(`Processing PayPal payment of $${amount}`);
  }
}

// Adding a new payment type? Just extend the class!
class ApplePayPayment extends PaymentProcessor {
  processPayment(amount) {
    console.log(`Processing Apple Pay payment of $${amount}`);
  }
}

// Usage
const payments = [
  new CreditCardPayment(),
  new PayPalPayment(),
  new ApplePayPayment(),
];

payments.forEach((payment) => payment.processPayment(100));
Now, adding new payment methods doesn’t require changing the existing PaymentProcessor class. You just created a new subclass. So the original code remains untouched, meaning there’s no risk of breaking existing features.
Each payment type has its own class, and adding PayPal payment support, for example, doesn’t break the code. Now you can reply to your boss: “Of course, I will add this feature in 5 minutes.” Your promotion is waiting for you to accept it.
I share even more tips in my book Clean Code Zero to One.