
Composing views to create a list row
Composing views to create a list row 관련

Updated for Xcode 15
Just having names of menu items written out isn't particularly appealing for a restaurant, so let's make those items look good.
First, though, an important lesson: SwiftUI is designed to be composable, which means you can make views out of any other views you like. We have a simple text view for our items right now, Text(item.name), but we're going to add much more in there to bring it to life. While we could put that directly into ContentView.swift, it becomes long and hard to read.
A better idea is to make a new view type that we can embed inside ContentView, and SwiftUI is designed to make this both easy (it takes only 30 seconds to learn) and extremely fast (it has almost zero performance impact).
So, press Cmd+N to create a new file, choose SwiftUI View under the User Interface category, then call it “ItemRow”. You'll see Xcode has generated a new view with some sample code to get us started:
struct ItemRow: View {
    var body: some View {
        Text("Hello World!")
    }
}
We're going to be doing something new in just a moment, but first I want to get us to the point where we are using ItemRow in our code. This means we need to add a MenuItem property to ItemRow, then use it in its body, like this:
struct ItemRow : View {
    let item: MenuItem

    var body: some View {
        Text(item.name)
    }
}
Now we can go back to ContentView.swift and replace Text(item.name) with this:
ItemRow(item: item)
As you can see, that will create new ItemRow for each item in our menu section, which in turn will have some text inside.
Now, our code won't build right now, because there's a problem in ItemRow.swift. This code is invalid:
struct ItemRow_Previews: PreviewProvider {
    static var previews: some View {
        ItemRow()
    }
}
That is SwiftUI's previewing code, which is what allows it show live previews while we work. It's trying to create an ItemRow without a menu item attached, which isn't possible. If you really wanted to preview individual rows you could do so by instantiating a copy of our full menu and passing in an example item, but in this instance I've provided an example item for us so we have something to look at.
Change the code to this to make it all work again:
struct ItemRow_Previews: PreviewProvider {
    static var previews: some View {
        ItemRow(item: MenuItem.example)
    }
}
Once that's done our code will build again, and if you return back to ContentView.swift you should see the same preview we had before – nothing has changed. Of course, now we can start to add new things to that ItemRow struct to make it more interesting!
In ItemRow, we're going to start by placing the item's thumbnail image and name side by side, like you'd normally see in a UITableViewCell. Try writing this:
var body: some View {
    Image(item.thumbnailImage)
    Text(item.name)
}
You'll find that Xcode's preview does something quite strange: you'll see a thumbnail image appear, but no text for the item's name – how come one but not both?
Well, what's happening here is that some View means we will return one specific view from our method – not two different views, and certainly not no views at all. When you try and return two views like this, Swift automatically wraps them up in a single, hidden container called a tuple view, but without any further instructions on how to display this SwiftUI just picks the first view.
To fix this we need to put those two views inside a container, which in our case will be a HStack. This is a container that places its child views side by side horizontally, which is perfect for our needs.
So, try this instead:
var body: some View {
    HStack {
        Image(item.thumbnailImage)
        Text(item.name)
    }
}
If you wanted to put the item's price next to its name, you might try something like this:
HStack {
    Image(item.thumbnailImage)
    Text(item.name)
    Text("$\(item.price)")
}
However, that will put the price to the right of the name, which isn't great. What we usually want here is the kind of subtitle style that we get from UITableViewCell, where we can have an image on the left, and on the right have a title above a detail label.
We can achieve that with another stack, called a VStack – a vertical stack. This can go inside our existing HStack to create the hierarchy we want:
HStack {
    Image(item.thumbnailImage)

    VStack {
        Text(item.name)
        Text("$\(item.price)")
    }
}
You'll notice that our item name and price are centered. That happens because it's the default behavior of VStack, but a left alignment would look much better here. We can get that by asking for a leading alignment when creating the VStack, like this:
VStack(alignment: .leading) {
    Text(item.name)
    Text("$\(item.price)")
}
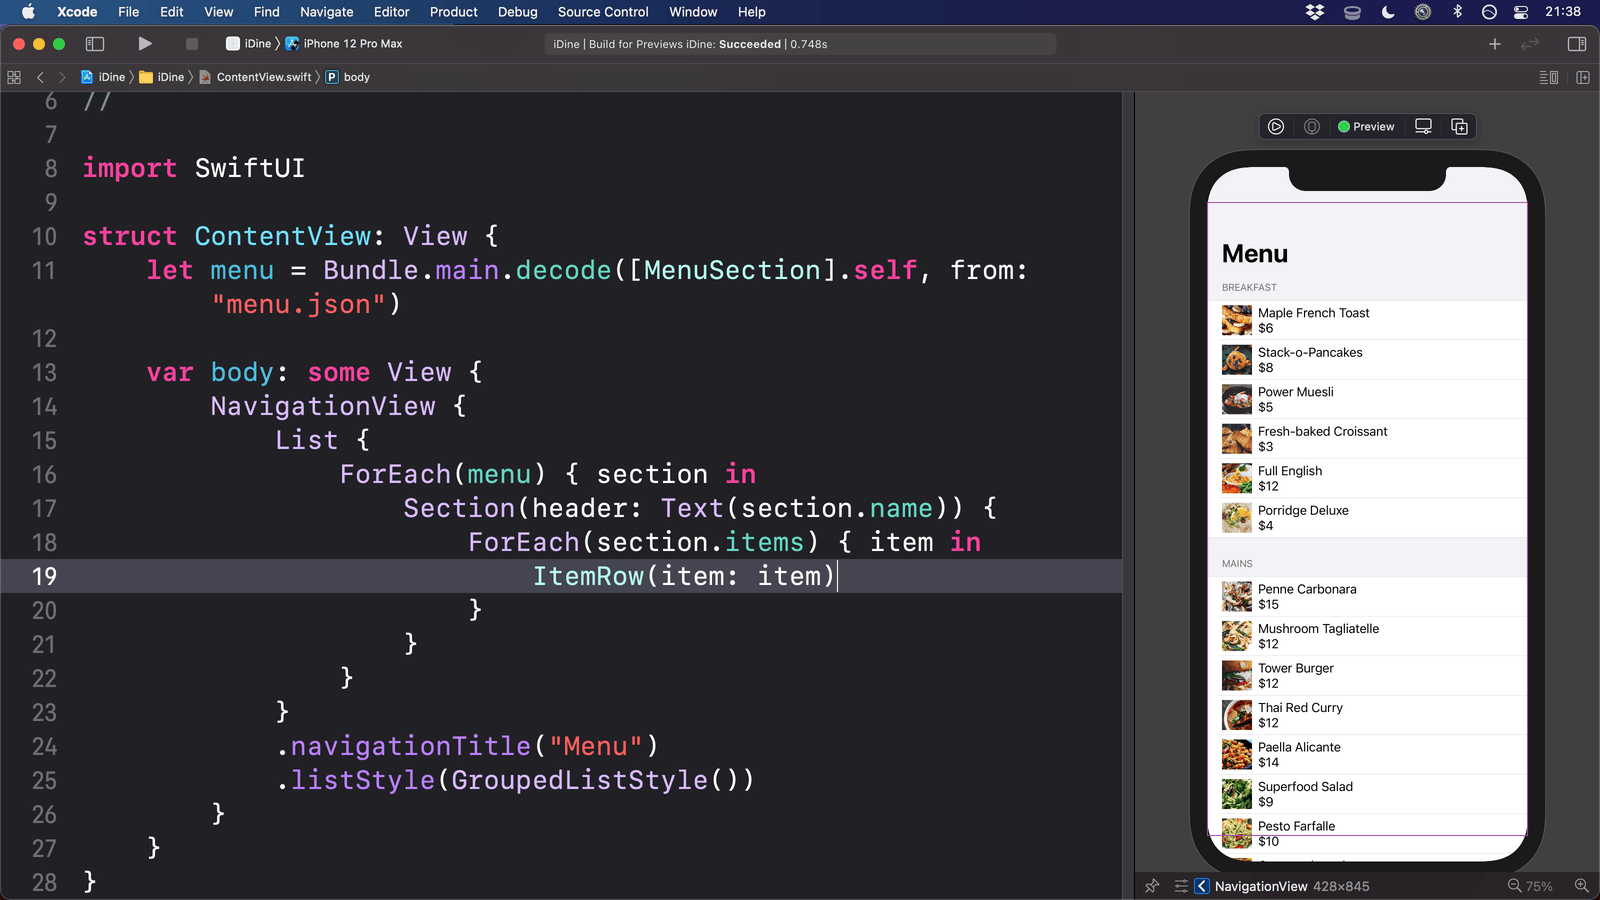
If you head back to ContentView.swift, your SwiftUI preview should update so you can see how the full list looks now – much better, I think!
Further reading
Similar solutions…
