
Polishing designs with fonts and colors
Polishing designs with fonts and colors 관련

Updated for Xcode 15
We'll add some more to our design in just a moment, but first let's pause and make what we have look better.
In ItemRow.swift, our menu item's name is clearly the most important thing in each row, but it has the same font size as the price below. We can bring it up in size and weight by using the font() modifier, which accepts any of Apple's Dynamic Type sizes.
So, something like this will make it stand out:
Text(item.name)
    .font(.headline)
As for the picture, it looks OK as it is, but with a little love it would look better. For example, we could apply a clipShape() modifier and ask it to be clipped to a circle shape:
Image(item.thumbnailImage)
    .clipShape(Circle())
Or we could apply a clipShape() modifier, then add an overlay() modifier so we place a shape on top of our image. For example, this will add a circle over the image, then give that circle a 2-point gray border:
Image(item.thumbnailImage)
    .clipShape(Circle())
    .overlay(Circle().stroke(.gray, lineWidth: 2))
OK, that's enough styling – let's look at something more complex.
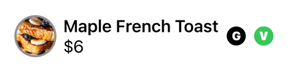
If you look in menu.json you'll see that each menu item has a string array of restrictions: “G” for containing gluten, “N” for containing nuts, “V” for being vegetarian friendly, and so on. We can use that to create colored icons representing what's in the food at a glance, showing zero or more of them in each row as appropriate.
First, we need a dictionary of colors that we'll use for each restriction type. Add this property to ItemRow:
let colors: [String: Color] = ["D": .purple, "G": .black, "N": .red, "S": .blue, "V": .green]
Second, we need to loop over all the restrictions and put each one into a text view. Put this after the VStack containing the name and cost:
ForEach(item.restrictions) { restriction in
    Text(restriction)
}
Now we have a problem: that code won't compile. As I mentioned earlier, we can put arrays into a ForEach as long as SwiftUI knows how to identify each item in the array uniquely. We solved that by making our sections and items conform to the Identifiable protocol, which uses the id property to identify items.
Here, though, we have an array of strings, so we can't make them conform to Identifiable. Instead, we need something else: we need to tell Swift that the string itself is the identifier for each item. This can be done using the id parameter for ForEach, passing in \.self as its only parameter, like this:
ForEach(item.restrictions, id: \.self) { restriction in
    Text(restriction)
}
And now you should see the text “G” and “V” next to our example item in the Xcode preview.
That's pretty dull, though, so let's spice it up with some modifiers:
Text(restriction)
    .font(.caption)
    .fontWeight(.black)
    .padding(5)
    .background(colors[restriction, default: .black])
    .clipShape(Circle())
    .foregroundStyle(.white)
That will use a small, bold font with white text and a colored background, add a circular clipping shape, and add a little space around it so the text circles aren't so near.
We're going to do one more thing before we're done with the design of this item row: we're going to force the restriction text to be spaced apart from the rest of the row. SwiftUI has a dedicated view for this called Spacer, and I'd like you to place it just before the ForEach for our restrictions, like this:
Spacer()

ForEach(item.restrictions, id: \.self) {
That will automatically take up all available free space, meaning that our picture will now be on the far left and the restrictions on the far right.
Go ahead and run the project now and I think you'll agree it looks great! Now think about how you might have accomplished all that using a UITableViewCell – it would take more code than you expect!
Further reading
Similar solutions…
