Day 13
Day 13 관련

Swift review, day one
Congratulations! You made it through all the fundamentals of the Swift programming language. Each video was purposefully very short to give you a lightning-fast introduction to the topic, but for the next three days we’ll be slowing right down so you can consolidate what you’ve learned.
This means we’ll be going over the fundamentals of Swift again, but this time more slowly and in more detail.
I know what you’re thinking. You’re thinking “why bother? I already learned this stuff – why go over it again?”
Well, there are several reasons:
- Repetition helps us learn things more thoroughly. These fundamentals are really important in all the Swift you’ll write, so it’s worth doubling down to make sure you understand them fully.
- Some concepts only make complete sense when you’ve understood other concepts. Circling back like this will help link together the core Swift concepts in your head.
- You might have missed something. Let’s face it, you’ve just gone through 100 videos about the most important parts of Swift – are you absolutely sure you remembered all of it?
- You’ll see how far you’ve come. When you read about arrays and loops – things you might have found challenging previously – hopefully you’ll find them easier now, and feel good that you’re making progress.
Today you have nine topics to review. Once you’ve completed them you can, if you want, go back over the tests from earlier days to improve on your scores.
1. Variables and constants
1. Variables and constants
Every useful program needs to store data at some point, and in Swift there are two ways to do it: variables and constants. A variable is a data store that can have its value changed whenever you want, and a constant is a data store that you set once and can never change. So, variables have values that can vary, and constants have values that are constant – easy, right?
Having both these options might seem pointless, after all you could just create a variable then never change it – why does it need to be made a constant? Well, it turns out that many programmers are – shock! – less than perfect at programming, and we make mistakes.
One of the advantages of separating constants and variables is that Xcode will tell us if we’ve made a mistake. If we say, "make this date a constant, because I know it will never change" then 10 lines later try to change it, Xcode will refuse to build our app.
Constants are also important because they let Xcode make decisions about the way it builds your app. If it knows a value will never change, it is able to apply optimizations to make your code run faster.
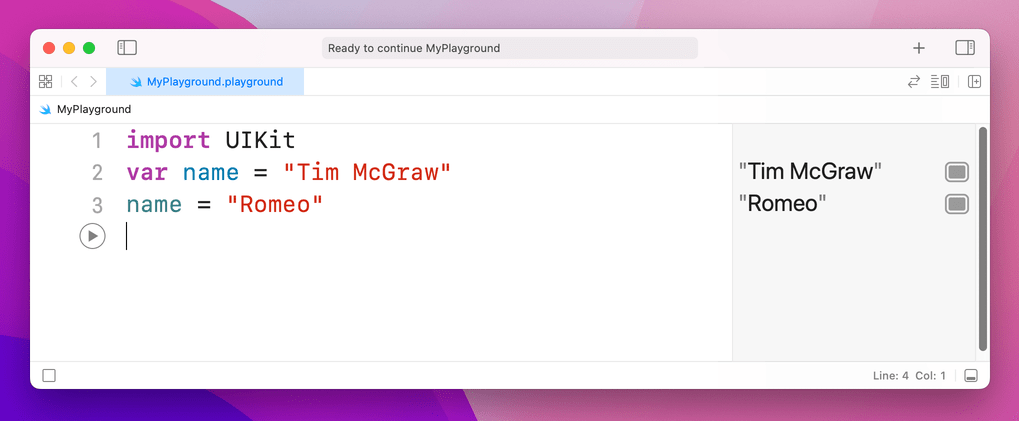
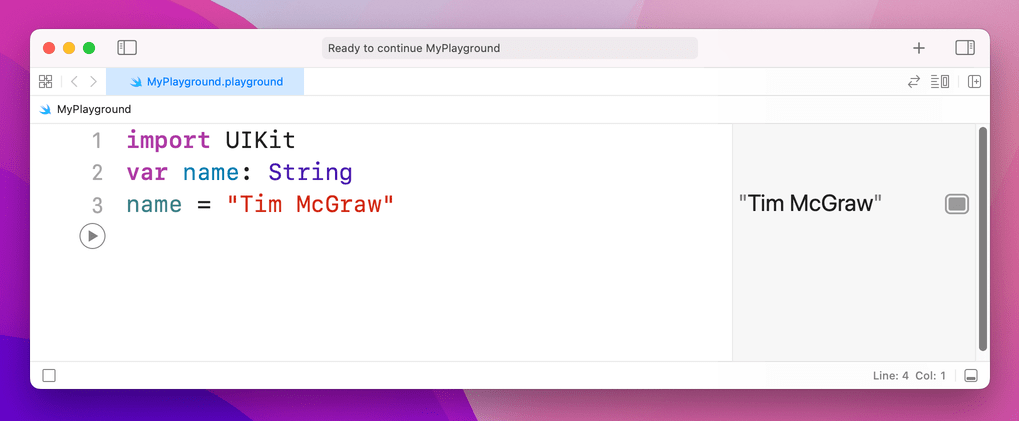
In Swift, you make a variable using the var keyword, like this:
var name = "Tim McGraw"
Let’s put that into a playground so you can start getting feedback. Delete everything in there apart from the import UIKit line (that's the bit that pulls in Apple's core iOS framework and it's needed later on), and add that variable.
Because this is a variable, you can change it whenever you want, but you shouldn't use the var keyword each time – that's only used when you're declaring new variables. Try writing this:
var name = "Tim McGraw"
name = "Romeo"
So, the first line creates the name variable and gives it an initial value, then the second line updates the name variable so that its value is now "Romeo". You'll see both values printed in the results area of the playground.
Now, what if we had made that a constant rather than a variable? Well, constants use the let keyword rather than var, so you can change your first line of code to say let name rather than var name like this:
import UIKit
let name = "Tim McGraw"
name = "Romeo"
But now there's a problem: Xcode will show a red warning next to line three, and it should have drawn a red underline underneath your code. Xcode’s message is “Cannot assign to value: 'name' is a 'let' constant”, which is Xcode-speak for "you're trying to change a constant and you can't do that."
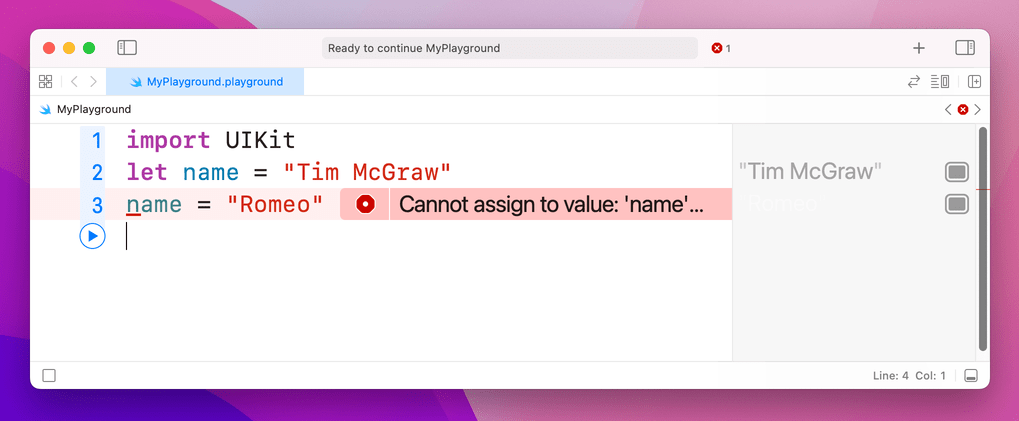
So, constants are a great way to make a promise to Swift and to yourself that a value won't change, because if you do try to change it Xcode will refuse to run. Swift developers have a strong preference to use constants wherever possible because it makes your code easier to understand. In fact, Xcode will actually tell you if you make something a variable then never change it!
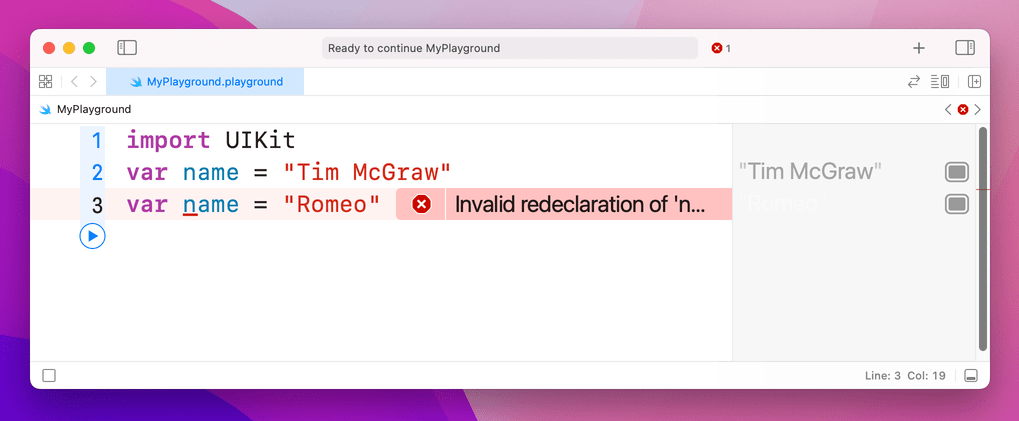
Important note: variable and constant names must be unique in your code. You'll get an error if you try to use the same variable name twice, like this:
var name = "Tim McGraw"
var name = "Romeo"
If the playground finds an error in your code, it will either flag up a warning in a red box, or will just refuse to run. You'll know if the latter has happened because the text in the results pane has gone gray rather than its usual black.
2. Types of Data
2. Types of Data
There are lots of kinds of data, and Swift handles them all individually. You already saw one of the most important types when you assigned some text to a variable, but in Swift this is called a String – literally a string of characters.
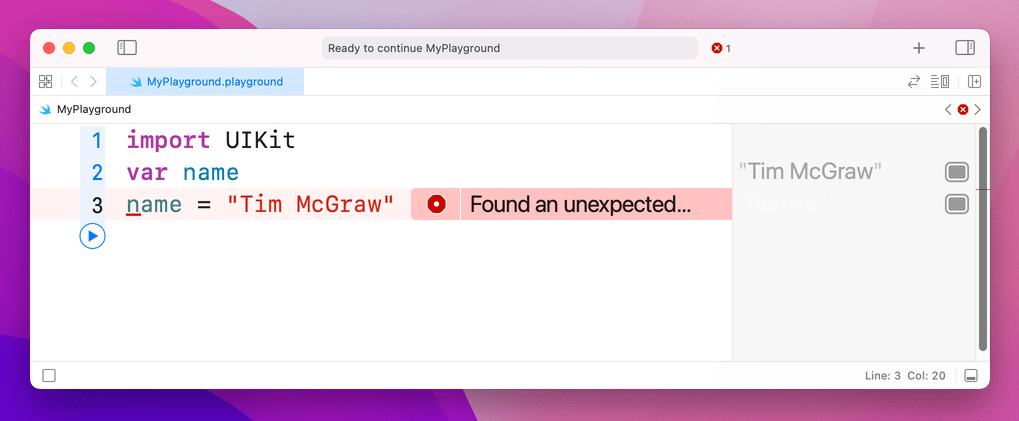
Strings can be long (e.g. a million letters or more), short (e.g. 10 letters) or even empty (no letters), it doesn't matter: they are all strings in Swift's eyes, and all work the same. Swift knows that name should hold a string because you assign a string to it when you create it: "Tim McGraw". If you were to rewrite your code to this it would stop working:
var name
name = "Tim McGraw"
At this point you have two options: either create your variable and give it an initial value on one line of code, or use what's called a type annotation, which is where you tell Swift what data type the variable will hold later on, even though you aren't giving it a value right now.
You've already seen how the first option looks, so let's look at the second: type annotations. We know that name is going to be a string, so we can tell Swift that by writing a colon then String, like this:
var name: String
name = "Tim McGraw"
Note: some people like to put a space before and after the colon, making var name : String, but they are wrong and you should try to avoid mentioning their wrongness in polite company.
The lesson here is that Swift always wants to know what type of data every variable or constant will hold. Always. You can't escape it, and that's a good thing because it provides something called type safety – if you say "this will hold a string" then later try and put a rabbit in there, Swift will refuse.
We can try this out now by introducing another important data type, called Int, which is short for "integer." Integers are round numbers like 3, 30, 300, or -16777216. For example:
var name: String
name = "Tim McGraw"

var age: Int
age = 25
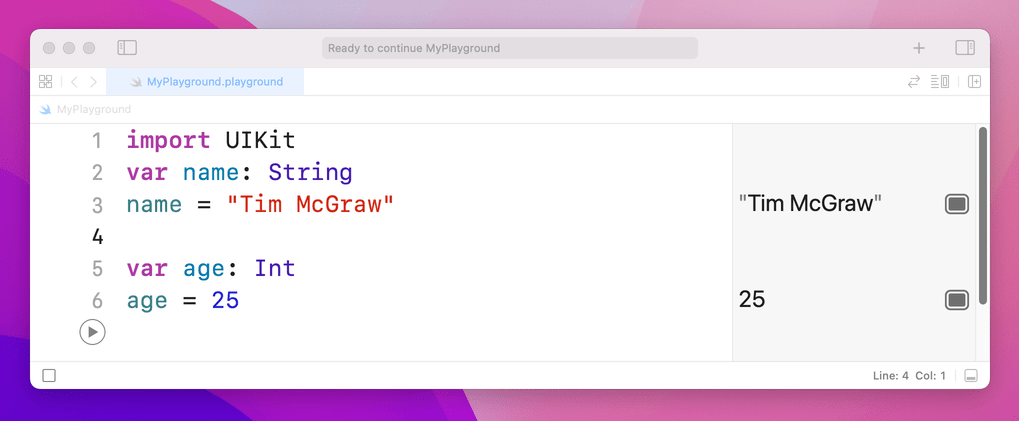
That declares one variable to be a string and one to be an integer. Note how both String and Int have capital letters at the start, whereas name and age do not – this is the standard coding convention in Swift. A coding convention is something that doesn't matter to Swift (you can write your names how you like!) but does matter to other developers. In this case, data types start with a capital letter, whereas variables and constants do not.
Now that we have variables of two different types, you can see type safety in action. Try writing this:
name = 25
age = "Tim McGraw"
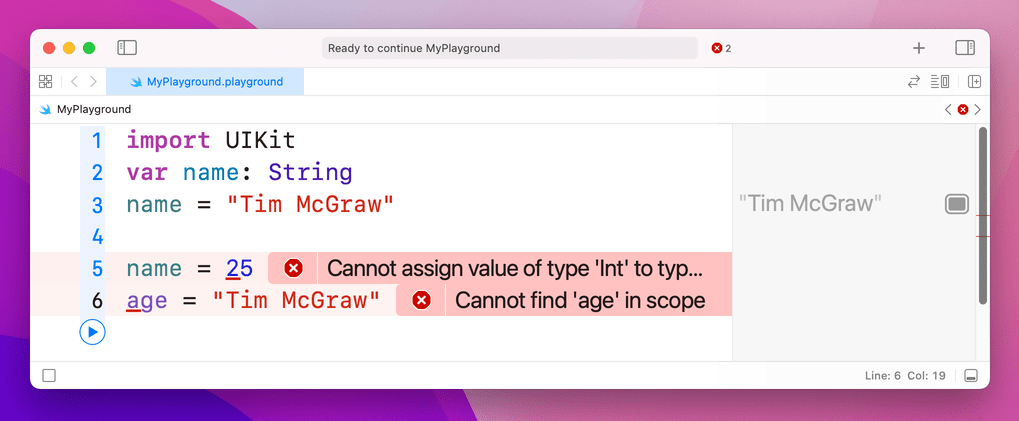
In that code, you're trying to put an integer into a string variable, and a string into an integer variable – and, thankfully, Xcode will throw up errors. You might think this is pedantic, but it's actually quite helpful: you make a promise that a variable will hold one particular type of data, and Xcode will enforce that throughout your work.
Before you go on, please delete those two lines of code causing the error, otherwise nothing in your playground will work going forward!
Float and Double
Let's look at two more data types, called Float and Double. This is Swift's way of storing numbers with a fractional component, such as 3.1, 3.141, 3.1415926, and -16777216.5. There are two data types for this because you get to choose how much accuracy you want, but most of the time it doesn't matter so the official Apple recommendation is always to use Double because it has the highest accuracy.
Try putting this into your playground:
var latitude: Double
latitude = 36.166667

var longitude: Float
longitude = -86.783333
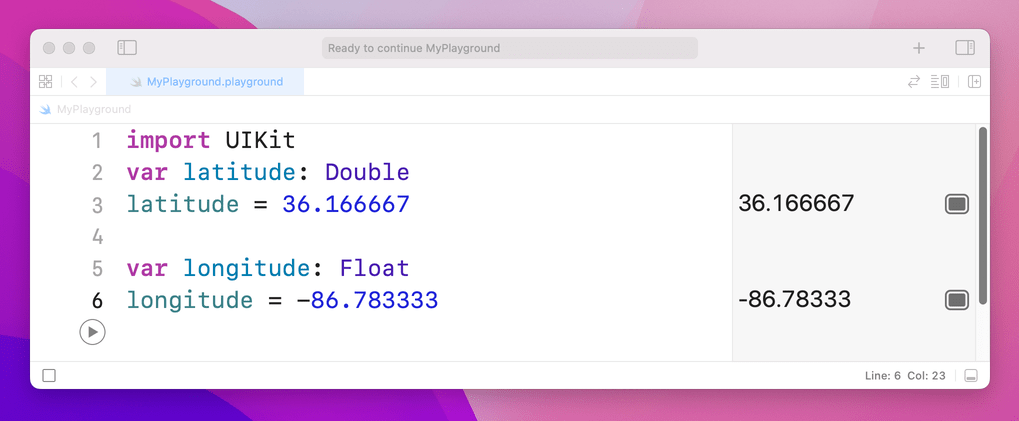
longitude has a 3 missing off the end in the printout.You can see both numbers appear on the right, but look carefully because there's a tiny discrepancy. We said that longitude should be equal to -86.783333, but in the results pane you'll see -86.78333 – it's missing one last 3 on the end. Now, you might well say, "what does 0.000003 matter among friends?" but this is ably demonstrating what I was saying about accuracy.
Because these playgrounds update as you type, we can try things out so you can see exactly how Float and Double differ. Try changing the code to be this:
var longitude: Float
longitude = -86.783333
longitude = -186.783333
longitude = -1286.783333
longitude = -12386.783333
longitude = -123486.783333
longitude = -1234586.783333
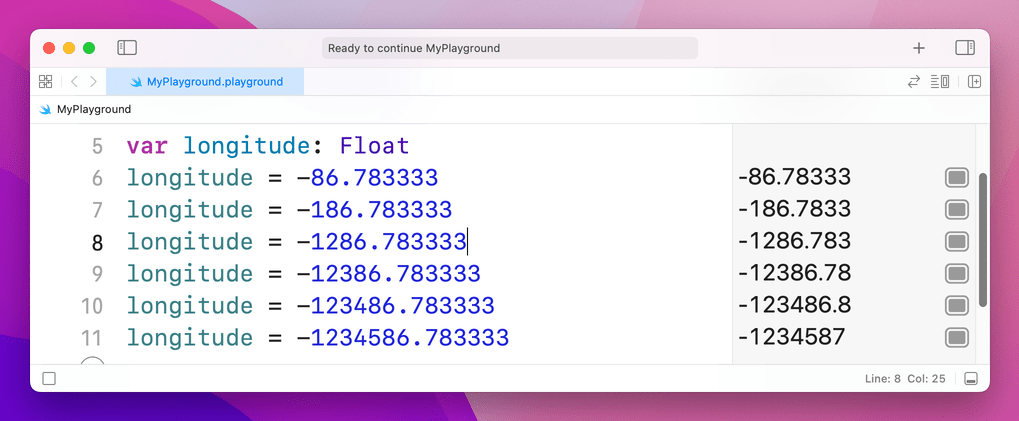
That's adding increasing numbers before the decimal point, while keeping the same amount of numbers after. But if you look in the results pane you'll notice that as you add more numbers before the point, Swift is removing numbers after. This is because it has limited space in which to store your number, so it's storing the most important part first – being off by 1,000,000 is a big thing, whereas being off by 0.000003 is less so.
Now try changing the Float to be a Double and you'll see Swift prints the correct number out every time:
var longitude: Double
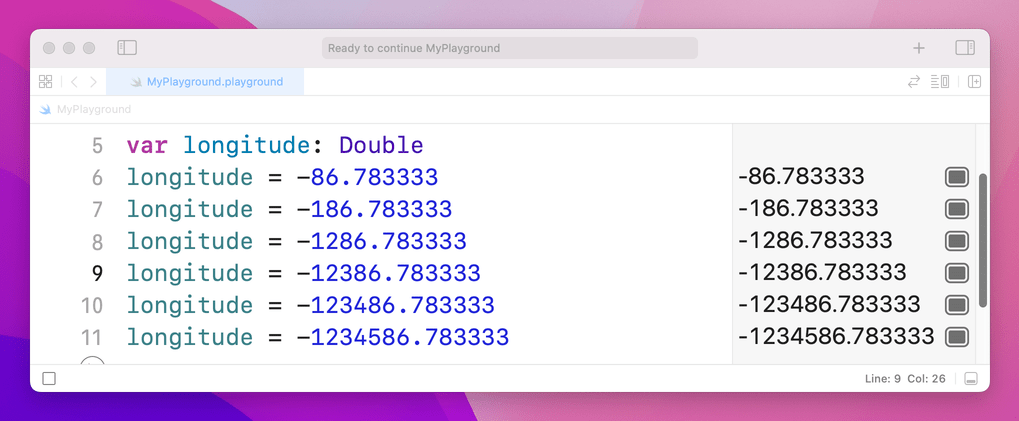
This is because, again, Double has twice the accuracy of Float so it doesn't need to cut your number to fit. Doubles still have limits, though – if you were to try a massive number like 123456789.123456789 you would see it gets cut down to 123456789.1234568.
Boolean
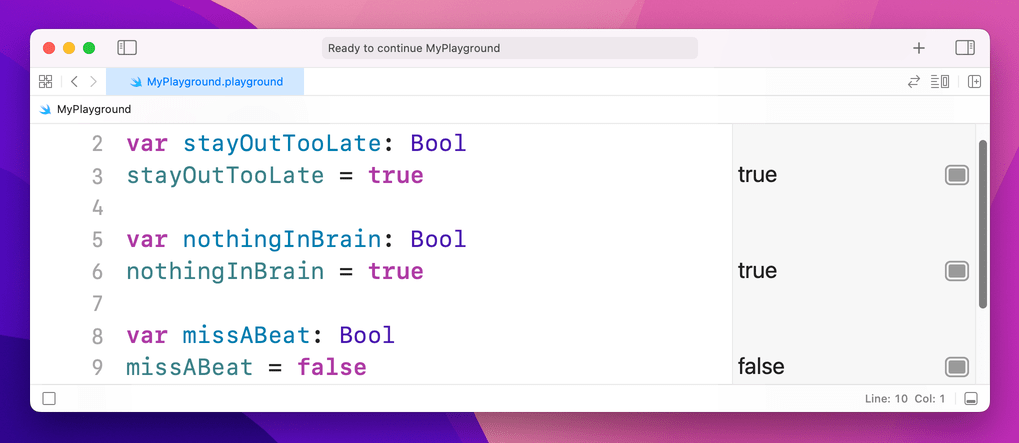
Swift has a built-in data type that can store whether a value is true or false, called a Bool, short for Boolean. Bools don't have space for "maybe" or "perhaps", only absolutes: true or false. For example:
var stayOutTooLate: Bool
stayOutTooLate = true

var nothingInBrain: Bool
nothingInBrain = true

var missABeat: Bool
missABeat = false
Tip: You’ll notice these variables are written in a very particular way: we don’t write MissABeat, missabeat, or other such variations, but instead make the initial letter lowercase then capitalize the first letter of the second and subsequent words. This is called “camel case” because it looks a bit like the humps of a camel, and it’s used to make it easier to read words in variable names.
Using type annotations wisely
As you've learned, there are two ways to tell Swift what type of data a variable holds: assign a value when you create the variable, or use a type annotation. If you have a choice, the first is always preferable because it's clearer. For example:
var name = "Tim McGraw"
…is preferred to:
var name: String
name = "Tim McGraw"
This applies to all data types. For example:
var age = 25
var longitude = -86.783333
var nothingInBrain = true
This technique is called type inference, because Swift can infer what data type should be used for a variable by looking at the type of data you want to put in there. When it comes to numbers like -86.783333, Swift will always infer a Double rather than a Float.
For the sake of completeness, I should add that it's possible to specify a data type and provide a value at the same time, like this:
var name: String = "Tim McGraw"
3. Operators
3. Operators
Operators are those little symbols you learned in your very first math classes: + to add, - to subtract, * to multiply, / to divide, = to assign value, and so on. They all exist in Swift, along with a few extras.
Let's try a few basics – please type this into your playground:
var a = 10
a = a + 1
a = a - 1
a = a * a
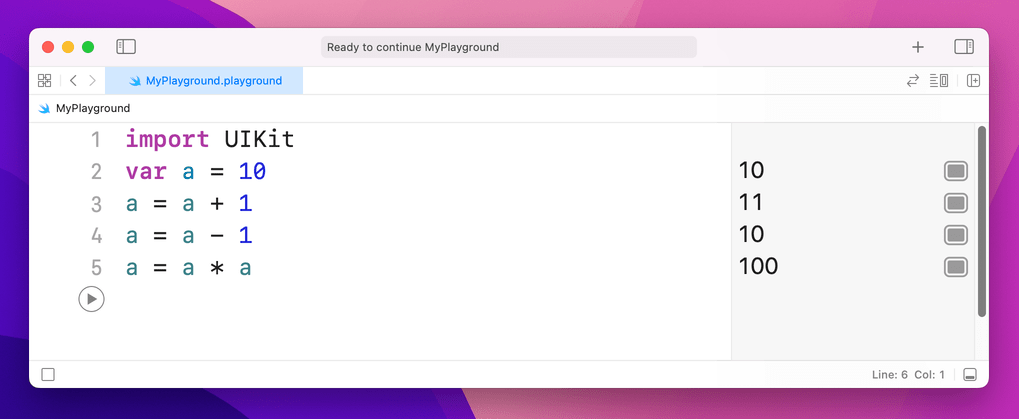
In the results pane, you'll see 10, 11, 10 and 100 respectively. Now try this:
var b = 10
b += 10
b -= 10
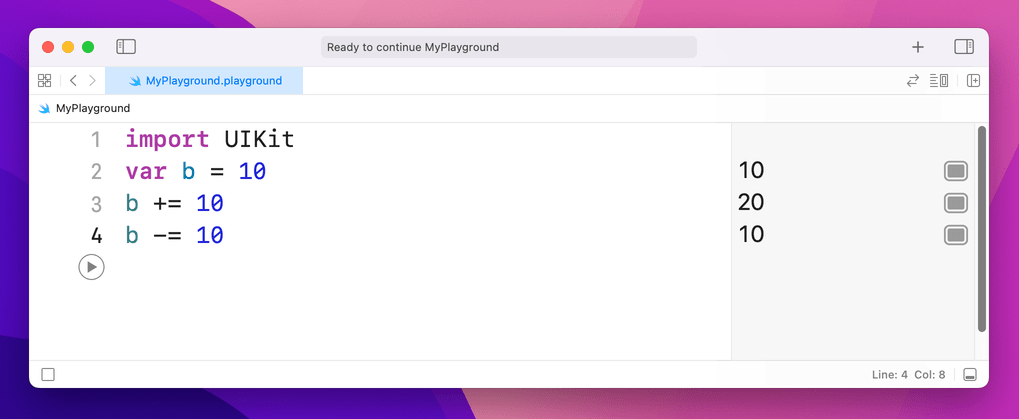
+= is an operator that means "add then assign to." In our case it means "take the current value of b, add 10 to it, then put the result back into b." As you might imagine, -= does the same but subtracts rather than adds. So, that code will show 10, 20, 10 in the results pane.
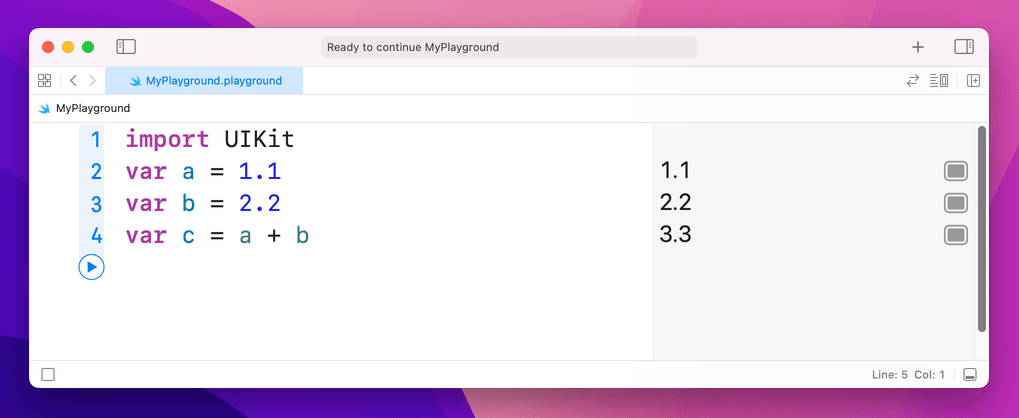
Some of these operators apply to other data types. As you might imagine, you can add two doubles together like this:
var a = 1.1
var b = 2.2
var c = a + b
When it comes to strings, + will join them together. For example:
var name1 = "Tim McGraw"
var name2 = "Romeo"
var both = name1 + " and " + name2
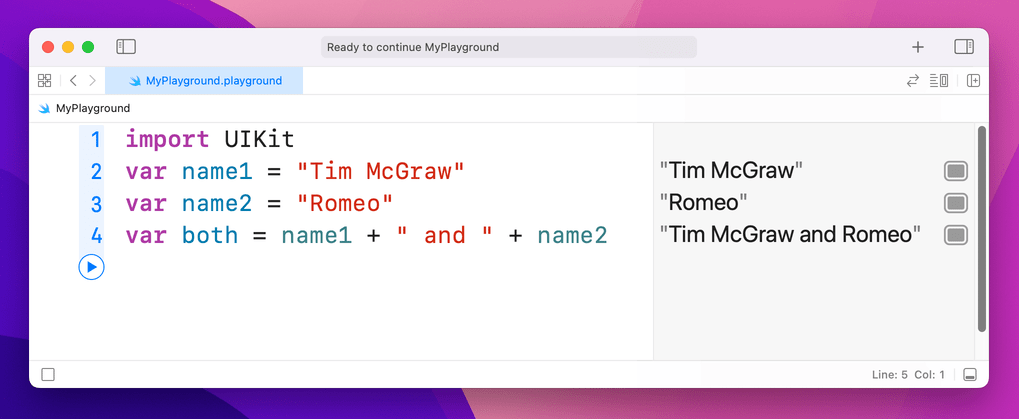
That will write "Tim McGraw and Romeo" into the results pane.
One more common operator you’ll see is called modulus, and is written using a percent symbol: %. It means “divide the left hand number evenly by the right, and return the remainder.” So, 9 % 3 returns 0 because 3 divides evenly into 9, whereas 10 % 3 returns 1, because 10 divides by 3 three times, with remainder 1.

Note: If you bought Hacking with Swift and are using the exclusive guide book accompaniment to the course, you’ll find the modulus operator useful later on.
Comparison operators
Swift has a set of operators that perform comparisons on values. For example:
var a = 1.1
var b = 2.2
var c = a + b

c > 3
c >= 3
c > 4
c < 4
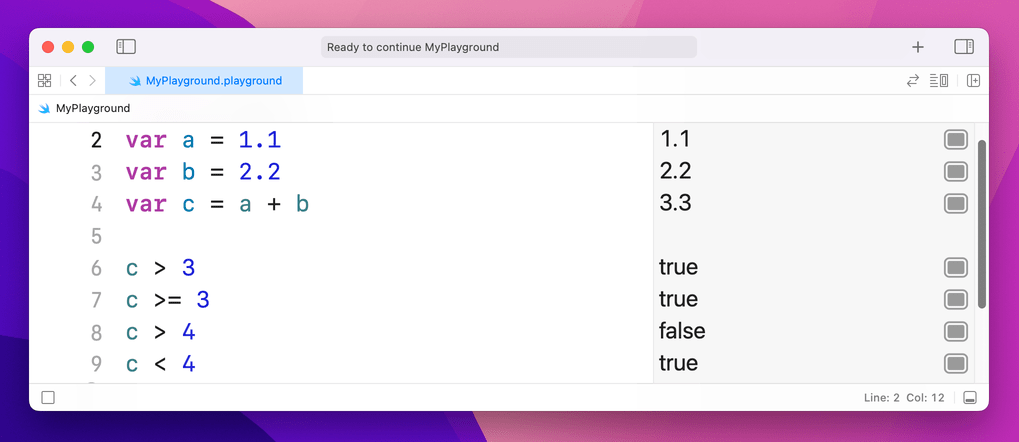
That shows off greater than (>), greater than or equal (>=), and less than (<). In the results window you'll see true, true, false, true – these are Booleans, because the answer to each of these statements can only ever be true or false.
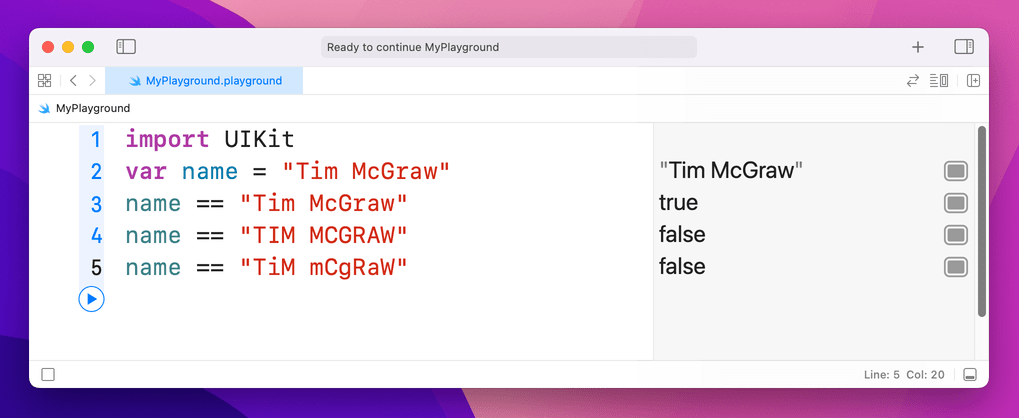
If you want to check for equality, you can't use = because it already has a meaning: it's used to give a variable a value. So, Swift has an alternative in the form of ==, meaning "is equal to." For example:
var name = "Tim McGraw"
name == "Tim McGraw"
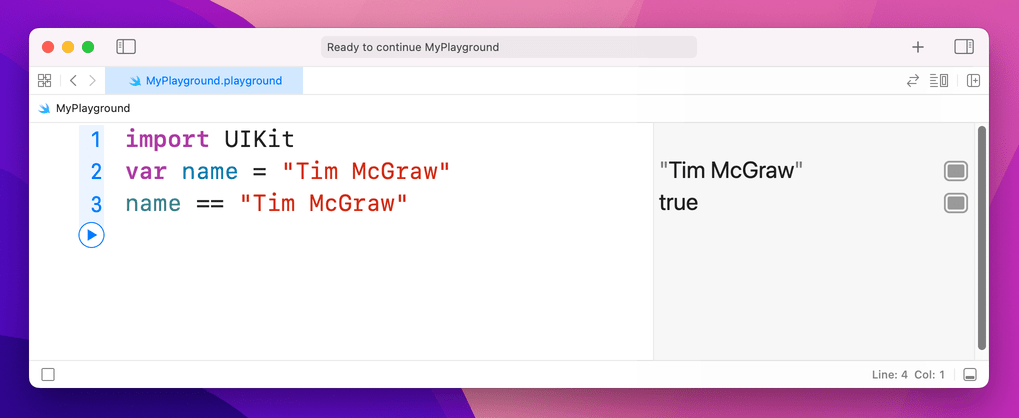
That will show "true" in the results pane. Now, one thing that might catch you out is that in Swift strings are case-sensitive, which means "Tim McGraw", "TIM MCGRAW" and "TiM mCgRaW" are all considered different. If you use == to compare two strings, you need to make sure they have the same letter case.
There's one more operator I want to introduce you to, and it's called the "not" operator: !. Yes, it's just an exclamation mark. This makes your statement mean the opposite of what it did. For example:
var stayOutTooLate = true
stayOutTooLate
!stayOutTooLate
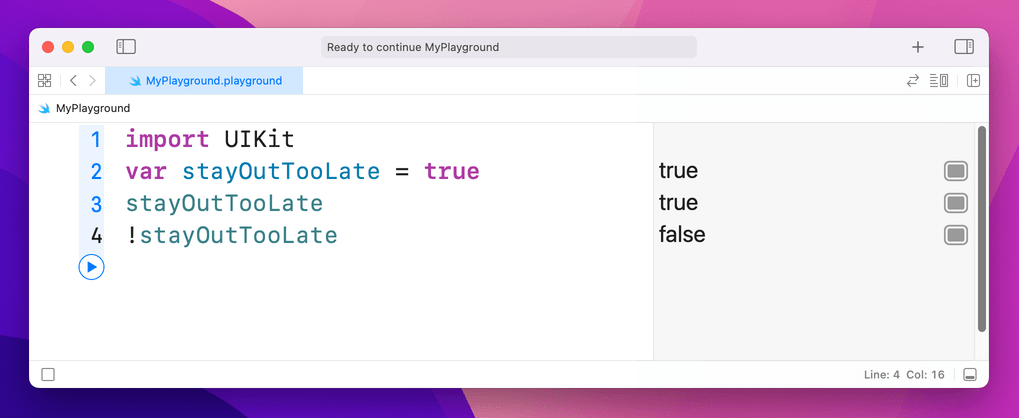
That will print out true, true, false – with the last value there because it flipped the previous true.
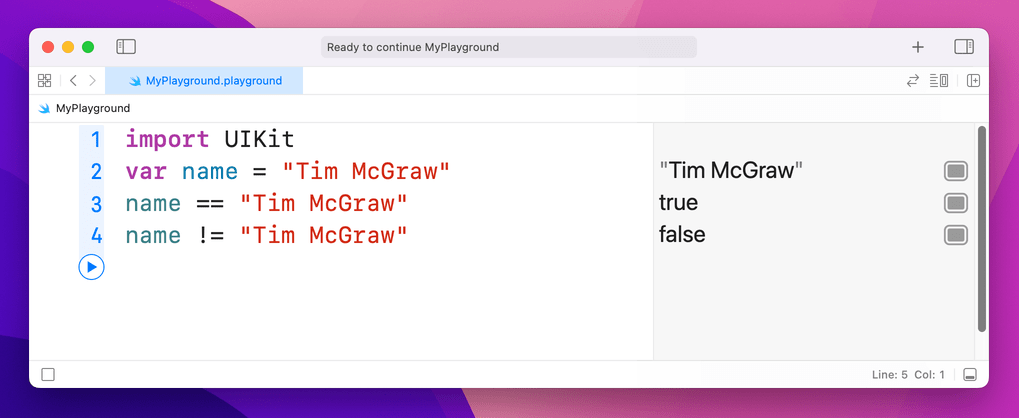
You can also use ! with = to make != or "not equal". For example:
var name = "Tim McGraw"
name == "Tim McGraw"
name != "Tim McGraw"
4. String interpolation
4. String interpolation
This is a fancy name for what is actually a very simple thing: combining variables and constants inside a string.
Clear out all the code you just wrote and leave only this:
var name = "Tim McGraw"
If we wanted to print out a message to the user that included their name, string interpolation is what makes that easy: you just write a backslash, then an open parenthesis, then your code, then a close parenthesis, like this:
var name = "Tim McGraw"
"Your name is \(name)"
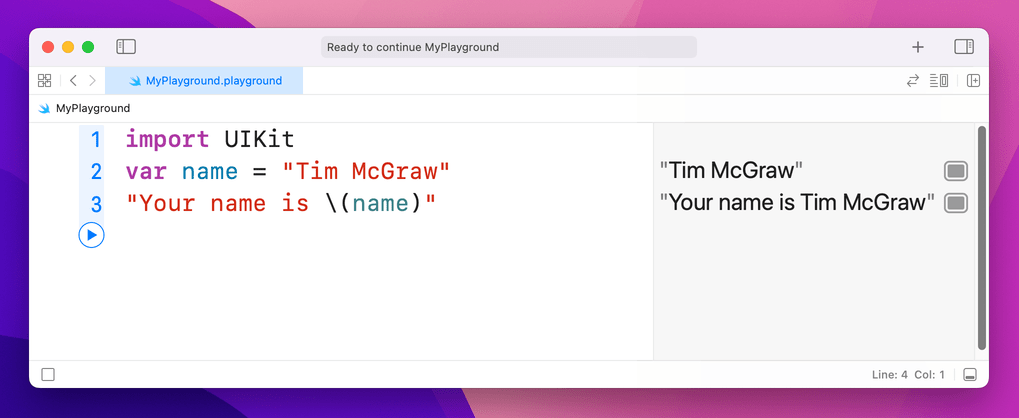
The results pane will now show "Your name is Tim McGraw" all as one string, because string interpolation combined the two for us.
Now, we could have written that using the + operator, like this:
var name = "Tim McGraw"
"Your name is " + name
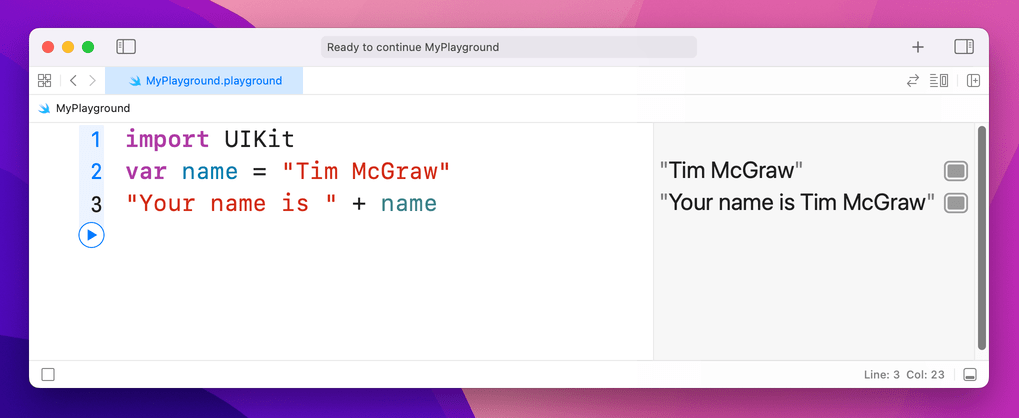
…but that's not as efficient, particularly if you're combining multiple variables together. In addition, string interpolation in Swift is smart enough to be able to handle a variety of different data types automatically. For example:
var name = "Tim McGraw"
var age = 25
var latitude = 36.166667

"Your name is \(name), your age is \(age), and your latitude is \(latitude)"
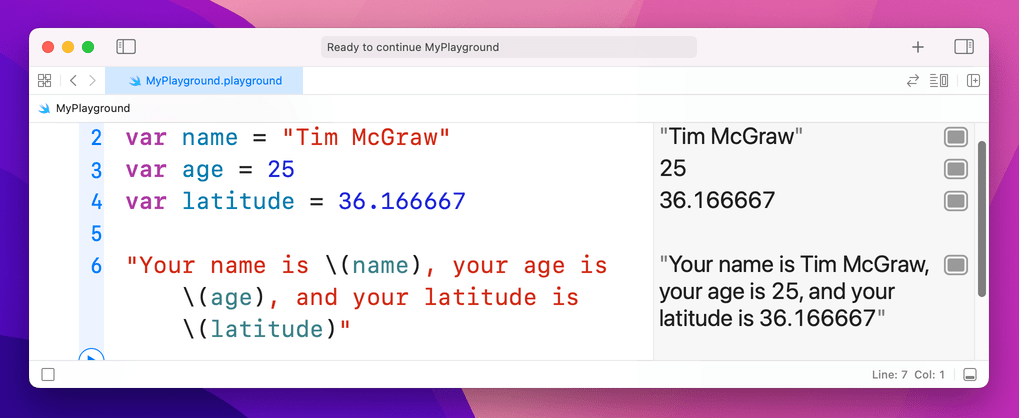
Doing that using + is much more difficult, because Swift doesn't let you add integers and doubles to a string.
At this point your result may no longer fit in the results pane, so either resize your window or hover over the result and click the + button that appears to have it shown inline.
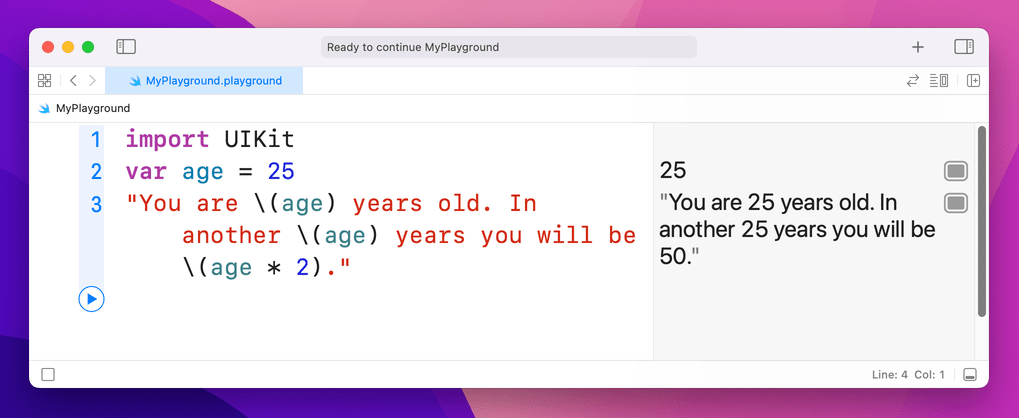
One of the powerful features of string interpolation is that everything between \( and ) can actually be a full Swift expression. For example, you can do mathematics in there using operators, like this:
var age = 25
"You are \(age) years old. In another \(age) years you will be \(age * 2)."
5. Arrays
5. Arrays
Arrays let you group lots of values together into a single collection, then access those values by their position in the collection. Swift uses type inference to figure out what type of data your array holds, like so:
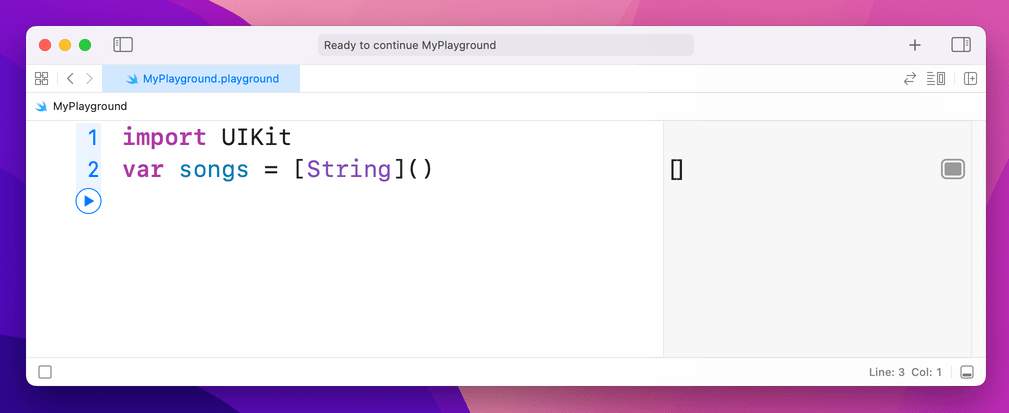
var evenNumbers = [2, 4, 6, 8]
var songs = ["Shake it Off", "You Belong with Me", "Back to December"]
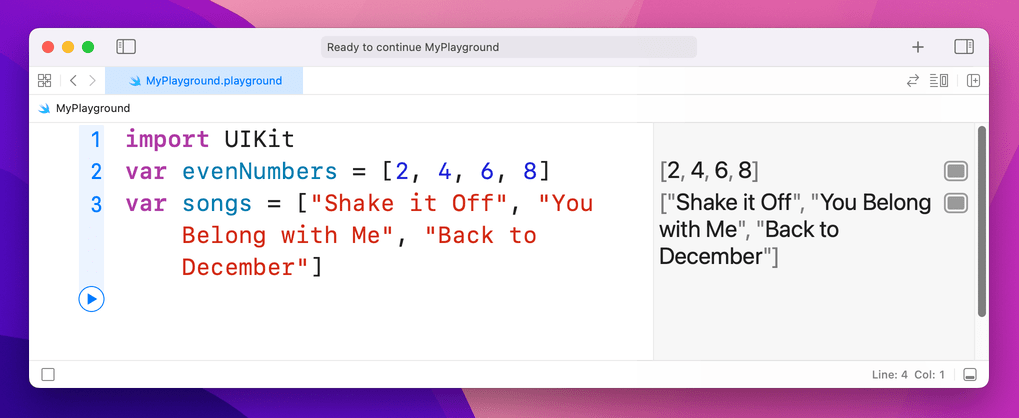
As you can see, Swift uses brackets to mark the start and end of an array, and each item in the array is separated with a comma.
When it comes to reading items out an array, there's a catch: Swift starts counting at 0. This means the first item is 0, the second item is 1, the third is 2, and so on. Try putting this into your playground:
var songs = ["Shake it Off", "You Belong with Me", "Back to December"]
songs[0]
songs[1]
songs[2]
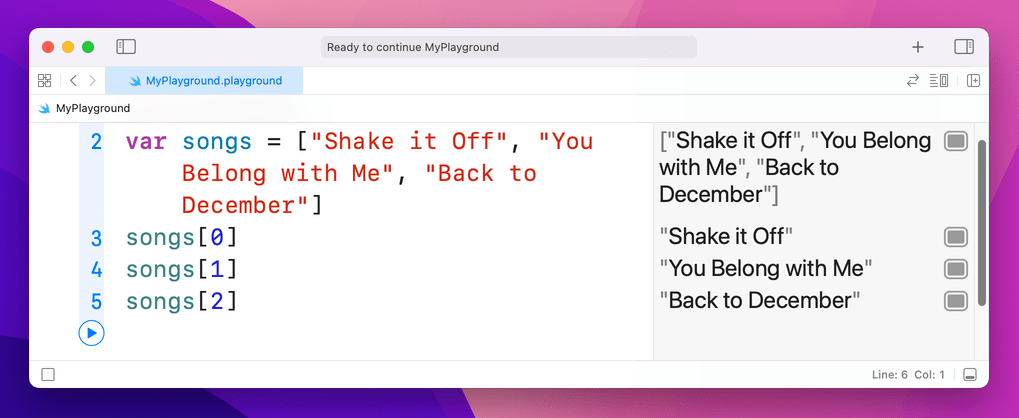
That will print "Shake it Off", "You Belong with Me", and "Back to December" in the results pane.
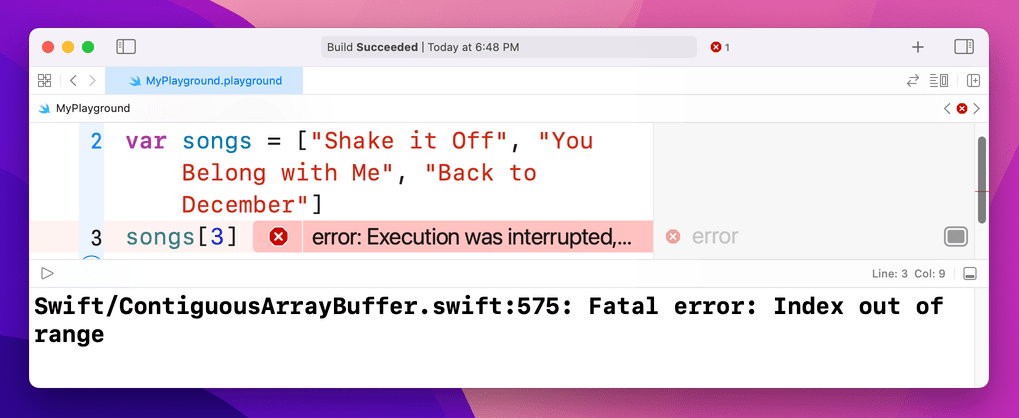
An item's position in an array is called its index, and you can read any item from the array just by providing its index. However, you do need to be careful: our array has three items in, which means indexes 0, 1 and 2 work great. But if you try and read songs[3] your playground will stop working – and if you tried that in a real app it would crash!
Because you've created your array by giving it three strings, Swift knows this is an array of strings. You can confirm this by using a special command in the playground that will print out the data type of any variable, like this:
var songs = ["Shake it Off", "You Belong with Me", "Back to December"]
type(of: songs)
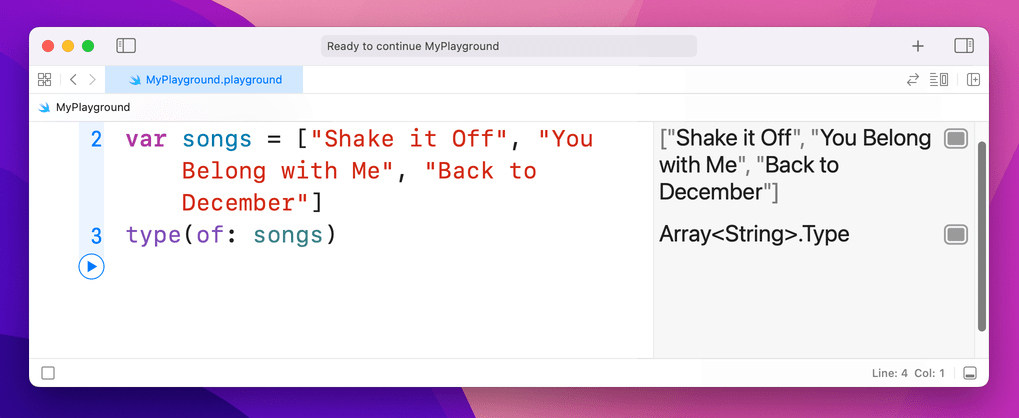
That will print Array<String>.Type into the results pane, telling you that Swift considers songs to be an array of strings.
Let's say you made a mistake, and accidentally put a number on the end of the array. Try this now and see what the results pane prints:
var songs = ["Shake it Off", "You Belong with Me", "Back to December", 3]
type(of: songs)
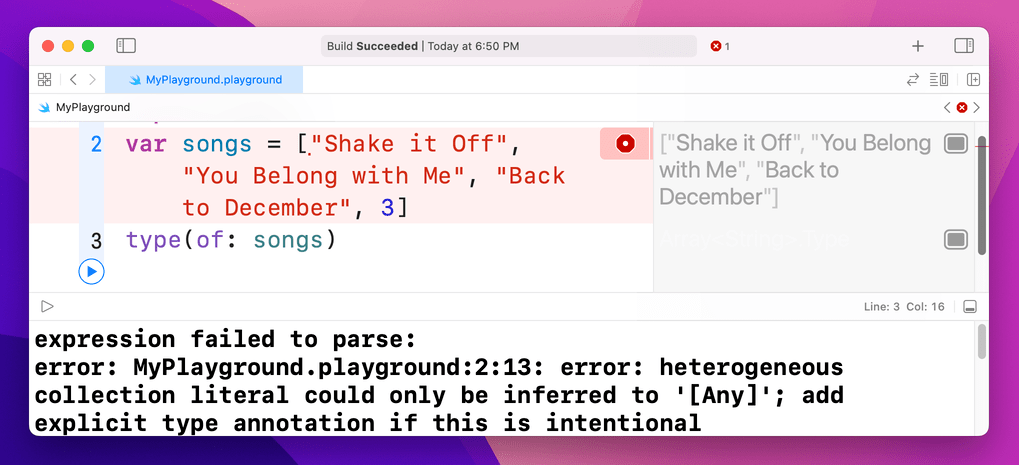
This time you'll see an error. The error isn’t because Swift can’t handle mixed arrays like this one – I’ll show you how to do that in just a moment! – but instead because Swift is being helpful. The error message you’ll see is, “heterogenous collection literal could only be inferred to '[Any]'; add explicit type annotation if this is intentional.” Or, in plain English, “it looks like this array is designed to hold lots of types of data – if you really meant that, please make it explicit.”
Type safety is important, and although it's neat that Swift can make arrays hold any kind of data this particular case was an accident. Fortunately, I've already said that you can use type annotations to specify exactly what type of data you want an array to store. To specify the type of an array, write the data type you want to store with brackets around it, like this:
var songs: [String] = ["Shake it Off", "You Belong with Me", "Back to December", 3]
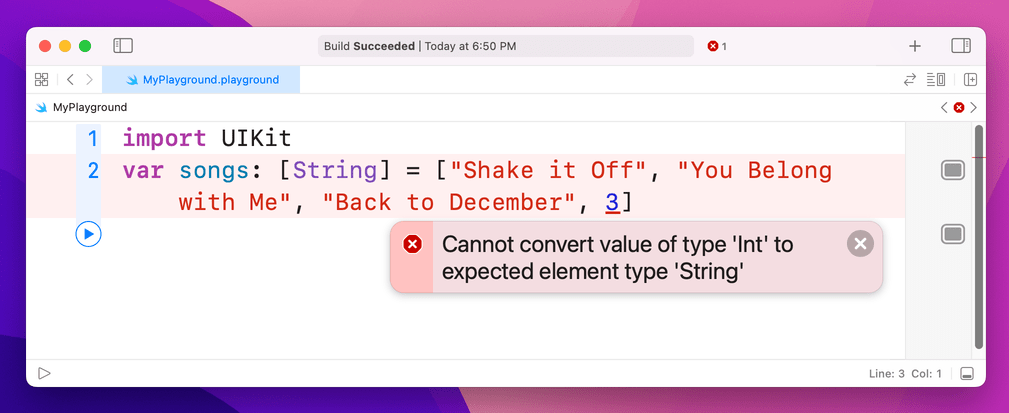
Now that we've told Swift we want to store only strings in the array, it will always refuse to run the code because 3 is not a string.
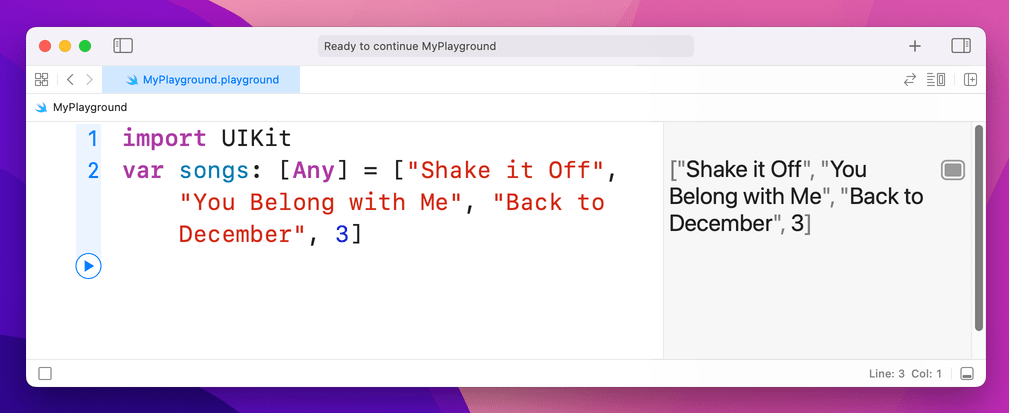
If you really want the array to hold any kind of data, use the special Any data type, like this:
var songs: [Any] = ["Shake it Off", "You Belong with Me", "Back to December", 3]
Creating arrays
If you make an array using the syntax shown above, Swift creates the array and fills it with the values we specified. Things aren't quite so straightforward if you want to create the array then fill it later – this syntax doesn't work:
var songs: [String]
songs[0] = "Shake it Off"
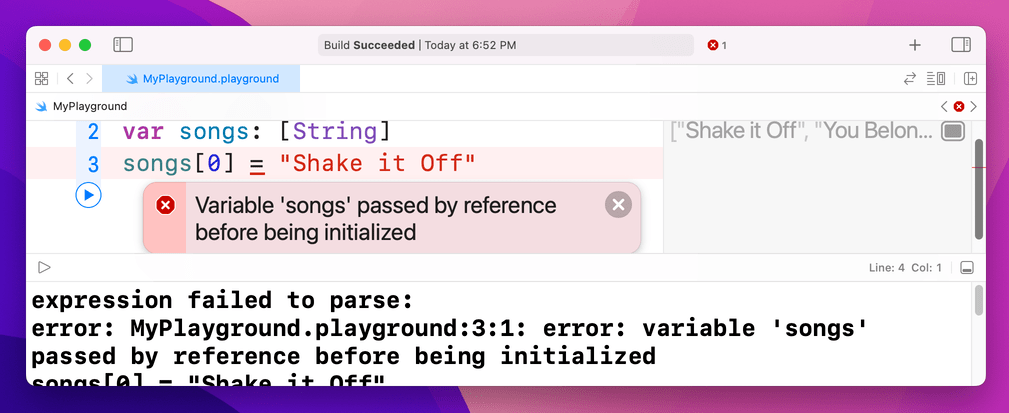
The reason is one that will seem needlessly pedantic at first, but has deep underlying performance implications so I'm afraid you're just stuck with it. Put simply, writing var songs: [String] tells Swift "the songs variable will hold an array of strings," but it doesn't actually create that array. It doesn't allocate any RAM, or do any of the work to actually create a Swift array. It just says that at some point there will be an array, and it will hold strings.
There are a few ways to express this correctly, and the one that probably makes most sense at this time is this:
var songs: [String] = []

That uses a type annotation to make it clear we want an array of strings, and it assigns an empty array (that's the [] part) to it.
You'll also commonly see this construct:
var songs = [String]()
That means the same thing: the () tells Swift we want to create the array in question, which is then assigned to songs using type inference. This option is two characters shorter, so it's no surprise programmers prefer it!
Array operators
You can use a limited set of operators on arrays. For example, you can merge two arrays by using the + operator, like this:
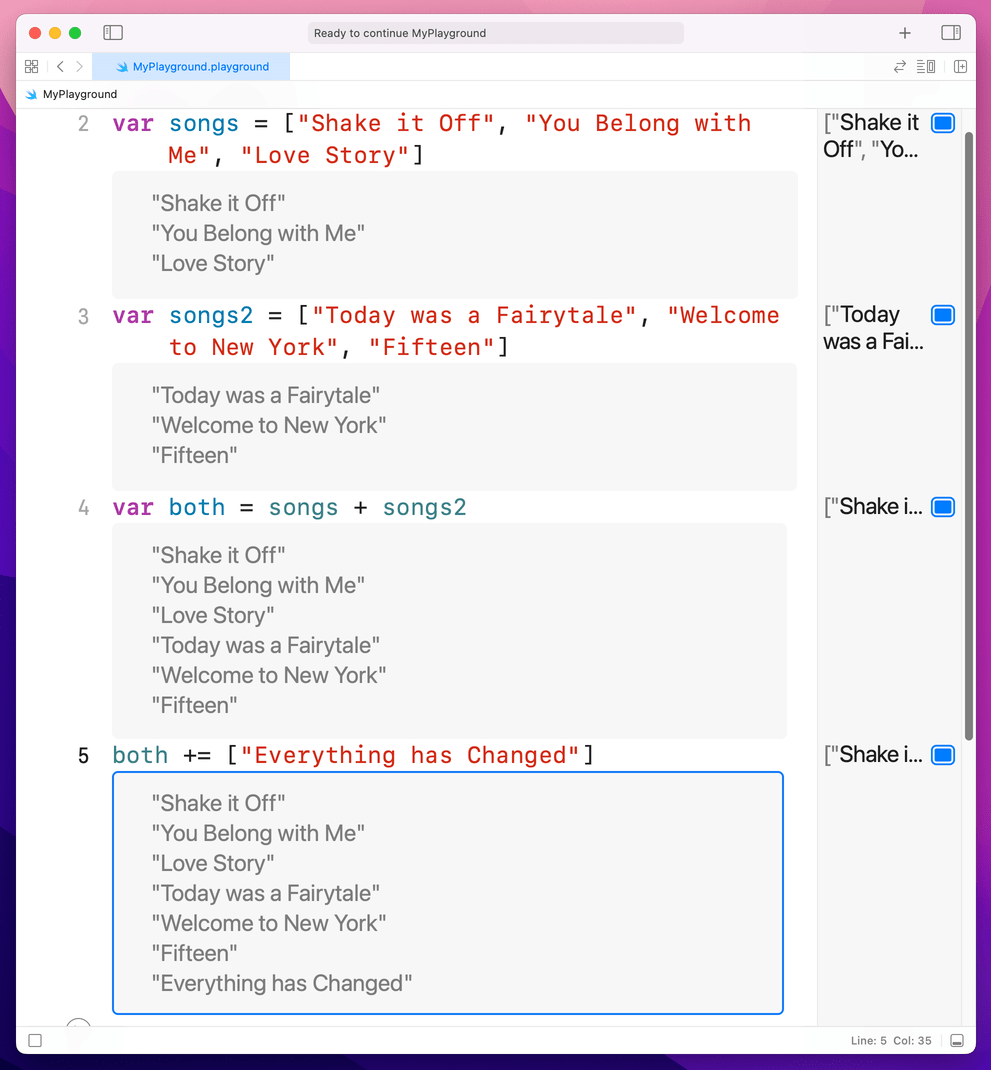
var songs = ["Shake it Off", "You Belong with Me", "Love Story"]
var songs2 = ["Today was a Fairytale", "Welcome to New York", "Fifteen"]
var both = songs + songs2
You can also use += to add and assign, like this:
both += ["Everything has Changed"]
6. Dictionaries
6. Dictionaries
As you've seen, Swift arrays are a collection where you access each item using a numerical index, such as songs[0]. Dictionaries are another common type of collection, but they differ from arrays because they let you access values based on a key you specify.
To give you an example, let's imagine how we might store data about a person in an array:
var person = ["Taylor", "Alison", "Swift", "December", "taylorswift.com"]
To read out that person's middle name, we'd use person[1], and to read out the month they were born we'd use person[3]. This has a few problems, not least that it's difficult to remember what index number is assigned to each value in the array! And what happens if the person has no middle name? Chances are all the other values would move down one place, causing chaos in your code.
With dictionaries we can re-write this to be far more sensible, because rather than arbitrary numbers you get to read and write values using a key you specify. For example:
var person = ["first": "Taylor", "middle": "Alison", "last": "Swift", "month": "December", "website": "taylorswift.com"]
person["middle"]
person["month"]
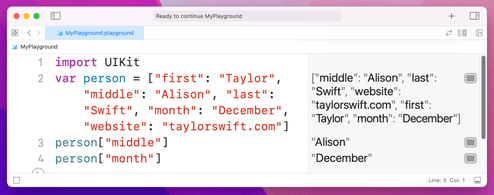
It might help if I use lots of whitespace to break up the dictionary on your screen, like this:
var person = [
                "first": "Taylor",
                "middle": "Alison",
                "last": "Swift",
                "month": "December",
                "website": "taylorswift.com"
            ]

person["middle"]
person["month"]
As you can see, when you make a dictionary you write its key, then a colon, then its value. You can then read any value from the dictionary just by knowing its key, which is much easier to work with.
As with arrays, you can store a wide variety of values inside dictionaries, although the keys are most commonly strings.
7. Conditional statements
7. Conditional statements
Sometimes you want code to execute only if a certain condition is true, and in Swift that is represented primarily by the if and else statements. You give Swift a condition to check, then a block of code to execute if that condition is true.
You can optionally also write else and provide a block of code to execute if the condition is false, or even else if and have more conditions. A "block" of code is just a chunk of code marked with an open brace – { – at its start and a close brace – } – at its end.
Here's a basic example:
var action: String
var person = "hater"

if person == "hater" {
    action = "hate"
}
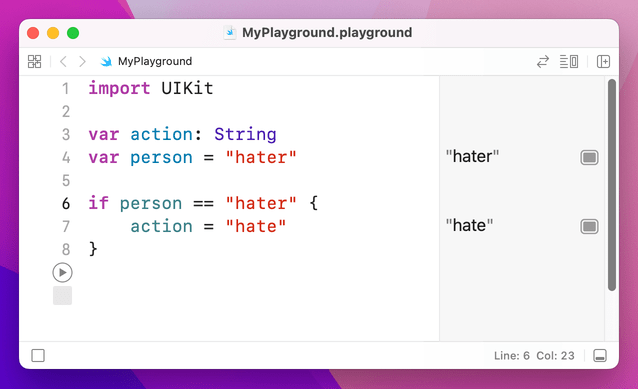
That uses the == (equality) operator introduced previously to check whether the string inside person is exactly equivalent to the string "hater". If it is, it sets the action variable to "hate". Note that open and close braces, also known by their less technical name of "curly brackets" – that marks the start and end of the code that will be executed if the condition is true.
Let's add else if and else blocks:
var action: String
var person = "hater"

if person == "hater" {
    action = "hate"
} else if person == "player" {
    action = "play"
} else {
    action = "cruise"
}
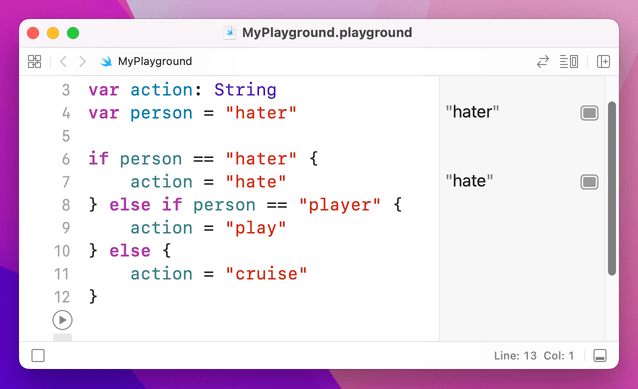
That will check each condition in order, and only one of the blocks will be executed: a person is either a hater, a player, or anything else.
Evaluating multiple conditions
You can ask Swift to evaluate as many conditions as you want, but they all need to be true in order for Swift to execute the block of code. To check multiple conditions, use the && operator – it means "and". For example:
var action: String
var stayOutTooLate = true
var nothingInBrain = true

if stayOutTooLate && nothingInBrain {
    action = "cruise"
}

Because stayOutTooLate and nothingInBrain are both true, the whole condition is true, and action gets set to "cruise." Swift uses something called short-circuit evaluation to boost performance: if it is evaluating multiple things that all need to be true, and the first one is false, it doesn't even bother evaluating the rest.
Looking for the opposite of truth
This might sound deeply philosophical, but actually this is important: sometimes you care whether a condition is not true, i.e. is false. You can do this with the ! (not) operator that was introduced earlier. For example:
if !stayOutTooLate && !nothingInBrain {
    action = "cruise"
}
A conditional which checks if both conditions are false.
This time, the action variable will only be set if both stayOutTooLate and nothingInBrain are false – the ! has flipped them around.
8. Loops
8. Loops
Computers are great at doing boring tasks billions of times in the time it took you to read this sentence. When it comes to repeating tasks in code, you can either copy and paste your code multiple times, or you can use loops – simple programming constructs that repeat a block of code for as long as a condition is true.
To demonstrate this, I want to introduce you to a special debugging function called print(): you give it some text to print, and it will print it. If you're running in a playground like we are, you'll see your text appear in the results window. If you're running a real app in Xcode, you'll see your text appear in Xcode's log window. Either way, print() is a great way to get a sneak peek at the contents of a variable.
Take a look at this code:
print("1 x 10 is \(1 * 10)")
print("2 x 10 is \(2 * 10)")
print("3 x 10 is \(3 * 10)")
print("4 x 10 is \(4 * 10)")
print("5 x 10 is \(5 * 10)")
print("6 x 10 is \(6 * 10)")
print("7 x 10 is \(7 * 10)")
print("8 x 10 is \(8 * 10)")
print("9 x 10 is \(9 * 10)")
print("10 x 10 is \(10 * 10)")
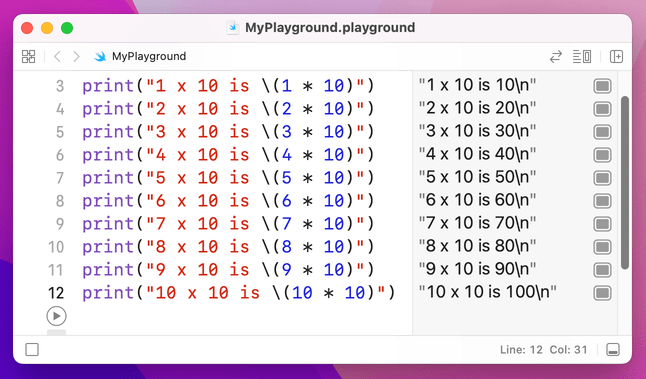
When it has finished running, you'll have the 10 times table in your playground results pane. But it's hardly efficient code, and in fact a much cleaner way is to loop over a range of numbers using what's called the closed range operator, which is three periods in a row: ...
Using the closed range operator, we could re-write that whole thing in three lines:
for i in 1...10 {
    print("\(i) x 10 is \(i * 10)")
}
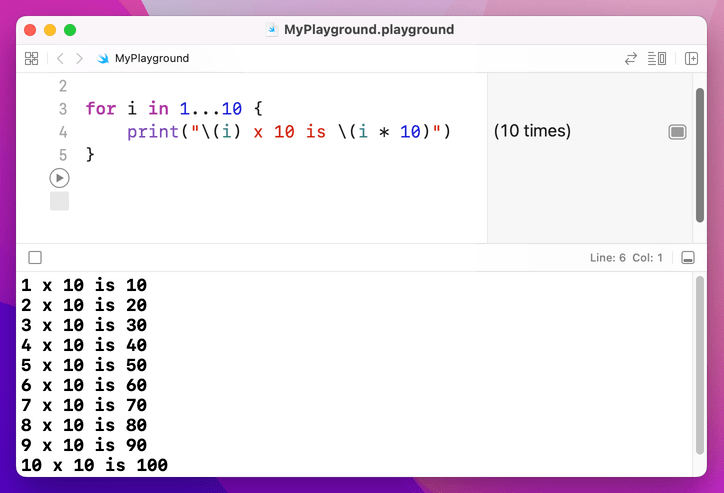
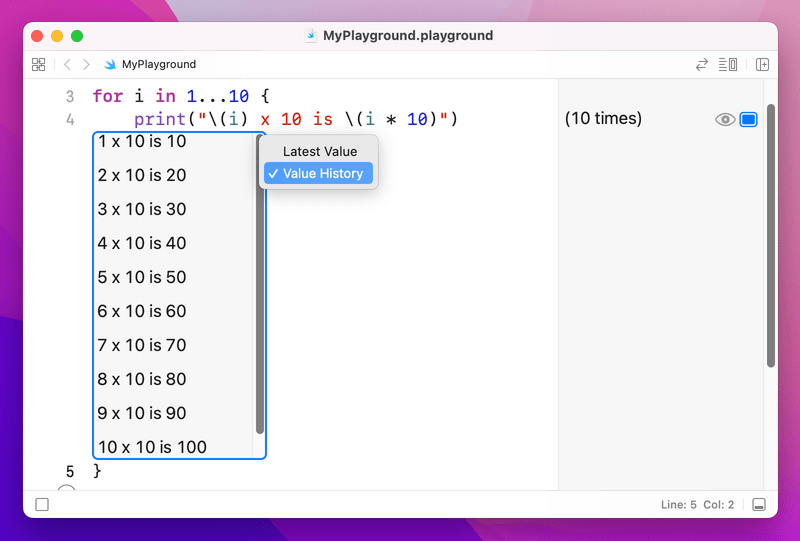
The results pane just shows "(10 times)" for our loop, meaning that the loop was run 10 times. If you want to know what the loop actually did, click the square immediately to the right of “(10 times). You'll see a box saying "10 x 10 is 100" appear inside your code, and if you right-click on that you should see the option “Value History”. Click on that now, and you should see all the printed values over time.
What the loop does is count from 1 to 10 (including 1 and 10), assigns that number to the constant i, then runs the block of code inside the braces.
If you don't need to know what number you're on, you can use an underscore instead. For example, we could print some Taylor Swift lyrics like this:
var str = "Fakers gonna"

for _ in 1...5 {
    str += " fake"
}

print(str)
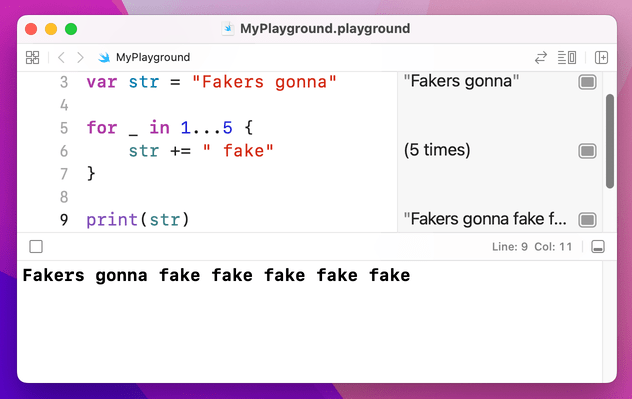
That will print "Fakers gonna fake fake fake fake fake" by adding to the string each time the loop goes around.
If Swift doesn’t have to assign each number to a variable each time the loop goes around, it can run your code a little faster. As a result, if you write for i in… then don’t use i, Xcode will suggest you change it to _.
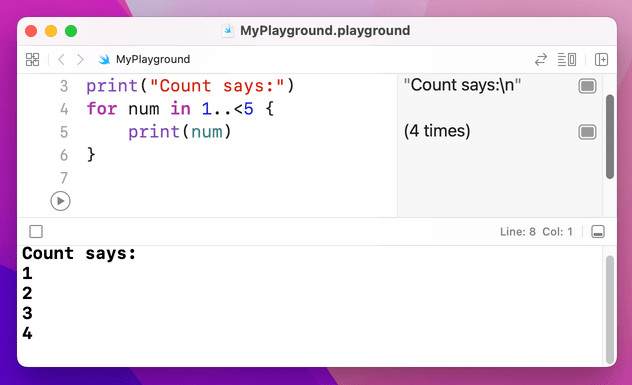
There's a variant of the closed range operator called the half open range operator, and they are easily confused. The half open range operator looks like ..< and counts from one number up to and excluding another. For example, 1..<5 will count 1, 2, 3, 4.
Looping over arrays
Swift provides a very simple way to loop over all the elements in an array. Because Swift already knows what kind of data your array holds, it will go through every element in the array, assign it to a constant you name, then run a block of your code. For example, we could print out a list of great songs like this:
var songs = ["Shake it Off", "You Belong with Me", "Look What You Made Me Do"]

for song in songs {
    print("My favorite song is \(song)")
}

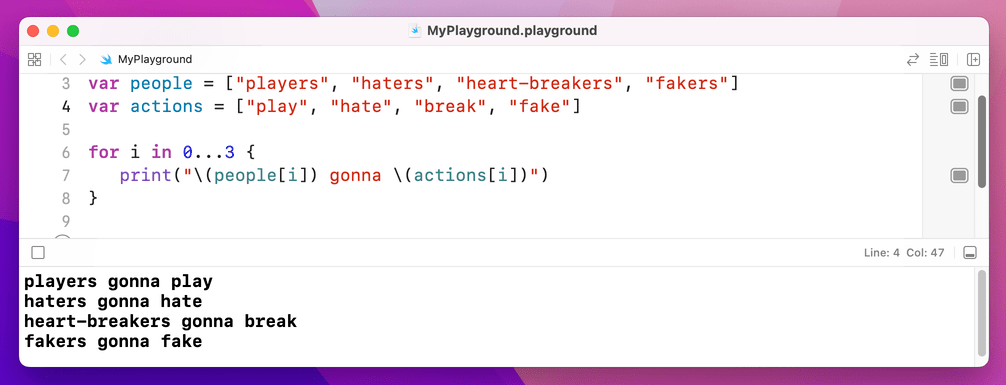
You can also use the for i in loop construct to loop through arrays, because you can use that constant to index into an array. We could even use it to index into two arrays, like this:
var people = ["players", "haters", "heart-breakers", "fakers"]
var actions = ["play", "hate", "break", "fake"]

for i in 0...3 {
    print("\(people[i]) gonna \(actions[i])")
}
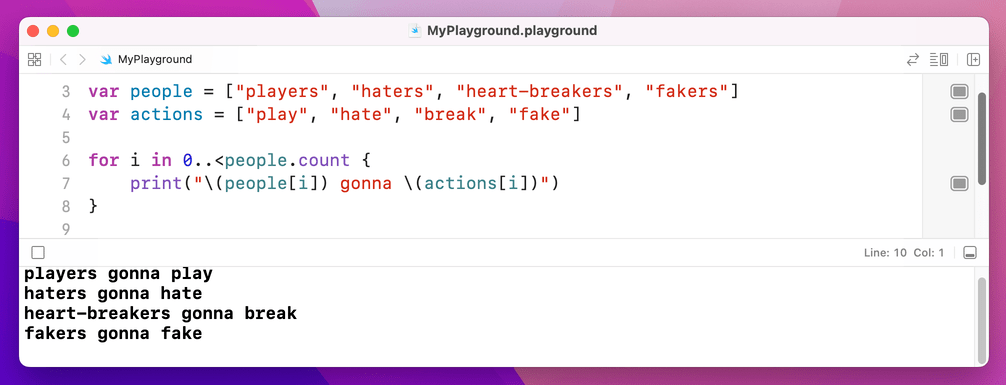
You might wonder what use the half open range operator has, but it's particularly useful for working with arrays because they count from zero. So, rather than counting from 0 up to and including 3, we could count from 0 up to and excluding the number of items in an array.
Remember: they count from zero, so if they have 4 items the maximum index is 3, which is why we need to use excluding for the loop.
To count how many items are in an array, use someArray.count. So, we could rewrite our code like this:
var people = ["players", "haters", "heart-breakers", "fakers"]
var actions = ["play", "hate", "break", "fake"]

for i in 0..<people.count {
    print("\(people[i]) gonna \(actions[i])")
}
Inner loops
You can put loops inside loops if you want, and even loops inside loops inside loops – although you might suddenly find you're doing something 10 million times, so be careful!
We can combine two of our previous loops to create this:
var people = ["players", "haters", "heart-breakers", "fakers"]
var actions = ["play", "hate", "break", "fake"]

for i in 0..<people.count {
    var str = "\(people[i]) gonna"

    for _ in 1...5 {
        str += " \(actions[i])"
    }

    print(str)
}
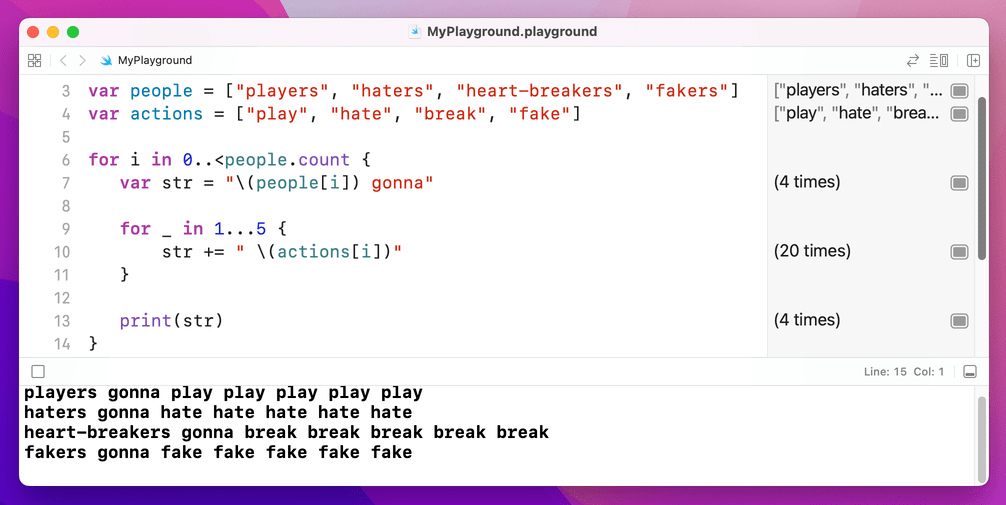
That outputs "players gonna play play play play play", then "haters gonna…" Well, you get the idea.
One important note: although programmers conventionally use i, j and even k for loop constants, you can name them whatever you please: for personNumber in 0..<people.count is perfectly valid.
While loops
There's a third kind of loop you'll see, which repeats a block of code until you tell it to stop. This is used for things like game loops where you have no idea in advance how long the game will last – you just keep repeating "check for touches, animate robots, draw screen, check for touches…" and so on, until eventually the user taps a button to exit the game and go back to the main menu.
These loops are called while loops, and they look like this:
var counter = 0

while true {
    print("Counter is now \(counter)")
    counter += 1

    if counter == 556 {
        break
    }
}
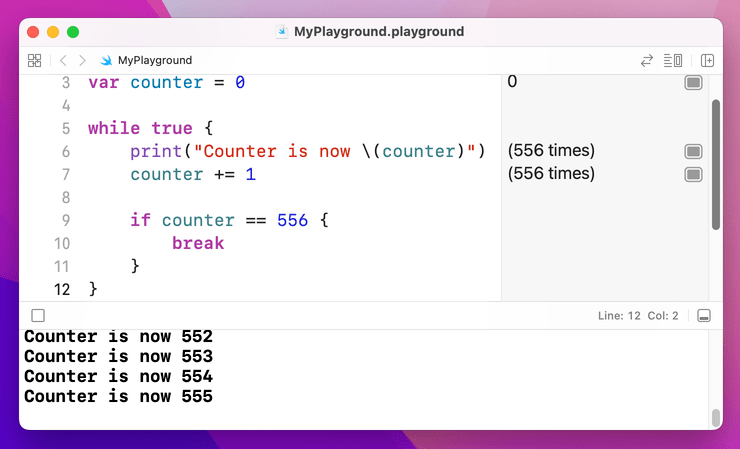
That code introduces a new keyword, called break. It's used to exit a while or for loop at a point you decide. Without it, the code above would never end because the condition to check is just "true", and true is always true. Without that break statement the loop is an infinite loop, which is A Bad Thing.
These while loops work best when you're using unknown data, such as downloading things from the internet, reading from a file such as XML, looking through user input, and so on. This is because you only know when to stop the loop after you've run it a sufficient number of times.
There is a counterpart to break called continue. Whereas breaking out of a loop stops execution immediately and continues directly after the loop, continuing a loop only exits the current iteration of the loop – it will jump back to the top of the loop and pick up from there.
As an example, consider the code below:
var songs = ["Shake it Off", "You Belong with Me", "Look What You Made Me Do"]

for song in songs {
    if song == "You Belong with Me" {
        continue
    }

    print("My favorite song is \(song)")
}
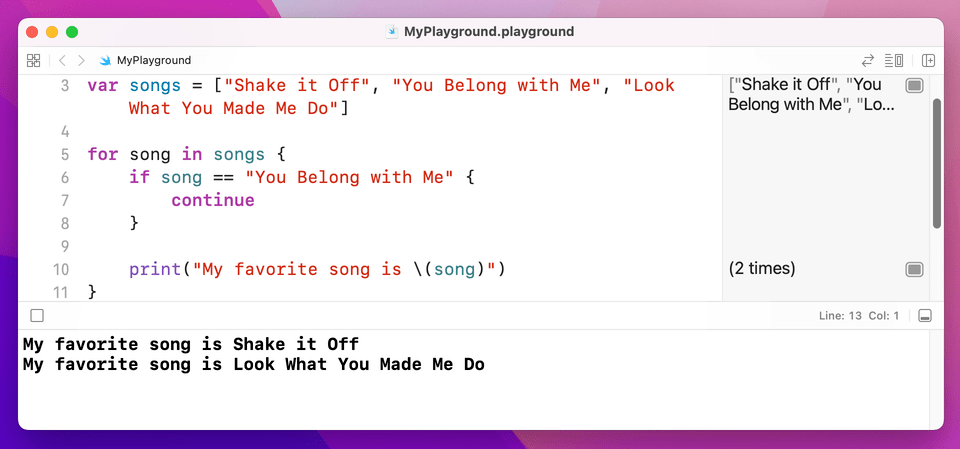
That loops through three Taylor Swift songs, but it will only print the name of two. The reason for this is the continue keyword: when the loop tries to use the song "You Belong with Me", continue gets called, which means the loop immediately jumps back to the start – the print() call is never made, and instead the loop continues straight on to “Look What You Made Me Do”.
9. Switch case
9. Switch case
You've seen if statements and now loops, but Swift has another type of flow control called switch/case. It's easiest to think of this as being an advanced form of if, because you can have lots of matches and Swift will execute the right one.
In the most basic form of a switch/case you tell Swift what variable you want to check, then provide a list of possible cases for that variable. Swift will find the first case that matches your variable, then run its block of code. When that block finishes, Swift exits the whole switch/case block.
Here's a basic example:
let liveAlbums = 2

switch liveAlbums {
case 0:
    print("You're just starting out")

case 1:
    print("You just released iTunes Live From SoHo")

case 2:
    print("You just released Speak Now World Tour")

default:
    print("Have you done something new?")
}

case 2 condition is matched.We could very well have written that using lots of if and else if blocks, but this way is clearer and that's important.
One advantage to switch/case is that Swift will ensure your cases are exhaustive. That is, if there's the possibility of your variable having a value you don't check for, Xcode will refuse to build your app.
In situations where the values are effectively open ended, like our liveAlbums integer, you need to include a default case to catch these potential values. Yes, even if you "know" your data can only fall within a certain range, Swift wants to be absolutely sure.
Swift can apply some evaluation to your case statements in order to match against variables. For example, if you wanted to check for a range of possible values, you could use the closed range operator like this:
let studioAlbums = 5

switch studioAlbums {
case 0...1:
    print("You're just starting out")

case 2...3:
    print("You're a rising star")

case 4...5:
    print("You're world famous!")

default:
    print("Have you done something new?")
}
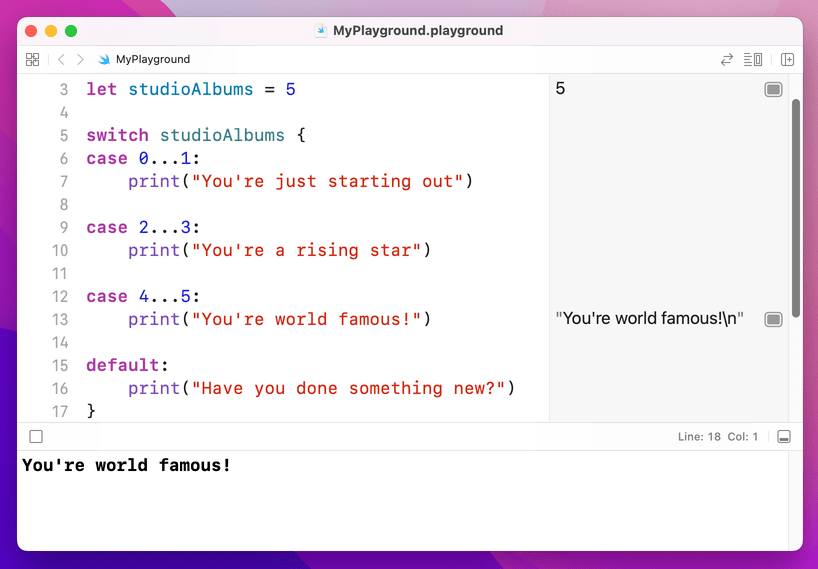
case 4...5 condition is matched.One thing you should know is that switch/case blocks in Swift don't fall through like they do in some other languages you might have seen. If you're used to writing break in your case blocks, you should know this isn't needed in Swift.
Instead, you use the fallthrough keyword to make one case fall into the next – it's effectively the opposite. Of course, if you have no idea what any of this means, that's even better: don't worry about it!
Optional: once you’ve finished reviewing those, you can go back to the review page and go over the tests related to the topics above.