Day 42
Day 42 관련

Project 10, part one
Today is day 42 of the 100 Days of Swift, so I figured it was time to tell you my favorite quote from Douglas Adams: “I may not have gone where I intended to go, but I think I have ended up where I intended to be.”
Everyone takes their own path to learn programming. Some like to read, some like to watch videos, some like to attend conferences, and still others like newsletters and podcasts. And that’s OK: as Adams says, as long as you end up where you intended the actual route you take often doesn’t matter.
Obviously it’s my job to make sure that the route you take is carefully graded so you don’t feel overwhelmed, but everyone is different – if you find some days easy, others hard, and some even a little overwhelming, that’s OK. I hope you can stick at it, because even if you find some things don’t “click” just yet it’s just because they take a little time to sink in.
Today you have three topics to work through, and you’ll learn about UICollectionView and UICollectionViewCell.
Setting up
Setting up
This is a fun, simple and useful project that will let you create an app to help store names of people you've met. If you're a frequent traveller, or perhaps just bad at putting names to faces, this project will be perfect for you.
And yes, you'll be learning lots along the way: this time you'll meet UICollectionViewController, UIImagePickerController, Data, and UUID. Plus you'll get to do more with your old pals CALayer, UIAlertController, and closures. But above all, you're going to learn how to make a new data type from scratch for the first time.
Create a new Single View App project in Xcode, call it Project10, then save it somewhere. This should be second nature to you by now – you're becoming a veteran!
Designing UICollectionView cells
Designing UICollectionView cells
We’ve used UITableViewController a few times so far, but this time we’re going to use UICollectionViewController instead. The procedure is quite similar, and starts by opening ViewController.swift and making it inherit from UICollectionViewController instead.
So, find this line:
class ViewController: UIViewController {
And change it to this:
class ViewController: UICollectionViewController {
Now open Main.storyboard in Interface Builder and delete the existing view controller. In its place, drag out a Collection View Controller (not a regular collection view!), then mark it as the initial view controller and embed it inside a navigation controller. Make sure you also use the identity inspector to change its class to “ViewController” so that it points to our class in code.
Use the document outline to select the collection view inside the collection view controller, then go to the size inspector and set Cell Size to have the width 140 and height 180. Now set the section insets for top, bottom, left and right to all be 10.
Collection views are extremely similar to table views, with the exception that they display as grids rather than as simple rows. But while the display is different, the underlying method calls are so similar that you could probably dive right in yourself if you wanted! (Don’t worry, though: I’ll walk you through it.)
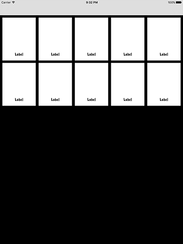
Our collection view already has one prototype cell, which is the empty square you'll see in the top-left corner. This works the same as with table views – you'll remember we changed the initial cell in project 7 so that we could add subtitles.
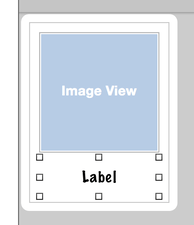
Select that collection view cell now, then go to the attributes inspector: change its Background from "Default" (transparent) to white and give it the identifier “Person” so that we can reference it in code. Now place a UIImageView in there, with X:10, Y:10, width 120 and height 120. We'll be using this to show pictures of people's faces.
Place a UILabel in there too, with X:10, Y:134, width 120 and height 40. In the attributes inspector, change the label's font by clicking the T button and choosing "Custom" for font, "Marker Felt" for family, and "Thin" for style. Give it the font size 16, which is 1 smaller than the default, then set its alignment to be centered and its number of lines property to be 2.
So far this has been fairly usual storyboard work, but now we're going to do something we've never done before: create a custom class for our cell. This is needed because our collection view cell has two views that we created – the image view and the label – and we need a way to manipulate this in code. The shortcut way would be to give them unique tags and give them variables when the app runs, but we're going to do it The Proper Way this time so you can learn.
Go to the File menu and choose [New] > [File], then select [iOS] > [Source] > [Cocoa Touch Class] and click Next. You'll be asked to fill in two text fields: where it says "Subclass of" you should enter "UICollectionViewCell", and where it says "Class" enter "PersonCell". Click Next then Create, and Xcode will create a new class called PersonCell that inherits from UICollectionViewCell.
This new class needs to be able to represent the collection view layout we just defined in Interface Builder, so it just needs two outlets. Give the class these two properties:
@IBOutlet var imageView: UIImageView!
@IBOutlet var name: UILabel!
Now go back to Interface Builder and select the collection view cell in the document outline. Select the identity inspector (Cmd+Alt+3) and you'll see next to Class the word "UICollectionViewCell" in gray text. That's telling us that the cell is its default class type.
We want to use our custom class here, so enter "PersonCell" and hit return. You'll see that "PersonCell" now appears in the document outline.
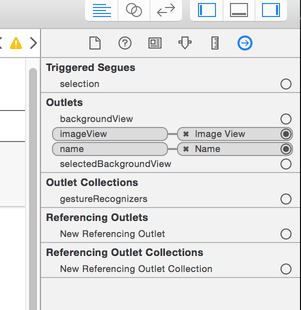
Now that Interface Builder knows that the cell is actually a PersonCell, we can connect its outlets. Go to the connections inspector (it's the last one, so Cmd+Alt+6) with the cell selected and you'll see imageView and name in there, both with empty circles to their right. That empty circle has exactly the same meaning as when you saw it with outlets in code: there is no connection between the storyboard and code for this outlet.
To make a connection from the connections inspector, just click on the empty circle next to imageView and drag a line over the view you want to connect. In our case, that means dragging over the image view in our custom cell. Now connect name to the label, and you're done with the storyboard.
UICollectionView data sources
UICollectionView data sources
We’ve now modified the user interface so that it considers ViewController to be a collection view controller, but we haven’t implemented any of the data source methods to make that work. This works just like table views, so we get questions like “how many items are there?” and “what’s in item number 1?” that we need to provide sensible answers for.
To begin with, let's put together the most basic implementation that allows our app to work. Normally this would be straightforward, but here we have a small complication: when we call dequeueReusableCell(withReuseIdentifier:for:) we’ll be sent back a regular UICollectionViewCell rather than our custom PersonCell type.
We can fix that we’ll add a conditional typecast, but that adds a second problem: what do we do if our typecast fails? That is, what if we expected to get a PersonCell but actually got back a regular UICollectionViewCell instead? If this happens it means something is fundamentally broken in our app – we screwed up in the storyboard, probably. As a result, we need to get out immediately; there’s no point trying to make our app limp onwards when something is really broken.
So, we’re going to be using a new function called fatalError(). When called this will unconditionally make your app crash – it will die immediately, and print out any message you provide to it. That might sound awful, but:
- You should only call this when things really are bad and you don’t want to continue – it’s really only a sense check to make sure everything is as we expect.
- Swift knows that
fatalError()always causes a crash, so we can use it to escape from a method that has a return value without sending anything back. This makes it really convenient to use in places like our current scenario.
It’s best if you see fatalError() in some real code, so add these two methods now:
override func collectionView(_ collectionView: UICollectionView, numberOfItemsInSection section: Int) -> Int {
    return 10
}

override func collectionView(_ collectionView: UICollectionView, cellForItemAt indexPath: IndexPath) -> UICollectionViewCell {
    guard let cell = collectionView.dequeueReusableCell(withReuseIdentifier: "Person", for: indexPath) as? PersonCell else {
        // we failed to get a PersonCell – bail out!
        fatalError("Unable to dequeue PersonCell.")
    }

    // if we're still here it means we got a PersonCell, so we can return it
    return cell
}
We haven't looked at any of this code before, so I want to pull it apart in detail before continuing:
collectionView(_:numberOfItemsInSection:)This must return an integer, and tells the collection view how many items you want to show in its grid. I've returned 10 from this method, but soon we'll switch to using an array.collectionView(_:cellForItemAt:)This must return an object of typeUICollectionViewCell. We already designed a prototype in Interface Builder, and configured thePersonCellclass for it, so we need to create and return one of these.dequeueReusableCell(withReuseIdentifier:for:)This creates a collection view cell using the reuse identified we specified, in this case "Person" because that was what we typed into Interface Builder earlier. But just like table views, this method will automatically try to reuse collection view cells, so as soon as a cell scrolls out of view it can be recycled so that we don't have to keep creating new ones.
Note that we need to typecast our collection view cell as a PersonCell because we'll soon want to access its imageView and name outlets.
These two new methods both come from collection views, but I think you’ll find them both remarkably similar to the table view methods we’ve been using so far – you can go back and open project 1 again to see just how similar!
Press Cmd+R to run your project now, and you'll see the beginning of things start to come together: the prototype cell you designed in Interface Builder will appear 10 times, and you can scroll up and down to view them all. As you'll see, you can fit two cells across the screen, which is what makes the collection view different to the table view. Plus, if you rotate to landscape you'll see it automatically (and beautifully) animates the movement of cells so they take up the full width.