Day 94
Day 94 관련

Project 29, part one
Today we’re starting another SpriteKit game, and although you will be learning new concepts such as destructible terrain and mixing UIKit and SpriteKit together, you’ll also get lots of practice with Core Graphics, physics and more.
At this point you might think you’re done with practicing that stuff: SpriteKit, physics, Core Graphics, and so on – that’s all easy, right? Well, there’s a quote so old no one is really sure who said it first, but I think it’s applicable here: “don’t practice until you get it right; practice until you can’t get it wrong.”
One of the goals in this series is to give you so much practice with the core fundamentals of app building that when it comes to you setting out to starting your own apps you’ll know exactly how to begin. That doesn’t mean you’ll know everything like the back of your hand, because no one can (or should!) memorize all this stuff. But at least you have a firm mental understanding of what’s possible, and you have and ever-increasing stash of your own code you can look back on as a reference for the future.
Today you have three topics to work through, and you’ll learn how to generate a scene dynamically, how to connect SpriteKit and UIKit, and more.
Setting up
Setting up
This game project will be hugely recognizable to people over the age of 35 because it was the classic way to waste time during computer classes at school.
The game? It's called Gorillas, and it first shipped with an old text-based operating system called MS-DOS 5.0 way back in 1991. Of course, we're going to re-make it using SpriteKit, but at the same time you're going to learn some new things: how to make colors from hues, texture atlases, scene transitions, mixing UIKit with SpriteKit, and destructible terrain. You'll also get a recap on the Core Graphics techniques from project 27.
"Destructible terrain" means "terrain that can be destroyed," which is a key part of Gorillas. If you've never played it before, you won't know that it pits two players against each other, both standing on high-rise buildings and both flinging exploding bananas at each other using physics. Realistic, right? Well, no, but it's certainly fun!
Make a new SpriteKit project named Project29. Please make it target iPads in landscape orientation, then through the usual project cleaning effort to remove all of the unneeded template code – including, as always, setting the anchor point to X:0 Y:0 and size 1024x768. You should download the files for this project from twostraws/HackingWithSwift, but for now please don’t copy any of its files into your project.
Building the environment: SKTexture and filling a path
Building the environment: SKTexture and filling a path
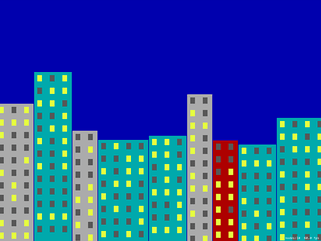
We're going to start by making the game environment, which means building the night-time, high-rise skyscraper scene that forms the backdrop for the game. We're going to do most of this with an SKSpriteNode subclass for buildings that sets up physics, draws the building graphic, and ultimately handles the building being hit by stray bananas. Are you ready to flex your Core Graphics muscle a little?
Add a new file, choosing iOS > Source > Cocoa Touch Class, name it "BuildingNode" and make it a subclass of SKSpriteNode. Open the new file for editing, and add import SpriteKit just above the UIKit import.
Initially, this class needs to have three methods:
setup()will do the basic work required to make this thing a building: setting its name, texture, and physics.configurePhysics()will set up per-pixel physics for the sprite's current texture.drawBuilding()will do the Core Graphics rendering of a building, and return it as aUIImage.
In amongst those three points was one small thing that you may have missed: "the sprite's current texture." This tells you that the texture will change as bits get blown off by those exploding bananas. To make this work, we're going to keep a copy of the building's texture as a UIImage so that we can modify it later.
Before we dive into the code we need to define some collision bitmasks. This is identical to project 26, except now we need only three categories: buildings, bananas and players. In the case of buildings, the only thing they'll collide with is a banana, which triggers our explosion. So, go back to GameScene.swift and add this enum just above the GameScene class definition:
enuYm CollisionTypes: UInt32 {
    case banana = 1
    case building = 2
    case player = 4
}
OK, back to BuildingNode.swift. Please add this code to the class – it's a property followed by two methods:
var currentImage: UIImage!

func setup() {
    name = "building"

    currentImage = drawBuilding(size: size)
    texture = SKTexture(image: currentImage)

    configurePhysics()
}

func configurePhysics() {
    physicsBody = SKPhysicsBody(texture: texture!, size: size)
    physicsBody?.isDynamic = false
    physicsBody?.categoryBitMask = CollisionTypes.building.rawValue
    physicsBody?.contactTestBitMask = CollisionTypes.banana.rawValue
}
This is using the same "don't override the initializer" hack from project 14, because quite frankly if I wanted to explain to you how and why Swift's initialization system worked I'd probably have to add another whole book to this series! Instead, we'll be creating the sprites as red-colored blocks of the right size, then drawing buildings into them.
As you can see in that code, it calls a drawBuilding() method that returns a UIImage, which then gets saved into the property and converted into a texture. It also calls configurePhysics() rather than putting the code straight into its method. Both of these two methods are separate because they will be called every time the building is hit, so we'll be using them in two different places.
That was the easy bit: you already know about bitmasks, per-pixel physics, textures and so on. The next method is drawBuilding() and it's going to get harder because we're going to use Core Graphics. You did read project 27, right? If so, this will be a cinch.
This method needs to:
- Create a new Core Graphics context the size of our building.
- Fill it with a rectangle that's one of three colors.
- Draw windows all over the building in one of two colors: there's either a light on (yellow) or not (gray).
- Pull out the result as a
UIImageand return it for use elsewhere.
There's nothing complicated in there, but just to keep you on your toes I'm going to introduce a new way to create colors: hue, saturation and brightness, or HSB. Using this method of creating colors you specify values between 0 and 1 to control how saturated a color is (from 0 = gray to 1 = pure color) and brightness (from 0 = black to 1 = maximum brightness), and 0 to 1 for hue.
"Hue" is a value from 0 to 1 also, but it represents a position on a color wheel, like using a color picker on your Mac. Hues 0 and 1 both represent red, with all other colors lying in between.
Now, programmers often look at HSB and think it's much clumsier than straight RGB, but there are reasons for both. The helpful thing about HSB is that if you keep the saturation and brightness constant, changing the hue value will cycle through all possible colors – it's an easy way to generate matching pastel colors, for example.
There's one more thing you need to know, but you'll be pleased to know it's a fairly basic Swift feature that we just haven't needed to use so far. It's a function called stride(), which lets you loop from one number to another with a specific interval. We're going to use this to count from the left edge of the building to the right edge in intervals of 40, to position our windows. We'll also do this vertically, to position the windows across the whole height of the building. To make it a little more attractive, we'll actually indent the left and right edges by 10 points.
By itself, stride() looks like this:
for row in stride(from: 10, to: Int(size.height - 10), by: 40) {
That means "count from 10 up to the height of the building minus 10, in intervals of 40." So, it will go 10, 50, 90, 130, and so on. Note that stride() has two variants: stride(from:to:by:) and stride(from:through:by). The first counts up to but excluding the to parameter, whereas the second counts up to and including the through parameter. We'll be using stride(from:to:by:) below.
Now add this code for drawBuilding(), with numbered comments lining up to the list above:
func drawBuilding(size: CGSize) -> UIImage {
    // 1
    let renderer = UIGraphicsImageRenderer(size: size)
    let img = renderer.image { ctx in
        // 2
        let rectangle = CGRect(x: 0, y: 0, width: size.width, height: size.height)
        let color: UIColor

        switch Int.random(in: 0...2) {
        case 0:
            color = UIColor(hue: 0.502, saturation: 0.98, brightness: 0.67, alpha: 1)
        case 1:
            color = UIColor(hue: 0.999, saturation: 0.99, brightness: 0.67, alpha: 1)
        default:
            color = UIColor(hue: 0, saturation: 0, brightness: 0.67, alpha: 1)
        }

        color.setFill()
        ctx.cgContext.addRect(rectangle)
        ctx.cgContext.drawPath(using: .fill)

        // 3
        let lightOnColor = UIColor(hue: 0.190, saturation: 0.67, brightness: 0.99, alpha: 1)
        let lightOffColor = UIColor(hue: 0, saturation: 0, brightness: 0.34, alpha: 1)

        for row in stride(from: 10, to: Int(size.height - 10), by: 40) {
            for col in stride(from: 10, to: Int(size.width - 10), by: 40) {
                if Bool.random() {
                    lightOnColor.setFill()
                } else {
                    lightOffColor.setFill()
                }

                ctx.cgContext.fill(CGRect(x: col, y: row, width: 15, height: 20))
            }
        }

        // 4
    }

    return img
}
The only things new in there – and they are so tiny you probably didn't even notice – is my use of .fill rather than .stroke to draw the rectangles, and my use of Bool.random() to generate either true or false randomly.
That's the BuildingNode class finished for now; we'll return to it later to add a method that will be called whenever it gets hit by a banana.
Go back to GameScene.swift because we have a small amount of work to do in order to use these new building nodes to build the night sky scene.
First, add a property that will store an array of buildings. We'll be using this to figure out where to place players later on:
var buildings = [BuildingNode]()
At this point, the didMove(to:) method needs to do only two things: give the scene a dark blue color to represent the night sky, then call a method called createBuildings() that will create the buildings. Here it is:
override func didMove(to view: SKView) {
    backgroundColor = UIColor(hue: 0.669, saturation: 0.99, brightness: 0.67, alpha: 1)

    createBuildings()
}
All those HSB values aren't an accident, by the way – I've chosen them so they look similar to the original design.
The createBuildings() method is the important one here, and calling it will finish our background scene. It needs to move horizontally across the screen, filling space with buildings of various sizes until it hits the far edge of the screen. I'm going to make it start at -15 rather than the left edge so that the buildings look like they keep on going past the screen's edge. I'm also going to leave a 2-point gap between the buildings to distinguish their edges slightly more.
Each building needs to be a random size. For the height, it can be anything between 300 and 600 points high; for the width, I want to make sure it divides evenly into 40 so that our window-drawing code is simple, so we'll generate a random number between 2 and 4 then multiply that by 40 to give us buildings that are 80, 120 or 160 points wide.
As I said earlier, we'll be creating each building node with a solid red color to begin with, then drawing over it with the building texture once it's generated. Remember: SpriteKit positions nodes based on their center, so we need to do a little division of width and height to place these buildings correctly. Here's the createBuildings() method – please put this directly beneath didMove(to:):
func createBuildings() {
    var currentX: CGFloat = -15

    while currentX < 1024 {
        let size = CGSize(width: Int.random(in: 2...4) * 40, height: Int.random(in: 300...600))
        currentX += size.width + 2

        let building = BuildingNode(color: UIColor.red, size: size)
        building.position = CGPoint(x: currentX - (size.width / 2), y: size.height / 2)
        building.setup()
        addChild(building)

        buildings.append(building)
    }
}
Make sure you select the lowest-spec iPad from the list of simulator options, then press Play to see the results of your hard work – a random set of buildings will be generated each time you run the game. Well done!
Mixing UIKit and SpriteKit: UISlider and SKView
Mixing UIKit and SpriteKit: UISlider and SKView
We've been mixing UIKit and SpriteKit ever since our first SpriteKit project, way back in project 11. Don't believe me? Look inside GameViewController.swift and you'll see a plain old UIViewController do all the work of loading and showing our GameScene code. There's a Main.storyboard file containing that view controller, and if you go to the identity inspector (Alt+Cmd+3) you'll see it has SKView set for its custom class – that's the view holding our scene.
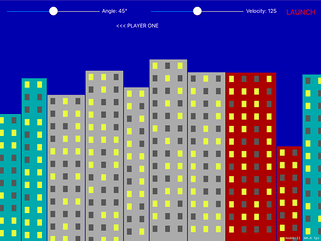
This UIKit setup existed all along, but so far we've been ignoring it. No more: we're going to add some controls to that view so that players can fire bananas. The way the game works, each player gets to enter an angle and a velocity for their throw. We'll be recreating this with a UISlider for both of these numbers, along with a UILabel so players can see exactly what numbers they chose. We'll also add a "Launch" button that makes the magic happen.
Now, think about this for a moment: our game view controller needs to house and manage the user interface, and the game scene needs to manage everything inside the game. But they also need to talk to each other: the view controller needs to tell the game scene to fire a banana when the launch button is clicked, and the game scene needs to tell the view controller when a player's turn has finished so that another banana can be launched again.
This two-way communication could be done using NotificationCenter, but it's not very pleasant: we know the sender and receiver, and we know exactly what kind of data they will send and receive, so the easiest solution here is to give the view controller a property that holds the game scene, and give the game scene a property that holds the view controller.
Hopefully that should be setting off some alarm bells in your head, because if two objects own each other then we have a strong reference cycle – neither object can be destroyed. The solution is to make one of them have a weak reference to the other: either the game controller owns the game scene strongly, or the game scene owns the game controller strongly, but not both. As it so happens, the game controller already strongly owns the game scene, albeit indirectly: it owns the SKView inside itself, and the view owns the game scene. So, it's owned, we just don't have a reference to it.
So, our solution is straightforward: add a strong reference to the game scene inside the view controller, and add a weak reference to the view controller from the game scene. Add this property to the game scene:
weak var viewController: GameViewController!
Now add this property to the game view controller:
var currentGame: GameScene!
Like I said, the game controller already owns the game scene, but it's a pain to get to. Adding that property means we have direct access to the game scene whenever we need it. To set the property, put this into the viewDidLoad() method of the game view controller, just after the call to presentScene():
currentGame = scene as? GameScene
currentGame.viewController = self
The first line sets the property to the initial game scene so that we can start using it. The second line makes sure that the reverse is true so that the scene knows about the view controller too.
Now to design the user interface: this needs two sliders, each with two labels, plus a launch button and one more label that will show whose turn it is. When you open Main.storyboard you'll probably see that it's shaped like an iPhone, which isn’t helpful when designing this user interface. Instead, I’d like you to click the View As button at the bottom of Interface Builder, and select a 9.7-inch iPad in landscape orientation so that we have more space for drawing.
Drop two sliders into your layout, both 300 points wide. The first should be at X:20, the second should be at X:480, and both should be at Y:20. Now place two labels in there, both 120 points wide. The first should be at X:325, the second should be at X:785, and both should be at Y:24 – this is slightly lower than the sliders so that everything is centered neatly.
For the launch button, place a button at X:910 Y:13, with width 100 and height 44; for the "which player is it?" label, place a label at X:370 Y:64 with width 285 and height 35.
That's the basic layout, but to make it all perfect we need a few tweaks. Using the attributes inspector, change the left-hand slider so that it has a maximum value of 90 and a current value of 45, then change the right-hand slider so that it has a maximum value of 250 and a current value of 125.
Make sure all three of your labels have their text color set to white, then give the bottom one the text “<<< PLAYER ONE" and center alignment. Select the button then give it a system bold font of size 22, a title of "LAUNCH" and a red text color.
That's the layout all done, but we also need lots of outlets: using the assistant editor, create these outlets:
- For the left slider:
angleSlider - For the left label:
angleLabel - For the right slider:
velocitySlider - For the right label:
velocityLabel - For the launch button:
launchButton - For the player number:
playerNumber
You'll also need to create actions from the left slider, the right slider and the button: angleChanged(), velocityChanged() and launch() respectively.
That's all the layout done, so we're finished with Interface Builder and you can open up GameViewController.swift.
We need to fill in three methods (angleChanged(), velocityChanged() and launch()), write one new method, then make two small changes to viewDidLoad().
The action methods for our two sliders are both simple: they update the correct label with the slider's current value. A UISlider always stores its values as a Float, but we only care about the integer value of that float so we're going to convert the values to Ints then use string interpolation to update the labels. Here's the code for both these methods:
@IBAction func angleChanged(_ sender: Any) {
    angleLabel.text = "Angle: \(Int(angleSlider.value))°"
}

@IBAction func velocityChanged(_ sender: Any) {
    velocityLabel.text = "Velocity: \(Int(velocitySlider.value))"
}
The only hard thing there is typing the ° symbol that represents degrees – to do that, press Shift+Option+8. With those methods written, we need to call both of them inside viewDidLoad() in order to have them load up with their default values. Add this to viewDidLoad() just after the call to super:
angleChanged(angleSlider)
velocityChanged(velocitySlider)
You could easily have typed default values into Interface Builder, and sometimes it's helpful to do so in order to measure your layout correctly, but setting it in code means you have only one place that can set those values so it's easier to change later if needed.
When a player taps the launch button, we need to hide the user interface so they can't try to fire again until we're ready, then tell the game scene to launch a banana using the current angle and velocity. Our game will then proceed with physics calculations until the banana is destroyed or lost (i.e., off screen), at which point the game will tell the game controller to change players and continue.
The code for the launch() method is trivial, largely because the work of actually launching the banana is hidden behind a call to a launch() method that we'll add to the game scene shortly:
@IBAction func launch(_ sender: Any) {
    angleSlider.isHidden = true
    angleLabel.isHidden = true

    velocitySlider.isHidden = true
    velocityLabel.isHidden = true

    launchButton.isHidden = true

    currentGame.launch(angle: Int(angleSlider.value), velocity: Int(velocitySlider.value))
}
Finally, we're going to create a activatePlayer() method that will be called from the game scene when control should pass to the other player. This will just update the player label to say who is in control, then show all our controls again:
func activatePlayer(number: Int) {
    if number == 1 {
        playerNumber.text = "<<< PLAYER ONE"
    } else {
        playerNumber.text = "PLAYER TWO >>>"
    }

    angleSlider.isHidden = false
    angleLabel.isHidden = false

    velocitySlider.isHidden = false
    velocityLabel.isHidden = false

    launchButton.isHidden = false
}
To make your code compile, you need to add a launch() method to GameScene.swift. It doesn't need to be the real thing, but it does need to accept parameters for angle and velocity. Give it this code for now:
func launch(angle: Int, velocity: Int) {
}