Day 14
Day 14 관련

Swift review, day two
This is the second consolidation day, and again the goal is to go over the fundamentals of Swift before we move on. This time we’ll be covering optionals amongst other things, so if you found them hard before this is your chance to really nail them.
Today you have six topics to review. Once you’ve completed them you can, if you want, go back over the tests from earlier days to improve on your scores.
1. Functions
1. Functions
Functions let you define re-usable pieces of code that perform specific pieces of functionality. Usually functions are able to receive some values to modify the way they work, but it's not required.
Let's start with a simple function:
func favoriteAlbum() {
    print("My favorite is Fearless")
}
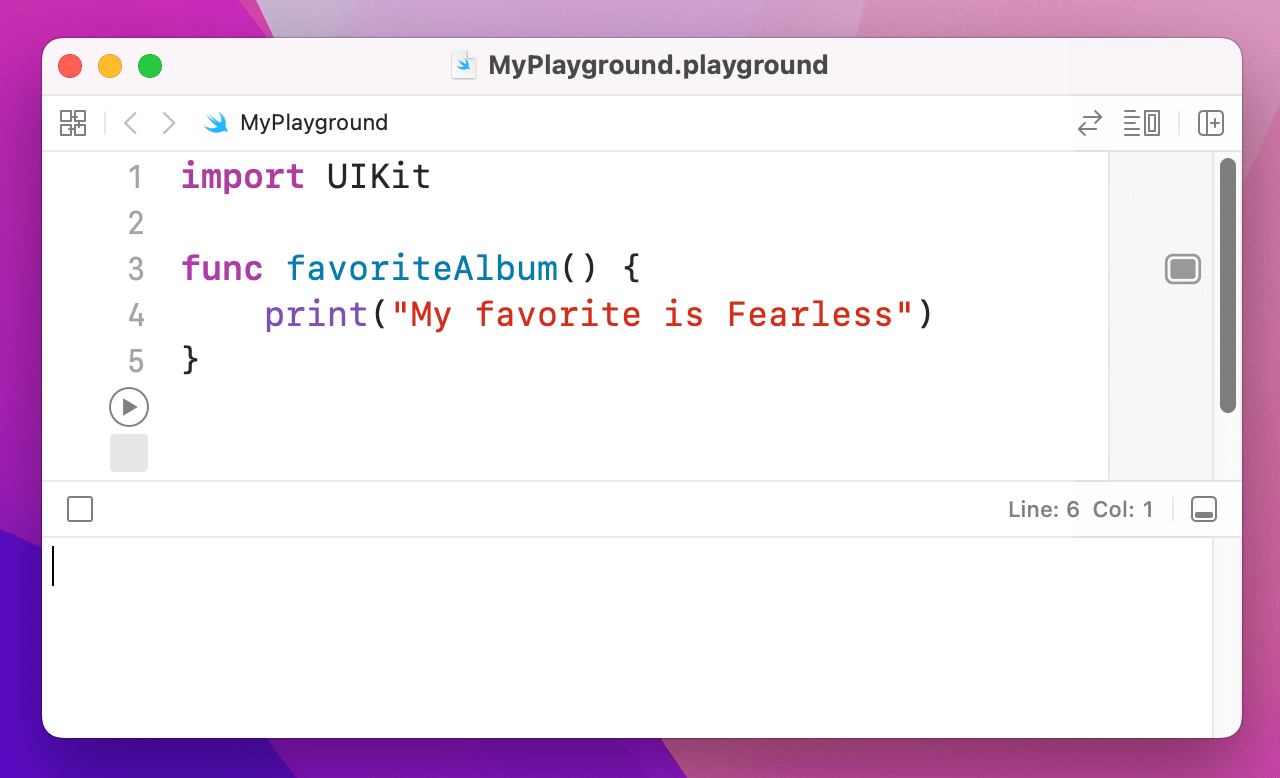
If you put that code into your playground, nothing will be printed. And yes, it is correct. The reason nothing is printed is that we've placed the "My favorite is Fearless" message into a function called favoriteAlbum(), and that code won't be called until we ask Swift to run the favoriteAlbum() function. To do that, add this line of code:
favoriteAlbum()
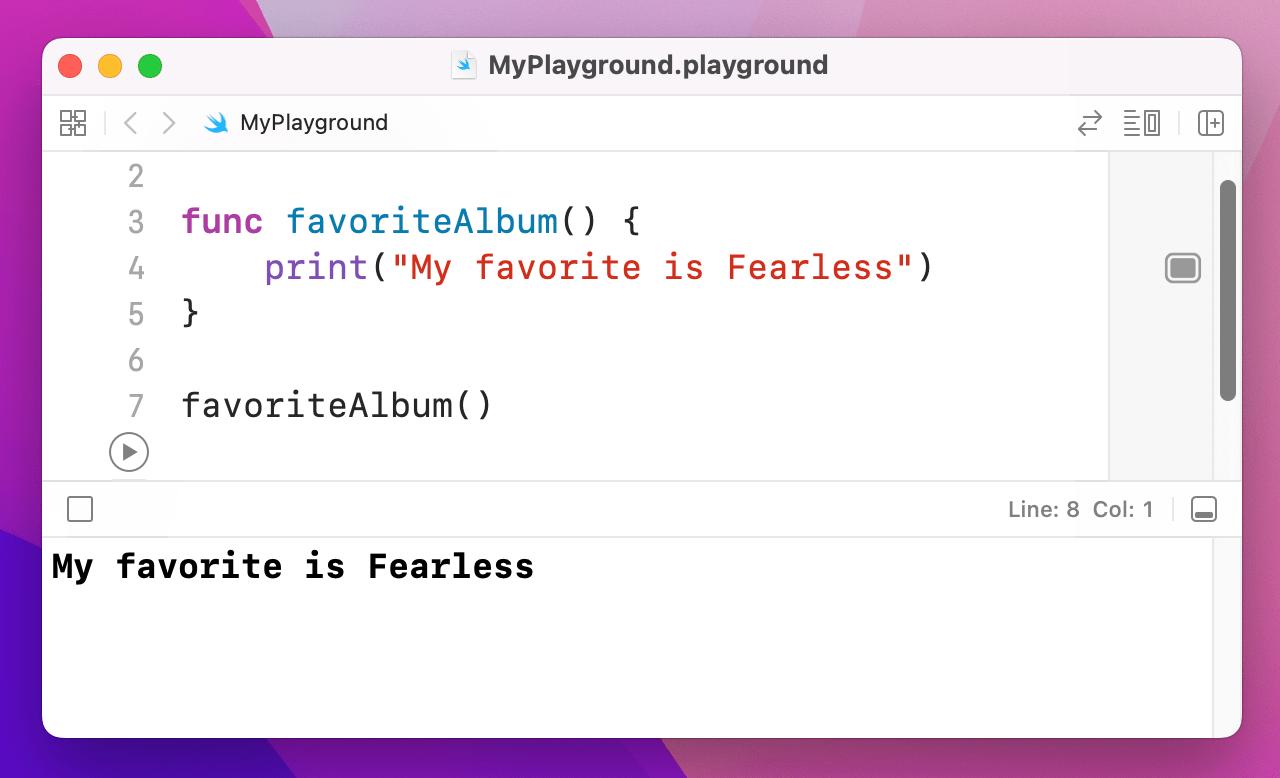
That runs the function (or "calls" it), so now you'll see "My favorite is Fearless" printed out.
As you can see, you define a function by writing func, then your function name, then open and close parentheses, then a block of code marked by open and close braces. You then call that function by writing its name followed by an open and close parentheses.
Of course, that's a silly example – that function does the same thing no matter what, so there's no point in it existing. But what if we wanted to print a different album each time? In that case, we could tell Swift we want our function to accept a value when it's called, then use that value inside it.
Let's do that now:
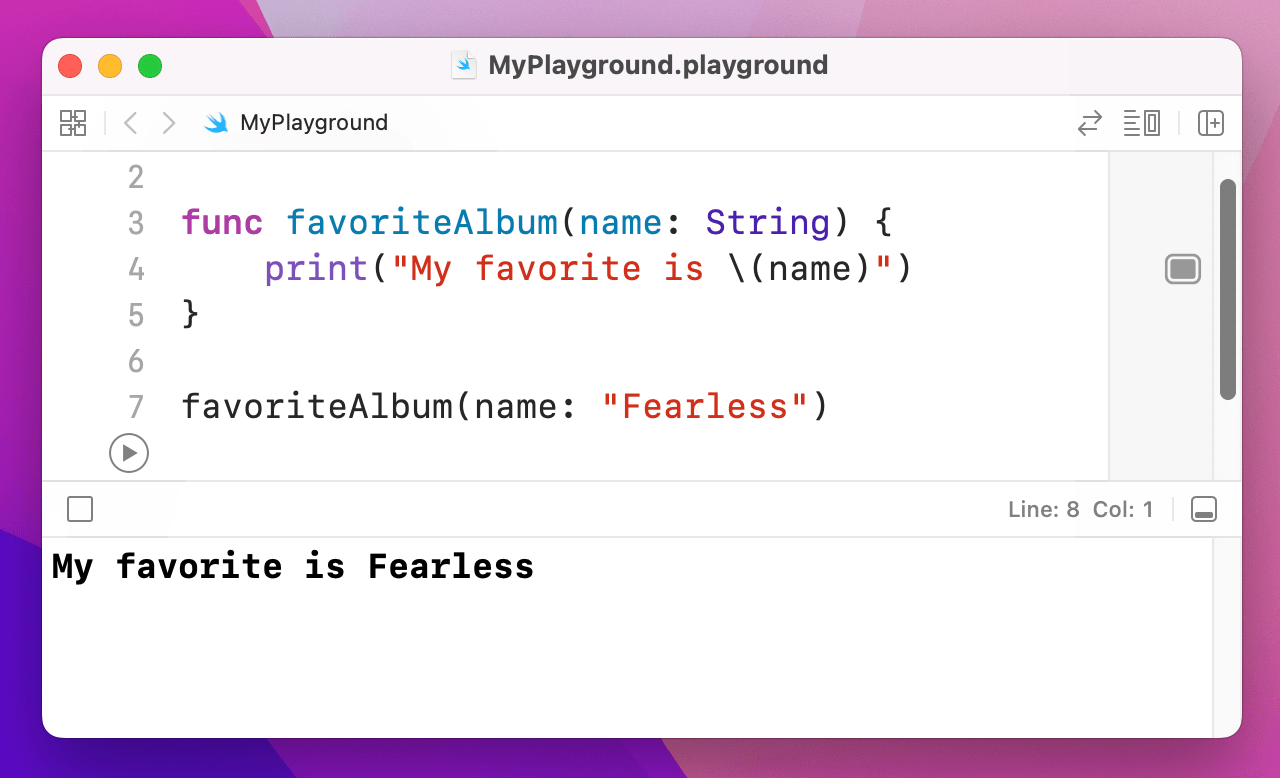
func favoriteAlbum(name: String) {
    print("My favorite is \(name)")
}
That tells Swift we want the function to accept one value (called a "parameter"), named "name", that should be a string. We then use string interpolation to write that favorite album name directly into our output message. To call the function now, you’d write this:
favoriteAlbum(name: "Fearless")
name as a parameter.You might still be wondering what the point is, given that it's still just one line of code. Well, imagine we used that function in 20 different places around a big app, then your head designer comes along and tells you to change the message to "I love Fearless so much – it's my favorite!" Do you really want to find and change all 20 instances in your code? Probably not. With a function you change it once, and everything updates.
You can make your functions accept as many parameters as you want, so let's make it accept a name and a year:
func printAlbumRelease(name: String, year: Int) {
    print("\(name) was released in \(year)")
}

printAlbumRelease(name: "Fearless", year: 2008)
printAlbumRelease(name: "Speak Now", year: 2010)
printAlbumRelease(name: "Red", year: 2012)
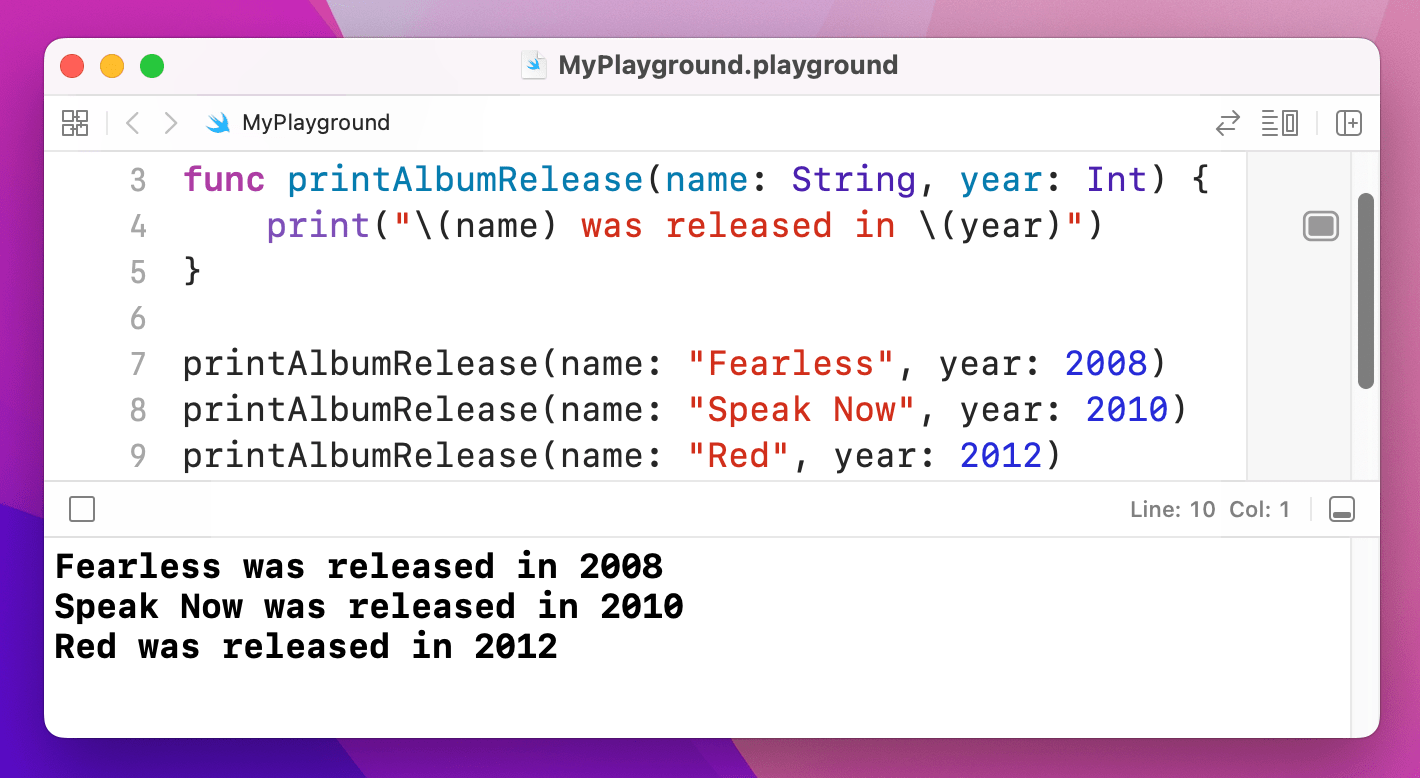
name and year parameters.These function parameter names are important, and actually form part of the function itself. Sometimes you’ll see several functions with the same name, e.g. handle(), but with different parameter names to distinguish the different actions.
External and internal parameter names
Sometimes you want parameters to be named one way when a function is called, but another way inside the function itself. This means that when you call a function it uses almost natural English, but inside the function the parameters have sensible names. This technique is employed very frequently in Swift, so it’s worth understanding now.
To demonstrate this, let’s write a function that prints the number of letters in a string. This is available using the count property of strings, so we could write this:
func countLettersInString(string: String) {
    print("The string \(string) has \(string.count) letters.")
}
With that function in place, we could call it like this:
countLettersInString(string: "Hello")
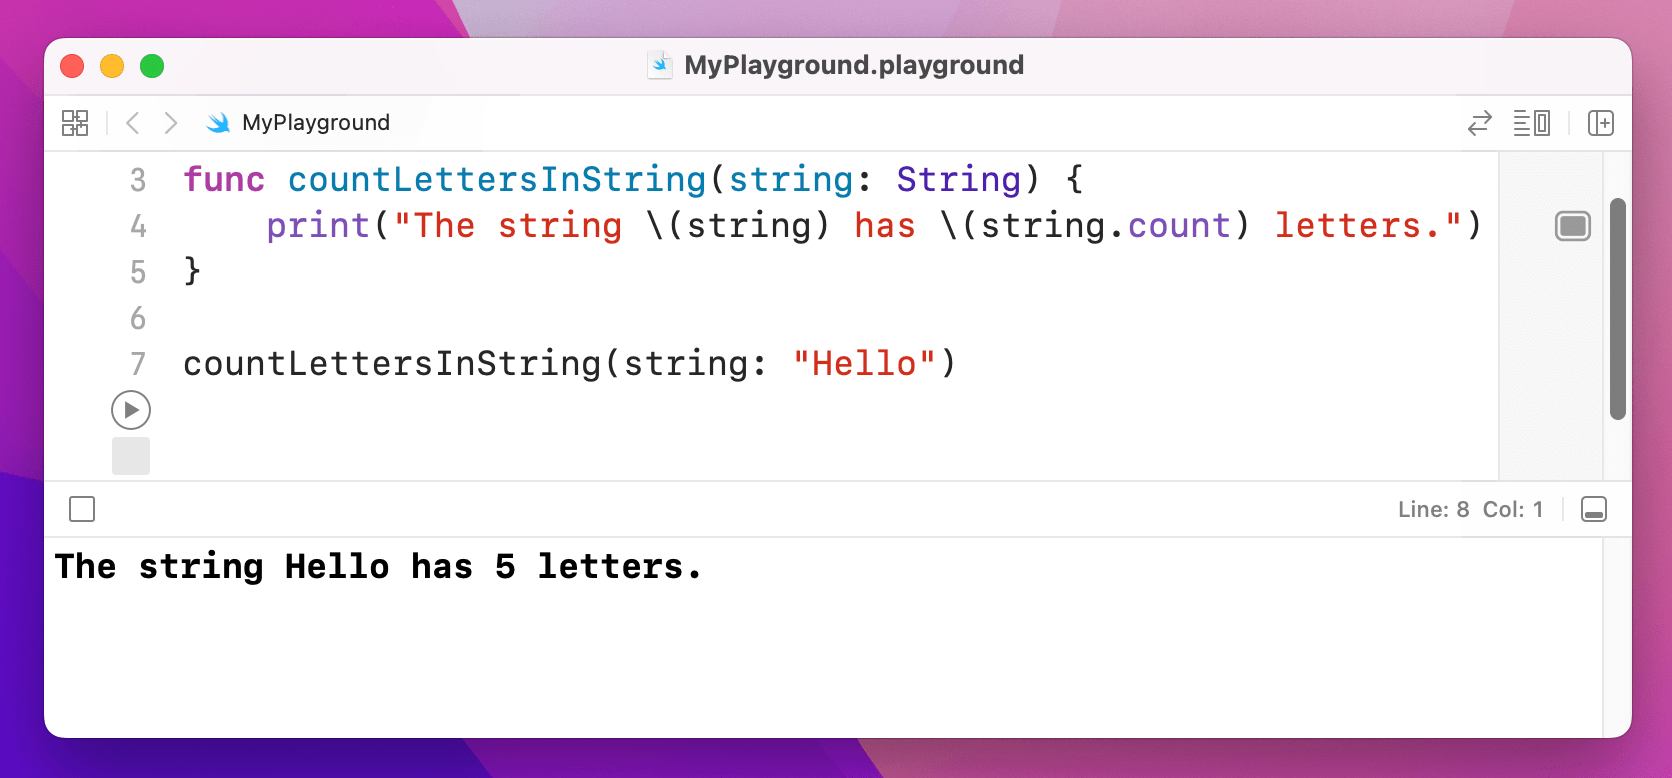
While that certainly works, it’s a bit wordy. Plus it’s not the kind of thing you would say aloud: “count letters in string string hello”.
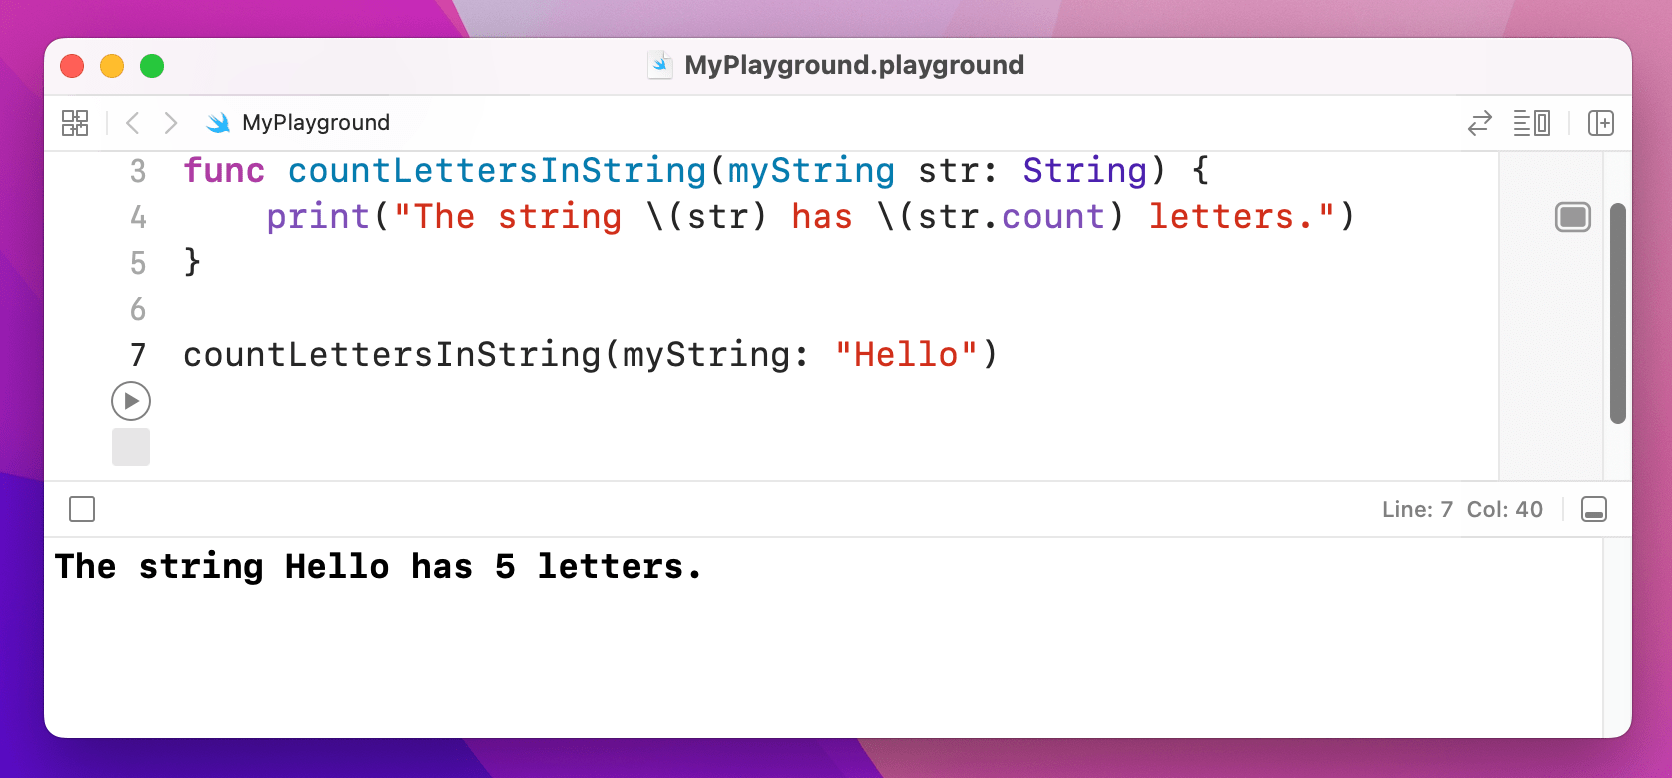
Swift’s solution is to let you specify one name for the parameter when it’s being called, and another inside the method. To use this, just write the parameter name twice – once for external, one for internal.
For example, we could name the parameter myString when it’s being called, and str inside the method, like this:
func countLettersInString(myString str: String) {
    print("The string \(str) has \(str.count) letters.")
}

countLettersInString(myString: "Hello")
You can also specify an underscore, _, as the external parameter name, which tells Swift that it shouldn’t have any external name at all. For example:
func countLettersInString(_ str: String) {
    print("The string \(str) has \(str.count) letters.")
}

countLettersInString("Hello")
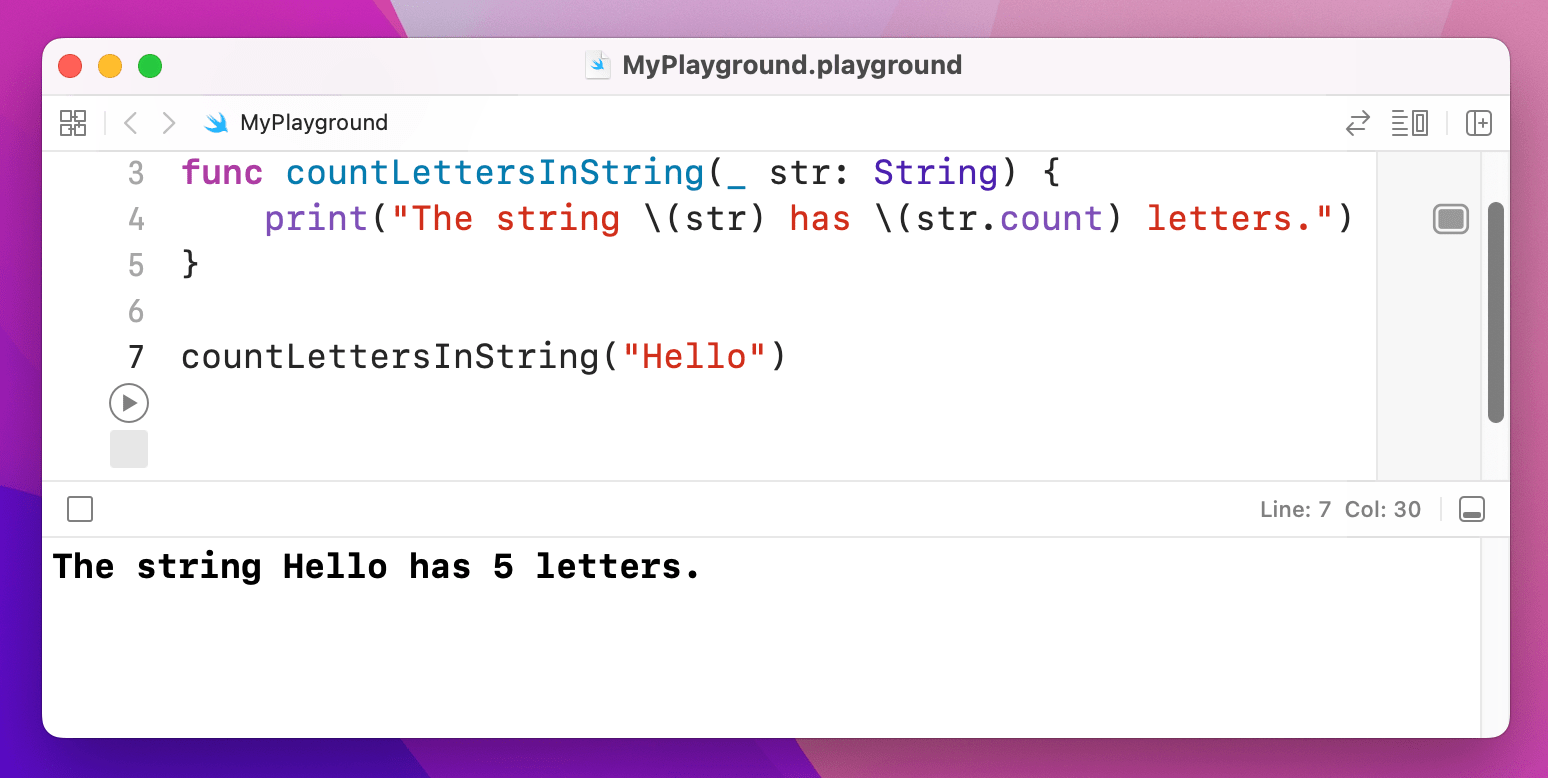
As you can see, that makes the line of code read like an English sentence: “count letters in string hello”.
While there are many cases when using _ is the right choice, Swift programmers generally prefer to name all their parameters. And think about it: why do we need the word “String” in the function – what else would we want to count letters on?
So, what you’ll commonly see is external parameter names like “in”, “for”, and “with”, and more meaningful internal names. So, the “Swifty” way of writing this function is like so:
func countLetters(in string: String) {
    print("The string \(string) has \(string.count) letters.")
}
That means you call the function with the parameter name “in”, which would be meaningless inside the function. However, inside the function the same parameter is called “string”, which is more useful. So, the function can be called like this:
countLetters(in: "Hello")
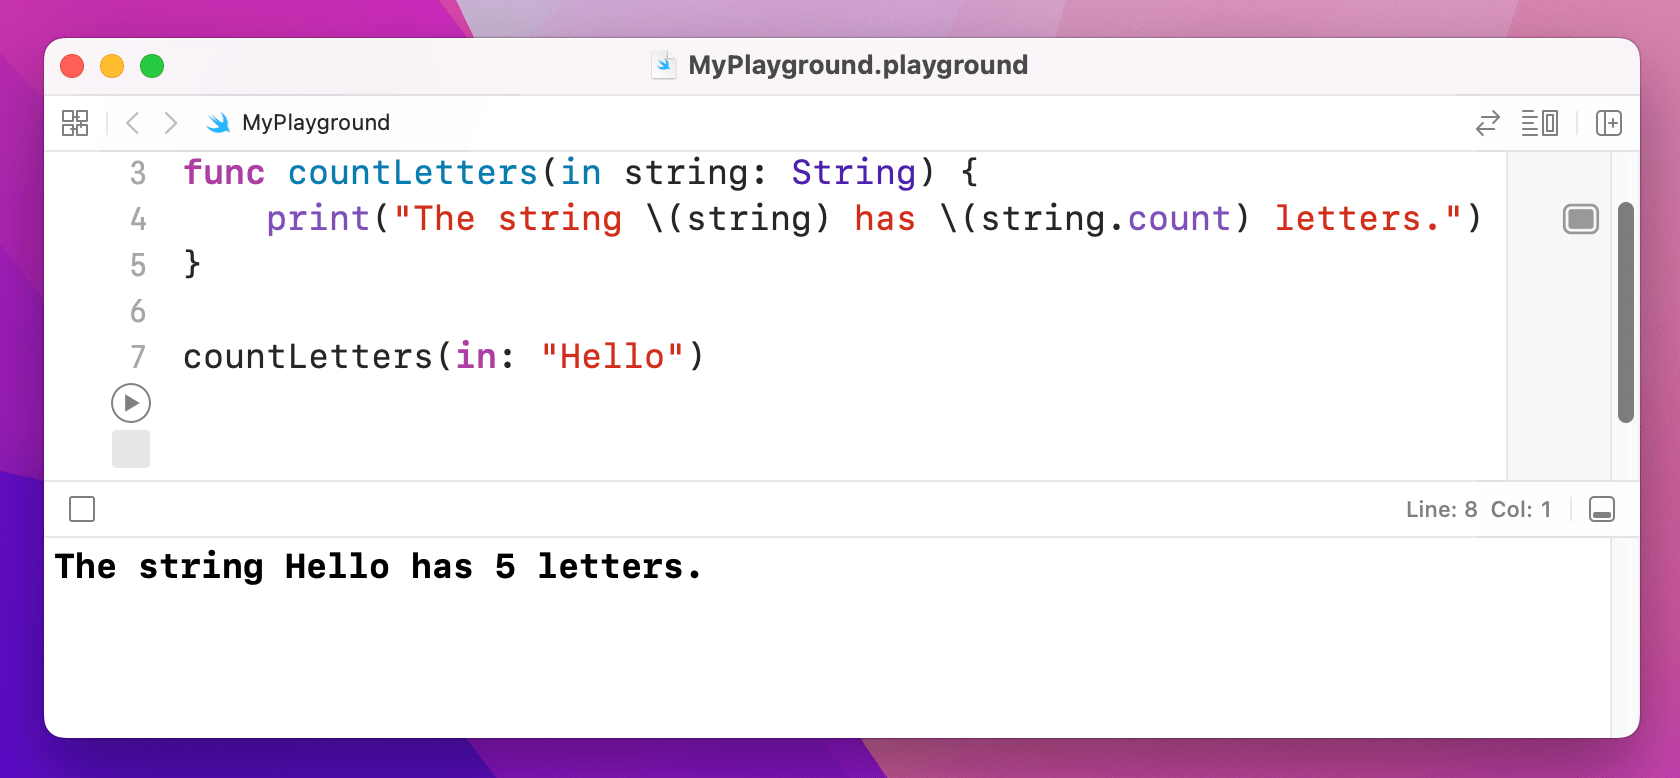
And that is truly Swifty code: “count letters in hello” reads like natural English, but the code is also clear and concise.
Return values
Swift functions can return a value by writing -> then a data type after their parameter list. Once you do this, Swift will ensure that your function will return a value no matter what, so again this is you making a promise about what your code does.
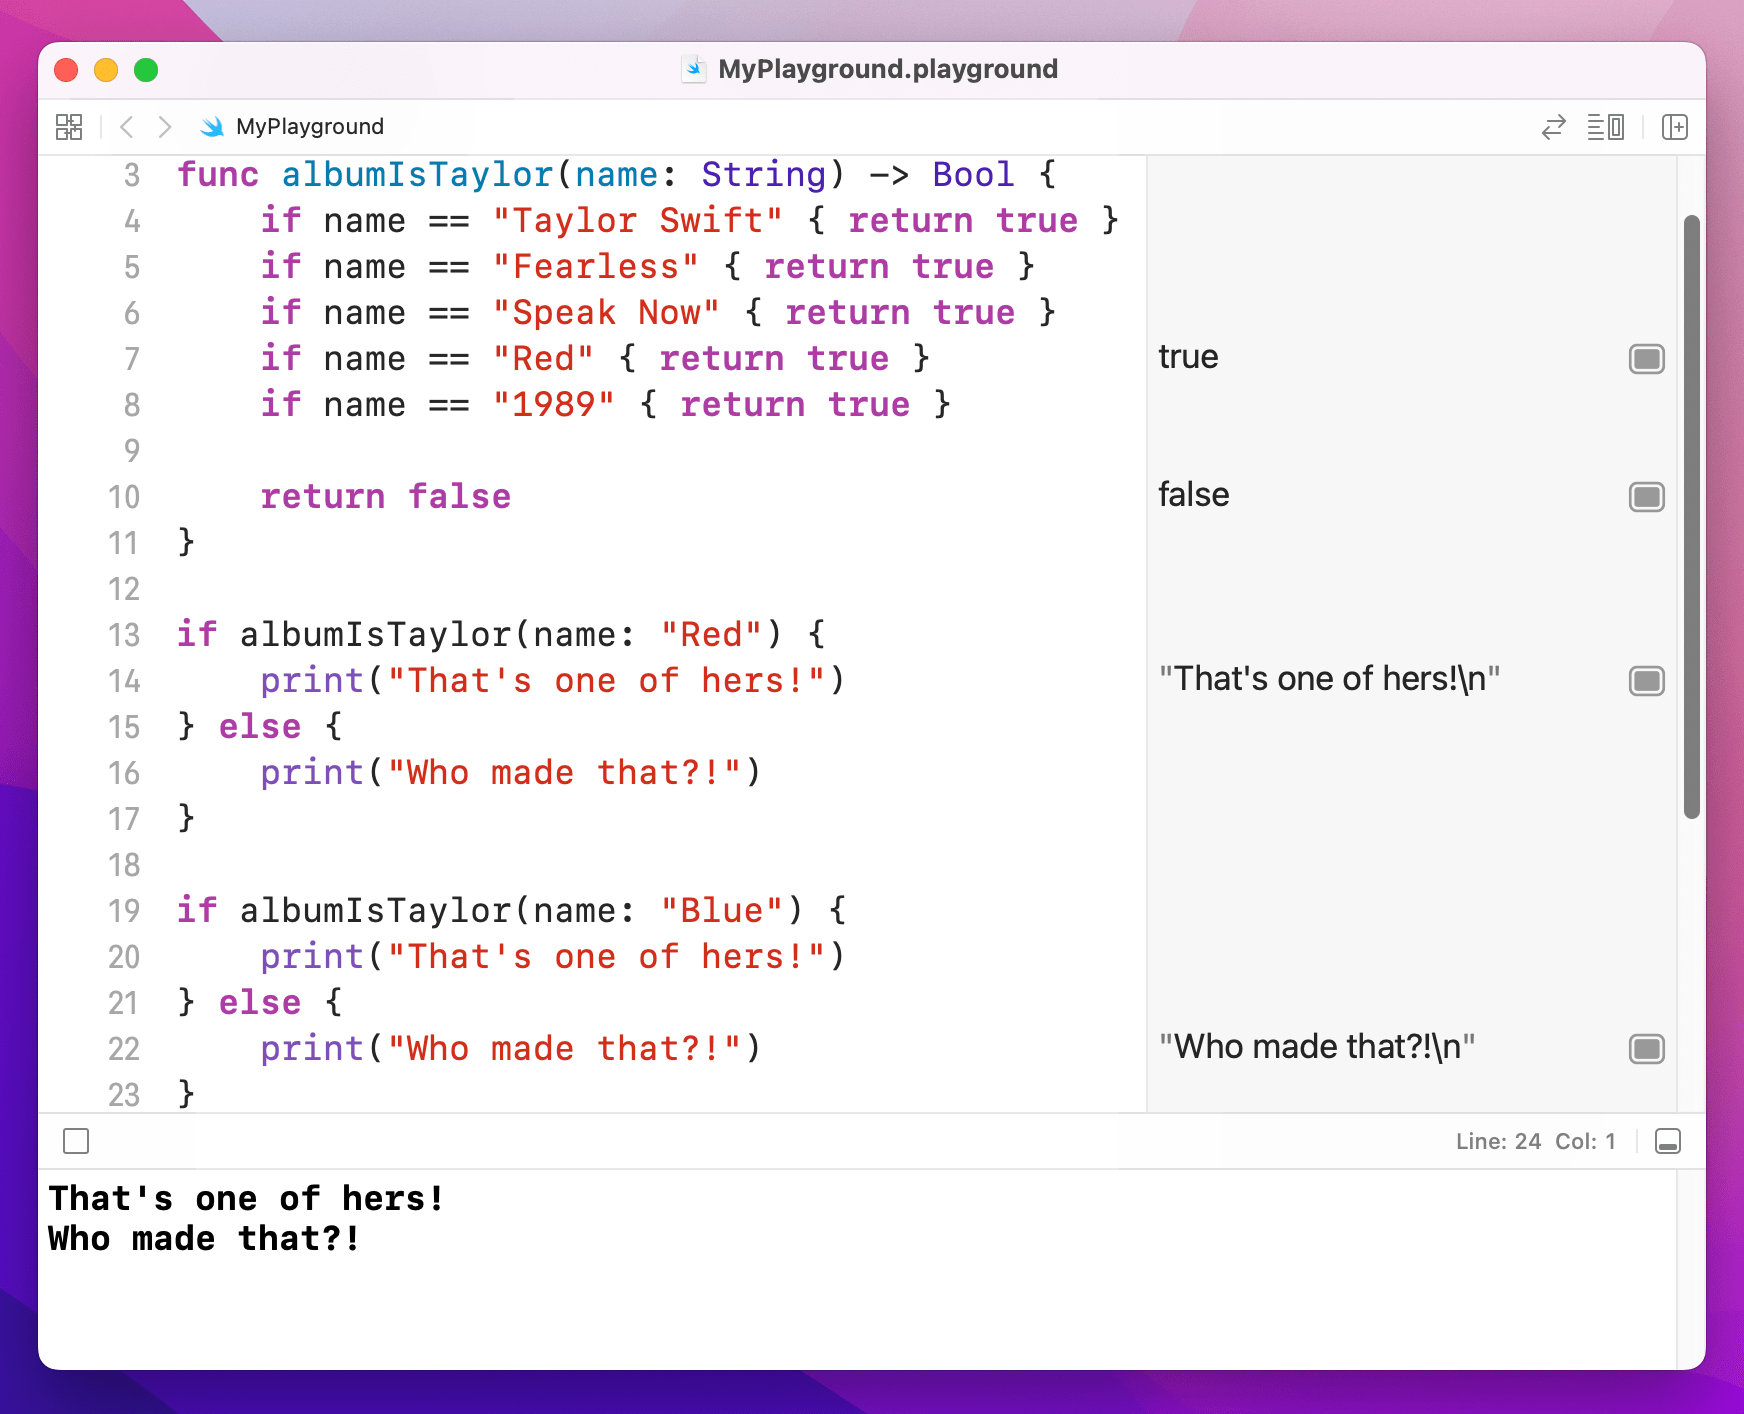
As an example, let's write a function that returns true if an album is one of Taylor Swift's, or false otherwise. This needs to accept one parameter (the name of the album to check) and will return a Boolean. Here's the code:
func albumIsTaylor(name: String) -> Bool {
    if name == "Taylor Swift" { return true }
    if name == "Fearless" { return true }
    if name == "Speak Now" { return true }
    if name == "Red" { return true }
    if name == "1989" { return true }

    return false
}
If you wanted to try your new switch/case knowledge, this function is a place where it would work well.
You can now call that by passing the album name in and acting on the result:
if albumIsTaylor(name: "Red") {
    print("That's one of hers!")
} else {
    print("Who made that?!")
}

if albumIsTaylor(name: "Blue") {
    print("That's one of hers!")
} else {
    print("Who made that?!")
}
If your function returns a value and has only one line of code inside it, you can omit the return keyword entirely – Swift knows a value must be sent back, and because there is only one line that must be the one that sends back a value.
For example, we could write this:
func getMeaningOfLife() -> Int {
    return 42
}
Or we could just write this:
func getMeaningOfLife() -> Int {
    42
}
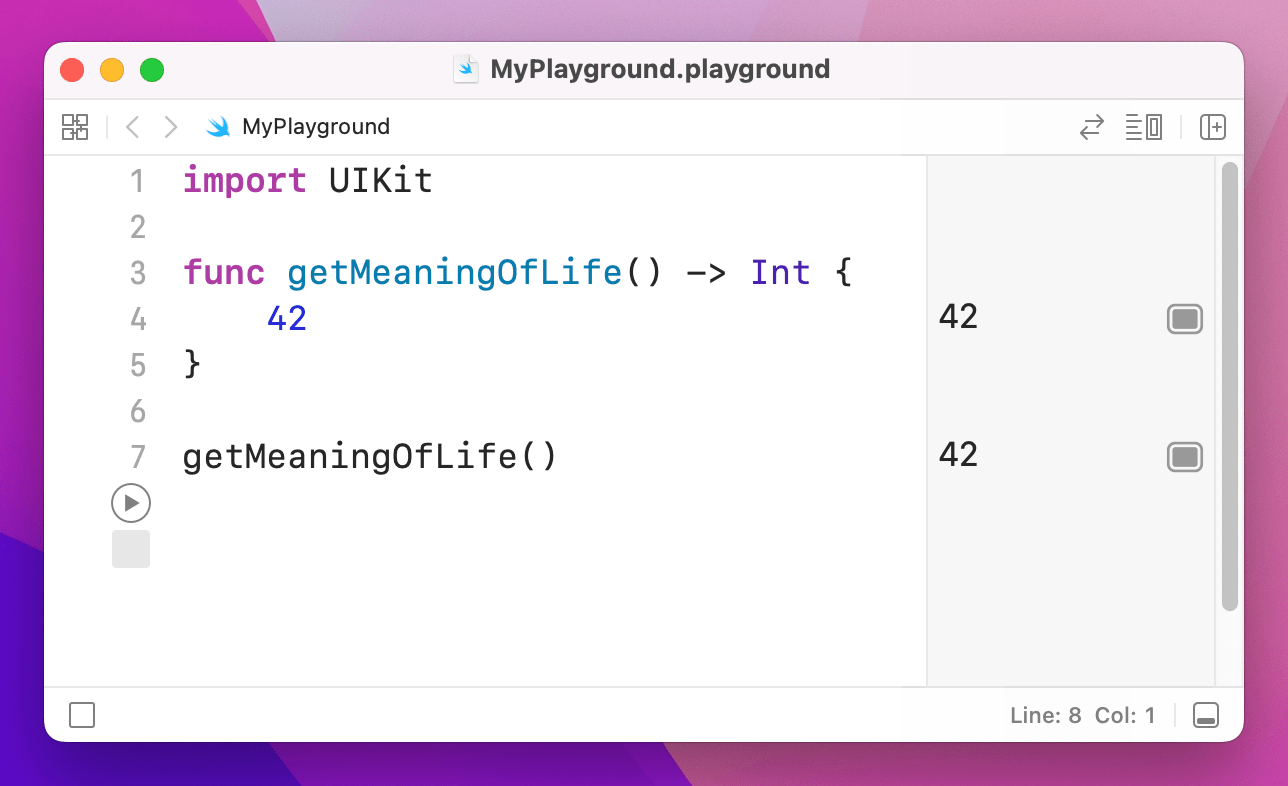
return.This is used very commonly in SwiftUI code.
2. Optionals
2. Optionals
Swift is a very safe language, by which I mean it works hard to ensure your code never fails in surprising ways.
One of the most common ways that code fails is when it tries to use data that is bad or missing. For example, imagine a function like this:
func getHaterStatus() -> String {
    return "Hate"
}
That function doesn't accept any parameters, and it returns a string: "Hate". But what if today is a particularly sunny day, and those haters don't feel like hating – what then? Well, maybe we want to return nothing: this hater is doing no hating today.
Now, when it comes to a string you might think an empty string is a great way to communicate nothing, and that might be true sometimes. But how about numbers – is 0 an "empty number"? Or -1?
Before you start trying to create imaginary rules for yourself, Swift has a solution: optionals. An optional value is one that might have a value or might not. Most people find optionals hard to understand, and that’s OK – I’m going to try explaining it in several ways, so hopefully one will work.
For now, imagine a survey where you ask someone, “On a scale of 1 to 5 how awesome is Taylor Swift?” – what would someone answer if they had somehow never heard of her? 1 would be unfairly slating her, and 5 would be praising her when they had no idea who Taylor Swift was. The solution is optionals: “I don’t want to provide a number at all.”
When we used -> String it means "this will definitely return a string," which means this function cannot return no value, and thus can be called safe in the knowledge that you'll always get a value back that you can use as a string. If we wanted to tell Swift that this function might return a value or it might not, we need to use this instead:
func getHaterStatus() -> String? {
    return "Hate"
}
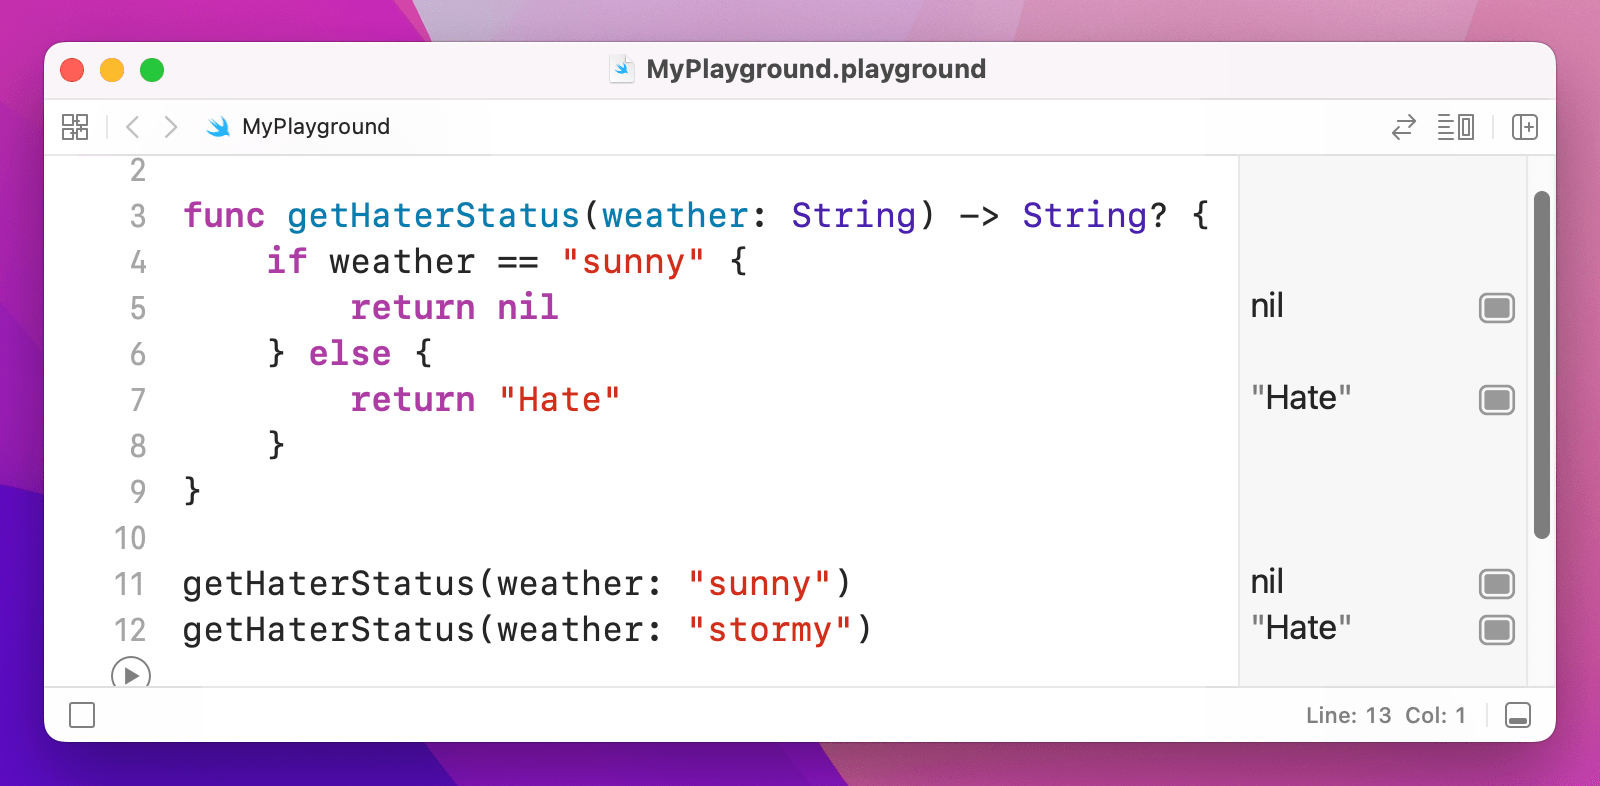
Note the extra question mark: String? means “optional string.” Now, in our case we're still returning “Hate” no matter what, but let's go ahead and modify that function further: if the weather is sunny, the haters have turned over a new leaf and have given up their life of hating, so we want to return no value. In Swift, this "no value" has a special name: nil.
Change the function to this:
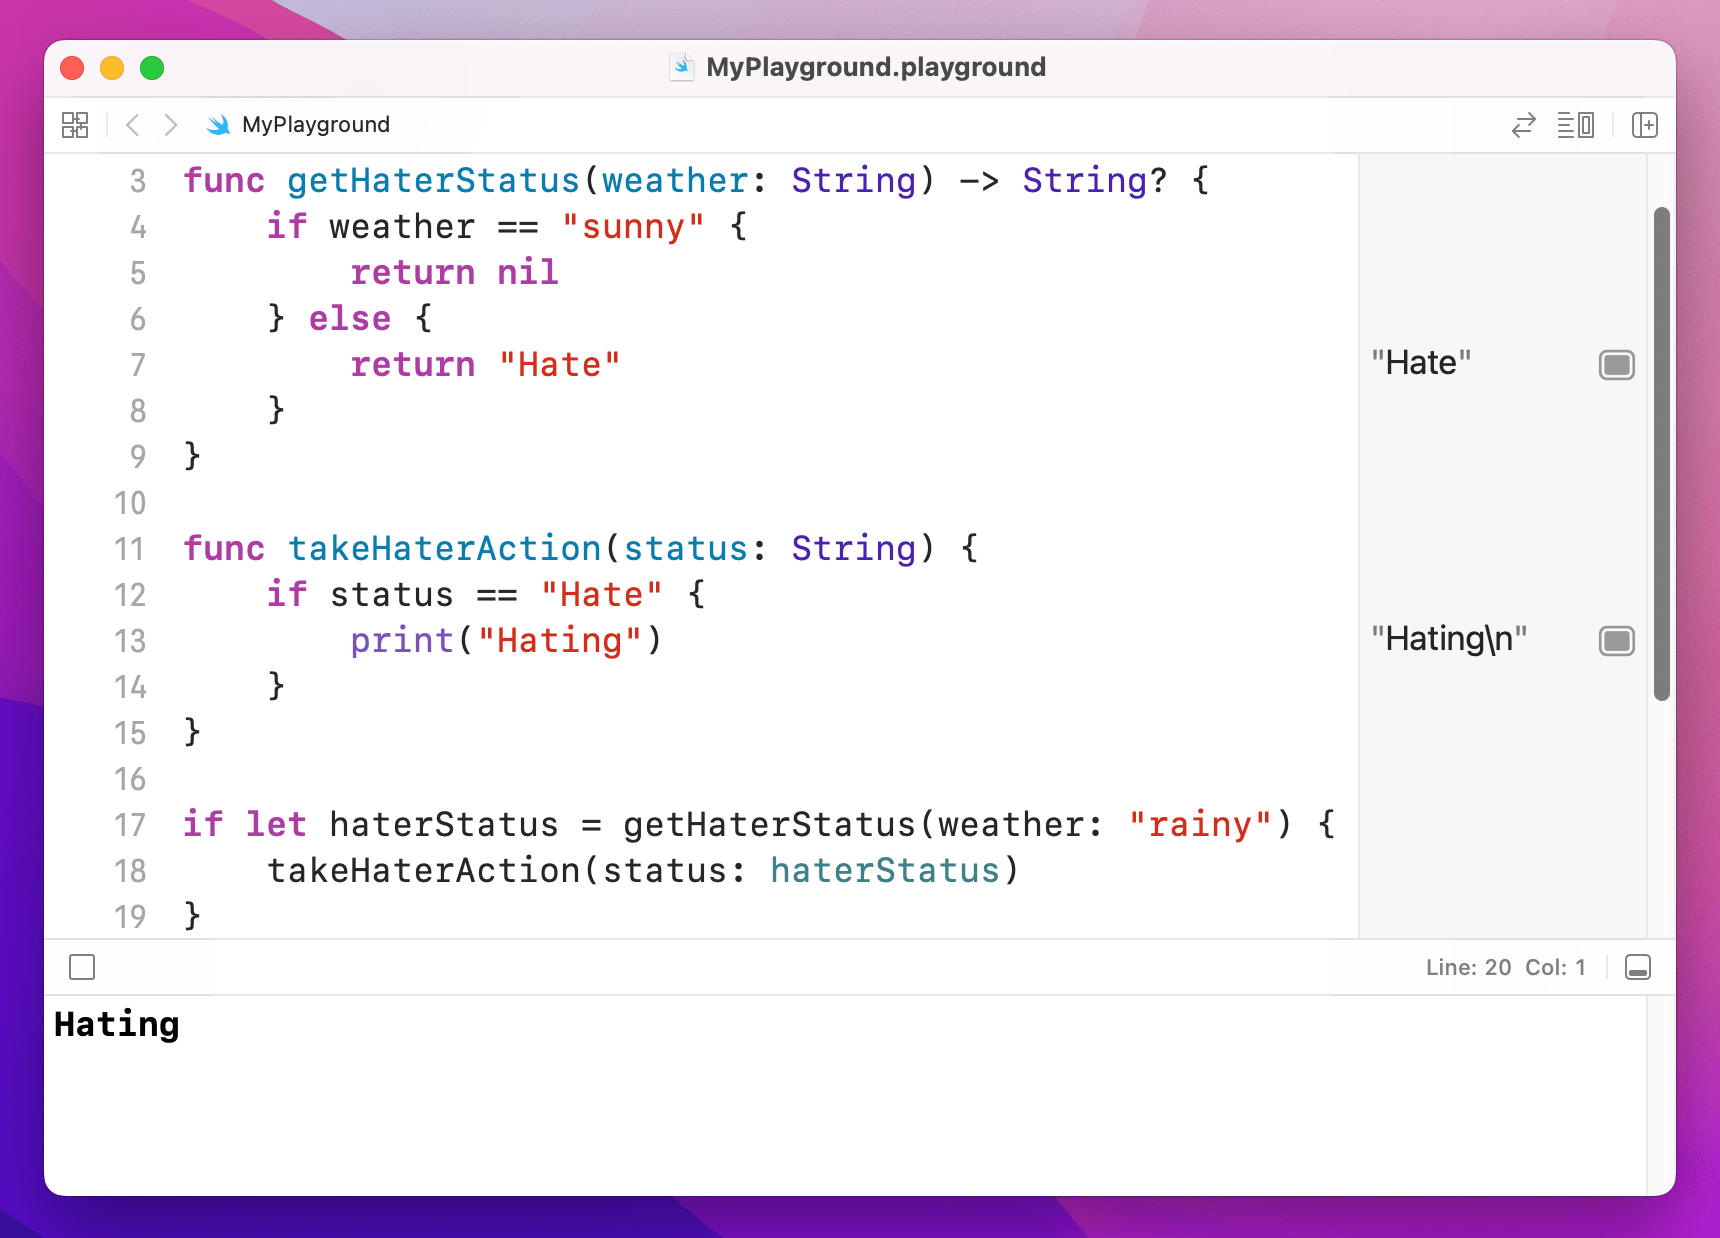
func getHaterStatus(weather: String) -> String? {
    if weather == "sunny" {
        return nil
    } else {
        return "Hate"
    }
}
That accepts one string parameter (the weather) and returns one string (hating status), but that return value might be there or it might not – it's nil. In this case, it means we might get a string, or we might get nil.
Now for the important stuff: Swift wants your code to be really safe, and trying to use a nil value is a bad idea. It might crash your code, it might screw up your app logic, or it might make your user interface show the wrong thing. As a result, when you declare a value as being optional, Swift will make sure you handle it safely.
Let's try this now: add these lines of code to your playground:
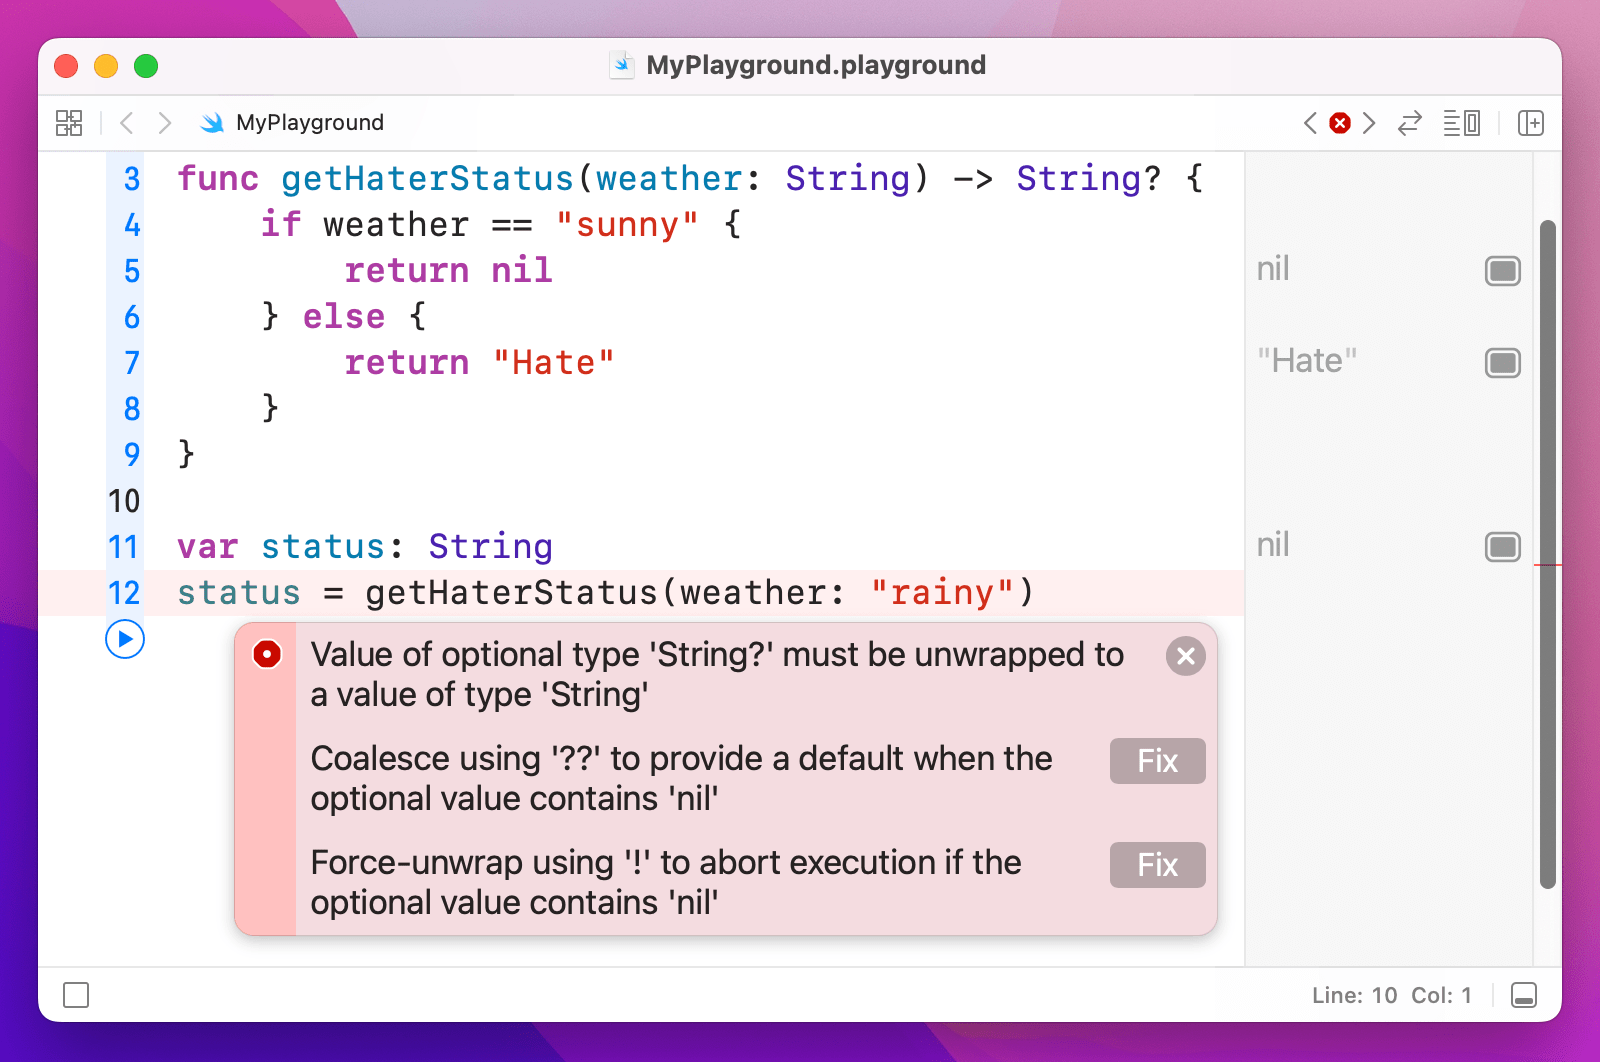
var status: String
status = getHaterStatus(weather: "rainy")
The first line creates a string variable, and the second assigns to it the value from getHaterStatus() – and today the weather is rainy, so those haters are hating for sure.
That code will not run, because we said that status is of type String, which requires a value, but getHaterStatus() might not provide one because it returns an optional string. That is, we said there would definitely be a string in status, but getHaterStatus() might return nothing at all. Swift simply will not let you make this mistake, which is extremely helpful because it effectively stops a whole class of common bugs.
To fix the problem, we need to make the status variable a String?, or just remove the type annotation entirely and let Swift use type inference. The first option looks like this:
var status: String?
status = getHaterStatus(weather: "rainy")
And the second like this:
var status = getHaterStatus(weather: "rainy")
Regardless of which you choose, that value might be there or might not, and by default Swift won't let you use it dangerously. As an example, imagine a function like this:
func takeHaterAction(status: String) {
    if status == "Hate" {
        print("Hating")
    }
}
That takes a string and prints a message depending on its contents. This function takes a String value, and not a String? value – you can't pass in an optional here, it wants a real string, which means we can't call it using the status variable we made.
Swift has two solutions. Both are used, but one is definitely preferred over the other. The first solution is called optional unwrapping, and it's done inside a conditional statement using special syntax. It does two things at the same time: checks whether an optional has a value, and if so unwraps it into a non-optional type then runs a code block.
The syntax looks like this:
if let unwrappedStatus = status {
    // unwrappedStatus contains a non-optional value!
} else {
    // in case you want an else block, here you go…
}
These if let statements check and unwrap in one succinct line of code, which makes them very common. Using this method, we can safely unwrap the return value of getHaterStatus() and be sure that we only call takeHaterAction() with a valid, non-optional string. Here's the complete code:
func getHaterStatus(weather: String) -> String? {
    if weather == "sunny" {
        return nil
    } else {
        return "Hate"
    }
}

func takeHaterAction(status: String) {
    if status == "Hate" {
        print("Hating")
    }
}

if let haterStatus = getHaterStatus(weather: "rainy") {
    takeHaterAction(status: haterStatus)
}
If you understand this concept, you're welcome to skip down to the title that says "Force unwrapping optionals". If you're still not quite sure about optionals, carry on reading.
Okay, if you're still here it means the explanation above either made no sense, or you sort of understood but could probably use some clarification. Optionals are used extensively in Swift, so you really do need to understand them. I'm going to try explaining again, in a different way, and hopefully that will help!
Here's a new function:
func yearAlbumReleased(name: String) -> Int {
    if name == "Taylor Swift" { return 2006 }
    if name == "Fearless" { return 2008 }
    if name == "Speak Now" { return 2010 }
    if name == "Red" { return 2012 }
    if name == "1989" { return 2014 }

    return 0
}
That takes the name of a Taylor Swift album, and returns the year it was released. But if we call it with the album name "Lantern" because we mixed up Taylor Swift with Hudson Mohawke (an easy mistake to make, right?) then it returns 0 because it's not one of Taylor's albums.
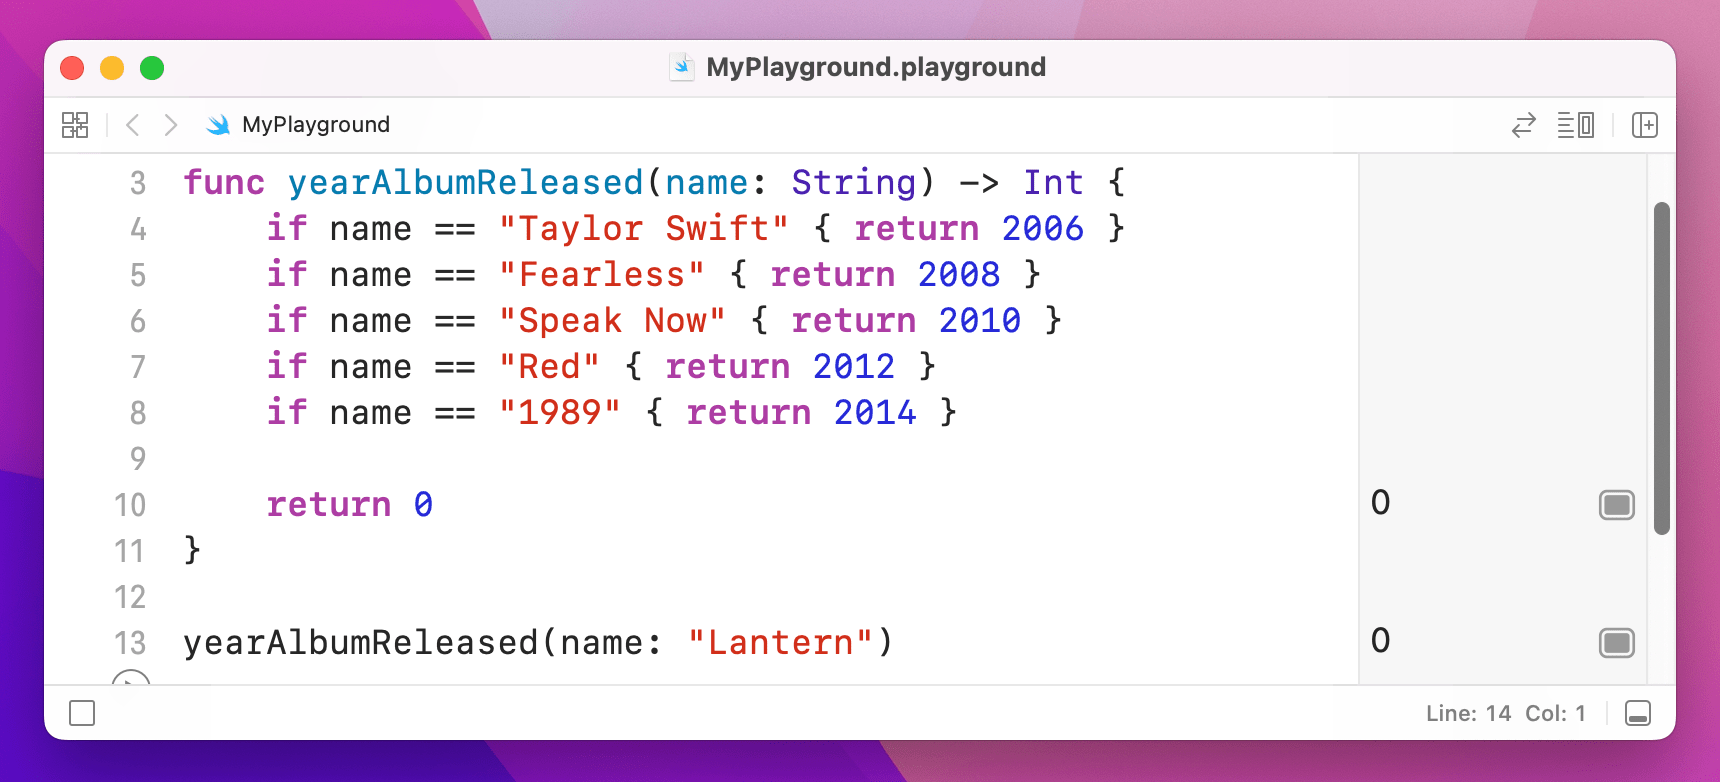
But does 0 make sense here? Sure, if the album was released back in 0 AD when Caesar Augustus was emperor of Rome, 0 might make sense, but here it's just confusing – people need to know ahead of time that 0 means “not recognized.”
A much better idea is to rewrite that function so that it either returns an integer (when a year was found) or nil (when nothing was found), which is easy thanks to optionals. Here's the new function:
func yearAlbumReleased(name: String) -> Int? {
    if name == "Taylor Swift" { return 2006 }
    if name == "Fearless" { return 2008 }
    if name == "Speak Now" { return 2010 }
    if name == "Red" { return 2012 }
    if name == "1989" { return 2014 }

    return nil
}
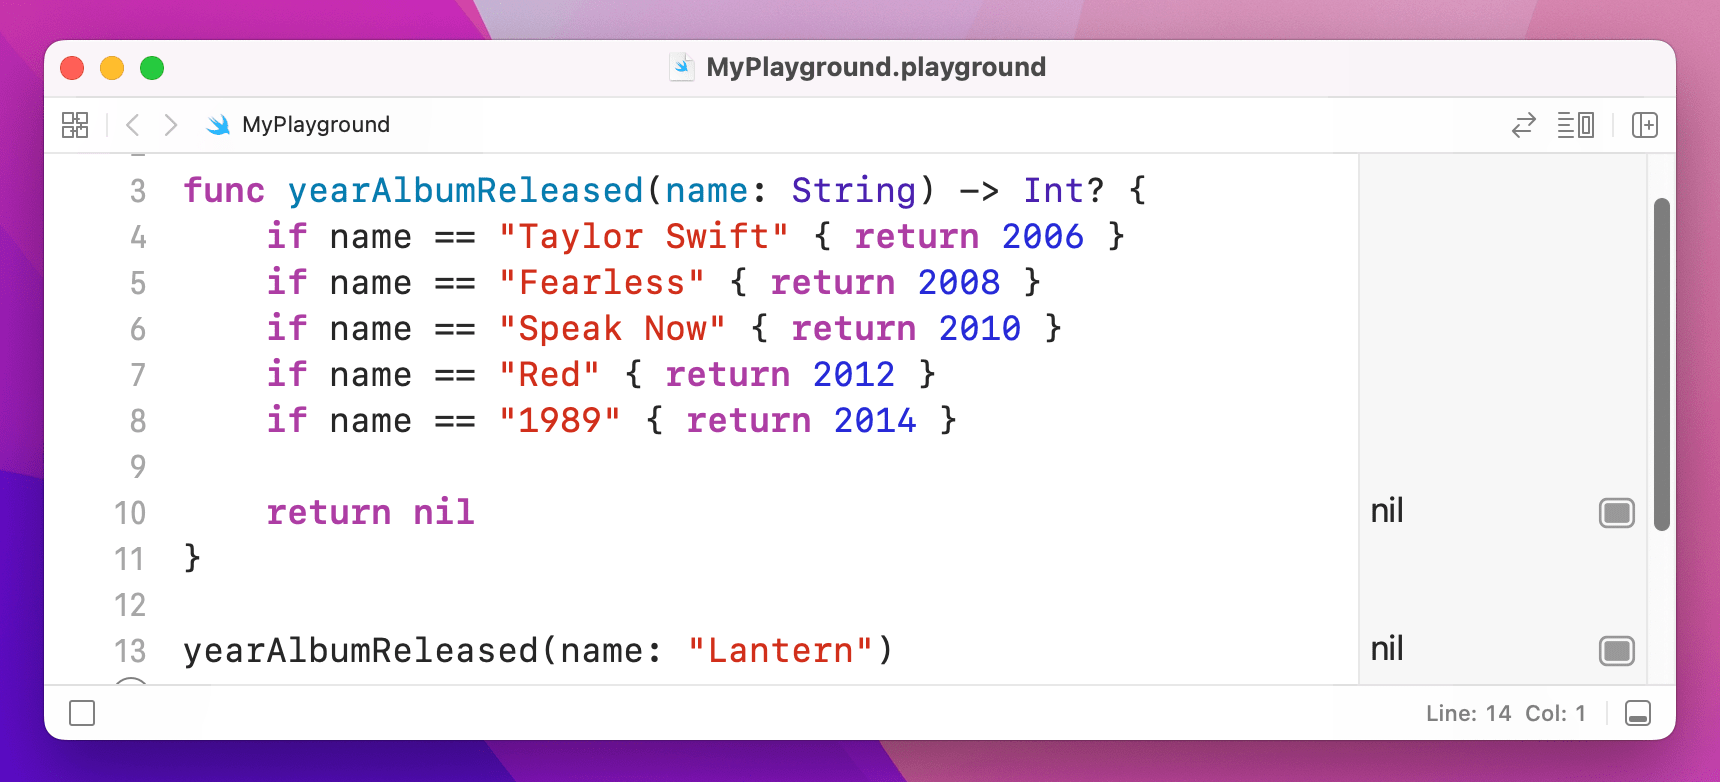
Now that it returns nil, we need to unwrap the result using if let because we need to check whether a value exists or not.
If you understand the concept now, you're welcome to skip down to the title that says “Force unwrapping optionals”. If you're still not quite sure about optionals, carry on reading.
Okay, if you're still here it means you're really struggling with optionals, so I'm going to have one last go at explaining them.
Here's an array of names:
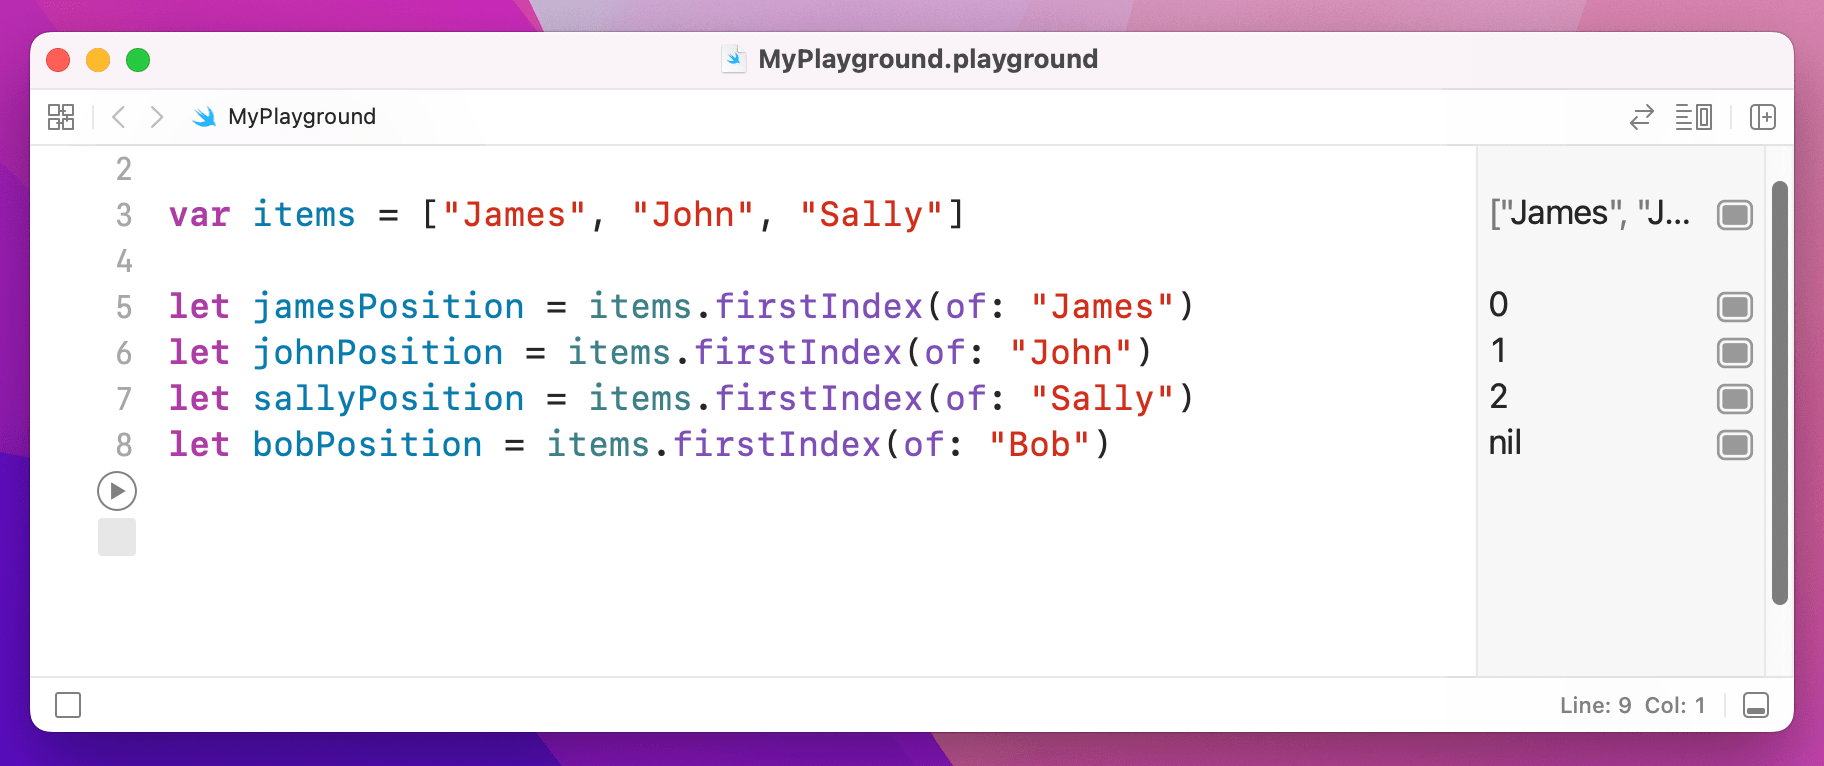
var items = ["James", "John", "Sally"]
If we wanted to write a function that looked in that array and told us the index of a particular name, we might write something like this:
func position(of string: String, in array: [String]) -> Int {
    for i in 0..<array.count {
        if array[i] == string {
            return i
        }
    }

    return 0
}
That loops through all the items in the array, returning its position if it finds a match, otherwise returning 0.
Now try running these four lines of code:
let jamesPosition = position(of: "James", in: items)
let johnPosition = position(of: "John", in: items)
let sallyPosition = position(of: "Sally", in: items)
let bobPosition = position(of: "Bob", in: items)
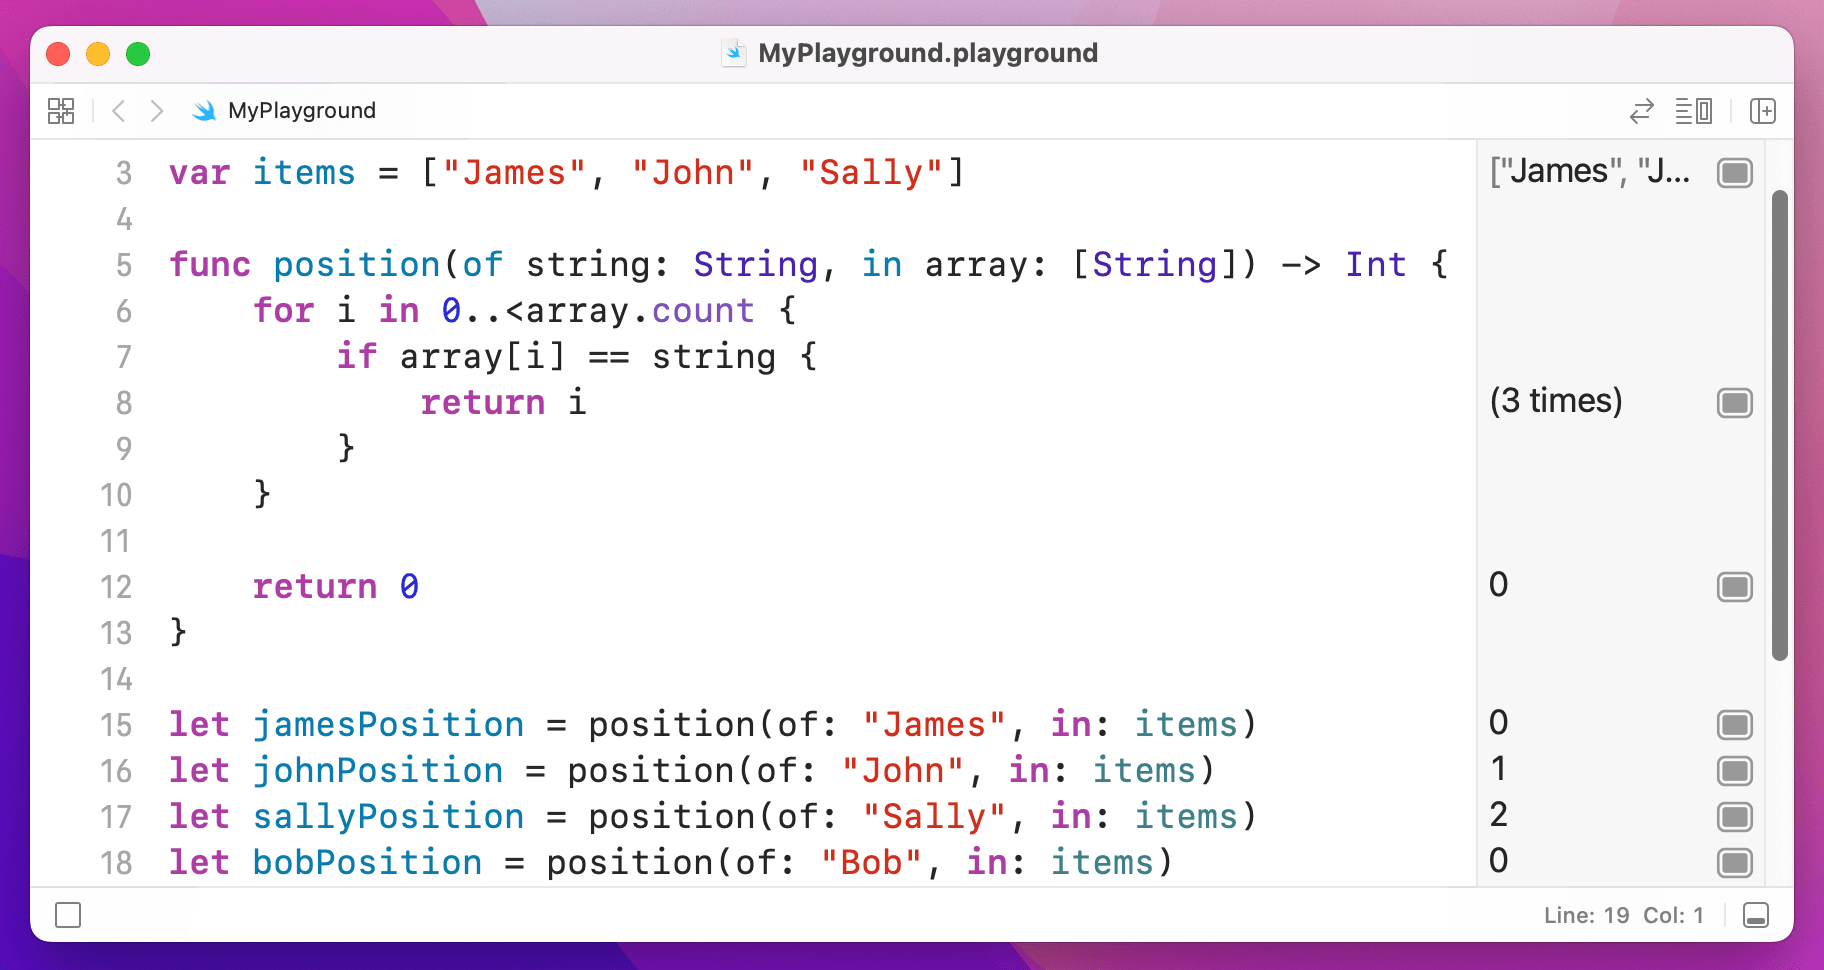
That will output 0, 1, 2, 0 – the positions of James and Bob are the same, even though one exists and one doesn't. This is because I used 0 to mean "not found." The easy fix might be to make -1 not found, but whether it's 0 or -1 you still have a problem because you have to remember that specific number means “not found.”
The solution is optionals: return an integer if you found the match, or nil otherwise. In fact, this is exactly the approach the built-in "find in array" methods use: someArray.firstIndex(of: someValue).
When you work with these "might be there, might not be" values, Swift forces you to unwrap them before using them, thus acknowledging that there might not be a value. That's what if let syntax does: if the optional has a value then unwrap it and use it, otherwise don't use it at all. You can’t use a possibly-empty value by accident, because Swift won’t let you.
If you're still not sure how optionals work, then the best thing to do is ask me on Twitter and I'll try to help: you can find me @twostraws.
Force unwrapping optionals
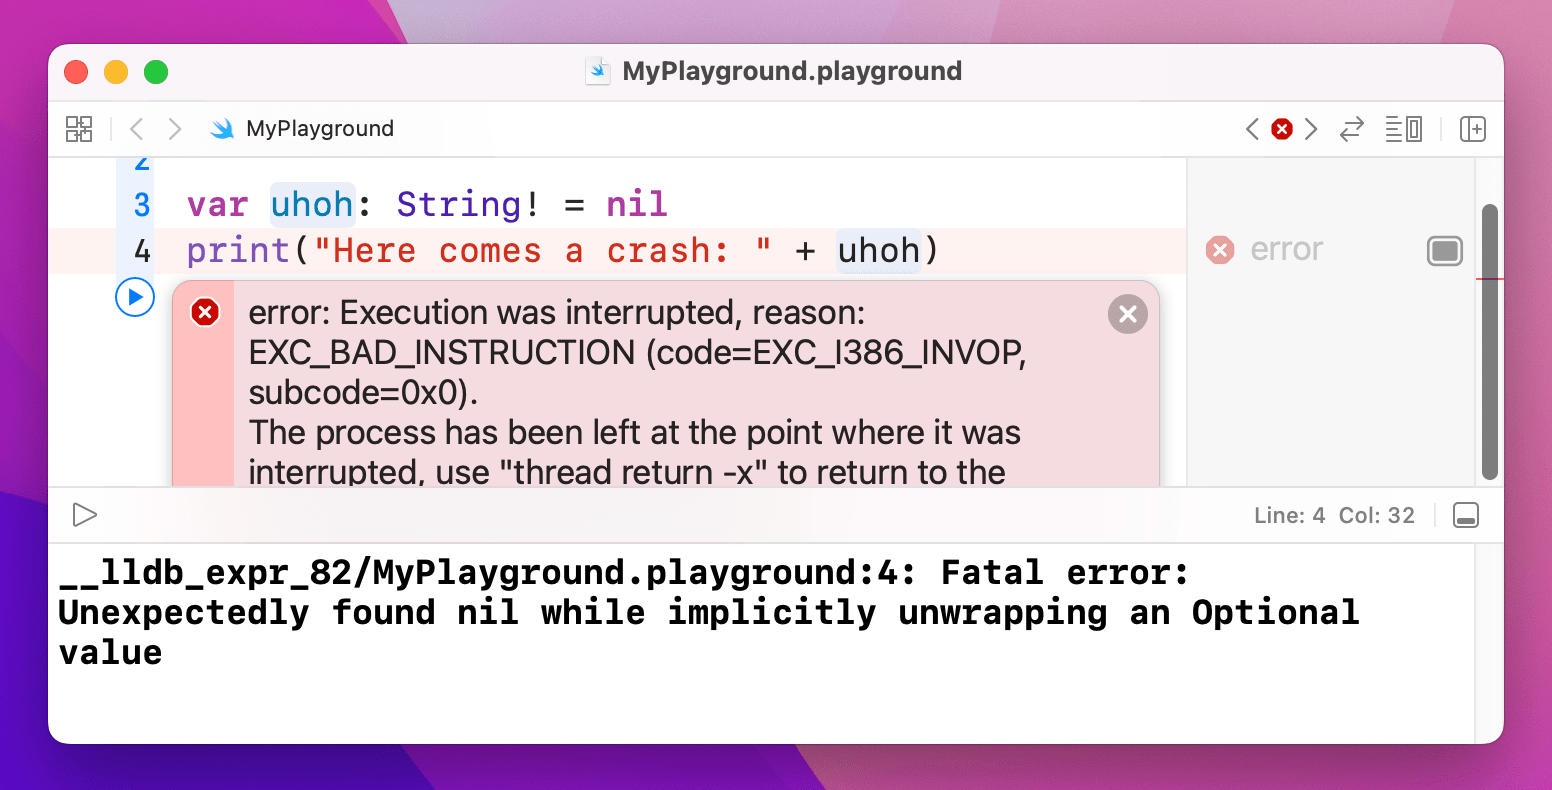
Swift lets you override its safety by using the exclamation mark character: !. If you know that an optional definitely has a value, you can force unwrap it by placing this exclamation mark after it.
Please be careful, though: if you try this on a variable that does not have a value, your code will crash.
To put together a working example, here's some foundation code:
func yearAlbumReleased(name: String) -> Int? {
if name == "Taylor Swift" { return 2006 }
if name == "Fearless" { return 2008 }
if name == "Speak Now" { return 2010 }
if name == "Red" { return 2012 }
if name == "1989" { return 2014 }
return nil
}
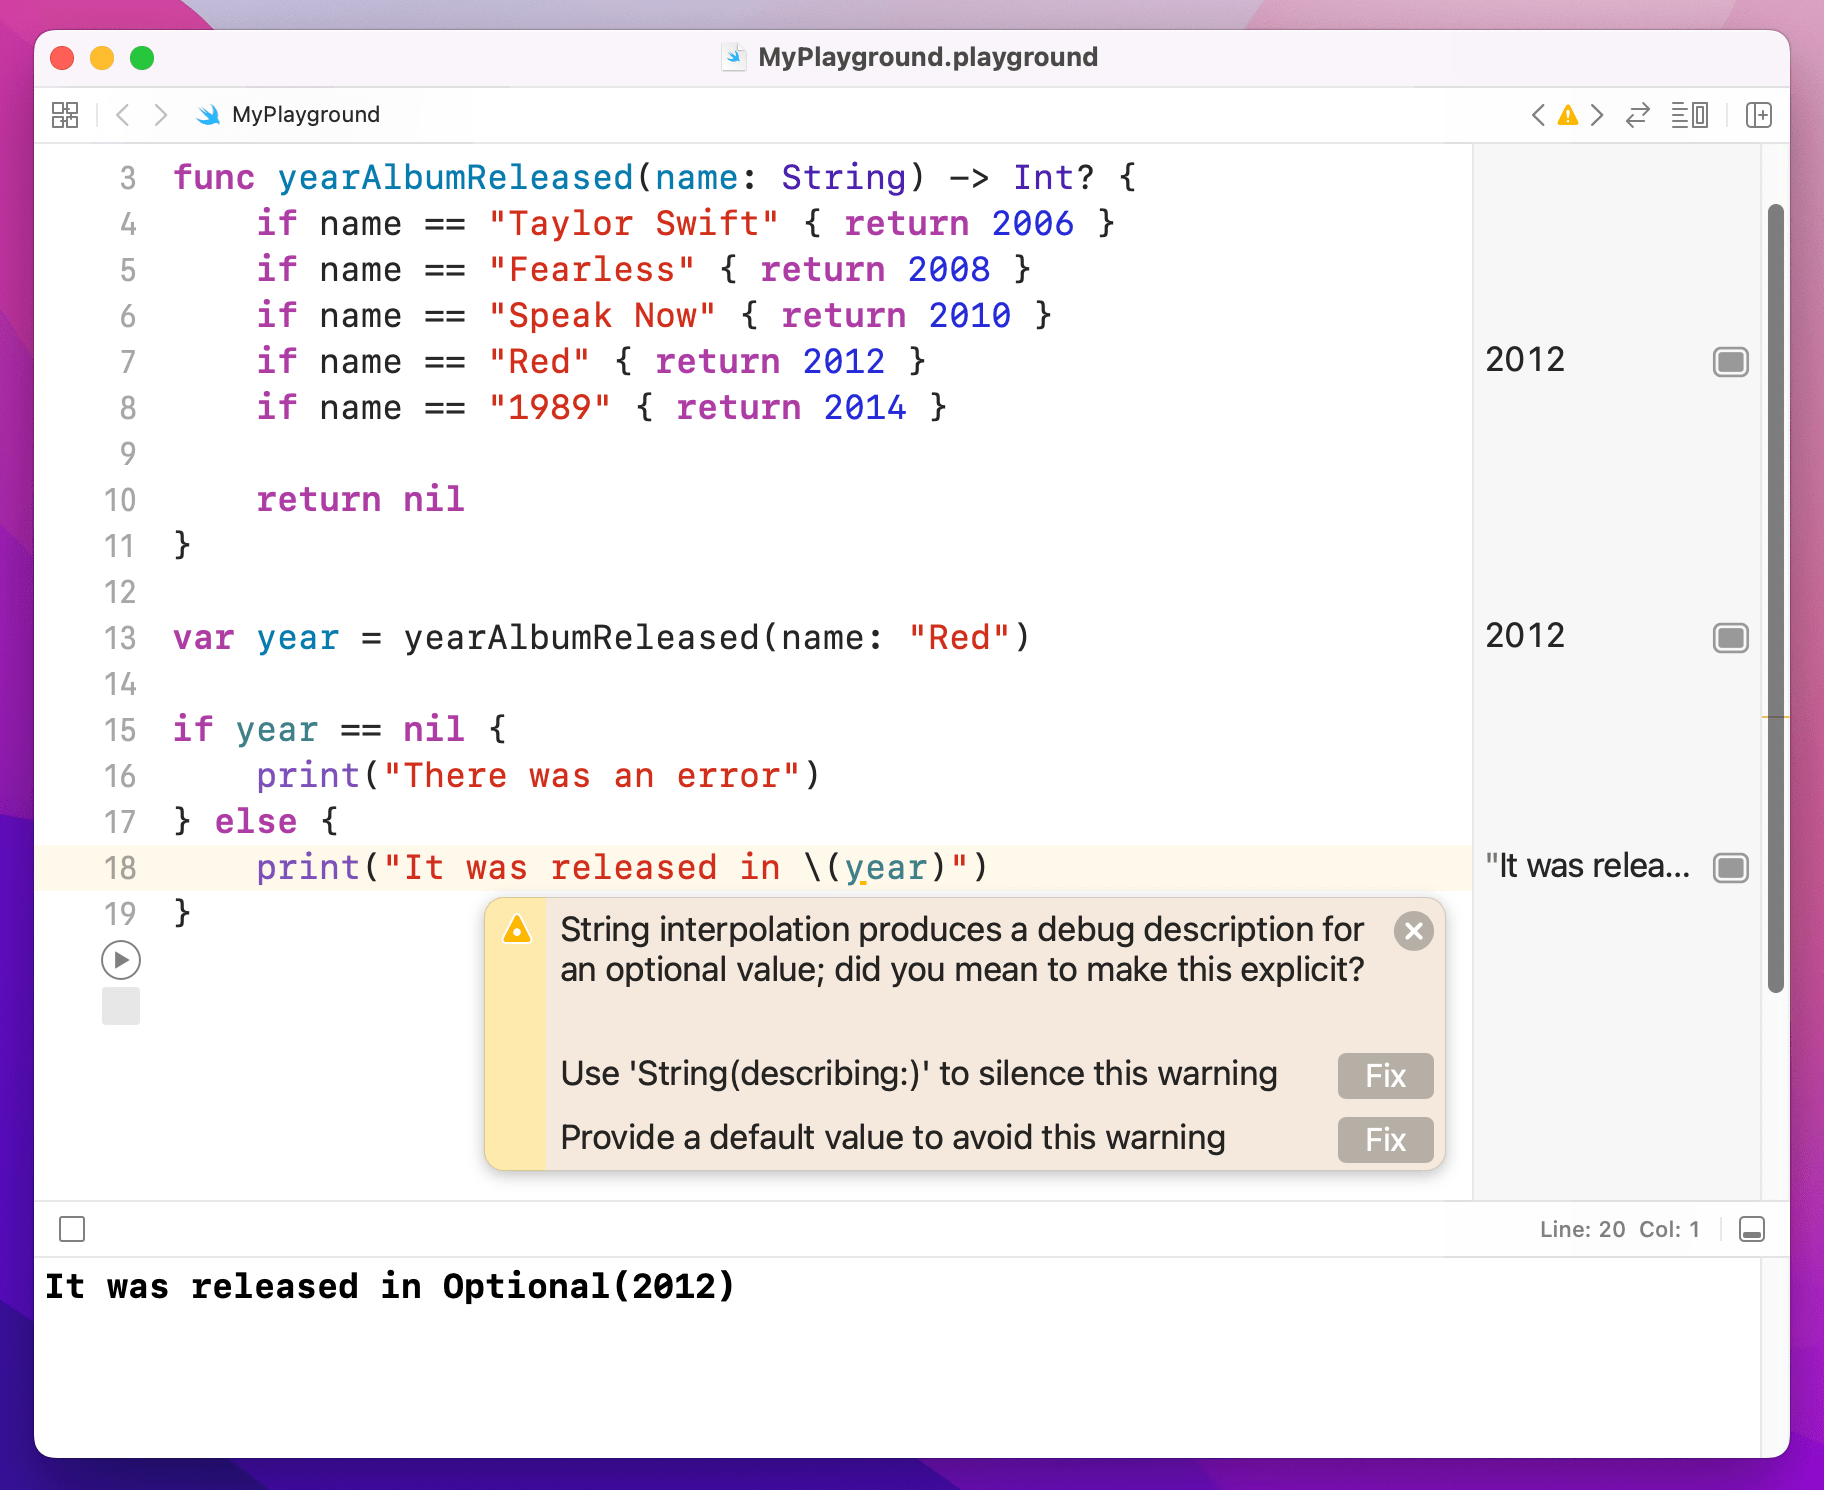
var year = yearAlbumReleased(name: "Red")
if year == nil {
print("There was an error")
} else {
print("It was released in \(year)")
}
That gets the year an album was released. If the album couldn't be found, year will be set to nil, and an error message will be printed. Otherwise, the year will be printed.
Or will it? Well, yearAlbumReleased() returns an optional integer, and this code doesn't use if let to unwrap that optional. As a result, it will print out the following: "It was released in Optional(2012)" – probably not what we wanted!
At this point in the code, we have already checked that we have a valid value, so it's a bit pointless to have another if let in there to safely unwrap the optional. So, Swift provides a solution – change the second print() call to this:
print("It was released in \(year!)")
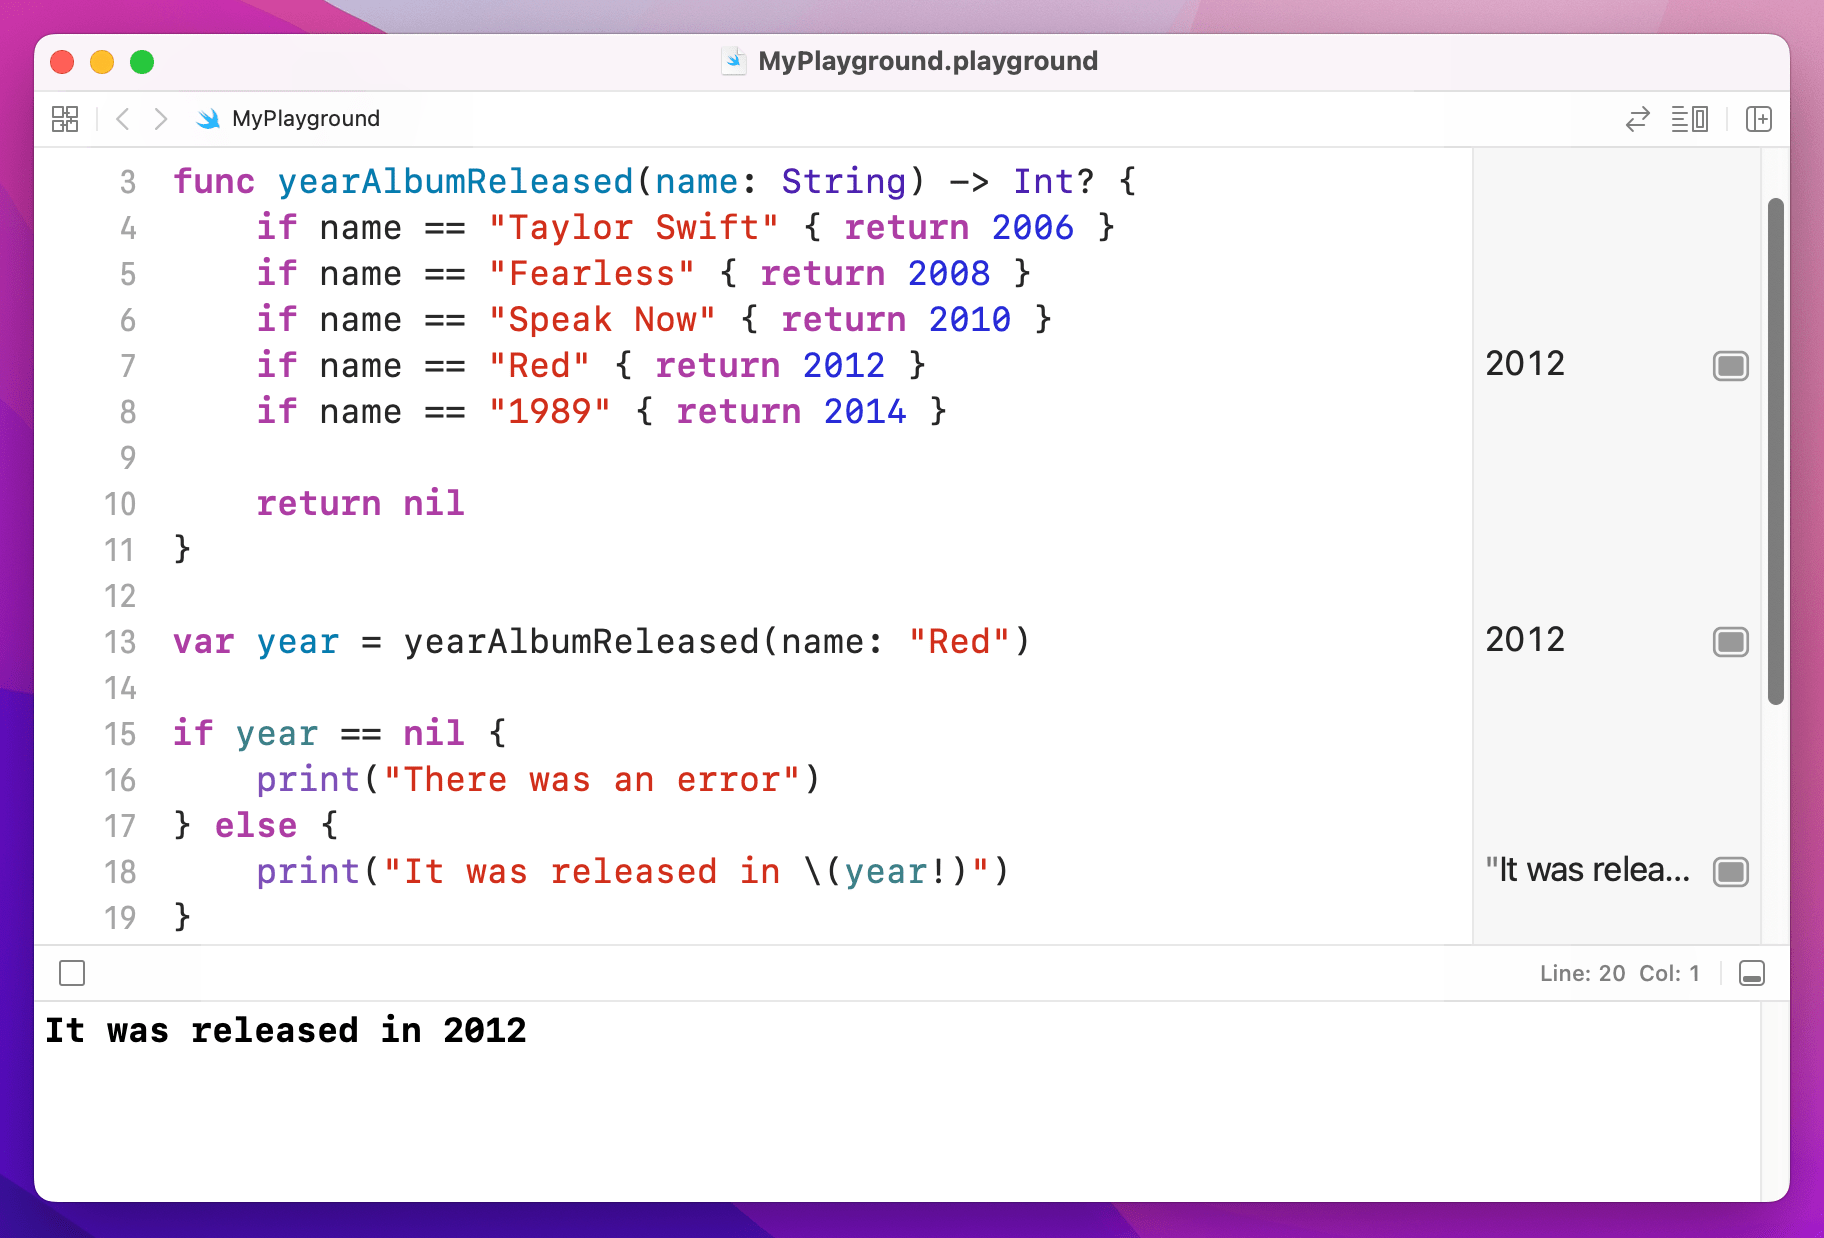
Note the exclamation mark: it means "I'm certain this contains a value, so force unwrap it now."
Broadly speaking force unwrapping optionals is frowned upon – if you find yourself doing it frequently you might want to rethink your approach.
Implicitly unwrapped optionals
You can also use this exclamation mark syntax to create implicitly unwrapped optionals, which is where some people really start to get confused. So, please read this carefully!
- A regular variable must contain a value. Example:
Stringmust contain a string, even if that string is empty, i.e."". It cannot be nil. - An optional variable might contain a value, or might not. It must be unwrapped before it is used. Example:
String?might contain a string, or it might contain nil. The only way to find out is to unwrap it. - An implicitly unwrapped optional might contain a value, or might not, but it does not need to be unwrapped before it is used. Swift won't check for you, so you need to be extra careful. Example:
String!might contain a string, or it might contain nil – and it's down to you to use it appropriately. It’s like a regular optional, but Swift lets you access the value directly without the unwrapping safety. If you try to do it, it means you know there’s a value there – but if you’re wrong your app will crash.
The main times you're going to meet implicitly unwrapped optionals is when you're working with user interface elements in UIKit on iOS or AppKit on macOS. These need to be declared up front, but you can't use them until they have been created – and Apple likes to create user interface elements at the last possible moment to avoid any unnecessary work. Having to continually unwrap values you definitely know will be there is annoying, so these are made implicitly unwrapped.
Don't worry if you find implicitly unwrapped optionals a bit hard to grasp – it will become clear as you work with the language, and you’ll be pleased to know they are rare in SwiftUI projects.
3. Optional chaining
3. Optional chaining
Working with optionals can feel a bit clumsy sometimes, and all the unwrapping and checking can become so onerous that you might be tempted to throw some exclamation marks to force unwrap stuff so you can get on with work. Be careful, though: if you force unwrap an optional that doesn't have a value, your code will crash.
Swift has two techniques to help make your code less complicated. The first is called optional chaining, which lets you run code only if your optional has a value. Put the below code into your playground to get us started:
func albumReleased(year: Int) -> String? {
    switch year {
    case 2006: return "Taylor Swift"
    case 2008: return "Fearless"
    case 2010: return "Speak Now"
    case 2012: return "Red"
    case 2014: return "1989"
    default: return nil
    }
}

let album = albumReleased(year: 2006)
print("The album is \(album)")
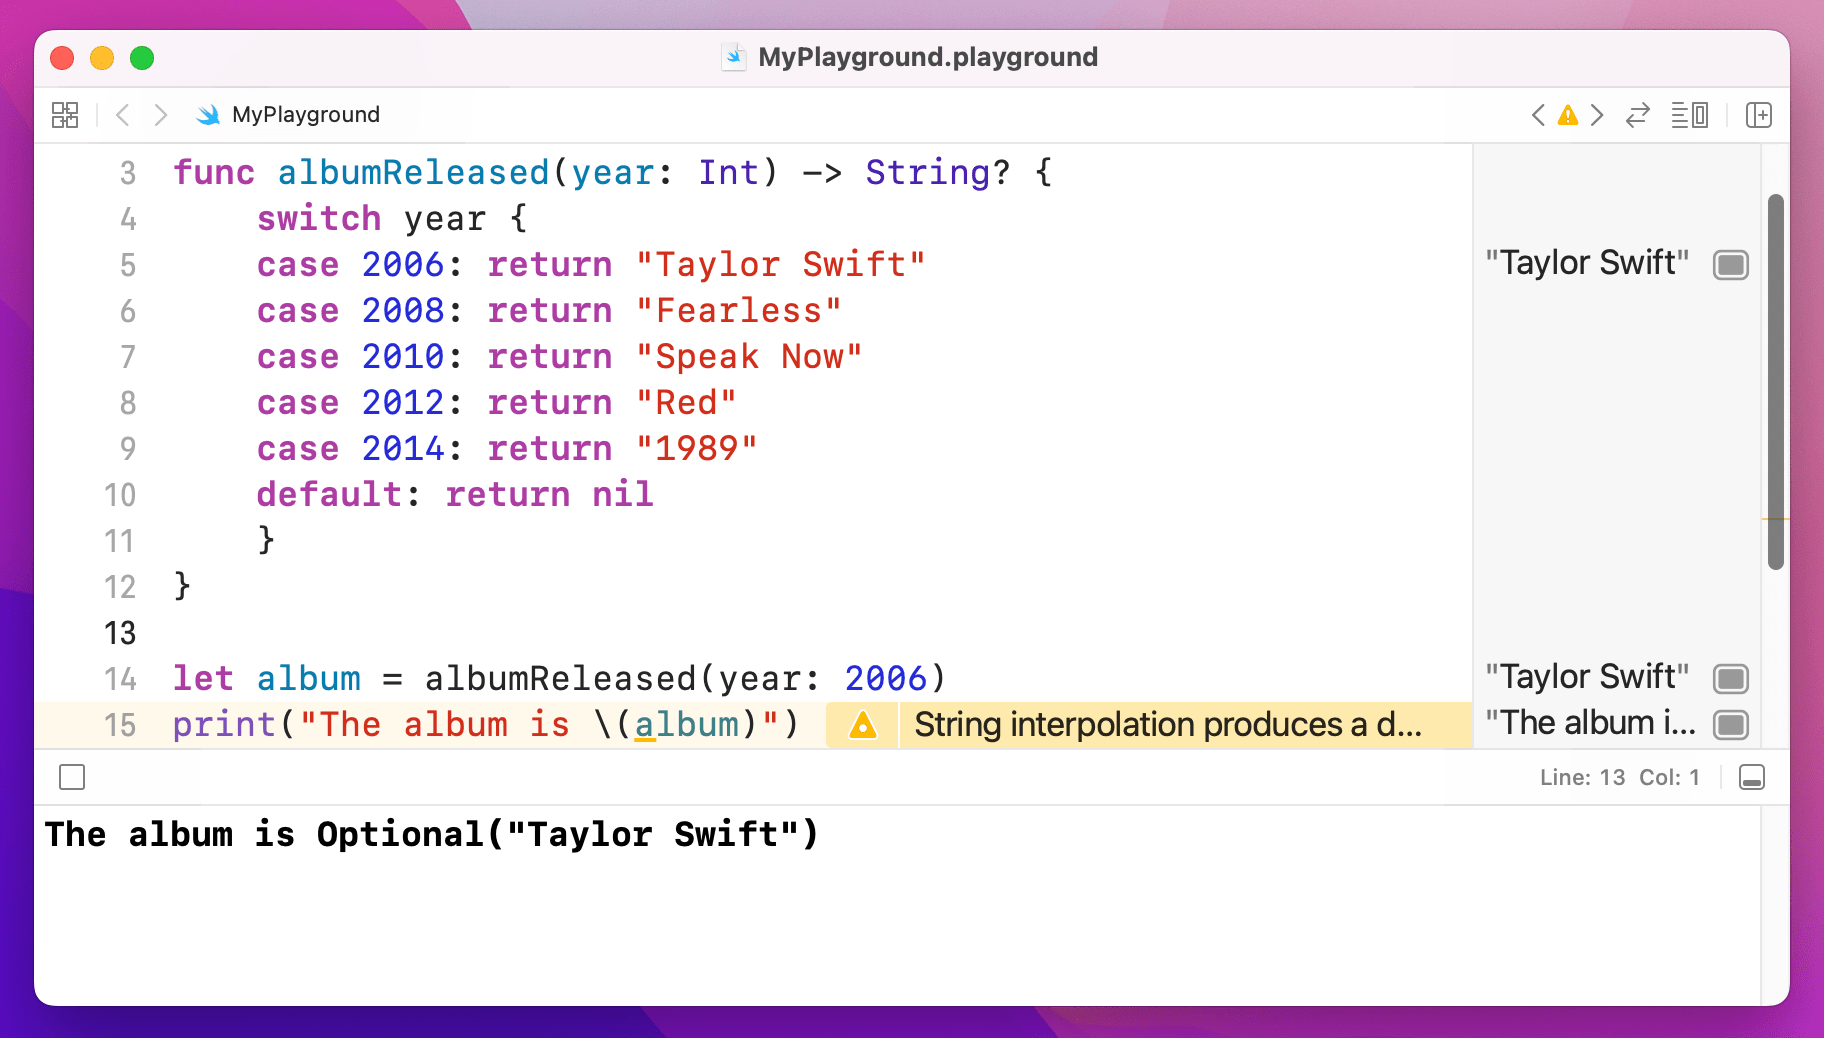
That will output "The album is Optional("Taylor Swift")" into the results pane.
If we wanted to convert the return value of albumReleased() to be uppercase letters (that is, "TAYLOR SWIFT" rather than "Taylor Swift") we could call the uppercased() method of that string. For example:
let str = "Hello world"
print(str.uppercased())

uppercased() method prints “HELLO WORLD” in uppercase letters.The problem is, albumReleased() returns an optional string: it might return a string or it might return nothing at all. So, what we really mean is, "if we got a string back make it uppercase, otherwise do nothing." And that's where optional chaining comes in, because it provides exactly that behavior.
Try changing the last two lines of code to this:
let album = albumReleased(year: 2006)?.uppercased()
print("The album is \(album)")
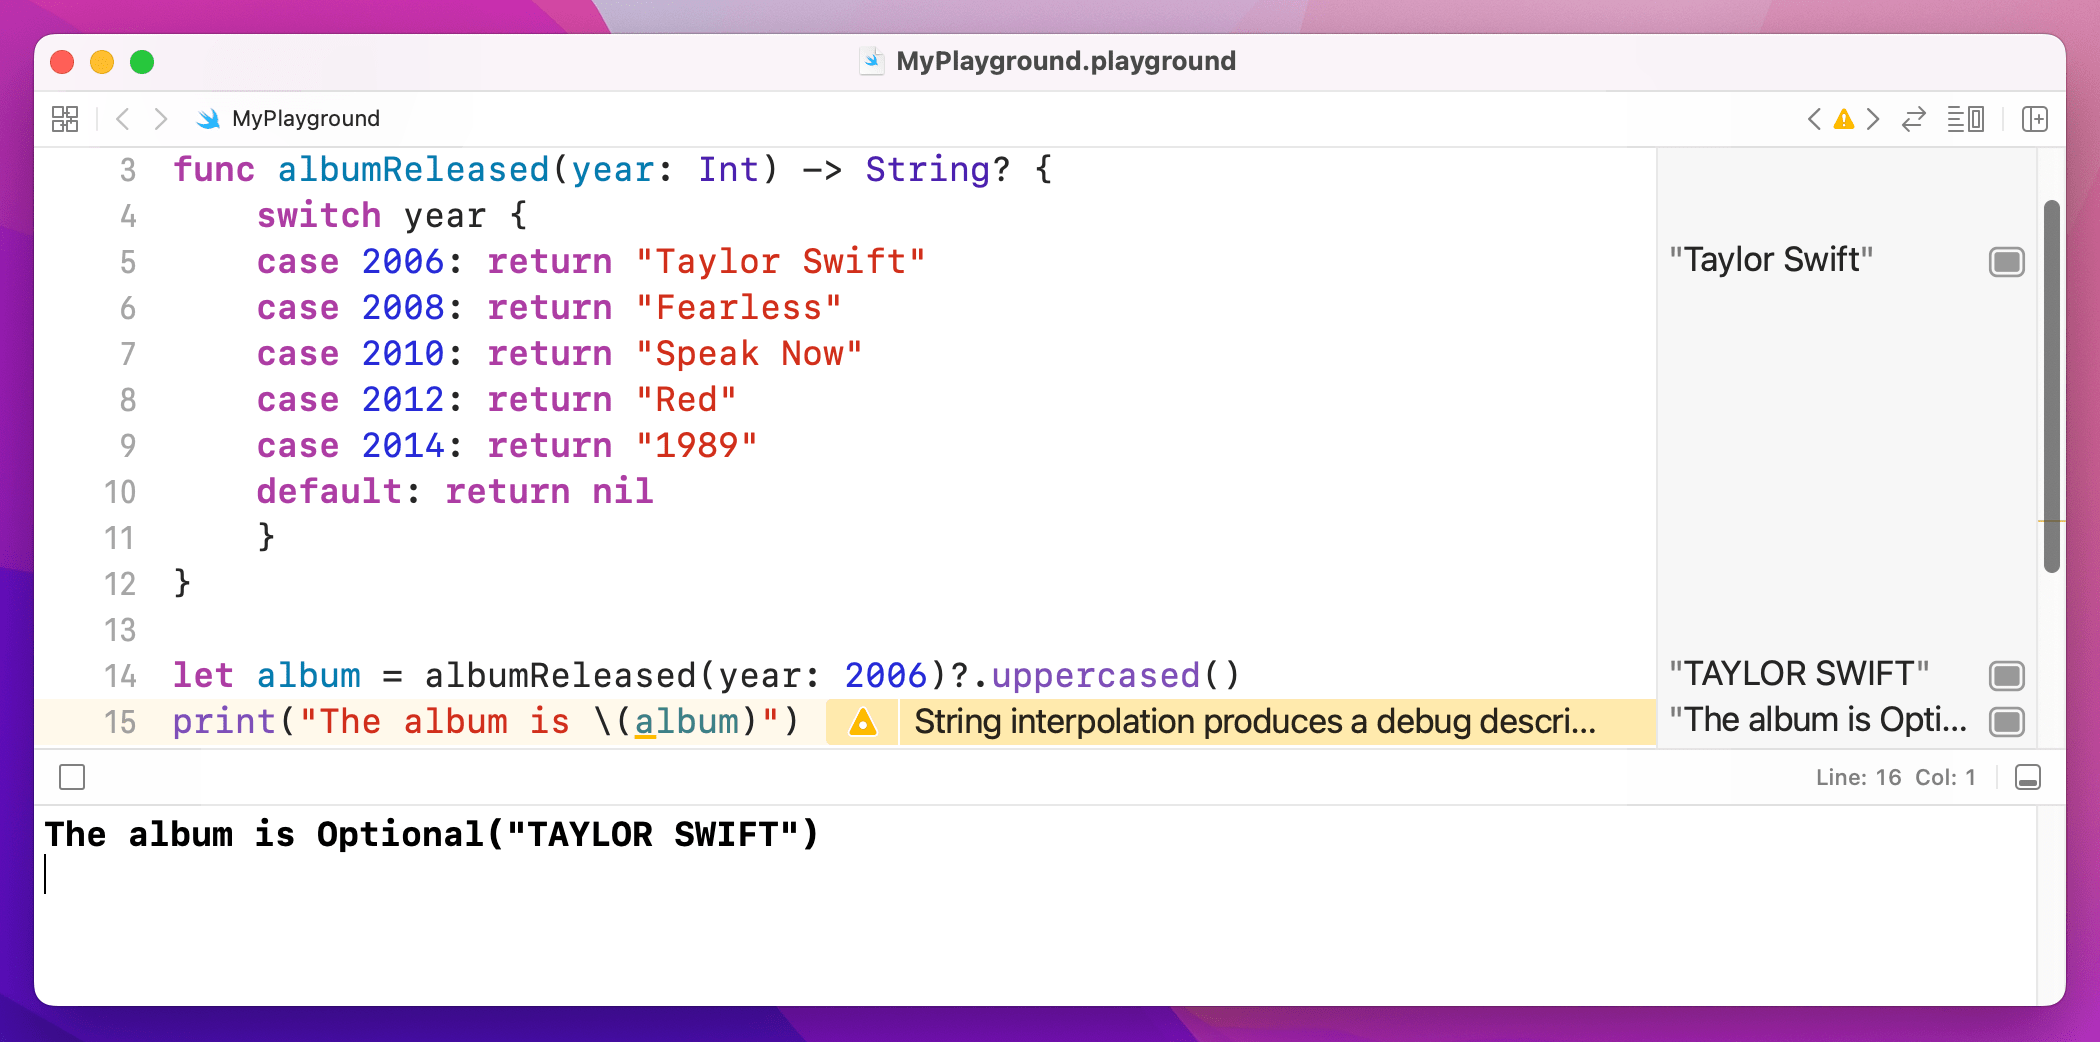
Note that there's a question mark in there, which is the optional chaining: everything after the question mark will only be run if everything before the question mark has a value. This doesn't affect the underlying data type of album, because that line of code will now either return nil or will return the uppercase album name – it's still an optional string.
Your optional chains can be as long as you need, for example:
let album = albumReleased(year: 2006)?.someOptionalValue?.someOtherOptionalValue?.whatever
Swift will check them from left to right until it finds nil, at which point it stops.
The nil coalescing operator
Nil coalescing makes your code much simpler and safer, and yet has such a grandiose name that many people are scared of it. This is a shame, because the nil coalescing operator will make your life easier if you take the time to figure it out!
What it does is let you say "use value A if you can, but if value A is nil then use value B." That's it. It's particularly helpful with optionals, because it effectively stops them from being optional because you provide a non-optional value B. So, if A is optional and has a value, it gets used (we have a value.) If A is present and has no value, B gets used (so we still have a value). Either way, we definitely have a value.
To give you a real context, try using this code in your playground:
let album = albumReleased(year: 2006) ?? "unknown"
print("The album is \(album)")
That double question mark is the nil coalescing operator, and in this situation it means "if albumReleased() returned a value then put it into the album variable, but if albumReleased() returned nil then use 'unknown' instead."
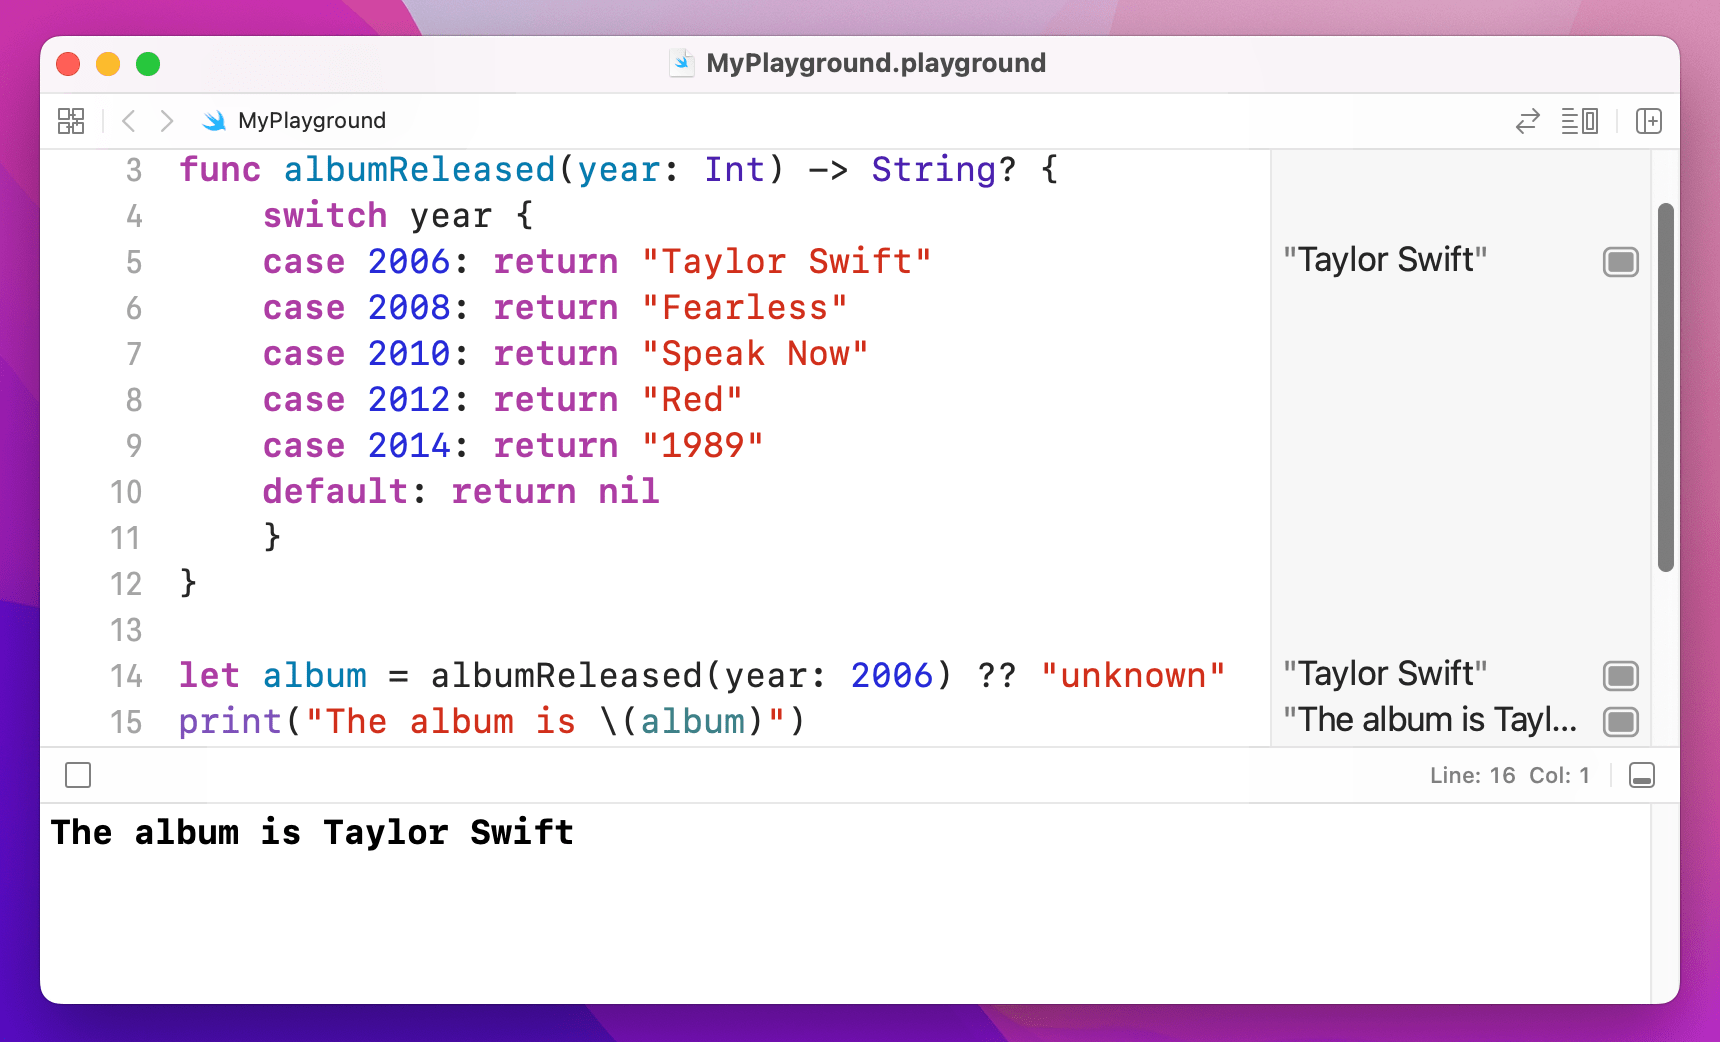
album is no longer an Optional.If you look in the results pane now, you'll see "The album is Taylor Swift" printed in there – no more optionals. This is because Swift can now be sure it will get a real value back, either because the function returned one or because you're providing "unknown". This in turn means you don't need to unwrap anything or risk crashes: you're guaranteed to have real data to work with, which makes your code safer and easier to work with.
4. Enumerations
4. Enumerations
Enumerations – usually just called “enum” and pronounced “ee-num” - are a way for you to define your own kind of value in Swift. In some programming languages they are simple little things, but Swift adds a huge amount of power to them if you want to go beyond the basics.
Let's start with a simple example from earlier:
func getHaterStatus(weather: String) -> String? {
    if weather == "sunny" {
        return nil
    } else {
        return "Hate"
    }
}
That function accepts a string that defines the current weather. The problem is, a string is a poor choice for that kind of data – is it “rain”, “rainy” or “raining”? Or perhaps “showering”, “drizzly” or “stormy”? Worse, what if one person writes “Rain” with an uppercase R and someone else writes “Ran” because they weren't looking at what they typed?
Enums solve this problem by letting you define a new data type, then define the possible values it can hold. For example, we might say there are five kinds of weather: sun, cloud, rain, wind and snow. If we make this an enum, it means Swift will accept only those five values – anything else will trigger an error. And behind the scenes enums are usually just simple numbers, which are a lot faster than strings for computers to work with.
Let's put that into code:
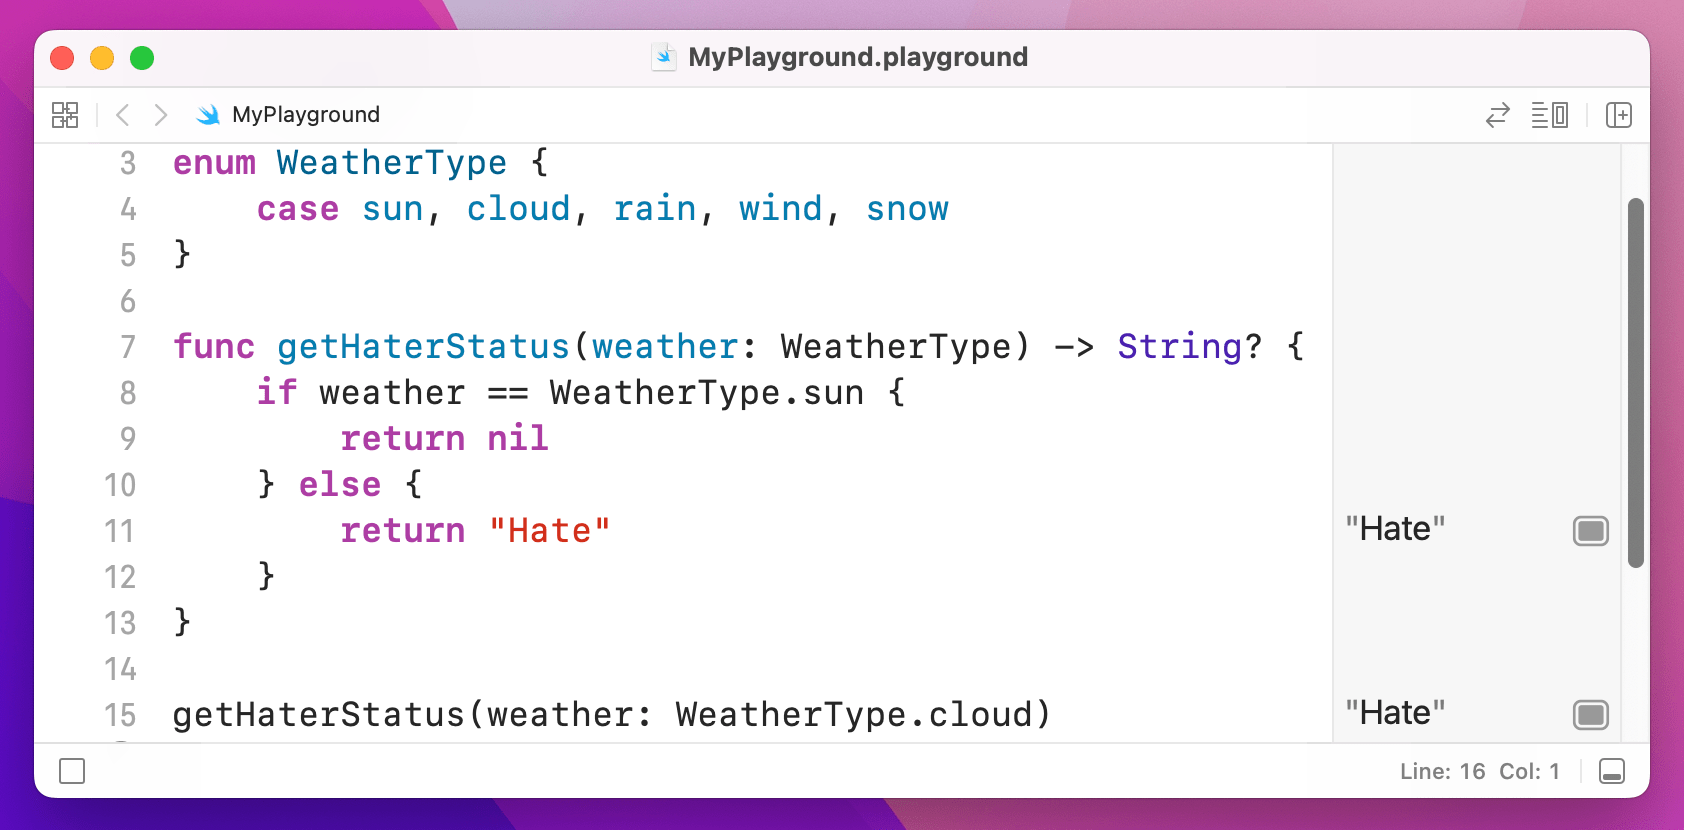
enum WeatherType {
    case sun, cloud, rain, wind, snow
}

func getHaterStatus(weather: WeatherType) -> String? {
    if weather == WeatherType.sun {
        return nil
    } else {
        return "Hate"
    }
}

getHaterStatus(weather: WeatherType.cloud)
Take a look at the first three lines: line 1 gives our type a name, WeatherType. This is what you'll use in place of String or Int in your code. Line 2 defines the five possible cases our enum can be, as I already outlined. Convention has these start with a lowercase letter, so “sun”, “cloud”, etc. And line 3 is just a closing brace, ending the enum.
Now take a look at how it's used: I modified the getHaterStatus() so that it takes a WeatherType value. The conditional statement is also rewritten to compare against WeatherType.sun, which is our value. Remember, this check is just a number behind the scenes, which is lightning fast.
getHaterStatus still returns “Hate”.Now, go back and read that code again, because I'm about to rewrite it with two changes that are important. All set?
enum WeatherType {
    case sun
    case cloud
    case rain
    case wind
    case snow
}

func getHaterStatus(weather: WeatherType) -> String? {
    if weather == .sun {
        return nil
    } else {
        return "Hate"
    }
}

getHaterStatus(weather: .cloud)
I made two changes there. First, each of the weather types are now on their own line. This might seem like a small change, and indeed in this example it is, but it becomes important soon. The second change was that I wrote if weather == .sun – I didn't need to spell out that I meant WeatherType.sun because Swift knows I am comparing against a WeatherType variable, so it's using type inference.
Enums are particularly useful inside switch/case blocks, particularly because Swift knows all the values your enum can have so it can ensure you cover them all. For example, we might try to rewrite the getHaterStatus() method to this:
func getHaterStatus(weather: WeatherType) -> String? {
    switch weather {
    case .sun:
        return nil
    case .cloud, .wind:
        return "dislike"
    case .rain:
        return "hate"
    }
}
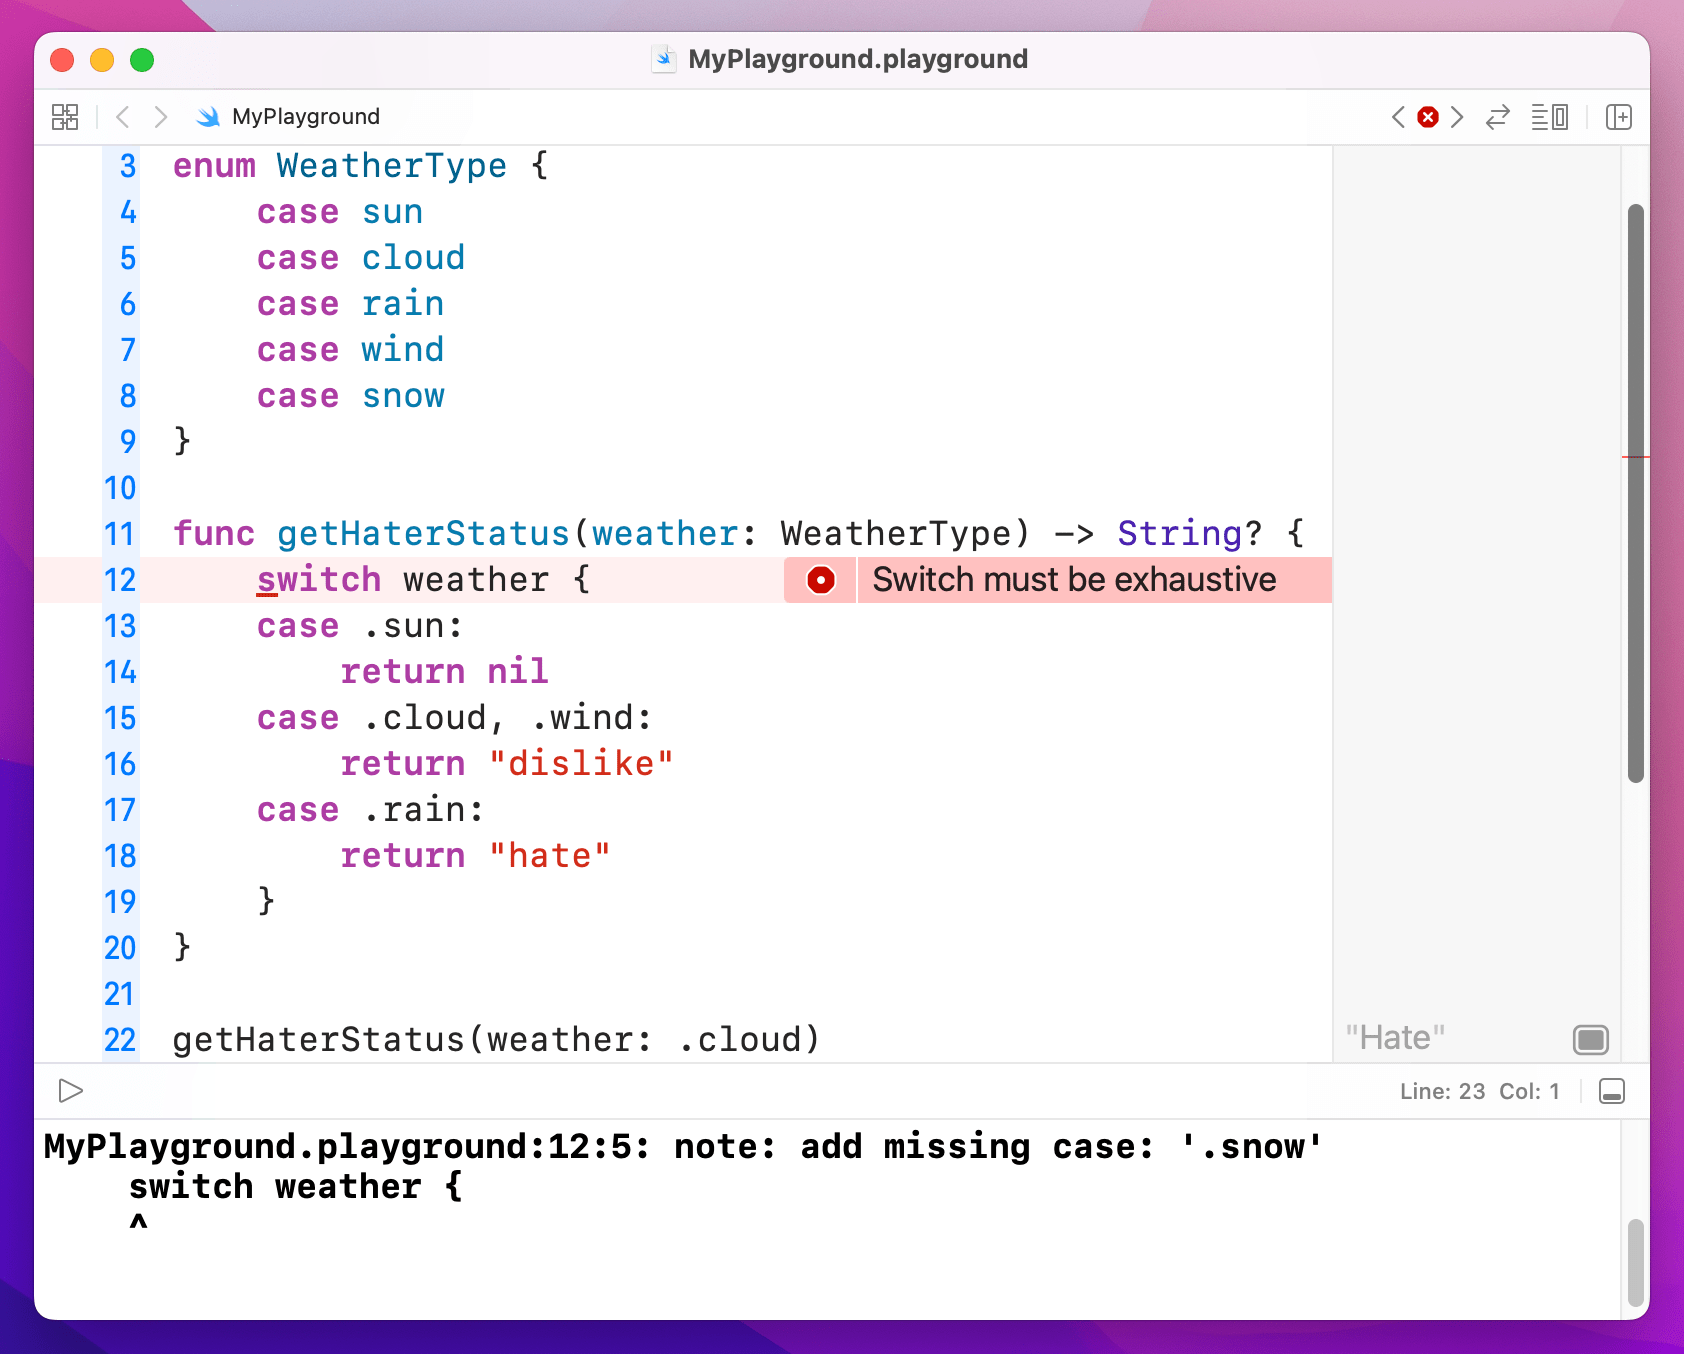
Yes, I realize "haters gonna dislike" is hardly a great lyric, but it's academic anyway because this code won't build: it doesn't handle the .snow case, and Swift wants all cases to be covered. You either have to add a case for it or add a default case.
Enums with additional values
One of the most powerful features of Swift is that enumerations can have values attached to them that you define. To extend our increasingly dubious example a bit further, I'm going to add a value to the .wind case so that we can say how fast the wind is. Modify your code to this:
enum WeatherType {
    case sun
    case cloud
    case rain
    case wind(speed: Int)
    case snow
}
As you can see, the other cases don't need a speed value – I put that just into wind. Now for the real magic: Swift lets us add extra conditions to the switch/case block so that a case will match only if those conditions are true. This uses the let keyword to access the value inside a case, then the where keyword for pattern matching.
Here's the new function:
func getHaterStatus(weather: WeatherType) -> String? {
    switch weather {
    case .sun:
        return nil
    case .wind(let speed) where speed < 10:
        return "meh"
    case .cloud, .wind:
        return "dislike"
    case .rain, .snow:
        return "hate"
    }
}

getHaterStatus(weather: WeatherType.wind(speed: 5))
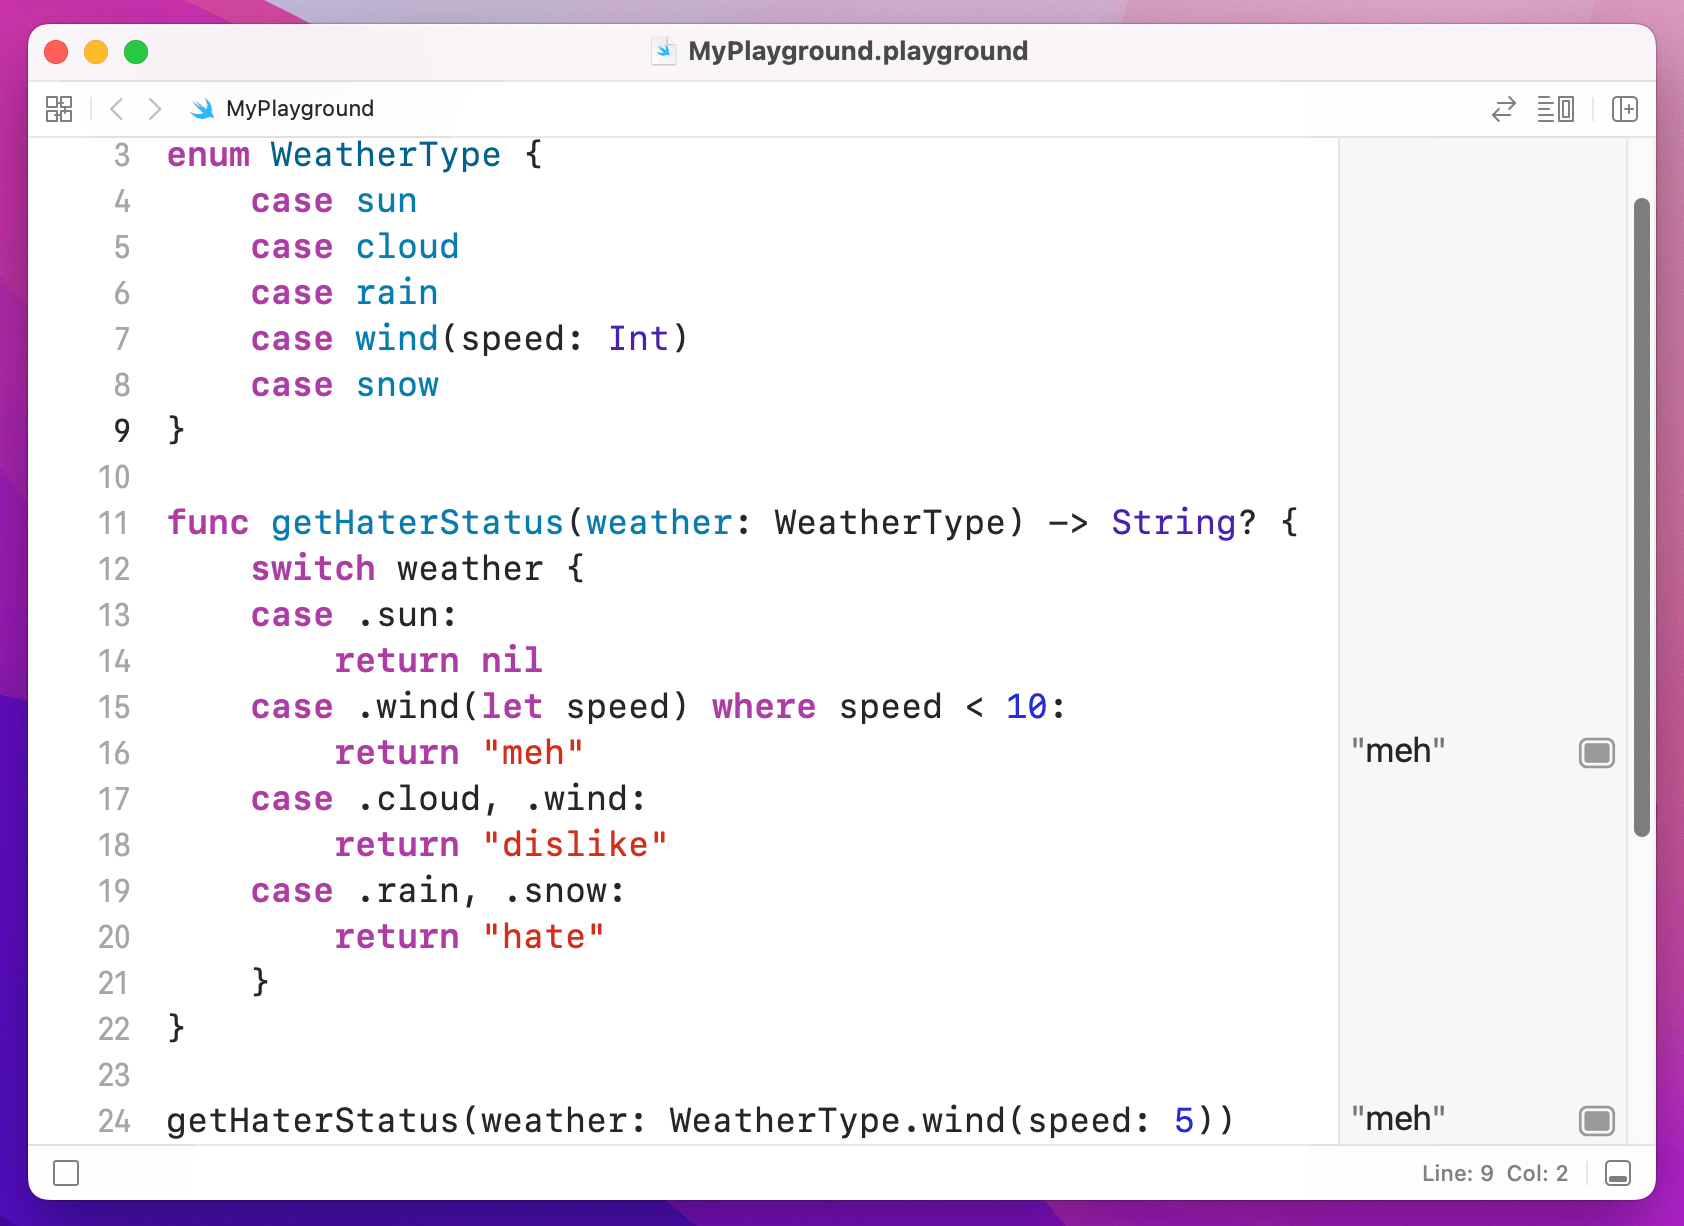
getHaterStatus with wind speed 5 returns “meh”.You can see .wind appears in there twice, but the first time is true only if the wind is slower than 10 kilometers per hour. If the wind is 10 or above, that won't match. The key is that you use let to get hold of the value inside the enum (i.e. to declare a constant name you can reference) then use a where condition to check.
Swift evaluates switch/case from top to bottom, and stops as soon as it finds a match. This means that if case .cloud, .wind: appears before case .wind(let speed) where speed < 10: then it will be executed instead – and the output changes.
So, think carefully about how you order cases!
Tip: Swift’s optionals are actually implemented using enums with associated values. There are two cases: none, and some, with some having whatever value is inside the optional.
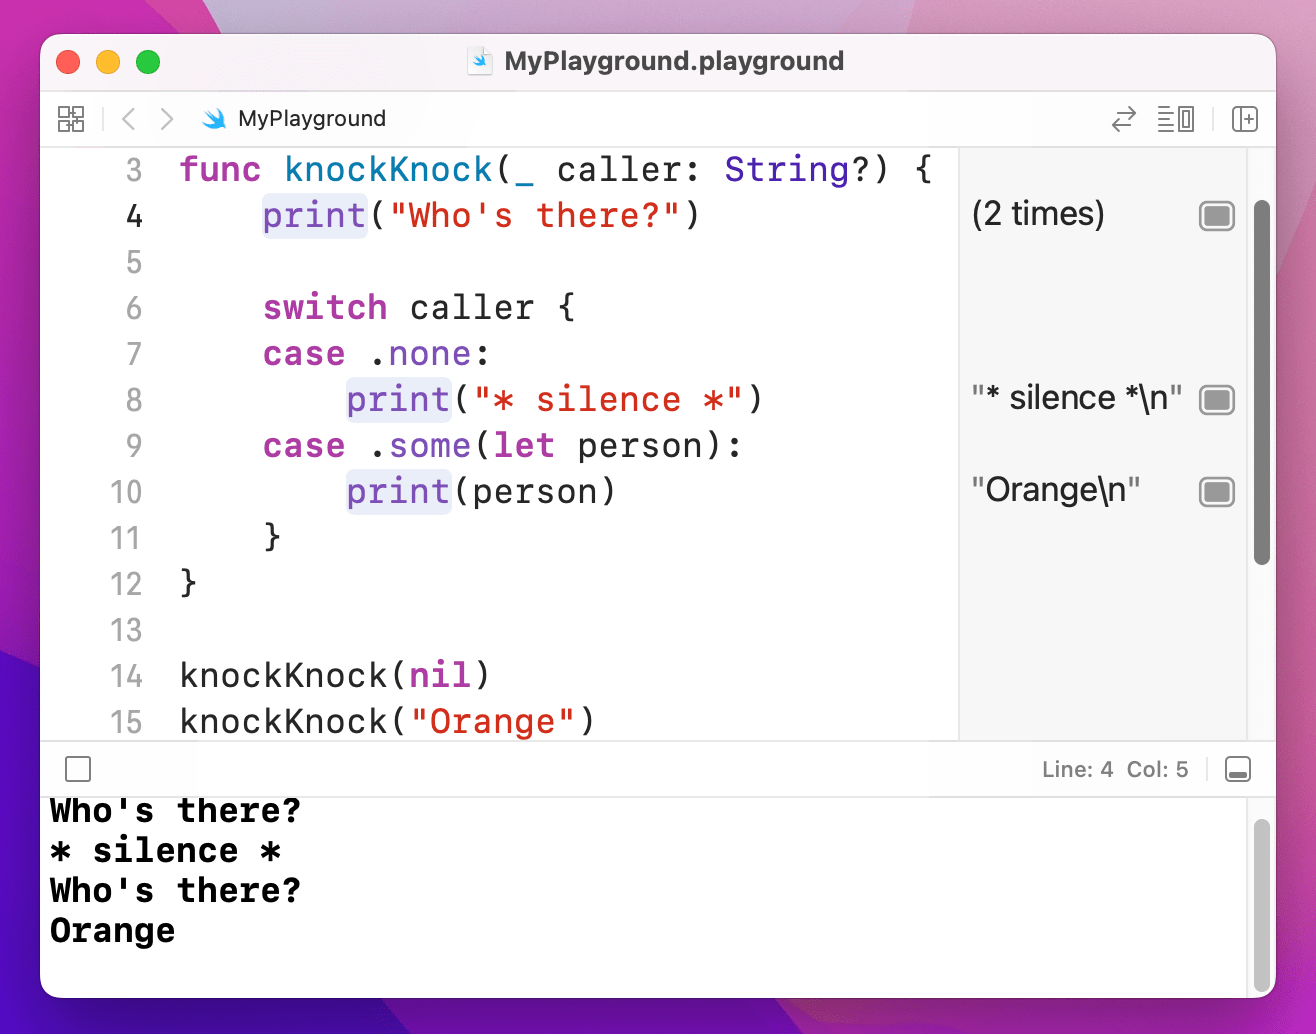
switch on an Optional String with .some and .none cases.5. Structs
5. Structs
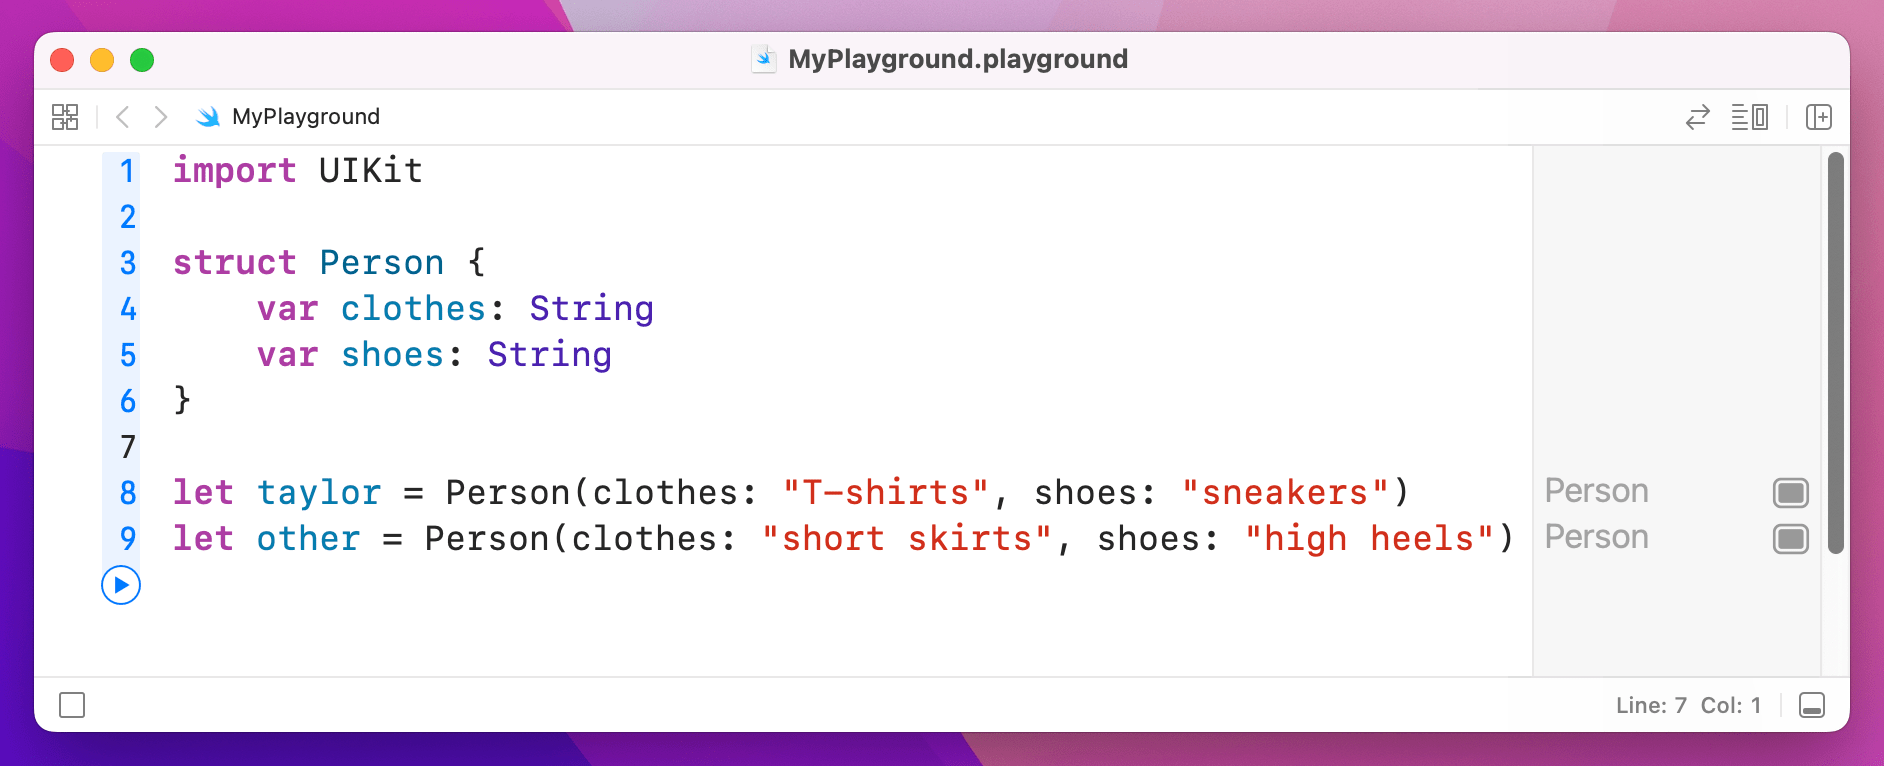
Structs are complex data types, meaning that they are made up of multiple values. You then create an instance of the struct and fill in its values, then you can pass it around as a single value in your code. For example, we could define a Person struct type that contains two properties: clothes and shoes:
struct Person {
    var clothes: String
    var shoes: String
}
When you define a struct, Swift makes them very easy to create because it automatically generates what's called a memberwise initializer. In plain speak, it means you create the struct by passing in initial values for its two properties, like this:
let taylor = Person(clothes: "T-shirts", shoes: "sneakers")
let other = Person(clothes: "short skirts", shoes: "high heels")
Person structs by telling Swift their clothes and shoes.Once you have created an instance of a struct, you can read its properties just by writing the name of the struct, a period, then the property you want to read:
print(taylor.clothes)
print(other.shoes)
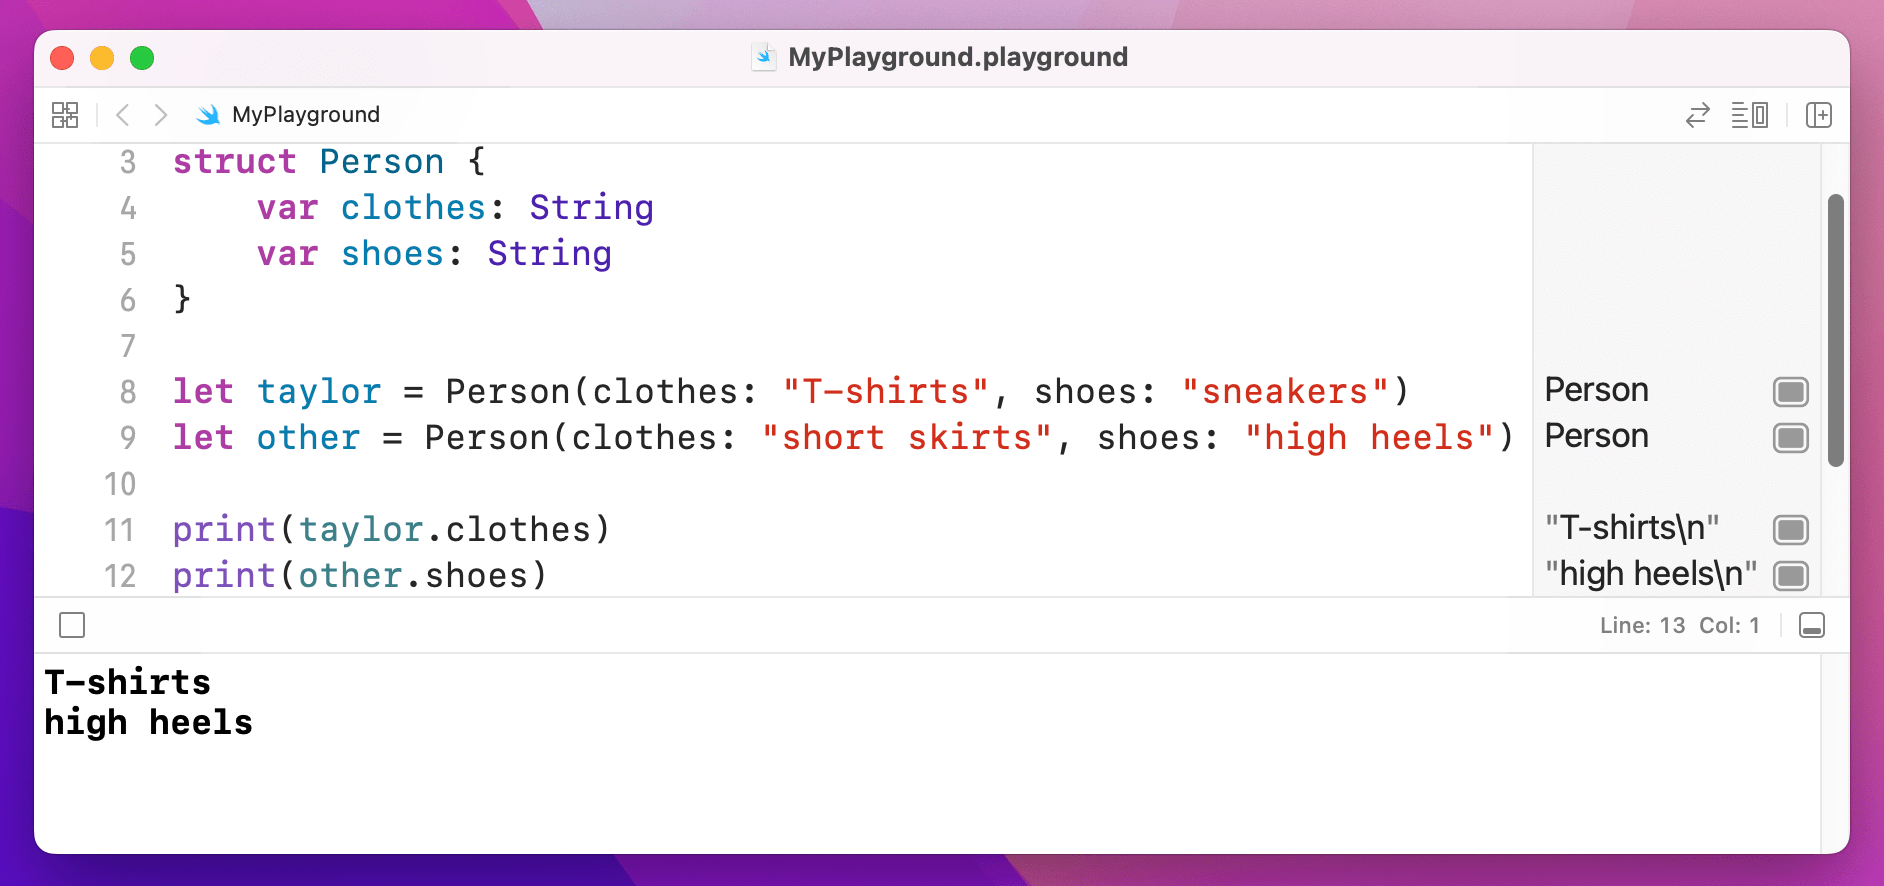
clothes and shoes propeties of our Person structs.If you assign one struct to another, Swift copies it behind the scenes so that it is a complete, standalone duplicate of the original. Well, that's not strictly true: Swift uses a technique called "copy on write" which means it only actually copies your data if you try to change it.
To help you see how struct copies work, put this into your playground:
struct Person {
    var clothes: String
    var shoes: String
}

let taylor = Person(clothes: "T-shirts", shoes: "sneakers")
let other = Person(clothes: "short skirts", shoes: "high heels")

var taylorCopy = taylor
taylorCopy.shoes = "flip flops"

print(taylor)
print(taylorCopy)
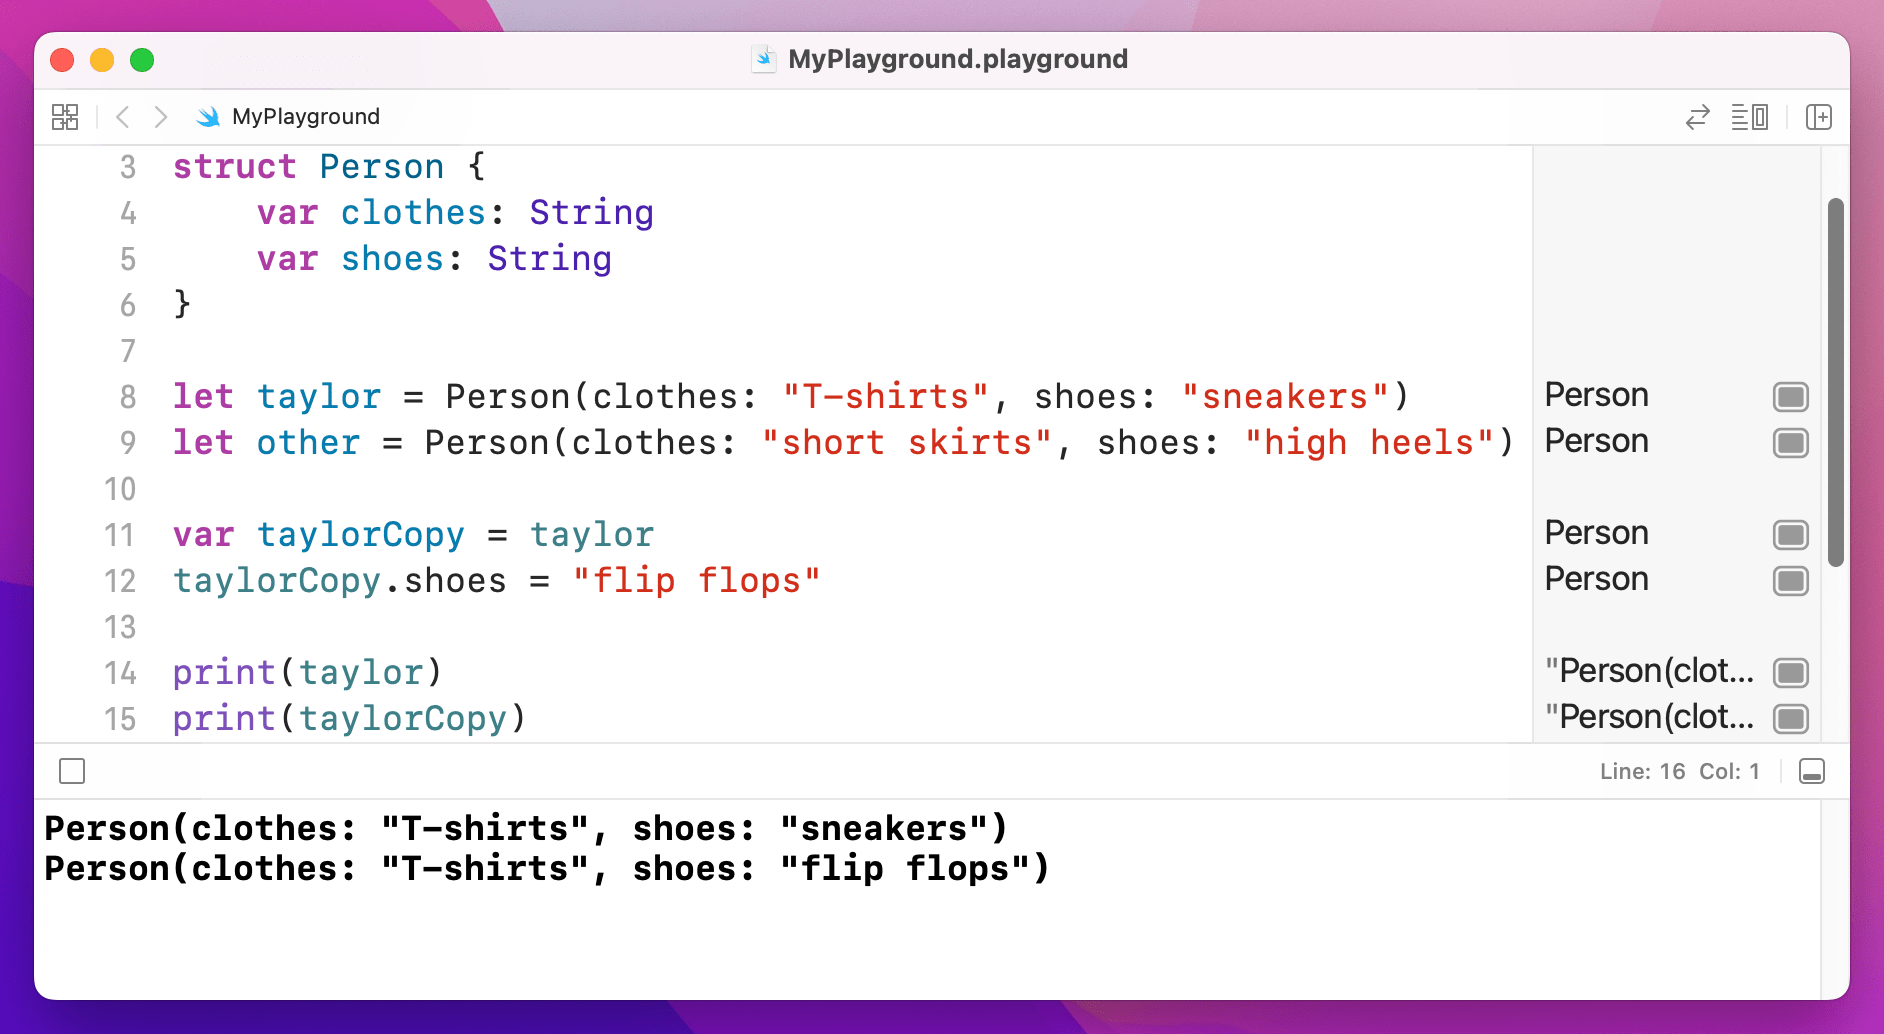
taylorCopy does not change the original Taylor Swift.That creates two Person structs, then creates a third one called taylorCopy as a copy of taylor. What happens next is the interesting part: the code changes taylorCopy, and prints both it and taylor. If you look in your results pane (you might need to resize it to fit) you'll see that the copy has a different value to the original: changing one did not change the other.
Functions inside structs
You can place functions inside structs, and in fact it’s a good idea to do so for all functions that read or change data inside the struct. For example, we could add a function to our Person struct to describe what they are wearing, like this:
struct Person {
    var clothes: String
    var shoes: String

    func describe() {
        print("I like wearing \(clothes) with \(shoes)")
    }
}
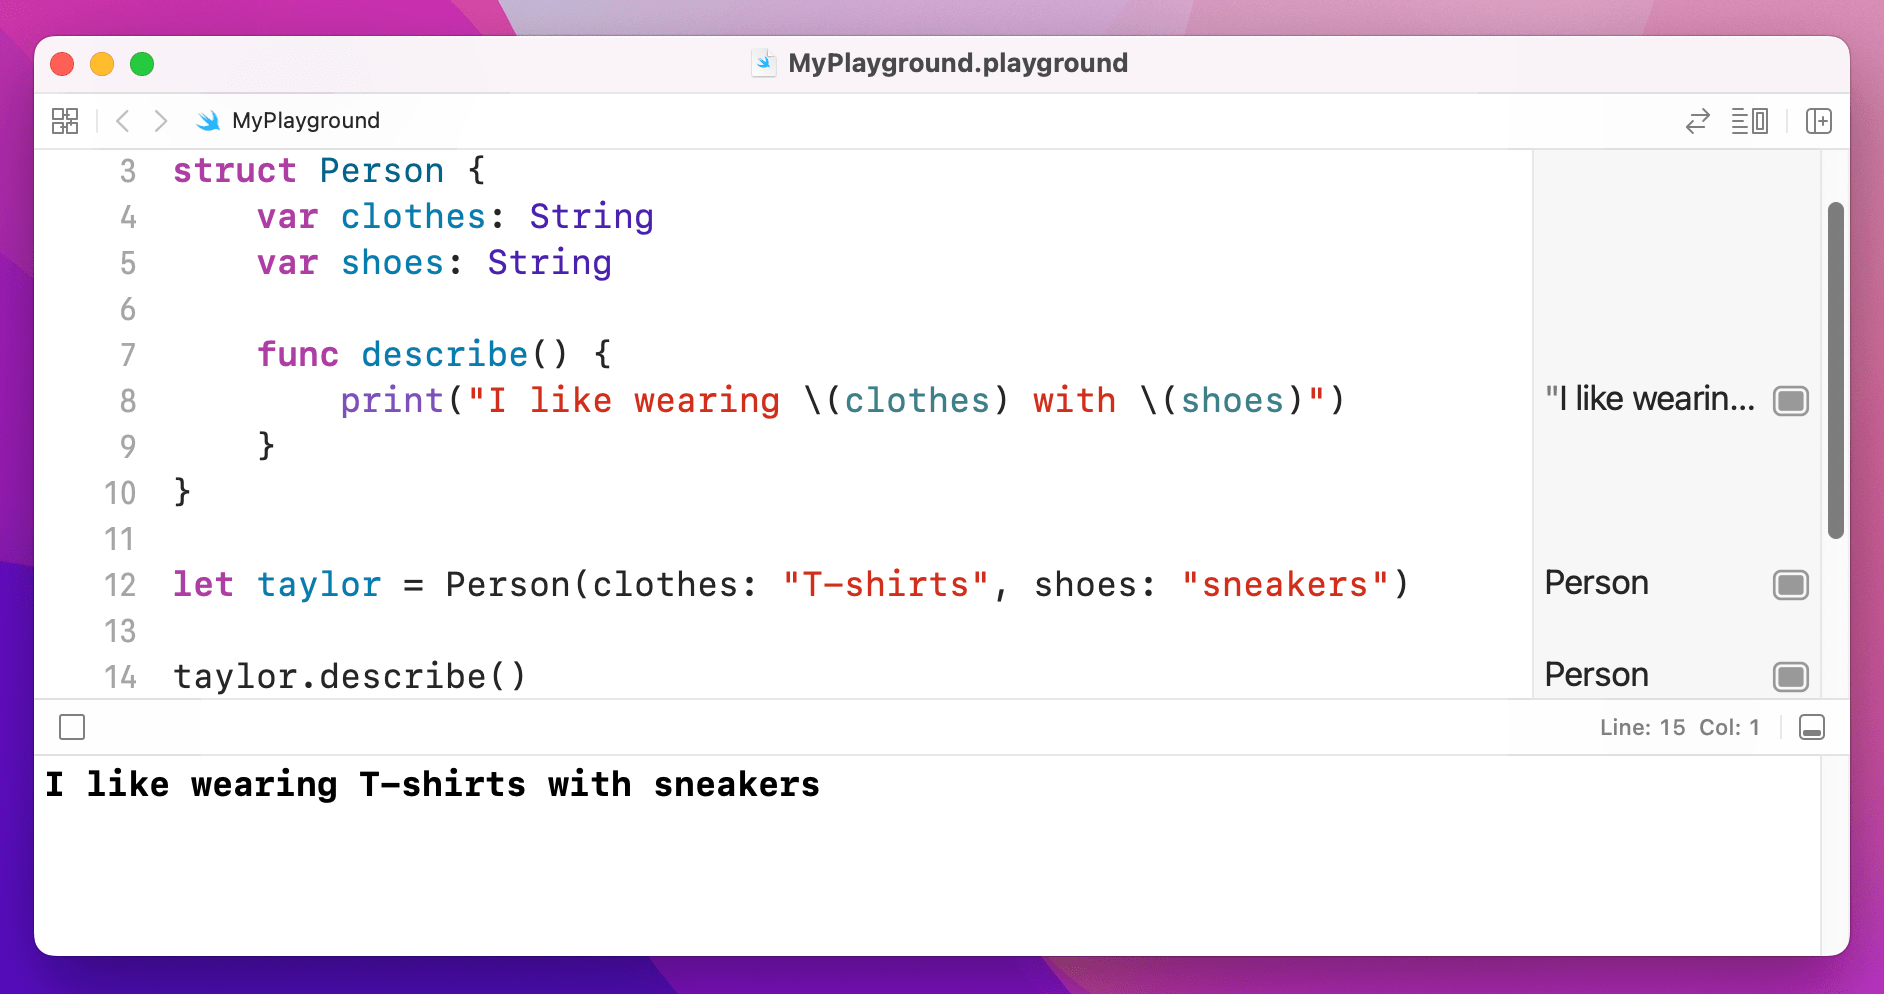
Person's describe method.There’s one more thing you ought to know but can't see in that code: when you write a function inside a struct, it's called a method instead. In Swift you write func whether it's a function or a method, but the distinction is preserved when you talk about them.
6. Classes
6. Classes
Swift has another way of building complex data types called classes. They look similar to structs, but have a number of important differences, including:
- You don't get an automatic memberwise initializer for your classes; you need to write your own.
- You can define a class as being based off another class, adding any new things you want.
- When you create an instance of a class it’s called an object. If you copy that object, both copies point at the same data by default – change one, and the copy changes too.
All three of those are massive differences, so I'm going to cover them in more depth before continuing.
Initializing an object
If we were to convert our Person struct into a Person class, Swift wouldn't let us write this:
class Person {
    var clothes: String
    var shoes: String
}

This is because we're declaring the two properties to be String, which if you remember means they absolutely must have a value. This was fine in a struct because Swift automatically produces a memberwise initializer for us that forced us to provide values for the two properties, but this doesn't happen with classes so Swift can't be sure they will be given values.
There are three solutions: make the two values optional strings, give them default values, or write our own initializer. The first option is clumsy because it introduces optionals all over our code where they don't need to be. The second option works, but it's a bit wasteful unless those default values will actually be used. That leaves the third option, and really it's the right one: write our own initializer.
To do this, create a method inside the class called init() that takes the two parameters we care about:
class Person {
    var clothes: String
    var shoes: String

    init(clothes: String, shoes: String) {
        self.clothes = clothes
        self.shoes = shoes
    }
}
There are two things that might jump out at you in that code.
First, you don't write func before your init() method, because it's special. Second, because the parameter names being passed in are the same as the names of the properties we want to assign, you use self. to make your meaning clear – "the clothes property of this object should be set to the clothes parameter that was passed in." You can give them unique names if you want – it's down to you.
Important: Swift requires that all non-optional properties have a value by the end of the initializer, or by the time the initializer calls any other method – whichever comes first.
Class inheritance
The second difference between classes and structs are that classes can build on each other to produce greater things, known as class inheritance. This is a technique used extensively in both UIKit and AppKit, even in the most basic programs, so it's something you will need to get to grips with eventually.
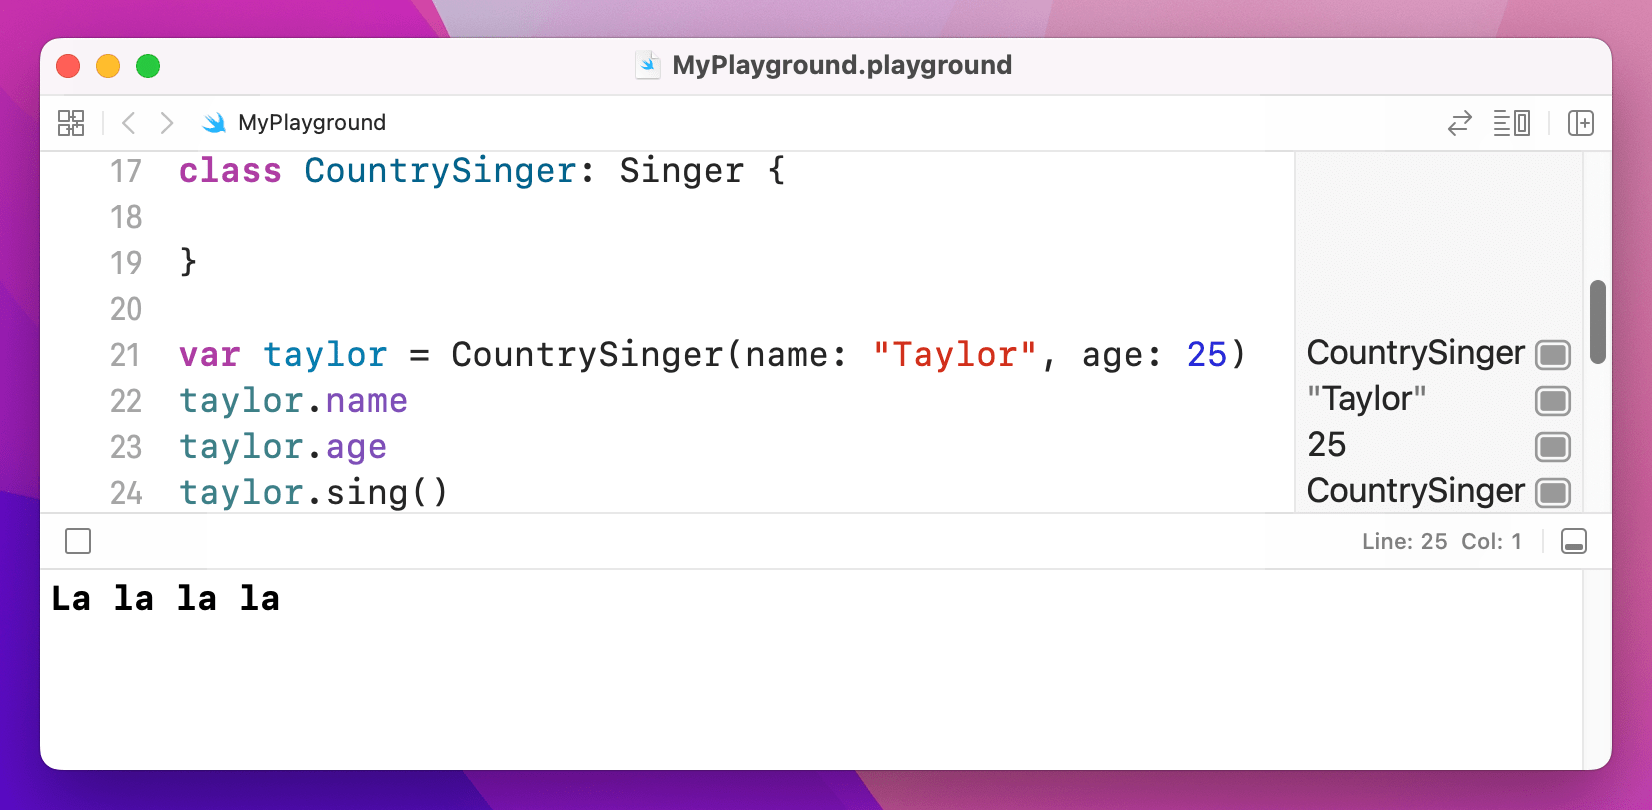
Let's start with something simple: a Singer class that has properties, which is their name and age. As for methods, there will be a simple initializer to handle setting the properties, plus a sing() method that outputs some words:
class Singer {
    var name: String
    var age: Int

    init(name: String, age: Int) {
        self.name = name
        self.age = age
    }

    func sing() {
        print("La la la la")
    }
}
We can now create an instance of that object by calling that initializer, then read out its properties and call its method:
var taylor = Singer(name: "Taylor", age: 25)
taylor.name
taylor.age
taylor.sing()
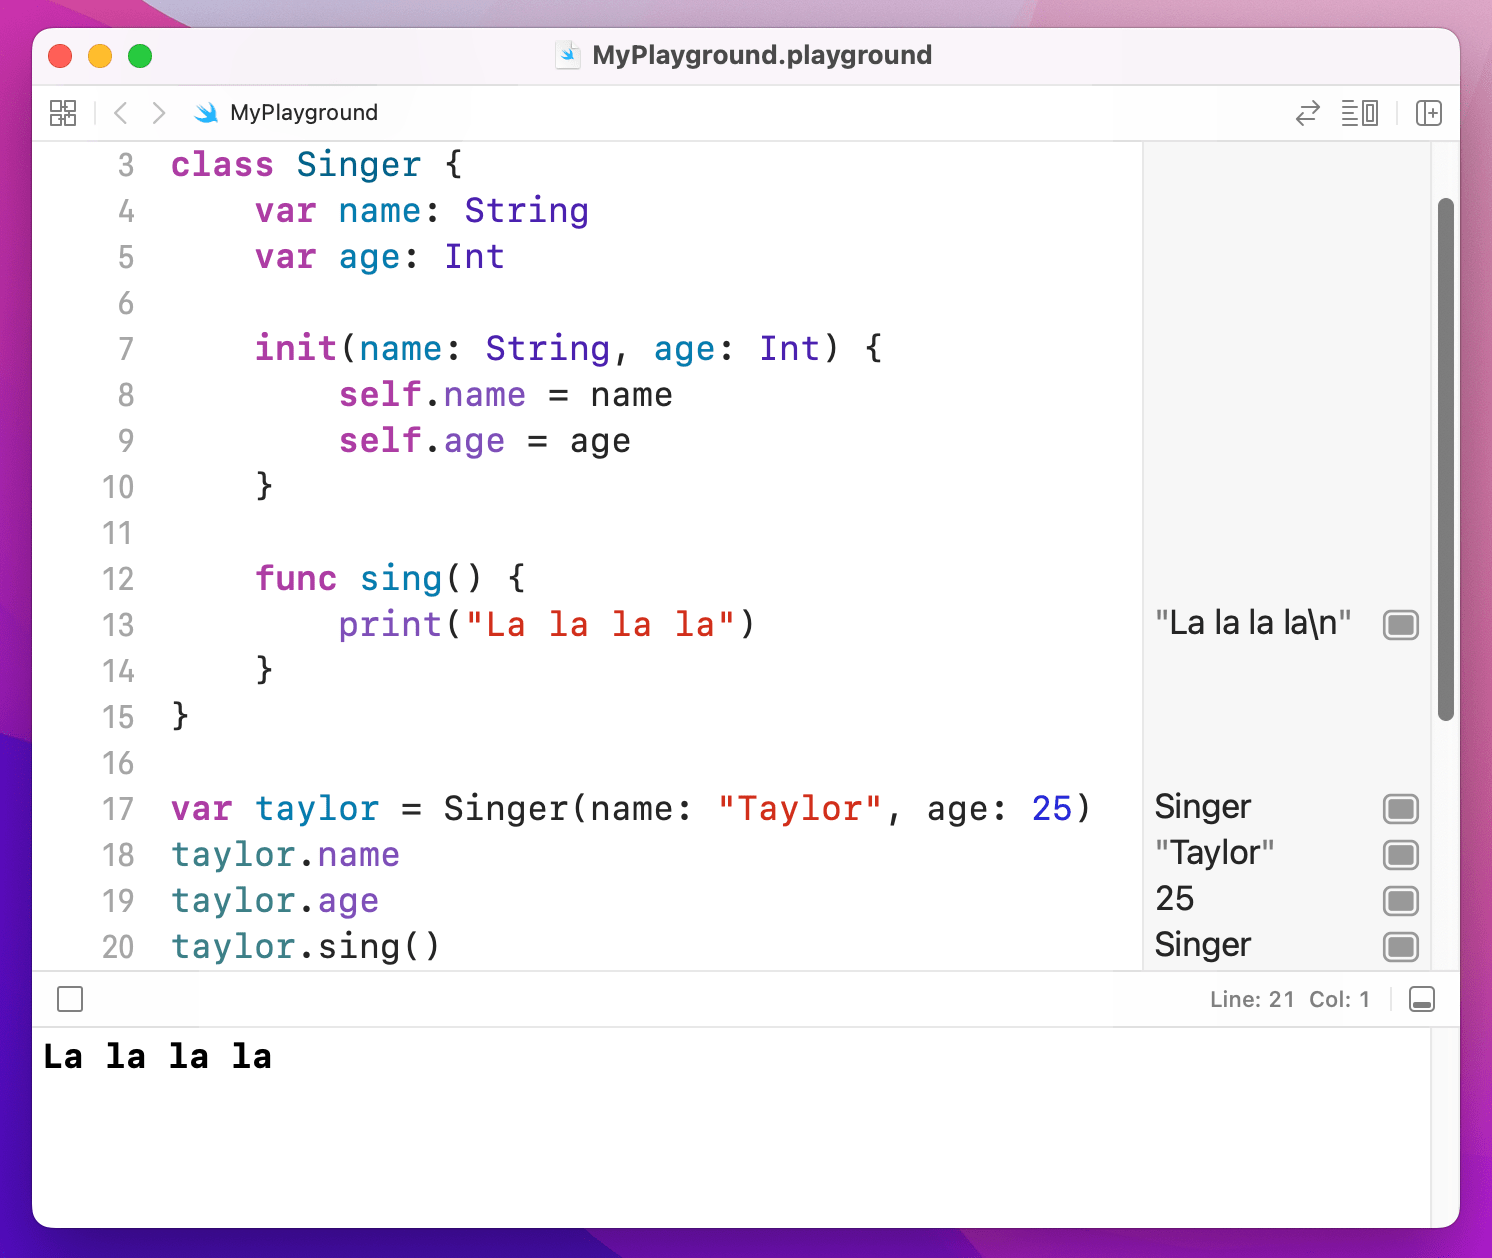
sing method on an instance of the Singer class.That's our basic class, but we're going to build on it: I want to define a CountrySinger class that has everything the Singer class does, but when I call sing() on it I want to print "Trucks, guitars, and liquor" instead.
You could of course just copy and paste the original Singer into a new class called CountrySinger but that's a lazy way to program and it will come back to haunt you if you make later changes to Singer and forget to copy them across. Instead, Swift has a smarter solution: we can define CountrySinger as being based off Singer and it will get all its properties and methods for us to build on:
class CountrySinger: Singer {

}
CountrySinger does everything Singer does.That colon is what does the magic: it means "CountrySinger extends Singer." Now, that new CountrySinger class (called a subclass) doesn't add anything to Singer (called the parent class, or superclass) yet. We want it to have its own sing() method, but in Swift you need to learn a new keyword: override. This means "I know this method was implemented by my parent class, but I want to change it for this subclass."
Having the override keyword is helpful, because it makes your intent clear. It also allows Swift to check your code: if you don't use override Swift won't let you change a method you got from your superclass, or if you use override and there wasn't anything to override, Swift will point out your error.
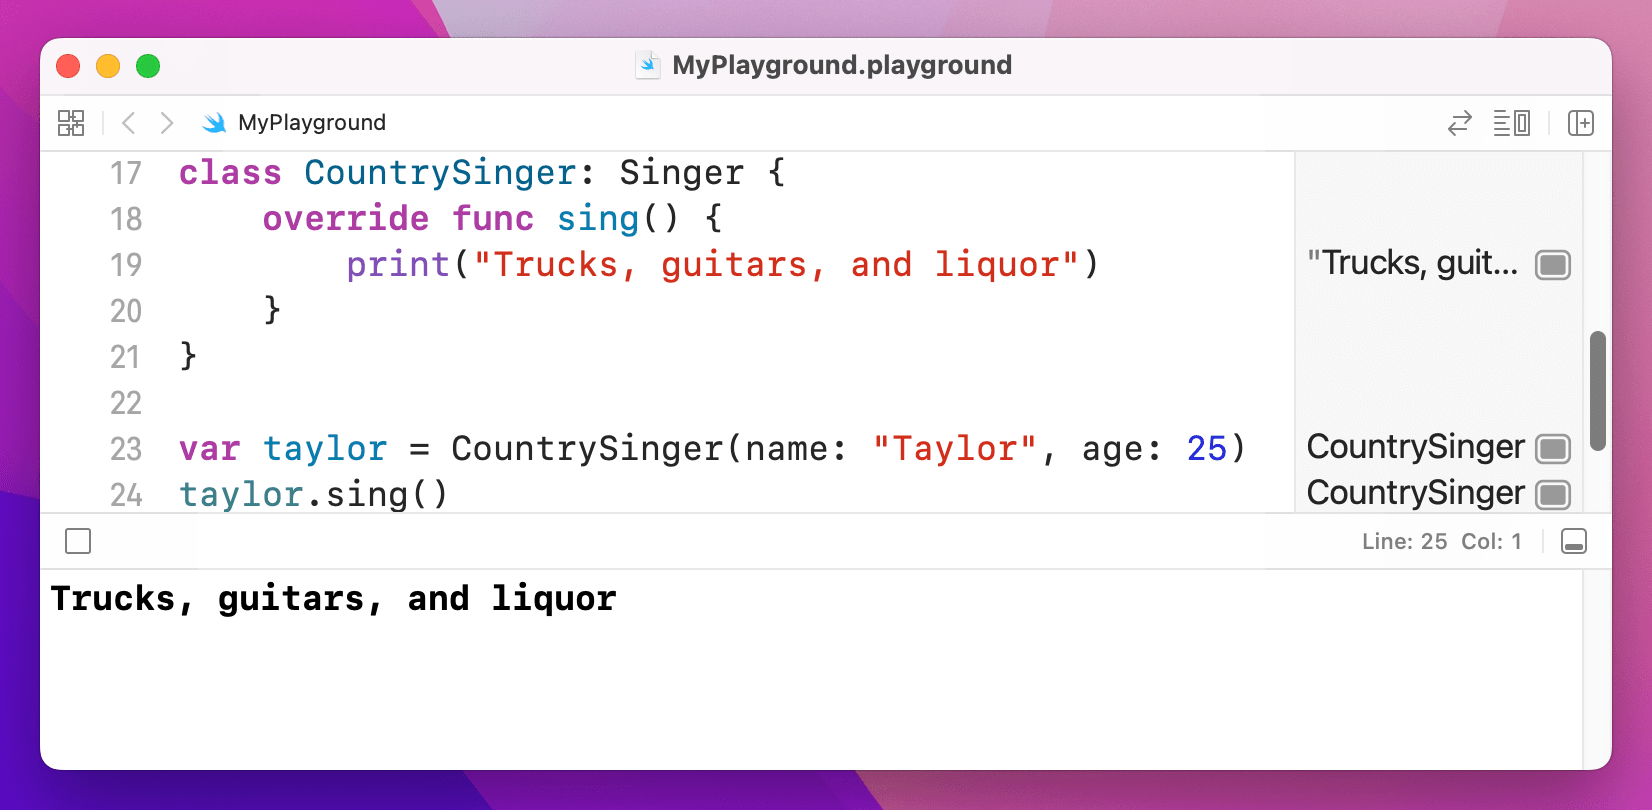
So, we need to use override func, like this:
class CountrySinger: Singer {
    override func sing() {
        print("Trucks, guitars, and liquor")
    }
}
Now modify the way the taylor object is created:
var taylor = CountrySinger(name: "Taylor", age: 25)
taylor.sing()
If you change CountrySinger to just Singer you should be able to see the different messages appearing in the results pane.
CountrySingers now sing differently from Singers.Now, to make things more complicated, we're going to define a new class called HeavyMetalSinger. But this time we're going to store a new property called noiseLevel defining how loud this particular heavy metal singer likes to scream down their microphone.
This causes a problem, and it's one that needs to be solved in a very particular way:
- Swift wants all non-optional properties to have a value.
- Our
Singerclass doesn't have anoiseLevelproperty. - So, we need to create a custom initializer for
HeavyMetalSingerthat accepts a noise level. - That new initializer also needs to know the
nameandageof the heavy metal singer, so it can pass it onto the superclassSinger. - Passing on data to the superclass is done through a method call, and you can't make method calls in initializers until you have given all your properties values.
- So, we need to set our own property first (
noiseLevel) then pass on the other parameters for the superclass to use.
That might sound awfully complicated, but in code it's straightforward. Here's the HeavyMetalSinger class, complete with its own sing() method:
class HeavyMetalSinger: Singer {
    var noiseLevel: Int

    init(name: String, age: Int, noiseLevel: Int) {
        self.noiseLevel = noiseLevel
        super.init(name: name, age: age)
    }

    override func sing() {
        print("Grrrrr rargh rargh rarrrrgh!")
    }
}
Notice how its initializer takes three parameters, then calls super.init() to pass name and age on to the Singer superclass - but only after its own property has been set. You'll see super used a lot when working with objects, and it just means "call a method on the class I inherited from.” It's usually used to mean "let my parent class do everything it needs to do first, then I'll do my extra bits."
Class inheritance is a big topic so don't fret if it's not clear just yet. However, there is one more thing you need to know: class inheritance often spans many levels. For example, A could inherit from B, and B could inherit from C, and C could inherit from D, and so on. This lets you build functionality and re-use up over a number of classes, helping to keep your code modular and easy to understand.
Working with Objective-C code
If you want to have some part of Apple’s operating system call your Swift class’s method, you need to mark it with a special attribute: @objc. This is short for “Objective-C”, and the attribute effectively marks the method as being available for older Objective-C code to run – which is almost all of iOS, macOS, watchOS, and tvOS. For example, if you ask the system to call your method after one second has passed, you’ll need to mark it with @objc.
Don’t worry too much about @objc for now – not only will I be explaining it in context later on, but Xcode will always tell you when it’s needed. Alternatively, if you don’t want to use @objc for individual methods you can put @objcMembers before your class to automatically make all its methods available to Objective-C.
Values vs References
When you copy a struct, the whole thing is duplicated, including all its values. This means that changing one copy of a struct doesn't change the other copies – they are all individual. With classes, each copy of an object points at the same original object, so if you change one they all change. Swift calls structs "value types" because they just point at a value, and classes "reference types" because objects are just shared references to the real value.
This is an important difference, and it means the choice between structs and classes is an important one:
- If you want to have one shared state that gets passed around and modified in place, you're looking for classes. You can pass them into functions or store them in arrays, modify them in there, and have that change reflected in the rest of your program.
- If you want to avoid shared state where one copy can't affect all the others, you're looking for structs. You can pass them into functions or store them in arrays, modify them in there, and they won't change wherever else they are referenced.
If I were to summarize this key difference between structs and classes, I'd say this: classes offer more flexibility, whereas structs offer more safety. In practice, which you choose depends on the Apple framework you’re working with: UIKit, AppKit, SpriteKit and the other older frameworks rely heavily on structs for data and classes for user interface elements, whereas SwiftUI flips things around and uses structs for user interface elements and classes for data.
Optional: once you’ve finished reviewing those, you can go back to the review page and go over the tests related to the topics above.