Day 85
Day 85 관련

Project 26, part one
I’ve been lucky enough to volunteer as a teacher at my daughters’ school, teaching programming to the girls there. It’s a fun job: they try things I’d never think of, ask questions that really make me pause for thought, and give me a lot of hope for the future of our industry.
But one thing that has struck me time and time again is how important physical computing is: we can talk about theory as much as we want, and write a fair amount code to go along with it, but nothing inspires them so much as picking up a real piece of hardware and watching it respond to human interaction.
Dan O’Sullivan once wrote, “personal computers have evolved in an office environment in which you sit on your butt, moving only your fingers, entering and receiving information censored by your conscious mind. That is not your whole life, and probably not even the best part – we need to think about computers that sense more of your body, serve you in more places, and convey the physical expression in addition to information.”
I hope you’re ready to take on that challenge, because today you’re going to meet Core Motion – Apple’s framework that handles the accelerometer and gyroscope inside all iOS devices. In plain terms, that means it lets us tell how users are holding their devices in the physical world. Now, I know Apple do a huge amount of work behind the scenes to read in data from a variety of finely calibrated sensors, but that gets distilled down into a set of numbers telling us how much tilt the device has on its X, Y, and Z axis. And the result is something quite remarkable: suddenly you’re no longer holding an iPad, but a board with a rolling ball, an ARKit route finder, or even a window into a virtual world.
What I love about the accelerometer is that it’s invisibly ubiquitous – it’s in every iOS device, but we never think about it and we don’t need to ask permission to use it. But as you’ll see as we work through project 25, reading motion data opens up another fabulous range of possibilities for your app ideas, and it only takes a handful of lines of code.
Today you have two topics to work through, and you’ll learn how to load a game level from a file and how to create custom physics bitmasks, while also getting some practice with fatalError(), SKAction, and more.
Setting up
Setting up
In this game project you'll create a rolling ball game for iPad, using the accelerometer – you tilt your device, and the balls rolls in that direction, hopefully avoiding holes as you go.
Along with the accelerometer, you're also going to learn how to load level layouts, how to have fine-grained contact bitmasks, and how to write code that executes in the simulator but not on devices (or vice versa). So, you learn things, you make a cool game, and I get to bask in the warmth of knowing that your Swift mastery continues to grow.
Create a new SpriteKit project named it Project26, then configure it to work on iPads in landscape right orientation, which is more restrictive than we usually use. We can't enable landscape left because we'll be tilting the device in all directions, and it would be annoying to have the device rotate because we tipped the iPad too far!
Please do the usual cleaning job on Xcode’s SpriteKit template, remembering to set the anchor point to X:0 Y:0 and size to 1024x768 in GameScene.sks. Now download the files for this project from twostraws/HackingWithSwift and copy its Content folder into your project.
In this project we're going to use the accelerometer, which is not supported in the iOS Simulator. To make things easier, we're going to add some code that lets you control the game through touch – it's nowhere near as fun, but at least it can be tested in the simulator.
Loading a level: categoryBitMask, collisionBitMask, contactTestBitMask
Loading a level: categoryBitMask, collisionBitMask, contactTestBitMask
We're going to start by looking at the biggest method in the project, and perhaps even the entire Hacking with Swift series. It's called loadLevel() and is responsible for loading a level file from disk and creating SpriteKit nodes onscreen.
The method isn't long because it's complicated, it's long just because it does a lot. When you finish this project one of the suggested ways to improve the code is to split this method off into smaller chunks, so you should pay close attention to how it works!
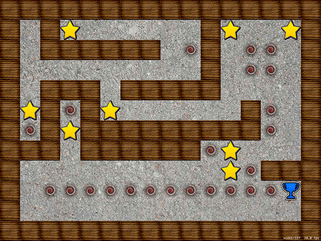
At the core of the method it loads a level file from disk, then splits it up by line. Each line will become one row of level data on the screen, so the method will loop over every character in the row and see what letter it is. Our game will recognize five possible options: a space will mean empty space, "x" means a wall, "v" means a vortex (deadly to players), "s" means a star (awards points), and "f" means level finish.
Using this kind of very simple level text format means that you can write your levels in a text editor, and visually see exactly how they will look in your game. You've already tackled most of the code required for the skeleton of loadLevel(), but there are a few things I want to highlight:
- We'll be using the
enumerated()method again. In case you've forgotten, this loops over an array, extracting each item and its position in the array. - We'll be positioning items as we go. Each square in the game world occupies a 64x64 space, so we can find its position by multiplying its row and column by 64. But: remember that SpriteKit calculates its positions from the center of objects, so we need to add 32 to the X and Y coordinates in order to make everything lines up on our screen.
- You might also remember that SpriteKit uses an inverted Y axis to UIKit, which means for SpriteKit Y:0 is the bottom of the screen whereas for UIKit Y:0 is the top. When it comes to loading level rows, this means we need to read them in reverse so that the last row is created at the bottom of the screen and so on upwards.
Here's the initial code for loadLevel():
func loadLevel() {
    guard let levelURL = Bundle.main.url(forResource: "level1", withExtension: "txt") else {
        fatalError("Could not find level1.txt in the app bundle.")
    }
    guard let levelString = try? String(contentsOf: levelURL) else {
        fatalError("Could not load level1.txt from the app bundle.")
    }

    let lines = levelString.components(separatedBy: "\n")

    for (row, line) in lines.reversed().enumerated() {
        for (column, letter) in line.enumerated() {
            let position = CGPoint(x: (64 * column) + 32, y: (64 * row) + 32)

            if letter == "x" {
                // load wall
            } else if letter == "v"  {
                // load vortex
            } else if letter == "s"  {
                // load star
            } else if letter == "f"  {
                // load finish
            } else if letter == " " {
                // this is an empty space – do nothing!
            } else {
                fatalError("Unknown level letter: \(letter)")
            }
        }
    }
}
There are lots of comments in there where we're going to do work to load the various level components. Much of the code for these is the same: load in an image, position it, give it a physics body, then add it to the scene. But they do vary, because we want the player to be able to collide with some, we want to notified of collisions with some, and so on.
But first: we're going to be using the categoryBitMask, contactTestBitMask and collisionBitMask properties in their fullest for this project, because we have very precise rules that make the game work. To clarify, here's what each of them mean:
- The
categoryBitMaskproperty is a number defining the type of object this is for considering collisions. - The
collisionBitMaskproperty is a number defining what categories of object this node should collide with, - The
contactTestBitMaskproperty is a number defining which collisions we want to be notified about.
They all do very different things, although the distinction might seem fine before you fully understand. Category is simple enough: every node you want to reference in your collision bitmasks or your contact test bitmasks must have a category attached. If you give a node a collision bitmask but not a contact test bitmask, it means they will bounce off each other but you won't be notified. If you do the opposite (contact test but not collision) it means they won't bounce off each other but you will be told when they overlap.
By default, physics bodies have a collision bitmask that means "everything", so everything bounces off everything else. By default, they also have a contact test bitmask that means "nothing", so you'll never get told about collisions.
A bitmask is a complicated beast to explain, but what it means in practice is that you can combine values together. In our game, vortexes, stars and the finish flag all have the player set for their contact test bitmask, and the player has star and vortex and finish flag.
SpriteKit expects these three bitmasks to be described using a UInt32. It's a particular way of storing numbers, but rather than using numbers we're going to use enums with a raw value. This means we can refer to the various options using names. Put this enum definition above your class in GameScene.swift:
enum CollisionTypes: UInt32 {
    case player = 1
    case wall = 2
    case star = 4
    case vortex = 8
    case finish = 16
}
Note that your bitmasks should start at 1 then double each time. With that, let's start replacing the comments in the loadLevel() method with real code. First, here's how to create a wall – replace the // load wall comment with this:
let node = SKSpriteNode(imageNamed: "block")
node.position = position

node.physicsBody = SKPhysicsBody(rectangleOf: node.size)
node.physicsBody?.categoryBitMask = CollisionTypes.wall.rawValue
node.physicsBody?.isDynamic = false
addChild(node)
It uses rectangle physics, it's not dynamic because the walls should be fixed… this is all child's play to you now, right? When assigning a value to categoryBitMask we can’t use our enum directly because it expects to receive a UInt32. So, we’re getting the number from the enum using its rawValue property.
Next, replace the // load vortex comment with this:
let node = SKSpriteNode(imageNamed: "vortex")
node.name = "vortex"
node.position = position
node.run(SKAction.repeatForever(SKAction.rotate(byAngle: .pi, duration: 1)))
node.physicsBody = SKPhysicsBody(circleOfRadius: node.size.width / 2)
node.physicsBody?.isDynamic = false

node.physicsBody?.categoryBitMask = CollisionTypes.vortex.rawValue
node.physicsBody?.contactTestBitMask = CollisionTypes.player.rawValue
node.physicsBody?.collisionBitMask = 0
addChild(node)
This is a little more interesting, because it uses rotate(byAngle:) and repeatForever() to make each vortex rotate around and around for as long the game lasts. It also sets the contactTestBitMask property to the value of the player's category, which means we want to be notified when these two touch.
The code to load stars and the finish flag are almost identical and quite trivial for you at this point, so here's the code to load stars:
let node = SKSpriteNode(imageNamed: "star")
node.name = "star"
node.physicsBody = SKPhysicsBody(circleOfRadius: node.size.width / 2)
node.physicsBody?.isDynamic = false

node.physicsBody?.categoryBitMask = CollisionTypes.star.rawValue
node.physicsBody?.contactTestBitMask = CollisionTypes.player.rawValue
node.physicsBody?.collisionBitMask = 0
node.position = position
addChild(node)
And the code to load the finish flag:
let node = SKSpriteNode(imageNamed: "finish")
node.name = "finish"
node.physicsBody = SKPhysicsBody(circleOfRadius: node.size.width / 2)
node.physicsBody?.isDynamic = false

node.physicsBody?.categoryBitMask = CollisionTypes.finish.rawValue
node.physicsBody?.contactTestBitMask = CollisionTypes.player.rawValue
node.physicsBody?.collisionBitMask = 0
node.position = position
addChild(node)
That completes the method. It's long, but it's quite repetitive – there are several ways it could be refactored into something neater, but that would be cheating for later!
To see the fruits of your labor, add a call to loadLevel() in didMove(to:) then run your game. Remember to use the lowest-spec iPad simulator you can find in order to help it run quickly!
To finish off the level-loading code, we should add a background picture. You've done this many times so far, so please just go ahead and put this code into didMove(to:), before the loadLevel() call:
let background = SKSpriteNode(imageNamed: "background.jpg")
background.position = CGPoint(x: 512, y: 384)
background.blendMode = .replace
background.zPosition = -1
addChild(background)