Day 67
Day 67 관련

Project 19, part one
As much as I love Swift, it would be unwise to think we have all the good ideas. In fact, the Swift community is dwarfed in size by that of JavaScript, which powers large parts of the modern web.
Today we’re going to start a tricky project that creates a bridge between our Swift app and JavaScript running in Safari. It’s not tricky because we’re doing anything clever, but instead because Apple’s API here – the types and methods we use - are a bit clumsy, and require some very precise organization.
Please don’t think for a second that you need to memorize all this stuff. The goal in learning isn’t rote memorization of long parameter lists and similar, but instead to remember the larger structure of what’s possible. The goal here is for you to be able to say in a year or more, “I need to do X, and I remember learning about that previously…” and then proceeding to open up the code you wrote so you can refresh your memory.
Ginni Rometty once said, “what I knew was I liked math and science, and I never wanted to memorize everything – I wanted to understand where it came from.” That’s the key to being a good developer: don’t worry about memorizing all the types and methods we’ll be using in this project, but instead focus on understanding the concepts and why they are used – you’ll do much better!
Today you have four topics to work through, and you’ll learn about extensions, NSExtensionItem, and just a touch of JavaScript.
Setting up
Setting up
In this project you're going to create a Safari extension, which lets us embed a version of our app directly inside Safari's action menu, then manipulate Safari data in interesting ways.
What do I mean by "interesting ways"? Well, our little Safari extension is going to read in the URL and page title that the user was visiting, then show them a large text area they can type JavaScript into. When the extension is dismissed, we'll execute that JavaScript in Safari.
This is the first of two projects that are hard. This is not because I want to torture you, but because this isn’t one of Apple’s better APIs – in fact, I’d say it’s downright ugly in places. In this project, the actual amount of code you're going to be writing is quite small. However, it's dense, and there's a lot to take in, so it might feel like slow going.
At the very least, the project will still be useful and you'll learn a lot too – not least about Safari extensions and a new class called NotificationCenter.
Let's get started: create a new Single View App project in Xcode, naming it Project19.
Making a shell app
Making a shell app
Safari extensions are launched from within the Safari action menu, but they ship inside a parent app. That is, you can't ship an extension by itself – it needs have an app alongside it. Frequently the app does very little, but it must at least be present.
There are two common ways to use the app side of the extension: to show help information, or to show basic settings for the user to adjust. We're going to go with the first option, although to skip writing lots of help text we'll just be using "Hello, world!"
Open your app’s Main.storyboard file, drop a UILabel into the view controller, then give it the text "Hello, world!". Using the document outline, Ctrl-drag from the label to the view just above it, and select ["Center Horizontally in Safe Area“] and ["Center Vertically in Safe Area.”]
When you add those two constraints, you'll probably see some orange boxes around your label – one is wholly orange, and one has a dashed line. These orange markers mean your views don't match your constraints: the solid orange lines mean "this is where you view is," and the dashed orange lines mean "this is where your view will be when your code runs."
The reason for the difference is because labels have a default size of whatever fits their current text. We placed the label by hand, and in my case I made it too small, so Xcode is telling me when the code runs the label will be smaller. You can fix this warning by going to the Editor menu and choosing [Resolve Auto Layout Issues > Update Frames], which will make the label the size Auto Layout thinks it ought to be.
That's the entire app complete. We're not going to add any more to it here because it's really not the point; we're going to focus on the extension from here on.
Adding an extension: NSExtensionItem
Adding an extension: NSExtensionItem
Extensions are miniature apps in their own right, and as such need their own space in your code. That doesn't mean you can't share code and resources between your extensions and your app, just that it's not automatic.
To get started with a fresh extension, go to the File menu and choose [New > Target]. When you're asked to choose a template, select [iOS > Application Extension > Action Extension], then click [Next]. For the name just call it Extension, make sure Action Type is set to "Presents User Interface", then click [Finish].

When you create an extension inside an app, Xcode will ask you whether you want to activate its scheme. Check the "Do not show this message again" box then click Activate. With this change, when you run your code, you'll actually launch the extension – it's perfect for our needs right now.
Once your extension has been created, it will appear in the project navigation in its own yellow folder. You should see Project19 at the top, but look below and you'll see Extension. Open up the disclosure arrow and you'll see Xcode has given you two files: ActionViewController.swift and MainInterface.storyboard.
If you look inside ActionViewController.swift you'll see a fair amount of code, and I have some bad news for you: the code is complicated, the code is pretty much all new, and most of it is required. It's complicated because it needs to be: your extension doesn't talk to Safari and Safari doesn't talk to your extension, because it opens up security risks. Instead, iOS acts as an intermediary between Safari and the extension, passing data safely between the two.
To help make the code in viewDidLoad() a little easier to understand, I want you to delete it. Go on – zap it all, leaving viewDidLoad() doing nothing more than calling super.viewDidLoad(). We're going to replace it with code that is somewhat similar, but I've removed the complicated parts to try to make it easier. You'll probably want to return to Apple's template code in your own apps!
Change your viewDidLoad() method to this:
override func viewDidLoad() {
    super.viewDidLoad()

    if let inputItem = extensionContext?.inputItems.first as? NSExtensionItem {
        if let itemProvider = inputItem.attachments?.first {
            itemProvider.loadItem(forTypeIdentifier: kUTTypePropertyList as String) { [weak self] (dict, error) in
                // do stuff!
            }
        }
    }
}
Let's walk through that line by line:
- When our extension is created, its
extensionContextlets us control how it interacts with the parent app. In the case ofinputItemsthis will be an array of data the parent app is sending to our extension to use. We only care about this first item in this project, and even then it might not exist, so we conditionally typecast usingif letandas?. - Our input item contains an array of attachments, which are given to us wrapped up as an
NSItemProvider. Our code pulls out the first attachment from the first input item. - The next line uses
loadItem(forTypeIdentifier: )to ask the item provider to actually provide us with its item, but you'll notice it uses a closure so this code executes asynchronously. That is, the method will carry on executing while the item provider is busy loading and sending us its data. - Inside our closure we first need the usual
[weak self]to avoid strong reference cycles, but we also need to accept two parameters: the dictionary that was given to us by the item provider, and any error that occurred. - With the item successfully pulled out, we can get to the interesting stuff: working with the data. We have
// do stuff!right now, but it'll be more interesting later, I promise.
This code takes a number of shortcuts that Apple's own code doesn't, which is why it's significantly shorter. Once you've gotten to grips with this basic extension, I do recommend you go back and look at Apple's template code to see how it loops through all the items and providers to find the first image it can.
Despite all that work, you can't see the results just yet – we need to do some configuration work first, because Apple's default action extension is configured for images, not for web page content.
What do you want to get?
What do you want to get?
Inside the Extension group in the project navigator is a file called Info.plist. You have one for your app too, and in fact all apps have one. This plist (that's short for property list, remember) contains metadata about apps and extensions: what language is it, what version number is it, and so on.
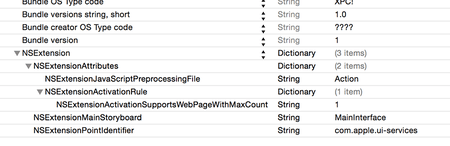
For extensions, this plist also describes what data you are willing to accept and how it should be processed. Look for the key marked NSExtension and open its disclosure indicator: you should see NSExtensionAttributes, NSExtensionMainStoryboard and NSExtensionPointIdentifier. It's that first one we care about, because it modifies the way our extension behaves.
Open up the disclosure arrow for NSExtensionAttributes and you should see NSExtensionActivationRule, then String, then TRUEPREDICATE. Change String to be Dictionary, then open its disclosure arrow and click the small + button to the left of “Dictionary”, and when it asks you for a key name change "New item" to be "NSExtensionActivationSupportsWebPageWithMaxCount". You can leave the new item as a string (it doesn't really matter), but change its value to be 1 – that's the empty space just to the right of String.
Adding this value to the dictionary means that we only want to receive web pages – we aren't interested in images or other data types.
Now select the NSExtensionAttributes line itself, and click the [+] button that appears next to the word Dictionary. Replace "New item" with "NSExtensionJavaScriptPreprocessingFile", then give it the value "Action". This tells iOS that when our extension is called, we need to run the JavaScript preprocessing file called Action.js, which will be in our app bundle. Make sure you type "Action" and not "Action.js", because iOS will append the ".js" itself.
In the picture below you can see how your extension's property list should look. Make sure you enter the key names precisely, because there is no room for error.
I say "will be" rather than "is" because we haven't actually created this file yet. Right-click on your extension's Info.plist file and choose New File. When you're asked what template you want, choose iOS > Other > Empty, then name it Action.js, and put this text into it:
var Action = function() {};

Action.prototype = {

run: function(parameters) {

},

finalize: function(parameters) {

}

};

var ExtensionPreprocessingJS = new Action
This is a book about Swift, not a book about JavaScript, so I'm afraid I don't intend to explain what that code does except for two things:
- There are two functions:
run()andfinalize(). The first is called before your extension is run, and the other is called after. - Apple expects the code to be exactly like this, so you shouldn't change it other than to fill in the
run()andfinalize()functions.
Even now, after all this hacking around, your extension still isn't ready to run, and I can only apologize – I told you it was complicated!
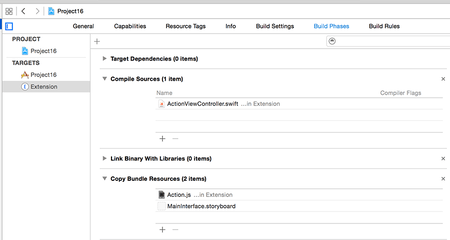
Action.js file needs to be in the Copy Bundle Resources build phase of your extension.Having problems? One reader reported that Xcode had tried to compile Action.js rather than copy it into the project, which will cause problems when you try to run the extension.
If you're worried that this might have happened to you, it's easy enough to check: choose your project from the Project Navigator, then choose your extension from the list of targets – it's just called Extension if you followed my instructions so far. Now choose the Build Phases tab and open up Compile Sources and Copy Bundle Resources.
If things have worked correctly you should see Action.js under Copy Bundle Resources and not Compile Sources. If this isn't the case, you can just drag it to move.