Day 75
Day 75 관련

Project 22, part one
We looked at MapKit back in project 16, and while maps work great for finding location at the large scale, they work much less well for small-scale location – when you’re inside buildings, or perhaps trying to measure distances in terms of centimeters.
The problem is that location matters. As Phyllis Schlafly said, “location is the key to most businesses, and the entrepreneurs typically build their reputation at a particular spot.” You’ve probably heard the saying “location, location, location”, which pretty much sums it up.
Well, today you’re going to learn about micro-location: the ability to detect very small distances between things, even when you’re inside. This is all made possible through Apple’s iBeacon technology, which are Bluetooth-powered devices that emit low-energy signals iOS can detect and act on.
The range is short – maybe 40 meters / 130 feet in a line of sight – but these devices use so little power that they can survive for years on a tiny battery. This makes them perfect for museums, schools, galleries, malls, and more.
Today you have three topics to work through, and you’ll learn about Core Location, CLBeaconRegion, and more.
Setting up
Setting up
Apple introduced iBeacon technology with iOS 7, and it helped make the Internet of Things hypefest even more stratospheric. In this project you're going to learn to detect and range beacons, which in turn means learning how to ask your user for their location. With this, you'll have all the tools required to make your own location-aware apps – just scatter a few beacons around your house!
If you don't have any iBeacons at home, that's OK because most people don't. Instead, I recommend you install the app "Locate Beacon" on your iPad or iPhone, because that comes with an iBeacon transmitter built in, making it perfect for testing. You also need an iOS device that's compatible with iBeacons, which means iPhone 5 or later, 3rd generation iPad or later, iPad Mini or later, or 5th generation iPod Touch or later. I'm afraid the iOS Simulator won't work, but you can at least follow along with the code. Please ensure you have Bluetooth enabled on your device.
If you've never pushed an app to a real device before, you need to make sure you select the device from the list of destinations. You can do this by clicking where it says "Project22" to the right of the play and stop buttons, or by going to the Product menu and choosing Destination then selecting your device. If it comes up with "ineligible" it means your device is running an older version of iOS than your project is designed for, so you may need to go to your project settings (where you configure orientation) and change Deployment Target to match.
Create a new Single View App project in Xcode then name it Project22. Let’s go!
Requesting location: Core Location
Requesting location: Core Location
It should come as no surprise that Apple considers a user's location to be private, and that means we need to ask for permission to use it. How you ask for permission depends on what you're trying to do: would you like the user's location only when your app is running, or would you like a user's location even when your app isn't running?
You might think that you'd only ever want location access when your app is running. After all, what's the point in asking for information when your app isn't around to use it?
There are times you'll want both. For example, if you're creating a map app that shows users how to get from their current location to your nearest store, you'll only need their location when the app is being used. But if you're creating an app that needs to be woken up when the user reaches a location, then you'll need access even when the app isn't running – iOS monitors the user's location on your behalf and automatically starts your app as needed.
Using location when the app isn’t running is of course highly sensitive information, so Apple flags it up in three ways:
- If you request Always access, users will still get the chance to choose When In Use.
- If they choose Always, iOS will automatically ask them again after a few days to confirm they still want to grant Always access.
- When your app is using location data in the background the iOS UI will update to reflect that – users will know it’s happening.
- Users can, at any point, go into the settings app and change from Always down to When In Use.
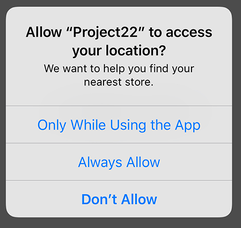
In this app we’re going to request Always access so that our app can detect beacons in the background. Requesting location access requires a change to your apps Info.plist file, which is the property list file we first met way back in project 3. We need to add to that file the reason why we want the user’s location – a string that will be shown in the iOS UI when the user is being asked to accept or decline our request.
Because of the rules above, we need to add two keys: “Privacy - Location Always and When In Use Usage Description” and “Privacy - Location When In Use Usage Description”. So, please add them both now, make sure their types are set to String, then in the value fields enter some text to explain to users why you want their location. For example, "We want to help you find your nearest store." When your user is prompted to grant location access, this text will be shown alongside Apple's own descriptive message.
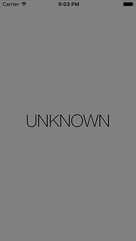
That's enough knowledge to get this app jump started, so open up Main.storyboard and place a label in there. Give it the custom font System Thin size 40, then give the text "UNKNOWN". For constraints, please center it horizontally and vertically. Now create an outlet for it using the assistant editor, and name the outlet distanceReading.
That label will show one of four messages depending on how close we are to our test beacon, which of course might be an iPad acting as a beacon if you don't own actual hardware. Because iBeacons use very low energy levels, their range is limited and also easily interrupted; even something as simple as turning your back to the beacon weakens its signal dramatically. Based on the beacon's distance to us, we'll show either "UNKNOWN", "FAR", "NEAR" or "RIGHT HERE".
Apple restricts your ranging to these values because of the signal's low energy nature, but it's more than enough for most uses.
To complete our current step, let's make sure we have location configured correctly. This bit will work fine on the simulator, because although the simulator isn't capable of detecting iBeacons it can simulate general location information well enough.
Open ViewController.swift and add this import alongside UIKit:
import CoreLocation
Now add this property to your class:
var locationManager: CLLocationManager?
This is the Core Location class that lets us configure how we want to be notified about location, and will also deliver location updates to us.
That doesn't actually create a location manager, or even prompt the user for location permission! To do that, we first need to create the object (easy), then set ourselves as its delegate (easy, but we need to conform to the protocol), then finally we need to request authorization. We'll start by conforming to the protocol, so change your class definition to this:
class ViewController: UIViewController, CLLocationManagerDelegate {
Now modify your viewDidLoad() method to this:
override func viewDidLoad() {
    super.viewDidLoad()

    locationManager = CLLocationManager()
    locationManager?.delegate = self
    locationManager?.requestAlwaysAuthorization()

    view.backgroundColor = .gray
}
Creating the object and setting the delegate are easy enough, but the requestAlwaysAuthorization() call is new. This is where the actual action happens: if you have already been granted location permission then things will Just Work; if you haven't, iOS will request it now.
Note: if you used the "when in use" key, you should call requestWhenInUseAuthorization() instead. If you did not set the correct plist key earlier, your request for location access will be ignored.
I slipped one other thing in there: I set the view's background color to be gray. As well as changing the label's text, we'll be using color to tell users how distant the beacon is.
Requesting location authorization is a non-blocking call, which means your code will carry on executing while the user reads your location message and decides whether to grant you access to their location.
When the user has finally made their mind, you'll get told their result because we set ourselves as the delegate for our CLLocationManager object. The method that will be called is this one:
func locationManager(_ manager: CLLocationManager, didChangeAuthorization status: CLAuthorizationStatus) {
    if status == .authorizedAlways {
        if CLLocationManager.isMonitoringAvailable(for: CLBeaconRegion.self) {
            if CLLocationManager.isRangingAvailable() {
                // do stuff
            }
        }
    }
}
Put that into your view controller class somewhere, then run your app. It's important to test it before continuing, because if you've made a mistake somewhere it's hard to know unless you stop and check. The most common error is misconfiguring the plist with location privacy settings, so if you don't see a message requesting location access then check there first.
The didChangeAuthorization method we just added doesn't do anything because it just has a comment saying // do stuff. We'll fill that in with great stuff shortly, but for now look at the conditional statements wrapped around it: did we get authorized by the user? If so, is our device able to monitor iBeacons? If so, is ranging available? (Ranging is the ability to tell roughly how far something else is away from our device.)
Hunting the beacon: CLBeaconRegion
Hunting the beacon: CLBeaconRegion
If everything is working, you should have received a large iOS confirmation prompt asking whether you want to grant the app access to your location. This message is really blunt, so users hopefully take a few moments to read it before continuing.
But that prompt is not the only way iOS helps users guard their privacy. If you went for "when in use", you'll still get location information while your app is in the background if you enable the background capability, and iOS will notify users that this is happening by making the device status bar blue and saying "YourAppName is using your location." If you went for "always", iOS will wait a few days then ask the user if they still want to grant permission, just to be fully sure.
Assuming everything went well, let's take a look at how we actually range beacons. First, we use a new class called CLBeaconRegion, which is used to identify a beacon uniquely. Second, we give that to our CLLocationManager object by calling its startMonitoring(for:) and startRangingBeacons(in:) methods. Once that's done, we sit and wait. As soon as iOS has anything tell us, it will do so.
iBeacons are identified using three pieces of information: a universally unique identifier (UUID), plus a major number and a minor number. The first number is a long hexadecimal string that you can create by running the uuidgen in your Mac's terminal. It should identify you or your store chain uniquely.
The major number is used to subdivide within the UUID. So, if you have 10,000 stores in your supermarket chain, you would use the same UUID for them all but give each one a different major number. That major number must be between 1 and 65535, which is enough to identify every McDonalds and Starbucks outlet combined!
The minor number can (if you wish) be used to subdivide within the major number. For example, if your flagship London store has 12 floors each of which has 10 departments, you would assign each of them a different minor number.
The combination of all three identify the user's precise location:
- UUID: You're in a Acme Hardware Supplies store.
- Major: You're in the Glasgow branch.
- Minor: You're in the shoe department on the third floor.
If you don't need that level of detail you can skip minor or even major – it's down to you.
It's time to put this into code, so we're going to create a new method called startScanning() that contains the following:
func startScanning() {
    let uuid = UUID(uuidString: "5A4BCFCE-174E-4BAC-A814-092E77F6B7E5")!
    let beaconRegion = CLBeaconRegion(proximityUUID: uuid, major: 123, minor: 456, identifier: "MyBeacon")

    locationManager?.startMonitoring(for: beaconRegion)
    locationManager?.startRangingBeacons(in: beaconRegion)
}
You met UUID in project 10, but here we're converting a string into a UUID rather than generating a UUID and converting it to a string. The UUID I'm using there is one of the ones that comes built into the Locate Beacon app – look under "Apple AirLocate 5A4BCFCE" and find it there. Note that I'm scanning for specific major and minor numbers, so please enter those into your Locate Beacon app.
The identifier field is just a string you can set to help identify this beacon in a human-readable way. That, plus the UUID, major and minor fields, goes into the CLBeaconRegion class, which is used to identify and work with iBeacons. It then gets sent to our location manager, asking it to monitor for the existence of the region and also to start measuring the distance between us and the beacon.
Find the // do stuff comment inside the didChangeAuthorization method you wrote a few minutes ago, and change it to this:
startScanning()
That method should now be much clearer: we only start scanning for beacons when we have permission and if the device is able to do so.
If you run the app now (on a real device, remember!) you'll see that it literally looks identical, as if we needn't have bothered writing any iBeacon code. But behind the scenes, detection and ranging is happening, we're just not doing anything with it!
This app is going to change the label text and view background color to reflect proximity to the beacon we're scanning for. This will be done in a single method, called update(distance:), which will use a switch/case block and animations in order to make the transition look smooth. Let's write that method first:
func update(distance: CLProximity) {
    UIView.animate(withDuration: 1) {
        switch distance {
        case .unknown:
            self.view.backgroundColor = UIColor.gray
            self.distanceReading.text = "UNKNOWN"

        case .far:
            self.view.backgroundColor = UIColor.blue
            self.distanceReading.text = "FAR"

        case .near:
            self.view.backgroundColor = UIColor.orange
            self.distanceReading.text = "NEAR"

        case .immediate:
            self.view.backgroundColor = UIColor.red
            self.distanceReading.text = "RIGHT HERE"
        }
    }
}
Most of that is just choosing the right color and text, but you'll notice the method accepts a CLProximity as its parameter.
Now, in theory this can only be be one of our four distance values, which is why we have a default case in there. However, Swift should show you a warning because Apple has marked CLProximity as an enum that might change in the future – they might add more fine-grained values, for example.
This is only a warning rather than an error because you can build ship your code without covering future cases if you want to. However, if you do that you risk running into problems in the future: if Apple added an extra .farFarAway case in there, what would your code do?
There are two solutions here: we can add a special case called @unknown default, which is specifically there to catch future values. This allows you to cover all the other cases explicitly, then provide one extra case to handle as-yet-unknown cases in the future:
@unknown default:
    self.view.backgroundColor = .black
    self.distanceReading.text = "WHOA!"
In this app, though, it’s easier to treat unknown future cases as a regular unknown case, so instead I would recommend you write this:
func update(distance: CLProximity) {
    UIView.animate(withDuration: 0.8) {
        switch distance {
        case .far:
            self.view.backgroundColor = UIColor.blue
            self.distanceReading.text = "FAR"

        case .near:
            self.view.backgroundColor = UIColor.orange
            self.distanceReading.text = "NEAR"

        case .immediate:
            self.view.backgroundColor = UIColor.red
            self.distanceReading.text = "RIGHT HERE"

        default:
            self.view.backgroundColor = UIColor.gray
            self.distanceReading.text = "UNKNOWN"
        }
    }
}
With that method written, all that remains before our project is complete is to catch the ranging method from CLLocationManager. We'll be given the array of beacons it found for a given region, which allows for cases where there are multiple beacons transmitting the same UUID.
If we receive any beacons from this method, we'll pull out the first one and use its proximity property to call our update(distance:) method and redraw the user interface. If there aren't any beacons, we'll just use .unknown, which will switch the text back to "UNKNOWN" and make the background color gray.
Here's the code:
func locationManager(_ manager: CLLocationManager, didRangeBeacons beacons: [CLBeacon], in region: CLBeaconRegion) {
    if let beacon = beacons.first {
        update(distance: beacon.proximity)
    } else {
        update(distance: .unknown)
    }
}
With that, your code is done. Run it on a device, make sure Locate Beacon is up and transmitting, and enjoy your location-aware app!