Day 72
Day 72 관련

Project 21, part one
Tim Ferriss is a well-known podcaster and angel investor, who once said “in a digital world, there are numerous technologies that we are attached to that create infinite interruption.” And it’s true: there’s a little jolt of excitement when we see your iPhone screen light up, because it means something interesting has happened.
In iOS these app interruptions come in two forms: either the app has received some remote data from the internet and it needs to be shown immediately, or it scheduled a local alert to be shown at a specific day and time. Remote data, known as push notifications, takes quite a lot of 📎set up because you need a server capable of communicating with Apple’s push notification server (APNS), but local alerts aren’t hard at all, so they are what we’ll be looking at today.
But please remember: just because you can show a notification doesn’t mean you should – if the user grants you some permission you should be grateful, and try not to abuse that responsibility!
Today you have three topics to work through, and you’ll learn about UNUserNotificationCenter, requesting permission for notifications, the different kinds of notification trigger, and more.
Setting up
Setting up
This is going to be the easiest technique project in the entire series, and I expect you're extremely relieved to hear that because it can be hard going always having to learn new things!
What you're going to learn about are local notifications, which let you send reminders to your user's lock screen to show them information when your app isn't running. If you set a reminder in your calendar, making it pop up on your lock screen at the right time is a local notification.
These aren't the same as push notifications, and in fact they are quite a different beast from a development perspective. I would love to cover push notifications here, but they require a dedicated server (or service, if you outsource) to send from and that's outside the remit of this course. Much later on – project 33 to be precise – we look at CloudKit, which can send push notifications when data is changed, but I wouldn’t recommend skipping ahead.
To get started, create a new Single View App project in Xcode, and name it Project21.
Scheduling notifications: UNUserNotificationCenter and UNNotificationRequest
Scheduling notifications: UNUserNotificationCenter and UNNotificationRequest
We only need two buttons to control the entire user interface for this project, and the easiest way to do that is using navigation bar buttons. So, open Main.storyboard in Interface Builder and embed the view controller inside a navigation controller – and that’s it for the interface.
Open ViewController.swift and add these two method stubs:
@objc func registerLocal() {

}

@objc func scheduleLocal() {

}
Now add this code to viewDidLoad():
navigationItem.leftBarButtonItem = UIBarButtonItem(title: "Register", style: .plain, target: self, action: #selector(registerLocal))
navigationItem.rightBarButtonItem = UIBarButtonItem(title: "Schedule", style: .plain, target: self, action: #selector(scheduleLocal))
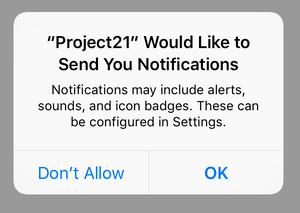
OK, time to explain how this project needs to work. First, you can't post messages to the user's lock screen unless you have their permission. This is a sensible restriction – it would, after all, be awfully annoying if any app could bother you when it pleased.
So, in order to send local notifications in our app, we first need to request permission, and that's what we'll put in the registerLocal() method. You register your settings based on what you actually need, and that's done with a method called requestAuthorization() on UNUserNotificationCenter. For this example we're going to request an alert (a message to show), along with a badge (for our icon) and a sound (because users just love those.)
You also need to provide a closure that will be executed when the user has granted or denied your permissions request. This will be given two parameters: a boolean that will be true if permission was granted, and an Error? containing a message if something went wrong.
All this functionality is contained in the UserNotifications framework, so before continuing add this import line now:
import UserNotifications
OK, let’s go – change your registerLocal() method to be this:
@objc func registerLocal() {
    let center = UNUserNotificationCenter.current()

    center.requestAuthorization(options: [.alert, .badge, .sound]) { (granted, error) in
        if granted {
            print("Yay!")
        } else {
            print("D'oh")
        }
    }
}
Helpful tip: if you want to test allowing or denying permission, just reset the simulator and run the app again to get a clean slate. Choose the Hardware menu then “Erase all Content and Settings" to make this happen.
Once we have user permission, it's time to fill in the scheduleLocal() method. This will configure all the data needed to schedule a notification, which is three things: content (what to show), a trigger (when to show it), and a request (the combination of content and trigger.)
Before I dive into the code, there are a few extra things I want to discuss.
First, the reason a notification request is split into two smaller components is because they are interchangeable. For example, the trigger – when to show the notification – can be a calendar trigger that shows the notification at an exact time, it can be an interval trigger that shows the notification after a certain time interval has lapsed, or it can be a geofence that shows the notification based on the user’s location.
I’ll be demonstrating both calendar and interval triggers here, but to do calendar triggers requires learning another new data type called DateComponents. We’re going to start with a calendar notification, which is where you specify a day, a month, an hour, a minute, or any combination of those to produce specific times. For example, if you specify hour 8 and minute 30, and don’t specify a day, it means either “8:30 tomorrow” or “8:30 every day” depending on whether you ask for the notification to be repeated.
So, we could create a repeating alarm at 10:30am every morning like this:
var dateComponents = DateComponents()
dateComponents.hour = 10
dateComponents.minute = 30
let trigger = UNCalendarNotificationTrigger(dateMatching: dateComponents, repeats: true)
When it comes to what to show, we need to use the class UNMutableNotificationContent. This has lots of properties that customize the way the alert looks and works – we’ll be using these:
- The
titleproperty is used for the main title of the alert. This should be a couple of words at most. - The
bodyproperty should contain your main text. - If you want to specify a sound you can create a custom
UNNotificationSoundobject and attach it to thesoundproperty, or just useUNNotificationSound.default. - To attach custom data to the notification, e.g. an internal ID, use the
userInfodictionary property. - You can also attach custom actions by specifying the
categoryIdentifierproperty.
Putting those all together, we could create some notification content like this:
let content = UNMutableNotificationContent()
content.title = "Title goes here"
content.body = "Main text goes here"
content.categoryIdentifier = "customIdentifier"
content.userInfo = ["customData": "fizzbuzz"]
content.sound = UNNotificationSound.default
The combination of content and trigger is enough to be combined into a request, but here notifications get clever: as well as content and a trigger, each notification also has a unique identifier. This is just a string you create, but it does need to be unique because it lets you update or remove notifications programmatically.
Apple’s example for this is an app that displays live sports scores to the user. When something interesting happens, what the user really wants is for the existing notification to be updated with new information, rather than have multiple notifications from the same app over time.
For technique project we don’t care what name is used for each notification, but we do want it to be unique. So, we’ll be using the UUID class to generate unique identifiers – we’ve used this before, so hopefully you’re familiar.
OK, enough talk – time for some code. Change the scheduleLocal() method to this:
@objc func scheduleLocal() {
    let center = UNUserNotificationCenter.current()

    let content = UNMutableNotificationContent()
    content.title = "Late wake up call"
    content.body = "The early bird catches the worm, but the second mouse gets the cheese."
    content.categoryIdentifier = "alarm"
    content.userInfo = ["customData": "fizzbuzz"]
    content.sound = UNNotificationSound.default

    var dateComponents = DateComponents()
    dateComponents.hour = 10
    dateComponents.minute = 30
    let trigger = UNCalendarNotificationTrigger(dateMatching: dateComponents, repeats: true)

    let request = UNNotificationRequest(identifier: UUID().uuidString, content: content, trigger: trigger)
    center.add(request)
}
If you want to test out your notifications, there are two more things that will help.
First, you can cancel pending notifications – i.e., notifications you have scheduled that have yet to be delivered because their trigger hasn’t been met – using the center.removeAllPendingNotificationRequests() method, like this:
center.removeAllPendingNotificationRequests()
Second, chances are you’ll find the interval trigger far easier to test with than the calendar trigger, because you can set it to a low number like 5 seconds to have your notification trigger almost immediately.
To do that, replace the existing trigger with this code:
let trigger = UNTimeIntervalNotificationTrigger(timeInterval: 5, repeats: false)
With that small change you should be able to click Schedule in the simulator, then press Cmd+L to lock the device and have it show an alert just a few seconds later.
Acting on responses
Acting on responses
There’s a lot more you can do with notifications, but chances are the thing you most want to do is act on the user’s response – to show one or more options alongside your alert, then respond to the user’s choice.
We already set the categoryIdentifier property for our notification, which is a text string that identifies a type of alert. We can now use that same text string to create buttons for the user to choose from, and iOS will show them when any notifications of that type are shown.
This is done using two new classes: UNNotificationAction creates an individual button for the user to tap, and UNNotificationCategory groups multiple buttons together under a single identifier.
For this technique project we’re going to create one button, “Show me more…”, that will cause the app to launch when tapped. We’re also going to set the delegate property of the user notification center to be self, meaning that any alert-based messages that get sent will be routed to our view controller to be handled.
Creating a UNNotificationAction requires three parameters:
- An identifier, which is a unique text string that gets sent to you when the button is tapped.
- A title, which is what user’s see in the interface.
- Options, which describe any special options that relate to the action. You can choose from
.authenticationRequired,.destructive, and.foreground.
Once you have as many actions as you want, you group them together into a single UNNotificationCategory and give it the same identifier you used with a notification.
That’s it! Add this method to ViewController now:
func registerCategories() {
    let center = UNUserNotificationCenter.current()
    center.delegate = self

    let show = UNNotificationAction(identifier: "show", title: "Tell me more…", options: .foreground)
    let category = UNNotificationCategory(identifier: "alarm", actions: [show], intentIdentifiers: [])

    center.setNotificationCategories([category])
}
You might have noticed the empty intentIdentifiers parameter in the category initializer - this is used to connect your notifications to intents, if you have created any.
You’ll get an error because you assigned self to be the delegate of the user notification center. To fix it, make the ViewController class conform to UNUserNotificationCenterDelegate like this:
class ViewController: UIViewController, UNUserNotificationCenterDelegate {
You can call registerCategories() wherever you want, but in this project the safest place is probably right at the beginning of the scheduleLocal() method.
Now that we have registered the “alarm” category with a single button, the last thing to do is implement the didReceive method for the notification center. This is triggered on our view controller because we’re the center’s delegate, so it’s down to us to decide how to handle the notification.
We attached some customer data to the userInfo property of the notification content, and this is where it gets handed back – it’s your chance to link the notification to whatever app content it relates to.
When the user acts on a notification you can read its actionIdentifier property to see what they did. We have a single button with the “show” identifier, but there’s also UNNotificationDefaultActionIdentifier that gets sent when the user swiped on the notification to unlock their device and launch the app.
So: we can pull out our user info then decide what to do based on what the user chose. The method also accepts a completion handler closure that you should call once you’ve finished doing whatever you need to do. This might be much later on, so it’s marked with the @escaping keyword.
Here’s the code – add this method to ViewController now:
func userNotificationCenter(_ center: UNUserNotificationCenter, didReceive response: UNNotificationResponse, withCompletionHandler completionHandler: @escaping () -> Void) {
    // pull out the buried userInfo dictionary
    let userInfo = response.notification.request.content.userInfo

    if let customData = userInfo["customData"] as? String {
        print("Custom data received: \(customData)")

        switch response.actionIdentifier {
        case UNNotificationDefaultActionIdentifier:
            // the user swiped to unlock
            print("Default identifier")

        case "show":
            // the user tapped our "show more info…" button
            print("Show more information…")

        default:
            break
        }
    }

    // you must call the completion handler when you're done
    completionHandler()
}
Our project now creates notifications, attaches them to categories so you can create action buttons, then responds to whichever button was tapped by the user – we’re done!