Day 33
Day 33 관련

Project 7, part one
One of the joys of working on Apple platforms is that it can feel like there’s no end to exciting technologies to try – whether that’s ARKit, Core ML, SpriteKit, or any of the dozens of other things, I don’t think there’s ever been a better time to get into software development.
But – and this is a big but! – as wonderful as those things are, a large part of our work as iOS developers is always going to involve the fundamentals of app development: receiving some data, formatting in a specific way, and making it look good on-screen.
Today you’re going to meet one of the truly great features of Swift development, and it also happens to be part of probably the most important skill. That feature is called the Codable protocol, and its job is to convert Swift data like strings, dictionaries, or structs to and from data that can be transferred over the internet.
Computing pioneer Mitch Kapor once said that “getting information off the internet is like taking a drink from a fire hydrant.” This is true: there’s a lot of it out there, and we need to be really careful how we read it in to our apps.
Fortunately, Codable does most of the work for us – I think you’ll be impressed!
Today you have three topics to work through, and you’ll learn about UITabBarController, Data, Codable, and more.
Setting up
Setting up
This project will take a data feed from a website and parse it into useful information for users. As per usual, this is just a way of teaching you some new iOS development techniques, but let's face it – you already have two apps and two games under your belt, so you're starting to build up a pretty good library of work!
This time you'll be learning about UITabBarController and a data format called JSON, which is a popular way to send and receive data online. It's not easy to find interesting JSON feeds that are freely available, but the option we'll be going for is the "We the people" Whitehouse petitions in the US, where Americans can submit requests for action, and others can vote on it.
Some are entirely frivolous ("We want the US to build a Death Star"), but it has good, clean JSON that's open for everyone to read, which makes it perfect. Lots to learn, and lots to do, so let's get started: create a new project in Xcode by choosing the Single View App template. Now name it Project7 and save it somewhere.
Creating the basic UI: UITabBarController
Creating the basic UI: UITabBarController
We’ve already used UINavigationController in previous projects to provide a core user interface that lets us control which screen is currently visible. Another fundamental UI component is the tab bar, which you see in apps such as the App Store, Music, and Photos – it lets the user control which screen they want to view by tapping on what interests them.
Our current app has a single empty view controller, but we’re going to jazz that up with a table view controller, a navigation controller, and a tab bar controller so you can see how they all work together.
You should know the drill by now, or at least part of it. Start by opening ViewController.swift and changing ViewController to inherit from UITableViewController rather than UIViewController. That is, change this line:
class ViewController: UIViewController {
…to this:
class ViewController: UITableViewController {
Now open Main.storyboard, remove the existing view controller, and drag out a table view controller in its place. Use the identity inspector to change its class to be “ViewController”, then make sure you check the “Is Initial View Controller” box.
Select its prototype cell and use the attributes inspector to give it the identifier “Cell”. Set its accessory to “Disclosure Indicator” while you’re there; it’s a great UI hint, and it’s perfect in this project. In this project, we’re also going to change the style of the cell – that’s the first item in the attributes inspector. It’s “Custom” by default, but I’d like you to change it to “Subtitle”, so that each row has a main title label and a subtitle label.
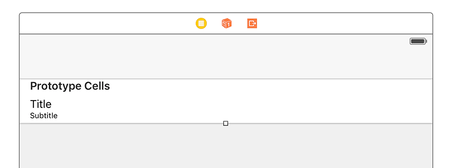
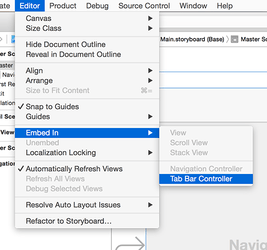
Now for the interesting part: we need to wrap this view controller inside two other things. Go to [Editor] > [Embed In] > [Navigation Controller], and then straight away go to [Editor] > [Embed In] > [Tab Bar Controller]. The navigation controller adds a gray bar at the top called a navigation bar, and the tab bar controller adds a gray bar at the bottom called a tab bar. Hit Cmd+R now to see them both in action.
Behind the scenes, UITabBarController manages an array of view controllers that the user can choose between. You can often do most of the work inside Interface Builder, but not in this project. We're going to use one tab to show recent petitions, and another to show popular petitions, which is the same thing really – all that's changing is the data source.
Doing everything inside the storyboard would mean duplicating our view controllers, which is A Bad Idea, so instead we're just going to design one of them in the storyboard then create a duplicate of it using code.
Now that our navigation controller is inside a tab bar controller, it will have acquired a gray strip along its bottom in Interface Builder. If you click that now, it will select a new type of object called a UITabBarItem, which is the icon and text used to represent a view controller in the tab bar. In the attributes inspector (Alt+Cmd+4) change System Item from "Custom" to "Most Recent".
One important thing about UITabBarItem is that when you set its system item, it assigns both an icon and some text for the title of the tab. If you try to change the text to your own text, the icon will be removed and you need to provide your own. This is because Apple has trained users to associate certain icons with certain information, and they don't want you using those icons incorrectly!
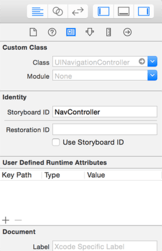
Select the navigation controller itself (just click where it says Navigation Controller in big letters in the center of the view controller), then press Alt+Cmd+3 to select the identity inspector. We haven't been here before, because it's not used that frequently. However, here I want you to type "NavController" in the text box to the right of where it says "Storyboard ID". We'll be needing that soon!
In the picture below you can see how the identity inspector should look when configured for your navigation controller. You'll be using this inspector in later projects to give views a custom class by changing the first of these four text boxes.
We're done with Interface Builder, so please open the file ViewController.swift so we can make the usual changes to get us a working table view.
First, add this property to the ViewController class:
var petitions = [String]()
That will hold our petitions. We won’t be using strings in the final project – in fact we’ll change that in the next chapter – but it’s good enough for now.
Now add this numberOfRowsInSection method:
override func tableView(_ tableView: UITableView, numberOfRowsInSection section: Int) -> Int {
    return petitions.count
}
We also need to add a cellForRowAt method, but this time it’s going to be a bit different: we’re going to set some dummy textLabel.text like before, but we’re also going to set detailTextLabel.text – that’s the subtitle in our cell. It’s called “detail text label” rather than “subtitle” because there are other styles available, for example one where the detail text is on the right of the main text.
Add this method now:
override func tableView(_ tableView: UITableView, cellForRowAt indexPath: IndexPath) -> UITableViewCell {
    let cell = tableView.dequeueReusableCell(withIdentifier: "Cell", for: indexPath)
    cell.textLabel?.text = "Title goes here"
    cell.detailTextLabel?.text = "Subtitle goes here"
    return cell
}
Step one is now complete: we have a basic user interface in place, and are ready to proceed with some real code…
Parsing JSON using the Codable protocol
Parsing JSON using the Codable protocol
JSON – short for JavaScript Object Notation – is a way of describing data. It's not the easiest to read yourself, but it's compact and easy to parse for computers, which makes it popular online where bandwidth is at a premium.
Before we do the parsing, here is a tiny slice of the actual JSON you'll be receiving:
{
    "metadata":{
        "responseInfo":{
            "status":200,
            "developerMessage":"OK",
        }
    },
    "results":[
        {
            "title":"Legal immigrants should get freedom before undocumented immigrants – moral, just and fair",
            "body":"I am petitioning President Trump's Administration to take a humane view of the plight of legal immigrants. Specifically, legal immigrants in Employment Based (EB) category. I believe, such immigrants were short changed in the recently announced reforms via Executive Action (EA), which was otherwise long due and a welcome announcement.",
            "issues":[
                {
                    "id":"28",
                    "name":"Human Rights"
                },
                {
                    "id":"29",
                    "name":"Immigration"
                }
            ],
            "signatureThreshold":100000,
            "signatureCount":267,
            "signaturesNeeded":99733,
        },
        {
            "title":"National database for police shootings.",
            "body":"There is no reliable national data on how many people are shot by police officers each year. In signing this petition, I am urging the President to bring an end to this absence of visibility by creating a federally controlled, publicly accessible database of officer-involved shootings.",
            "issues":[
                {
                    "id":"28",
                    "name":"Human Rights"
                }
            ],
            "signatureThreshold":100000,
            "signatureCount":17453,
            "signaturesNeeded":82547,
        }
    ]
}
You'll actually be getting between 2000-3000 lines of that stuff, all containing petitions from US citizens about all sorts of political things. It doesn't really matter (to us) what the petitions are, we just care about the data structure. In particular:
- There's a metadata value, which contains a
responseInfovalue, which in turn contains a status value. Status 200 is what internet developers use for "everything is OK." - There's a results value, which contains a series of petitions.
- Each petition contains a title, a body, some issues it relates to, plus some signature information.
- JSON has strings and integers too. Notice how the strings are all wrapped in quotes, whereas the integers aren't.
Swift has built-in support for working with JSON using a protocol called Codable. When you say “my data conforms to Codable”, Swift will allow you to convert freely between that data and JSON using only a little code.
Swift’s simple types like String and Int automatically conform to Codable, and arrays and dictionaries also conform to Codable if they contain Codable objects. That is, [String] conforms to Codable just fine, because String itself conforms to Codable.
Here, though, we need something more complex: each petition contains a title, some body text, a signature count, and more. That means we need to define a custom struct called Petition that stores one petition from our JSON, which means it will track the title string, body string, and signature count integer.
So, start by pressing Cmd+N and choosing to create a new Swift file called Petition.swift.
struct Petition {
    var title: String
    var body: String
    var signatureCount: Int
}
That defines a custom struct with three properties. You might remember that one of the advantages of structs in Swift is that it gives us a memberwise initializer – a special function that can create new Petition instances by passing in values for title, body, and signatureCount.
We’ll come onto that in a moment, but first I mentioned the Codable protocol. Our Petition struct contains two strings and an integer, all of which conforms to Codable already, so we can ask Swift to make the whole Petition type conform to Codable like this:
struct Petition: Codable {
    var title: String
    var body: String
    var signatureCount: Int
}
With that simple change we’re almost ready to load instances of Petition from JSON.
I say almost ready because there’s a slight wrinkle in our plan: if you looked at the JSON example I gave above, you’ll have noticed that our array of petitions actually comes inside a dictionary called “results”. This means when we try to have Swift parse the JSON we need to load that key first, then inside that load the array of petition results.
Swift’s Codable protocol needs to know exactly where to find its data, which in this case means making a second struct. This one will have a single property called results that will be an array of our Petition struct. This matches exactly how the JSON looks: the main JSON contains the results array, and each item in that array is a Petition.
So, press Cmd+N again to make a new file, choosing Swift file and naming it Petitions.swift. Give it this content:
struct Petitions: Codable {
    var results: [Petition]
}
I realize this seems like a lot of work, but trust me: it gets much easier!
All we’ve done is define the kinds of data structures we want to load the JSON into. The next step is to create a property in ViewController that will store our petitions array.
As you'll recall, you declare arrays just by putting the data type in brackets, like this:
var petitions = [String]()
We want to make an array of our Petition object. So, it looks like this:
var petitions = [Petition]()
Put that in place of the current petitions definition at the top of ViewController.swift.
It's now time to parse some JSON, which means to process it and examine its contents. We're going to start by updating the viewDidLoad() method for ViewController so that it downloads the data from the Whitehouse petitions server, converts it to a Swift Data object, then tries to convert it to an array of Petition instances.
We haven’t used Data before. Like String and Int it’s one of Swift’s fundamental data types, although it’s even more low level – it holds literally any binary data. It might be a string, it might be the contents of a zip file, or literally anything else.
Data and String have quite a few things in common. You already saw that String can be created using contentsOf to load data from disk, and Data has exactly the same initializer.
This is perfect for our needs – here's the new viewDidLoad method:
override func viewDidLoad() {
    super.viewDidLoad()

    // let urlString = "https://api.whitehouse.gov/v1/petitions.json?limit=100"
    let urlString = "https://www.hackingwithswift.com/samples/petitions-1.json"

    if let url = URL(string: urlString) {
        if let data = try? Data(contentsOf: url) {
            // we're OK to parse!
        }
    }
}
Note: Above I’ve included a URL for the official Whitehouse API feed, but that might go away or change at any point in the future. So, to avoid problems I’ve taken a copy of that feed and put it on my own site – you can use either the official API or my own copy.
Let's focus on the new stuff:
urlStringpoints either to the Whitehouse.gov server or to my cached copy of the same data, accessing the available petitions.- We use
if letto make sure theURLis valid, rather than force unwrapping it. Later on you can return to this to add more URLs, so it's good play it safe. - We create a new
Dataobject using itscontentsOfmethod. This returns the content from aURL, but it might throw an error (i.e., if the internet connection was down) so we need to usetry?. - If the
Dataobject was created successfully, we reach the “we're OK to parse!” line. This starts with//, which begins a comment line in Swift. Comment lines are ignored by the compiler; we write them as notes to ourselves.
This code isn't perfect, in fact far from it. In fact, by downloading data from the internet in viewDidLoad() our app will lock up until all the data has been transferred. There are solutions to this, but to avoid complexity they won't be covered until project 9.
For now, we want to focus on our JSON parsing. We already have a petitions array that is ready to accept an array of petitions. We want to use Swift’s Codable system to parse our JSON into that array, and once that's done tell our table view to reload itself.
Are you ready? Because this code is remarkably simple given how much work it's doing:
func parse(json: Data) {
    let decoder = JSONDecoder()

    if let jsonPetitions = try? decoder.decode(Petitions.self, from: json) {
        petitions = jsonPetitions.results
        tableView.reloadData()
    }
}
Place that method just underneath viewDidLoad() method, then replace the existing // we're OK to parse! line in viewDidLoad() with this:
parse(json: data)
This new parse() method does a few new and interesting things:
- It creates an instance of
JSONDecoder, which is dedicated to converting between JSON andCodableobjects. - It then calls the
decode()method on that decoder, asking it to convert ourjsondata into aPetitionsobject. This is a throwing call, so we usetry?to check whether it worked. - If the JSON was converted successfully, assign the
resultsarray to ourpetitionsproperty then reload the table view.
The one part you haven’t seen before is Petitions.self, which is Swift’s way of referring to the Petitions type itself rather than an instance of it. That is, we’re not saying “create a new one”, but instead specifying it as a parameter to the decoding so JSONDecoder knows what to convert the JSON too.
You can run the program now, although it just shows “Title goes here” and “Subtitle goes here” again and again, because our cellForRowAt method just inserts dummy data.
We want to modify this so that the cells print out the title value of our Petition object, but we also want to use the subtitle text label that got added when we changed the cell type from "Basic" to "Subtitle" in the storyboard. To do that, change the cellForRowAt method to this:
let petition = petitions[indexPath.row]
cell.textLabel?.text = petition.title
cell.detailTextLabel?.text = petition.body
Our custom Petition type has properties for title, body and signatureCount, so now we can read them out to configure our cell correctly.
If you run the app now, you'll see things are starting to come together quite nicely – every table row now shows the petition title, and beneath it shows the first few words of the petition's body. The subtitle automatically shows "…" at the end when there isn't enough room for all the text, but it's enough to give the user a flavor of what's going on.
Tip: If you don’t see any data, make sure you named all the properties in the Petition struct correctly – the Codable protocol matches those names against the JSON directly, so if you have a typo in “signatureCount” then it will fail.