Day 55
Day 55 관련

Project 14, part one
Ezra Koenig said “some people say video games rot your brain, but I think they work different muscles that maybe you don't normally use.” By now you should know I believe that idea extends further: making video games works different muscles that you wouldn’t otherwise use making apps or similar.
Yes, you might decide making games is what you want to do on iOS, and maybe you’ll even be lucky enough to get into Apple’s Arcade program. Of course, you’re also just as likely to decide that your goal is to make apps, but even then the skills you learn making games will prove useful.
In this project, the skills include loops, masking, GCD, and more – all the kinds of things you can use regardless of whether you decide games are for you. And of course the deeper skill is learning how to structure Swift to solve problems – practicing the art of understanding code flow across larger projects.
So, whether or not you decide to make games in the future, there’s lots to learn in this project!
Today you have three topics to work through, and you’ll learn about SKCropNode, SKTexture, and more.
Setting up
Setting up
It's time for another game, and we'll be using more of SpriteKit to build a whack-a-mole game, except with penguins because Whack-a-Penguin isn't trademarked. You're going to learn about SKCropNode, SKTexture and some more types of SKAction, and we'll also use more GCD to execute closures after a delay.
Create a new SpriteKit game project in Xcode, named Project14 and targeting landscape iPads, then delete most of the example code just like you did in project 11 – you want the same clean project, with no “Hello World” template content.
If you don’t remember all the steps, here’s the abridged version:
- Delete Actions.sks.
- Open GameScene.sks and delete the “Hello World” label.
- Change the scene’s anchor point to X:0 Y:0, its width to 1024 and its height to 768.
Finally, remove almost everything in GameScene.swift so that it looks like this:
import SpriteKit

class GameScene: SKScene {
    override func didMove(to view: SKView) {
    }

    override func touchesBegan(_ touches: Set<UITouch>, with event: UIEvent?) {
    }
}
I won’t be repeating those instructions again from now on.
Now download the files for this project from GitHub twostraws/HackingWithSwift and copy the assets from the Content folder into your Xcode project.
All set? Open up GameScene.swift and get whacking!
Reminder: When working with SpriteKit projects I strongly recommend you use a device if possible. If you don’t have a physical iPad to hand, use the lowest-spec iPad simulator rather than something like the 12.9-inch iPad Pro – you'll get much slightly frame rates, making it much more suitable for testing.
Getting up and running: SKCropNode
Getting up and running: SKCropNode
We already went over the basics of SpriteKit in project 11, so this time we're going to move a little faster – add these two properties to your GameScene class:
var gameScore: SKLabelNode!
var score = 0 {
    didSet {
        gameScore.text = "Score: \(score)"
    }
}
Blah blah property observers blah – this is old stuff to a Swift veteran like you, so I don't need to explain what that does.
Now modify your didMove(to:) method so it reads this:
override func didMove(to view: SKView) {
    let background = SKSpriteNode(imageNamed: "whackBackground")
    background.position = CGPoint(x: 512, y: 384)
    background.blendMode = .replace
    background.zPosition = -1
    addChild(background)

    gameScore = SKLabelNode(fontNamed: "Chalkduster")
    gameScore.text = "Score: 0"
    gameScore.position = CGPoint(x: 8, y: 8)
    gameScore.horizontalAlignmentMode = .left
    gameScore.fontSize = 48
    addChild(gameScore)
}
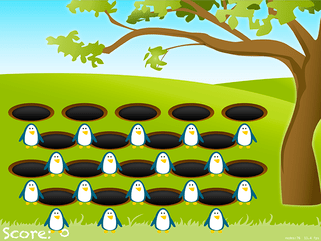
If you run the "game" now you'll see a grassy background with a tree on one side, plus the score label at the bottom left. We’re going to be doing much more with that in a moment, but first we need to fix one small but important bug: our game will look wrong on certain devices.
We set our game scene to have the size 1024x768, which will be sized correctly for most iPads. However, the 11-inch iPad Pro is a little bit special: it has an aspect ratio that’s ever so slightly different from the other iPads, and the default behavior of our Xcode template is to stretch the game so the edges get cut off.
Very often that solution is perfectly fine – the difference is only very slight, after all – but in this case we can ask SpriteKit to gently stretch our scene so that it fits the device dimensions no matter what aspect ratio.
To do that, open GameViewController.swift and find this line of code:
scene.scaleMode = .aspectFill
Now modify it to this:
scene.scaleMode = .fill
If you run the game again you’ll see it looks identical on iPad, iPad Air, and iPad Pro 12.9-inch, but it is ever so slightly stretched on the 11-inch iPad Pro – imperceptible, really, but it avoids our score lying off the screen.
Now that the small layout bug is fixed, the next job is to fill our game scene with holes, with a penguin in each hole. We want each hole to do as much work itself as possible, so rather than clutter our game scene with code we're going to create a subclass of SKNode that will encapsulate all hole related functionality.
Add a new file, choosing [iOS] > [Source] > [Cocoa Touch Class], make it a subclass of SKNode and name it "WhackSlot". You've already met SKSpriteNode, SKLabelNode and SKEmitterNode, and they all come from SKNode. This base class doesn't draw images like sprites or hold text like labels; it just sits in our scene at a position, holding other nodes as children.
Note: If you were wondering why we're not calling the class WhackHole it's because a slot is more than just a hole. It will contain a hole, yes, but it will also contain the penguin image and more.
When you create the subclass you will immediately get a compile error, because Swift claims not to know what SKNode is. This is easily fixed by adding the line import SpriteKit at the top of your file, just above the import UIKit.
To begin with, all we want the WhackSlot class to do is add a hole at its current position, so add this method to your new class:
func configure(at position: CGPoint) {
    self.position = position

    let sprite = SKSpriteNode(imageNamed: "whackHole")
    addChild(sprite)
}
You might wonder why we aren't using an initializer for this purpose, but the truth is that if you created a custom initializer you get roped into creating others because of Swift's required init rules. If you don't create any custom initializers (and don't have any non-optional properties) Swift will just use the parent class's init() methods.
We want to create four rows of slots, with five slots in the top row, then four in the second, then five, then four. This creates quite a pleasing shape, but as we're creating lots of slots we're going to need three things:
- An array in which we can store all our slots for referencing later.
- A
createSlot(at:)method that handles slot creation. - Four loops, one for each row.
The first item is easy enough – just add this property above the existing gameScore definition in GameScene.swift:
var slots = [WhackSlot]()
As for number two, that's not hard either – we need to create a method that accepts a position, then creates a WhackSlot object, calls its configure(at:) method, then adds the slot both to the scene and to our array:
func createSlot(at position: CGPoint) {
    let slot = WhackSlot()
    slot.configure(at: position)
    addChild(slot)
    slots.append(slot)
}
The only moderately hard part of this task is the four loops that call createSlot(at:) because you need to figure out what positions to use for the slots. Fortunately for you, I already did the design work, so I can tell you exactly where the slots should go! Put this just before the end of didMove(to:):
for i in 0 ..< 5 { createSlot(at: CGPoint(x: 100 + (i * 170), y: 410)) }
for i in 0 ..< 4 { createSlot(at: CGPoint(x: 180 + (i * 170), y: 320)) }
for i in 0 ..< 5 { createSlot(at: CGPoint(x: 100 + (i * 170), y: 230)) }
for i in 0 ..< 4 { createSlot(at: CGPoint(x: 180 + (i * 170), y: 140)) }
Remember that higher Y values in SpriteKit place nodes towards the top of the scene, so those lines create the uppermost slots first then work downwards.
In case you've forgotten, ..< is the half-open range operator, meaning that the first loop will count 0, 1, 2, 3, 4 then stop. The i is useful because we use that to calculate the X position of each slot.
So far this has all been stuff you've done before, so I tried to get through it as fast as I could. But it's now time to try something new: SKCropNode. This is a special kind of SKNode subclass that uses an image as a cropping mask: anything in the colored part will be visible, anything in the transparent part will be invisible.
By default, nodes don't crop, they just form part of a node tree. The reason we need the crop node is to hide our penguins: we need to give the impression that they are inside the holes, sliding out for the player to whack, and the easiest way to do that is just to have a crop mask shaped like the hole that makes the penguin invisible when it moves outside the mask.
The easiest way to demonstrate the need for SKCropNode is to give it a nil mask – this will effectively stop the crop node from doing anything, thus allowing you to see the trick behind our game.
In WhackSlot.swift, add a property to your class in which we'll store the penguin picture node:
var charNode: SKSpriteNode!
Now add this just before the end of the configure(at:) method:
let cropNode = SKCropNode()
cropNode.position = CGPoint(x: 0, y: 15)
cropNode.zPosition = 1
cropNode.maskNode = nil

charNode = SKSpriteNode(imageNamed: "penguinGood")
charNode.position = CGPoint(x: 0, y: -90)
charNode.name = "character"
cropNode.addChild(charNode)

addChild(cropNode)
Some parts of that are old and some are new, but all bear explaining.
First, we create a new SKCropNode and position it slightly higher than the slot itself. The number 15 isn't random – it's the exact number of points required to make the crop node line up perfectly with the hole graphics. We also give the crop node a zPosition value of 1, putting it to the front of other nodes, which stops it from appearing behind the hole.
We then do something that, right now, means nothing: we set the maskNode property of the crop node to be nil, which is the default value. It's there because we'll be changing it in just a moment.
We then create the character node, giving it the "good penguin" graphic, which is a blue color – the bad penguins are red, presumably because they are bubbling over with hellfire or something. This is placed at -90, which is way below the hole as if the penguin were properly hiding. And by "properly" you should read "bizarrely" because penguins aren't exactly known for hiding in holes in the countryside!
I hope you noticed the important thing, which is that the character node is added to the crop node, and the crop node was added to the slot. This is because the crop node only crops nodes that are inside it, so we need to have a clear hierarchy: the slot has the hole and crop node as children, and the crop node has the character node as a child.
If you run the game now you'll see that every hole now has a penguin directly beneath it. This is where the penguin is hiding, "in the hole", or at least would be if we gave the crop node a mask graphic. Now is probably a good time to select the whackMask.png graphic in the project navigator – it's a red square with a curved bottom to match the rim of the hole.
Remember, with crop nodes everything with a color is visible, and everything transparent is invisible, so the whackMask.png will show all parts of the character that are above the hole. Change the maskNode = nil line to load the actual mask instead:
cropNode.maskNode = SKSpriteNode(imageNamed: "whackMask")
If you run the game now, you'll see the penguins are invisible. They are still there, of course, but now can't be seen.s
Penguin, show thyself: SKAction moveBy(x:y:duration:)
Penguin, show thyself: SKAction moveBy(x:y:duration:)
We want the slots to manage showing and hiding penguins themselves as needed, which means we need to give them some properties and methods of their own.
The two things a slot needs to know are "am I currently visible to be whacked by the player?" and "have I already been hit?" The former avoids players tapping on slots that are supposed to be invisible; the latter so that players can't whack a penguin more than once.
To track this data, put these two properties at the top of your WhackSlot class:
var isVisible = false
var isHit = false
Showing a penguin for the player to tap on will be handled by a new method called show(). This will make the character slide upwards so it becomes visible, then set isVisible to be true and isHit to be false. The movement is going to be created by a new SKAction, called moveBy(x:y:duration:).
This method will also decide whether the penguin is good or bad – i.e., whether the player should hit it or not. This will be done using Swift’s Int.random() method: one-third of the time the penguin will be good; the rest of the time it will be bad.
To make it clear to the player which is which, we have two different pictures: penguinGood and penguinEvil. We can change the image inside our penguin sprite by changing its texture property. This takes a new class called SKTexture, which is to SKSpriteNode sort of what UIImage is to UIImageView – it holds image data, but isn't responsible for showing it.
Changing the character node's texture like this is helpful because it means we don't need to keep adding and removing nodes. Instead, we can just change the texture to match what kind of penguin this is, then change the node name to match so we can do tap detection later on.
However, all the above should only happen if the slot isn't already visible, because it could cause havoc. So, the very first thing the method needs to do is check whether isVisible is true, and if so exit.
Enough talk; here's the show() method:
func show(hideTime: Double) {
    if isVisible { return }

    charNode.run(SKAction.moveBy(x: 0, y: 80, duration: 0.05))
    isVisible = true
    isHit = false

    if Int.random(in: 0...2) == 0 {
        charNode.texture = SKTexture(imageNamed: "penguinGood")
        charNode.name = "charFriend"
    } else {
        charNode.texture = SKTexture(imageNamed: "penguinEvil")
        charNode.name = "charEnemy"
    }
}
You may have noticed that I made the method accept a parameter called hideTime. This is for later, to avoid having to rewrite too much code.
The show() method is going to be triggered by the view controller on a recurring basis, managed by a property we're going to create called popupTime. This will start at 0.85 (create a new enemy a bit faster than once a second), but every time we create an enemy we'll also decrease popupTime so that the game gets harder over time.
First, the easy bit: add this property to GameScene.swift:
var popupTime = 0.85
To jump start the process, we need to call createEnemy() once when the game starts, then have createEnemy() call itself thereafter. Clearly we don't want to start creating enemies as soon as the game starts, because the player needs a few moments to orient themselves so they have a chance.
So, in didMove(to:) we're going to call the (as yet unwritten) createEnemy() method after a delay. This requires some new Grand Central Dispatch (GCD) code: asyncAfter() is used to schedule a closure to execute after the time has been reached.
Here's how the code looks to run a closure after a delay:
DispatchQueue.main.asyncAfter(deadline: .now() + 1) { [weak self] in
    self?.doStuff()
}
The deadline parameter to asyncAfter() means “1 second after now,” giving us the 1-second delay.
Now, onto the createEnemy() method. This will do several things:
- Decrease
popupTimeeach time it's called. I'm going to multiply it by 0.991 rather than subtracting a fixed amount, otherwise the game gets far too fast. - Shuffle the list of available slots using the
shuffle()method we've used previously. - Make the first slot show itself, passing in the current value of
popupTimefor the method to use later. - Generate four random numbers to see if more slots should be shown. Potentially up to five slots could be shown at once.
- Call itself again after a random delay. The delay will be between
popupTimehalved andpopupTimedoubled. For example, ifpopupTimewas 2, the random number would be between 1 and 4.
There are only two new things in there. First, I'll be using the *= operator to multiply and assign at the same time, in the same way that += meant "add and assign" in project 2. Second, I'll be using the RandomDouble() function to generate a random Double value, which is what asyncAfter() uses for its delay.
Here's the method to create enemies:
func createEnemy() {
    popupTime *= 0.991

    slots.shuffle()
    slots[0].show(hideTime: popupTime)

    if Int.random(in: 0...12) > 4 { slots[1].show(hideTime: popupTime) }
    if Int.random(in: 0...12) > 8 {  slots[2].show(hideTime: popupTime) }
    if Int.random(in: 0...12) > 10 { slots[3].show(hideTime: popupTime) }
    if Int.random(in: 0...12) > 11 { slots[4].show(hideTime: popupTime)  }

    let minDelay = popupTime / 2.0
    let maxDelay = popupTime * 2
    let delay = Double.random(in: minDelay...maxDelay)

    DispatchQueue.main.asyncAfter(deadline: .now() + delay) { [weak self] in
        self?.createEnemy()
    }
}
Because createEnemy() calls itself, all we have to do is call it once in didMove(to: ) after a brief delay. Put this just before the end of the method:
DispatchQueue.main.asyncAfter(deadline: .now() + 1) { [weak self] in
    self?.createEnemy()
}
From then on, we don't have to worry about it because createEnemy() will call itself.
Before we're done, we need to upgrade the WhackSlot class to include a hide() method. If you run the code now, you'll see that the penguins appear nice and randomly, but they never actually go away. We're already passing a hideTime parameter to the show() method, and we're going to use that so the slots hide themselves after they have been visible for a time.
We could of course just make the slots hide after a fixed time, but that's no fun. By using popupTime as the input for hiding delay, we know the penguins will hide themselves more quickly over time.
First, add this method to the WhackSlot class:
func hide() {
    if !isVisible { return }

    charNode.run(SKAction.moveBy(x: 0, y: -80, duration: 0.05))
    isVisible = false
}
That just undoes the results of show(): the penguin moves back down the screen into its hole, then its isVisible property is set to false.
We want to trigger this method automatically after a period of time, and, through extensive testing (that is, sitting around playing) I have determined the optimal hide time to be 3.5x popupTime.
So, put this code at end of show():
DispatchQueue.main.asyncAfter(deadline: .now() + (hideTime * 3.5)) { [weak self] in
    self?.hide()
}
Go ahead and run the app, because it's really starting to come together: the penguins show randomly, sometimes by themselves and sometimes in groups, then hide after a period of being visible. But you can't hit them, which means this game is more Watch-a-Penguin than Whack-a-Penguin. Let's fix that!