Day 70
Day 70 관련

Project 20, part one
When Steve Jobs first announced the iPhone, he asked an important question: “how are we going to communicate with this?” His answer was as follows:
“We don’t want to carry around a mouse, right? So what are we going to do? Oh, a stylus, right? We’re going to use a stylus. No! Who wants a stylus? You have to get them and put them away, and you lose them – yuck. Nobody wants a stylus, so we’re not going to use a stylus. We’re going to use the best pointing device in the world. We’re going to use a pointing device we’re all born with, we’re born with ten of them – we’re going to use our fingers.”
It might sound odd today, but the idea of touching the screen with your fingers was pretty revolutionary back then, not least because most phone screens were small.
But these days – well over a decade after Jobs made that announcement – the feeling of manipulating apps by tapping your fingers on a thin layer of glass is still amazing, and the game we’re starting to build today is a good example of that.
In this game players will need to select and detonate groups of fireworks, which means tapping and swiping around the screen. You can try it in the simulator, of course, but it’s just not the same – if you’re able to use a real iPad for your tests please do!
Today you have three topics to work through, and you’ll learn about UIBezierPath, SKAction.follow(), for case let, and more.
Setting up
Setting up
In this game project we're going to let users create fireworks displays using their fingers. They'll need to touch fireworks of the same color, then shake their device to make them explode. Shaking an iPad isn't the most pleasant user experience, but I had to find some way of teaching you about shake gestures!
On the topic of what you'll learn, you're going to use sprite color blending, you're going to try the follow() SpriteKit action, you’ll learn to detect shake gestures, and you’ll also get more practice with Timer.
Create a new SpriteKit project in Xcode, name it project 20, and adjust its project setting so that it runs on landscape iPads. Now download the files for this project from GitHub twostraws/HackingWithSwift and drag the Content folder into your Xcode project.
You should, like always with SpriteKit, go through the cleaning process to make Apple’s template usable. Particularly important is cleaning up GameScene.sks: make sure its anchor point is X:0 Y:0 and its size is 1024x768.
As always, please use a real iPad device for this project, or if you must use the simulator then choose the lowest-spec iPad on the list.
Ready... aim... fire: Timer and follow()
Ready... aim... fire: Timer and follow()
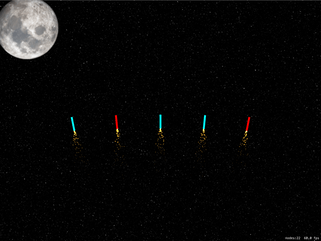
To get the game up and running quickly, we're going to work on the three methods required to launch some fireworks: didMove(to:) will create a timer that launches fireworks every six seconds, createFirework() will create precisely one firework at a specific position and launchFireworks() will call createFirework() to create firework spreads.
First, the easy stuff: we need to add some properties to our class:
- The
gameTimerproperty will be aTimer. We'll use this to call thelaunchFireworks()method every six seconds. - The
fireworksproperty will be an array ofSKNodeobjects. Fireworks, like the slots in project 14, will be a container node with other nodes inside them. This avoids accidental taps triggered by tapping on the fuse of a firework. - The
leftEdge,bottomEdge, andrightEdgeproperties are used to define where we launch fireworks from. Each of them will be just off screen to one side. - The
scoreproperty will track the player's score. I'm going to give you adidSetproperty observer but leave it blank for you to fill in later – you should know how to show a score label by now!
Add these properties now:
var gameTimer: Timer?
var fireworks = [SKNode]()

let leftEdge = -22
let bottomEdge = -22
let rightEdge = 1024 + 22

var score = 0 {
    didSet {
        // your code here
    }
}
To get the whole thing moving, we need to put in a background picture (the same way we've put in all the background pictures so far) and start up our Timer object. In our case, we're going to have it call launchFireworks() every six seconds, with repeating enabled. So, replace your current didMove(to:) with this:
override func didMove(to view: SKView) {
    let background = SKSpriteNode(imageNamed: "background")
    background.position = CGPoint(x: 512, y: 384)
    background.blendMode = .replace
    background.zPosition = -1
    addChild(background)

    gameTimer = Timer.scheduledTimer(timeInterval: 6, target: self, selector: #selector(launchFireworks), userInfo: nil, repeats: true)
}
That timer will carry on repeating until we tell it to stop, which in this project we won't – that'll be your job! Each time the timer fires, it will call launchFireworks(), which itself will call createFirework(). Initially we're going to write four types of firework “spreads” (different ways of launching fireworks) but this is something you could easily add more to later.
First, let's take a look at the createFirework() method. This needs to accept three parameters: the X movement speed of the firework, plus X and Y positions for creation. Inside the method there's a lot going on. It needs to:
- Create an
SKNodethat will act as the firework container, and place it at the position that was specified. - Create a rocket sprite node, give it the name "firework" so we know that it's the important thing, adjust its
colorBlendFactorproperty so that we can color it, then add it to the container node. - Give the firework sprite node one of three random colors: cyan, green or red. I've chosen cyan because pure blue isn't particularly visible on a starry sky background picture.
- Create a
UIBezierPaththat will represent the movement of the firework. - Tell the container node to follow that path, turning itself as needed.
- Create particles behind the rocket to make it look like the fireworks are lit.
- Add the firework to our
fireworksarray and also to the scene.
Here's that, just in Swift:
func createFirework(xMovement: CGFloat, x: Int, y: Int) {
    // 1
    let node = SKNode()
    node.position = CGPoint(x: x, y: y)

    // 2
    let firework = SKSpriteNode(imageNamed: "rocket")
    firework.colorBlendFactor = 1
    firework.name = "firework"
    node.addChild(firework)

    // 3
    switch Int.random(in: 0...2) {
    case 0:
        firework.color = .cyan

    case 1:
        firework.color = .green

    case 2:
        firework.color = .red

    default:
        break
    }

    // 4
    let path = UIBezierPath()
    path.move(to: .zero)
    path.addLine(to: CGPoint(x: xMovement, y: 1000))

    // 5
    let move = SKAction.follow(path.cgPath, asOffset: true, orientToPath: true, speed: 200)
    node.run(move)

    // 6
    if let emitter = SKEmitterNode(fileNamed: "fuse") {
        emitter.position = CGPoint(x: 0, y: -22)
        node.addChild(emitter)
    }

    // 7
    fireworks.append(node)
    addChild(node)
}
The coloring process is done using two new properties: color and colorBlendFactor. These two show off a simple but useful feature of SpriteKit, which is its ability to recolor your sprites dynamically with absolutely no performance cost. So, our rocket image is actually white, but by giving it .red with colorBlendFactor set to 1 (use the new color exclusively) it will appear red.
Step five is done using a new SKAction you haven't seen before: follow(). This takes a CGPath as its first parameter (we'll pull this from the UIBezierPath) and makes the node move along that path. It doesn't have to be a straight line like we're using, any bezier path is fine.
The follow() method takes three other parameters, all of which are useful. The first decides whether the path coordinates are absolute or are relative to the node's current position. If you specify asOffset as true, it means any coordinates in your path are adjusted to take into account the node's position.
The third parameter to follow() is orientToPath and makes a complicated task into an easy one. When it's set to true, the node will automatically rotate itself as it moves on the path so that it's always facing down the path. Perfect for fireworks, and indeed most things! Finally, you can specify a speed to adjust how fast it moves along the path.
Now comes the launchFireworks() method, which will launch fireworks five at a time in four different shapes. As a result this method is quite long because it needs to call createFirework() 20 times, but really it's not difficult at all.
The method will generate a random number between 0 and 3 inclusive. If it's zero, we launch the fireworks straight up; if it's one, we fire them in a fan from the center outwards; if it's two we fire them from the left edge to the right; it it's three we fire them from the right edge to the left.
Regardless of the direction of travel, the createFirework() call is much the same: how much should the firework move horizontally, and what should its starting X/Y coordinates be. Put this method into your project, then we'll look at it again:
@objc func launchFireworks() {
    let movementAmount: CGFloat = 1800

    switch Int.random(in: 0...3) {
    case 0:
        // fire five, straight up
        createFirework(xMovement: 0, x: 512, y: bottomEdge)
        createFirework(xMovement: 0, x: 512 - 200, y: bottomEdge)
        createFirework(xMovement: 0, x: 512 - 100, y: bottomEdge)
        createFirework(xMovement: 0, x: 512 + 100, y: bottomEdge)
        createFirework(xMovement: 0, x: 512 + 200, y: bottomEdge)

    case 1:
        // fire five, in a fan
        createFirework(xMovement: 0, x: 512, y: bottomEdge)
        createFirework(xMovement: -200, x: 512 - 200, y: bottomEdge)
        createFirework(xMovement: -100, x: 512 - 100, y: bottomEdge)
        createFirework(xMovement: 100, x: 512 + 100, y: bottomEdge)
        createFirework(xMovement: 200, x: 512 + 200, y: bottomEdge)

    case 2:
        // fire five, from the left to the right
        createFirework(xMovement: movementAmount, x: leftEdge, y: bottomEdge + 400)
        createFirework(xMovement: movementAmount, x: leftEdge, y: bottomEdge + 300)
        createFirework(xMovement: movementAmount, x: leftEdge, y: bottomEdge + 200)
        createFirework(xMovement: movementAmount, x: leftEdge, y: bottomEdge + 100)
        createFirework(xMovement: movementAmount, x: leftEdge, y: bottomEdge)

    case 3:
        // fire five, from the right to the left
        createFirework(xMovement: -movementAmount, x: rightEdge, y: bottomEdge + 400)
        createFirework(xMovement: -movementAmount, x: rightEdge, y: bottomEdge + 300)
        createFirework(xMovement: -movementAmount, x: rightEdge, y: bottomEdge + 200)
        createFirework(xMovement: -movementAmount, x: rightEdge, y: bottomEdge + 100)
        createFirework(xMovement: -movementAmount, x: rightEdge, y: bottomEdge)

    default:
        break
    }
}
You'll notice I made movementAmount into a constant. This is because I was testing various values to find one that worked best, so having it in a constant made it easy to adjust with trial and error.
As you can see in the code, each firework is fired from different positions so that you get a nice spread on the screen. For example, firing a fan creates one firework on the far left and moving to the left, one in the center left and moving to the left, one in the center moving straight up, and so on.
With that code, you're now able to run the game and see how it works – after a few seconds the first fireworks will start, then they'll continue launches as the timer continues to fire.
Swipe to select
Swipe to select
Now that you can see fireworks shooting across your screen, it's time to reveal the difficulty element. You see, every game needs some challenge, and in our case the challenge is to destroy fireworks in groups of the same color. We're going to make it so that players can select only one color of firework at a time, so if they choose two red then touch a green, the two red will become deselected.
So, the challenge will be to select and detonate fireworks based on their color, and as you'll see shortly we're going to heavily bias scores so that players receive many more points for larger groups.
What we're going to code now is the touch handling method, checkTouches(). We're going to call this from touchesBegan() and touchesMoved() so that users can either tap to select fireworks or just swipe across the screen.
The method needs to start by figuring out where in the scene the player touches, and what nodes are at that point. It will then loop through all nodes under the point to find any with the name "firework". When it finds one, it will set its name to be "selected" rather than "firework" and change its colorBlendFactor value to 0. That will disable the color blending entirely, making the firework white.
To make this code a little cleaner I want to introduce you to a new piece of Swift syntax that is a bit confusing at first because it uses three keywords back to back: for case let.
You see, when we ask for all the nodes under the users finger we’ll get back an array of SKNode, and that’s not good enough – we can’t set the color blend factor of an SKNode, because it might not have a texture. Instead, what we want to do is go over only the sprite nodes in the returned array – we want to run the body of our loop only for sprite nodes, not for the other items.
This is where for case let comes in: it lets us attempts some work (typecasting to SKSpriteNode in this case), and run the loop body only for items that were successfully typecast.
So, rather than writing this:
for node in nodesAtPoint {
We write this:
for case let node as SKSpriteNode in nodesAtPoint {
The let node part creates a new constant called node, the case…as SKSpriteNode part means “if we can typecast this item as a sprite node, and of course the for loop is the loop itself.
Here's the checkTouches() method with that functionality in there:
func checkTouches(_ touches: Set<UITouch>) {
    guard let touch = touches.first else { return }

    let location = touch.location(in: self)
    let nodesAtPoint = nodes(at: location)

    for case let node as SKSpriteNode in nodesAtPoint {
        guard node.name == "firework" else { continue }
        node.name = "selected"
        node.colorBlendFactor = 0
    }
}
Apart from the for case let you've seen most of that previously, but that's because I missed out the logic to handle ensuring that players select only one color at a time. The above code will let them select all the fireworks, regardless of color.
So, we need to insert a second loop just before the node.name = "selected" line. When you place one loop inside another it's called an inner loop, and you need to be careful: if you have one loop that executes 100 times it's OK, and if you have another loop that executes 200 times that's OK too, but if you put one inside the other you now have 20,000 iterations of your loop and that's almost certainly not OK. Here, though, we'll have maybe two or three items in our outer loop and a maximum of 10 or so in the inner, so we're quite safe.
Remember, this inner loop needs to ensure that the player can select only one firework color at a time. So if they select red then another red, both are selected. But if they then select a green, we need to deselect the first two because they are red.
So, the loop will go through every firework in our fireworks array, then find the firework image inside it. Remember, that array holds the container node, and each container node holds the firework image and its spark emitter. If the firework was selected and is a different color to the firework that was just tapped, then we'll put its name back to "firework" and put its colorBlendFactor back to 1 so it resumes its old color.
So, put this code just before the node.name = "selected" line:
for parent in fireworks {
    guard let firework = parent.children.first as? SKSpriteNode else { continue }

    if firework.name == "selected" && firework.color != node.color {
        firework.name = "firework"
        firework.colorBlendFactor = 1
    }
}
That's the entire method, so all we need to do is make sure it's called. To make that happen, we need to modify the existing touchesBegan() method and add one for touchesMoved() too. All they will do is send the touch information on to checkTouches(), like this:
override func touchesBegan(_ touches: Set<UITouch>, with event: UIEvent?) {
    super.touchesBegan(touches, with: event)
    checkTouches(touches)
}

override func touchesMoved(_ touches: Set<UITouch>, with event: UIEvent?) {
    super.touchesMoved(touches, with: event)
    checkTouches(touches)
}
There's one more thing we need to code before moving on, and that's some additions to the update() method. This is because we need to handle the fireworks that the player doesn't destroy, and our solution is simple enough: if they get past 900 points up vertically, we consider them dead and remove them from the fireworks array and from the scene.
There is one curious quirk here, and it's down to how you remove items from an array. When removing items, we're going to loop through the array backwards rather than forwards. The reason for is that array items move down when you remove an item, so if you have 1, 2, 3, 4 and remove 3 then 4 moves down to become 3. If you're counting forwards, this is a problem because you just checked three and want to move on, but there's now a new 3 and possibly no longer a 4! If you're counting backwards, you just move on to 2.
Note: I chose 900 rather than 800 to mean "off screen vertically" because it's nice to give players a little extra time when making important actions. It's possible that the top firework is at 890 and the bottom one still on screen and being manipulated, so at least this way the player has the best possible window in which to make all their selections.
Here's the new update() method:
override func update(_ currentTime: TimeInterval) {
    for (index, firework) in fireworks.enumerated().reversed() {
        if firework.position.y > 900 {
            // this uses a position high above so that rockets can explode off screen
            fireworks.remove(at: index)
            firework.removeFromParent()
        }
    }
}