Day 24
Day 24 관련

Project 4, part one
Alexis Ohanian, the founder of Reddit, once said “to join in the industrial revolution, you needed to open a factory; in the Internet revolution, you need to open a laptop.” Well, thanks to iOS we have something even easier: you just need to tap a button on your iPhone.
Apple gives us the ability to render any kind of web content just like Safari does, all powered through its open source WebKit framework. This is cross-platform, meaning that we can use it on macOS and iOS just the same, and it’s also blazingly fast as you’ll see in a moment.
In this project we’re going to build a simple web browser using WebKit. The whole thing takes only about 60 lines of code once you remove comments and empty lines, which shows you just how easy to use WebKit is.
Today you have three topics to work through, and you’ll meet WKWebView, action sheets, and more.
Setting up
Setting up
In this project you're going to build on your new knowledge of UIBarButtonItem and UIAlertController by producing a simple web browser app. Yes, I realize this is another easy project, but learning is as much about tackling new challenges as going over what you've already learned.
To sweeten the deal, I'm going to use this opportunity to teach you lots of new things: WKWebView (Apple's extraordinary web widget), UIToolbar (a toolbar component that holds UIBarButtonItems), UIProgressView, delegation, key-value observing, and how to create your views in code. Plus, this is the last easy app project, so enjoy it while it lasts!
To get started, create a new Xcode project using the Single View App template, and call it Project4. Make sure Swift is selected for the language, then save the project on your desktop.
Open up Main.storyboard, select the view controller, and choose [Editor] > [Embed In] > [Navigation Controller] – that's our storyboard finished. Nice!
Creating a simple browser with WKWebView
Creating a simple browser with WKWebView
In our first two projects we used Interface Builder for a lot of layout work, but here our layout will be so simple that we can do the entire thing in code. You see, before we were adding buttons and images to our view, but in this project the web view is going to take up all the space so it might as well be the view controller's main view.
So far, we've been using the viewDidLoad() method to configure our view once its layout has loaded. This time we need to override the actual loading of the view because we don't want that empty thing on the storyboard, we want our own code. It will still be placed inside the navigation controller, but the rest is up to us.
iOS has two different ways of working with web views, but the one we’ll be using for this project is called WKWebView. It’s part of the WebKit framework rather than the UIKit framework, but we can import it by adding this line to the top of ViewController.swift:
import WebKit
When we create the web view, we need to store it as a property so we can reference it later on. So, add this property to the class now:
var webView: WKWebView!
Finally, add this new method before viewDidLoad():
override func loadView() {
    webView = WKWebView()
    webView.navigationDelegate = self
    view = webView
}
Tha t code will trigger a compiler error for now, but we’ll fix it in a moment.
Note: You don’t need to put loadView() before viewDidLoad(), and in fact you could put it anywhere between class ViewController: UIViewController { down to the last closing brace in the file. However, I encourage you to structure your methods in an organized way, and because loadView() gets called before viewDidLoad() it makes sense to position the code above it too.
Anyway, there are only three things we care about, because by now you should understand why we need to use the override keyword. (Hint: it's because there's a default implementation, which is to load the layout from the storyboard.)
First, we create a new instance of Apple's WKWebView web browser component and assign it to the webView property. Third, we make our view (the root view of the view controller) that web view.
Yes, I missed out the second line, and that's because it introduces new concept: delegation. Delegation is what's called a programming pattern – a way of writing code – and it's used extensively in iOS. And for good reason: it's easy to understand, easy to use, and extremely flexible.
A delegate is one thing acting in place of another, effectively answering questions and responding to events on its behalf. In our example, we're using WKWebView: Apple's powerful, flexible and efficient web renderer. But as smart as WKWebView is, it doesn't know (or care) how our application wants to behave, because that's our custom code.
The delegation solution is brilliant: we can tell WKWebView that we want to be informed when something interesting happens. In our code, we're setting the web view's navigationDelegate property to self, which means "when any web page navigation happens, please tell me – the current view controller.”
When you do this, two things happen:
- You must conform to the protocol. This is a fancy way of saying, "if you're telling me you can handle being my delegate, here are the methods you need to implement." In the case of
navigationDelegate, all these methods are optional, meaning that we don't need to implement any methods. - Any methods you do implement will now be given control over the
WKWebView's behavior. Any you don't implement will use the default behavior ofWKWebView.
Before we go any further, it’s time to fix the compilation error. When you set any delegate, you need to conform to the protocol that matches the delegate. Yes, all the navigationDelegate protocol methods are optional, but Swift doesn't know that yet. All it knows is that we're promising we're a suitable delegate for the web view, and yet haven't implemented the protocol.
The fix for this is simple, but I'm going to hijack it to introduce something else at the same time, because this is an opportune moment. First, the fix: find this line:
class ViewController: UIViewController {
…and change it to this:
class ViewController: UIViewController, WKNavigationDelegate {
That's the fix. But what I want to discuss is the way ViewController now appears to inherit from two things, which isn’t possible in Swift. As you know, when we say class A: B we’re defining a new class called A that builds on the functionality provided by class B. However, when we say class A: B, C we’re saying it inherits from UIViewController (the first item in the list), and promises it implements the WKNavigationDelegate protocol.
The order here really is important: the parent class (superclass) comes first, then all protocols implemented come next, all separated by commas. We're saying that we conform to only one protocol here (WKNavigationDelegate) but you can specify as many as you need to.
So, the complete meaning of this line is "create a new subclass of UIViewController called ViewController, and tell the compiler that we promise we’re safe to use as a WKNavigationDelegate."
This program is almost doing something useful, so before you run it let's add three more lines. Please place these in the viewDidLoad() method, just after the super call:
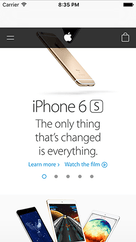
let url = URL(string: "https://www.hackingwithswift.com")!
webView.load(URLRequest(url: url))
webView.allowsBackForwardNavigationGestures = true
The first line creates a new data type called URL, which is Swift’s way of storing the location of files. You’re probably already familiar with URLs as being used online, like with https://www.hackingwithswift.com, but they are just as important for storing local filenames too – they are flexible little things!
Even though we’re used to URLs being strings of text, Swift stores URLs in a specific URL data type that adds a lot of extra functionality. So, that first line of code creates a new URL out of the string “https://www.hackingwithswift.com”. I'm using hackingwithswift.com as an example website, but please change it to something you like.
Warning: you need to ensure you use https:// for your websites, because iOS does not like apps sending or receiving data insecurely. If this is something you want to override, I wrote an article specifically about App Transport Security: </example-code/system/how-to-handle-the-https-requirements-in-ios-9-with-app-transport-security>.
The second line does two things: it creates a new URLRequest object from that URL, and gives it to our web view to load.
Now, this probably seems like pointless obfuscation from Apple, but WKWebViews don't load websites from strings like www.hackingwithswift.com, or even from a URL made out of those strings. You need to turn the string into a URL, then put the URL into an URLRequest, and WKWebView will load that. Fortunately it's not hard to do!
Warning: Your URL must be complete, and valid, in order for this process to work. That means including the https:// part.
The third line enables a property on the web view that allows users to swipe from the left or right edge to move backward or forward in their web browsing. This is a feature from the Safari browser that many users rely on, so it's nice to keep it around.
It’s time to run the app, so please press Cmd+R to run your app, and you should be able to view your website. Step one done!
Choosing a website: UIAlertController action sheets
Choosing a website: UIAlertController action sheets
We're going to lock this app down so that it opens websites selected by the user. The first step to doing this is to give the user the option to choose from one of our selected websites, and that means adding a button to the navigation bar.
Somewhere in viewDidLoad() (but always after it has called super.viewDidLoad()), add this:
navigationItem.rightBarButtonItem = UIBarButtonItem(title: "Open", style: .plain, target: self, action: #selector(openTapped))
We did exactly this in the previous project, except here we're using a custom title for our bar button rather than a system icon. It’s going to call the openTapped() method when the button is tapped, so let's add that now. Put this method below viewDidLoad():
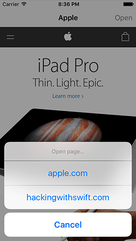
@objc func openTapped() {
    let ac = UIAlertController(title: "Open page…", message: nil, preferredStyle: .actionSheet)
    ac.addAction(UIAlertAction(title: "apple.com", style: .default, handler: openPage))
    ac.addAction(UIAlertAction(title: "hackingwithswift.com", style: .default, handler: openPage))
    ac.addAction(UIAlertAction(title: "Cancel", style: .cancel))
    ac.popoverPresentationController?.barButtonItem = self.navigationItem.rightBarButtonItem
    present(ac, animated: true)
}
We haven’t written the openPage() method yet, so ignore any warnings you see about it for the time being. Just like in project 3 we’re calling openTapped() from Apple’s own Objective-C code in UIBarButtonItem, so the method must be marked @objc.
Just like in project 3, setting the alert controller’s popoverPresentationController?.barButtonItem property is used only on iPad, and tells iOS where it should make the action sheet be anchored.
We used the UIAlertController class in project 2, but here it's slightly different for three reason:
- We're using
nilfor the message, because this alert doesn't need one. - We're using the
preferredStyleof.actionSheetbecause we're prompting the user for more information. - We're adding a dedicated Cancel button using style
.cancel. It doesn’t provide ahandlerparameter, which means iOS will just dismiss the alert controller if it’s tapped.
Both our website buttons point to the openPage() method, which, again, doesn't exist yet. This is going to be very similar to how we loaded the web page before, but now you will at least see why the handler method of UIAlertAction takes a parameter telling you which action was selected!
Add this method directly beneath the openTapped() method you just made:
func openPage(action: UIAlertAction) {
    let url = URL(string: "https://" + action.title!)!
    webView.load(URLRequest(url: url))
}
This method takes one parameter, which is the UIAlertAction object that was selected by the user. Obviously it won't be called if Cancel was tapped, because that had a nil handler rather than openPage.
What the method does is use the title property of the action (apple.com, hackingwithswift.com), put "https://" in front of it to satisfy App Transport Security, then construct a URL out of it. It then wraps that inside an URLRequest, and gives it to the web view to load. All you need to do is make sure the websites in the UIAlertController are correct, and this method will load anything.
You can go ahead and test the app now, but there's one small change we can add to make the whole experience more pleasant: setting the title in the navigation bar. Now, we are the web view's navigation delegate, which means we will be told when any interesting navigation happens, such as when the web page has finished loading. We're going to use this to set the navigation bar title.
As soon as we told Swift that our ViewController class conformed to the WKNavigationDelegate protocol, Xcode updated its code completion system to support all the WKNavigationDelegate methods that can be called. As a result, if you go below the openPage() method and start typing "web" you'll see a list of all the WKNavigationDelegate methods we can use.
Scroll through the list of options until you see didFinish and press return to have Xcode fill in the method for you. Now modify it to this:
func webView(_ webView: WKWebView, didFinish navigation: WKNavigation!) {
    title = webView.title
}
All this method does is update our view controller's title property to be the title of the web view, which will automatically be set to the page title of the web page that was most recently loaded.
Press Cmd+R now to run the app, and you'll see things are starting to come together: your initial web page will load, and when the load finishes you'll see its page title in the navigation bar.
UIAlertController is an easy way to let users choose which website to visit.Remember to tell others about your progress – it keeps you engaged in learning, and you’ll be back for more tomorrow!