Day 68
Day 68 관련

Project 19, part two
Yesterday we did a lot of set up work, but now it’s time for the pay off: we’re going to send custom JavaScript code back to Safari and have it executed, giving our (hypothetical!) users the ability to manipulate web pages right on their phone.
I’m not going to pretend that Apple’s actions API is pleasant, and I’m certainly not going to argue that you need to like using JavaScript. As Jeremy Foster once said, “every developer loves and hates JavaScript a little bit” – it’s something we all need to be aware of, and perhaps even be able to write to some level, but it’s by no means required.
The point of this project isn’t to teach you JavaScript, but instead to show you what’s possible with iOS. The overwhelming majority of iPhone owners use Safari, and in just two days you’ll have finished building an app that adds functionality directly to it – what common problems can you solve?
Today you have three topics to work through, and you’ll learn about UITextView, NotificationCenter, and more.
Establishing communication
Establishing communication
To begin with, all we're going to do is send some data from Safari to our extension to make sure everything is set up correctly – after all, it's been quite a bit of hassle so far with nothing to show for it!
First, we're going to modify Action.js to send two pieces of data to our extension: the URL the user was visiting, and the title of the page. Go to Action.js and modify the run() function to this:
run: function(parameters) {
    parameters.completionFunction({"URL": document.URL, "title": document.title });
},
JavaScript is quite a murky language, so you might be staring at that blankly. If I were to put it in plain English, what it means is "tell iOS the JavaScript has finished preprocessing, and give this data dictionary to the extension." The data that is being sent has the keys "URL" and "title", with the values being the page URL and page title.
As with the previous JavaScript, don't worry about the nitty-gritty. There are many volumes of books on learning JavaScript and I don't intend to repeat them here.
Now that data is being sent from JavaScript, data will be received in Swift. In ActionViewController.swift, replace the // do stuff! comment with this:
guard let itemDictionary = dict as? NSDictionary else { return }
guard let javaScriptValues = itemDictionary[NSExtensionJavaScriptPreprocessingResultsKey] as? NSDictionary else { return }
print(javaScriptValues)
Before I explain what that code does, please run the code. I'm saying this because if you're like me then you're probably desperate to see anything working at this point, so let's at least make sure things are working. When you press [Run], wait for the list of host applications to finish loading, then select Safari and click [Run].
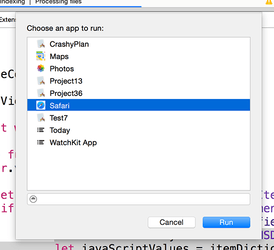
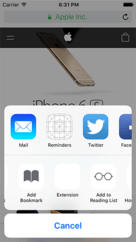
When Safari loads, go to any web page, then tap the action toolbar button on the bottom – it's the box with an arrow coming out. You'll see two rows of icons: swipe to the right on the bottom row. If your extension isn't listed, click [More] and enable it there. Don't be surprised if you see strange messages being printed out in the Xcode debug console while you're doing this, because Apple sometimes likes to spout unhelpful warnings in their own code.
In the picture below you can see where your extension's icon should appear inside Safari's action menu. If you don't see it there, tap [More].
When your app runs, you should see messages in the console at the bottom of your Xcode window. If the console isn't visible, use Shift+Cmd+C to activate it, and you should see something like this:
{
    URL = "https://www.apple.com/retail/code/";
    title = "Apple Retail Store - Hour of Code Workshop";
}
If you're seeing that, well done – your extension is working! If not, you screwed up somewhere, so check my steps again.
Let's take a look at the code. As a reminder, here it is again:
guard let itemDictionary = dict as? NSDictionary else { return }
guard let javaScriptValues = itemDictionary[NSExtensionJavaScriptPreprocessingResultsKey] as? NSDictionary else { return }
print(javaScriptValues)
NSDictionary is a new data type, and it’s not really one you have much cause to use in Swift that often because it’s a bit of a holdover from older iOS code. Put simply, NSDictionary works like a Swift dictionary, except you don't need to declare or even know what data types it holds. One of the nasty things about NSDictionary is that you don't need to declare or even know what data types it holds.
Yes, it's both an advantage and a disadvantage in one, which is why modern Swift dictionaries are preferred. When working with extensions, however, it's definitely an advantage because we just don't care what's in there – we just want to pull out our data.
When you use loadItem(forTypeIdentifier:), your closure will be called with the data that was received from the extension along with any error that occurred. Apple could provide other data too, so what we get is a dictionary of data that contains all the information Apple wants us to have, and we put that into itemDictionary.
Right now, there's nothing in that dictionary other than the data we sent from JavaScript, and that's stored in a special key called NSExtensionJavaScriptPreprocessingResultsKey. So, we pull that value out from the dictionary, and put it into a value called javaScriptValues.
We sent a dictionary of data from JavaScript, so we typecast javaScriptValues as an NSDictionary again so that we can pull out values using keys, but for now we just send the whole lot to the print() function, which dumps the dictionary contents to Xcode's debug console.
So, we've successfully proved that Safari is sending data to our extension; it's time to do something interesting with it!
Editing multiline text with UITextView
Editing multiline text with UITextView
Our extension is going to let users type in JavaScript, so before we get onto more coding we're going to add a basic user interface. Open MainInterface.storyboard, then delete its UIImageView and navigation bar. Once that's done, embed the view controller in a navigation controller.
Note: When you delete the image view, it’s possible Xcode might leave its connection intact. This will cause you problems later, so I suggest you double check the image view is really dead: right-click on the yellow view controller circle above your view, and if you see an outlet called “imageView” click the [X] next to it to clear the connection.
We're going to use a new UIKit component called UITextView. You already met UITextField in project 5, and it's useful for letting users enter text into a single-line text box. But if you want multiple lines of text you need UITextView, so search for "textview" in the object library and drag one into your view so that it takes up all the space. Delete the template "Lorem ipsum" text that is in there.
Go to the Editor menu and use [Resolve Layout Issues > Reset To Suggested Constraints] to add automatic Auto Layout constraints. Now use the assistant editor to create an outlet named script for the text view in ActionViewController.swift, and while you're there you can delete the UIImageView outlet that Xcode made for you.
This text view is going to contain code rather than writing, so we don’t want any of Apple’s “helpful” text correction systems in place. To turn them off, select the text view then go to the attributes inspector – you want to to set Capitalization to None, then Correction, Smart Dashes, Smart Insert, Smart Quotes, and Spell Checking all to No.
That's everything for Interface Builder, so switch back to the standard editor, open ActionViewController.swift and add these two properties to your class:
var pageTitle = ""
var pageURL = ""
We're going to store these two because they are being transmitted by Safari. We'll use the page title to show useful text in the navigation bar, and the URL is there for you to use yourself if you make improvements.
You already saw that we're receiving the data dictionary from Safari, because we used the print() function to output its values. Replace the print() call with this:
self?.pageTitle = javaScriptValues["title"] as? String ?? ""
self?.pageURL = javaScriptValues["URL"] as? String ?? ""

DispatchQueue.main.async {
    self?.title = self?.pageTitle
}
That sets our two properties from the javaScriptValues dictionary, typecasting them as String. It then uses async() to set the view controller's title property on the main queue. This is needed because the closure being executed as a result of loadItem(forTypeIdentifier:) could be called on any thread, and we don't want to change the UI unless we're on the main thread.
You might have noticed that I haven't written [weak self] in for the async() call, and that's because it's not needed. The closure will capture the variables it needs, which includes self, but we're already inside a closure that has declared self to be weak, so this new closure will use that.
We can immediately make our app useful by modifying the done() method. It's been there all along, but I've been ignoring it because there's so much other prep to do just to get out of first gear, but it's now time to turn our eyes towards it and add some functionality.
The done() method was originally called as an action from the storyboard, but we deleted the navigation bar Apple put in because it's terrible. Instead, let's create a UIBarButtonItem in code, and make that call done() instead. Put this in viewDidLoad():
navigationItem.rightBarButtonItem = UIBarButtonItem(barButtonSystemItem: .done, target: self, action: #selector(done))
Right now, done() just has one line of code, which is this:
self.extensionContext!.completeRequest(returningItems: self.extensionContext!.inputItems, completionHandler: nil)
Calling completeRequest(returningItems:) on our extension context will cause the extension to be closed, returning back to the parent app. However, it will pass back to the parent app any items that we specify, which in the current code is the same items that were sent in.
In a Safari extension like ours, the data we return here will be passed in to the finalize() function in the Action.js JavaScript file, so we're going to modify the done() method so that it passes back the text the user entered into our text view.
To make this work, we need to:
- Create a new
NSExtensionItemobject that will host our items. - Create a dictionary containing the key "customJavaScript" and the value of our script.
- Put that dictionary into another dictionary with the key
NSExtensionJavaScriptFinalizeArgumentKey. - Wrap the big dictionary inside an
NSItemProviderobject with the type identifierkUTTypePropertyList. - Place that
NSItemProviderinto ourNSExtensionItemas its attachments. - Call
completeRequest(returningItems:), returning ourNSExtensionItem.
I realize that seems like far more effort than it ought to be, but it's really just the reverse of what we are doing inside viewDidLoad().
With all that in mind, rewrite your done() method to this:
@IBAction func done() {
    let item = NSExtensionItem()
    let argument: NSDictionary = ["customJavaScript": script.text]
    let webDictionary: NSDictionary = [NSExtensionJavaScriptFinalizeArgumentKey: argument]
    let customJavaScript = NSItemProvider(item: webDictionary, typeIdentifier: kUTTypePropertyList as String)
    item.attachments = [customJavaScript]

    extensionContext?.completeRequest(returningItems: [item])
}
That's all the code required to send data back to Safari, at which point it will appear inside the finalize() function in Action.js. From there we can do what we like with it, but in this project the JavaScript we need to write is remarkably simple: we pull the "customJavaScript" value out of the parameters array, then pass it to the JavaScript eval() function, which executes any code it finds.
Open Action.js, and change the finalize() function to this:
finalize: function(parameters) {
    var customJavaScript = parameters["customJavaScript"];
    eval(customJavaScript);
}
That's it! Our user has written their code in our extension, tapped Done, and it gets executed in Safari using eval(). If you want to give it a try, enter the code alert(document.title); into the extension. When you tap Done, you'll return to Safari and see the page title in a message box.
Fixing the keyboard: NotificationCenter
Fixing the keyboard: NotificationCenter
Before we're done, there's a bug in our extension, and it's a bad one – or at least it's bad once you spot it. You see, when you tap to edit a text view, the iOS keyboard automatically appears so that user can start typing. But if you try typing lots, you'll notice that you can actually type underneath the keyboard because the text view hasn't adjusted its size because the keyboard appeared.
If you don't see a keyboard when you tap to edit, it probably means you have the Connect Hardware Keyboard setting turned on. Press Shift+Cmd+K to disable the hardware keyboard and use the on-screen one.
Having our view adjust to the presence of a keyboard is tricky, because there are a number of situations you need to cope with. For example, various keyboards are different heights, the user can rotate their device at will, they can connect a hardware keyboard when they need to, and there's even the QuickType bar that can be shown or hidden on demand.
In all the years I've done iOS development, I've seen at least a dozen ways of coping with keyboards, and few of them are easy. Even Apple's example solution requires fiddling around with constraints, which isn't ideal. I've tried to put together a solution that copes with all possibilities and also requires as little code as possible. If you manage to find something even simpler, do let me know!
We can ask to be told when the keyboard state changes by using a new class called NotificationCenter. Behind the scenes, iOS is constantly sending out notifications when things happen – keyboard changing, application moving to the background, as well as any custom events that applications post. We can add ourselves as an observer for certain notifications and a method we name will be called when the notification occurs, and will even be passed any useful information.
When working with the keyboard, the notifications we care about are keyboardWillHideNotification and keyboardWillChangeFrameNotification. The first will be sent when the keyboard has finished hiding, and the second will be shown when any keyboard state change happens – including showing and hiding, but also orientation, QuickType and more.
It might sound like we don't need keyboardWillHideNotification if we have keyboardWillChangeFrameNotification, but in my testing just using keyboardWillChangeFrameNotification isn't enough to catch a hardware keyboard being connected. Now, that's an extremely rare case, but we might as well be sure!
To register ourselves as an observer for a notification, we get a reference to the default notification center. We then use the addObserver() method, which takes four parameters: the object that should receive notifications (it's self), the method that should be called, the notification we want to receive, and the object we want to watch. We're going to pass nil to the last parameter, meaning "we don't care who sends the notification."
So, add this code to viewDidLoad():
let notificationCenter = NotificationCenter.default
notificationCenter.addObserver(self, selector: #selector(adjustForKeyboard), name: UIResponder.keyboardWillHideNotification, object: nil)
notificationCenter.addObserver(self, selector: #selector(adjustForKeyboard), name: UIResponder.keyboardWillChangeFrameNotification, object: nil)
The adjustForKeyboard() method is complicated, but that's because it has quite a bit of work to do. First, it will receive a parameter that is of type Notification. This will include the name of the notification as well as a Dictionary containing notification-specific information called userInfo.
When working with keyboards, the dictionary will contain a key called UIResponder.keyboardFrameEndUserInfoKey telling us the frame of the keyboard after it has finished animating. This will be of type NSValue, which in turn is of type CGRect. The CGRect struct holds both a CGPoint and a CGSize, so it can be used to describe a rectangle.
One of the quirks of Objective-C was that arrays and dictionaries couldn't contain structures like CGRect, so Apple had a special class called NSValue that acted as a wrapper around structures so they could be put into dictionaries and arrays. That's what's happening here: we're getting an NSValue object, but we know it contains a CGRect inside so we use its cgRectValue property to read that value.
Once we finally pull out the correct frame of the keyboard, we need to convert the rectangle to our view's co-ordinates. This is because rotation isn't factored into the frame, so if the user is in landscape we'll have the width and height flipped – using the convert() method will fix that.
The next thing we need to do in the adjustForKeyboard() method is to adjust the contentInset and scrollIndicatorInsets of our text view. These two essentially indent the edges of our text view so that it appears to occupy less space even though its constraints are still edge to edge in the view.
Finally, we're going to make the text view scroll so that the text entry cursor is visible. If the text view has shrunk this will now be off screen, so scrolling to find it again keeps the user experience intact.
It's not a lot of code, but it is complicated – par for the course on this project, it seems. Anyway, here's the method:
@objc func adjustForKeyboard(notification: Notification) {
    guard let keyboardValue = notification.userInfo?[UIResponder.keyboardFrameEndUserInfoKey] as? NSValue else { return }

    let keyboardScreenEndFrame = keyboardValue.cgRectValue
    let keyboardViewEndFrame = view.convert(keyboardScreenEndFrame, from: view.window)

    if notification.name == UIResponder.keyboardWillHideNotification {
        script.contentInset = .zero
    } else {
        script.contentInset = UIEdgeInsets(top: 0, left: 0, bottom: keyboardViewEndFrame.height - view.safeAreaInsets.bottom, right: 0)
    }

    script.scrollIndicatorInsets = script.contentInset

    let selectedRange = script.selectedRange
    script.scrollRangeToVisible(selectedRange)
}
As you can see, setting the inset of a text view is done using the UIEdgeInsets struct, which needs insets for all four edges. I'm using the text view's content inset for its scrollIndicatorInsets to save time.
Note there's a check in there for UIKeyboardWillHide, and that's the workaround for hardware keyboards being connected by explicitly setting the insets to be zero.
Trivia
My first Swift app, written back when Swift was first launched in iOS 8.0, was a Safari action. They had just been introduced, and I wanted to solve a problem I had: I wanted to be able to use View Source in Safari.