Day 52
Day 52 관련

Project 13, part one
We’re back to our regular schedule today, starting with another all-new app called Instafilter. You’re going to meet an important UIKit component called UISlider, but more importantly you’ll learn how Core Image lets us create real-time image effects.
As you’ll see, Core Image is one of the most advanced frameworks available on iOS, letting us create all sorts of powerful image effects with only a handful of lines of code. However, it’s also slow in the simulator – while you can try it out there, if possible I would recommend running your code on a real device. Even an old iPhone is likely to perform better than the simulator running on the very latest Macs.
As we embark on the next series of app projects, you’ll see the things we cover start to change a little: we look at more advanced components, and we look at a few niche components too. Although these are much less commonly used than things like UITableViewController, I include them in the course because they form part of a the larger puzzle of iOS development.
As you progress, what you’ll find is that it’s rare you’ll have an app idea that is totally covered by one of my projects here. Instead, you’ll want a piece of project 9, a piece of project 3, a piece of project 18, and some new work of your own. So, by broadening your horizons with things like MapKit, notifications, and iBeacons, I’m giving you the long-term knowledge to help your own app dreams come true in the future.
Yes, I know it’s tempting to wander off and try something else instead, but stick with me. As Alexa Hirschfeld said, “the biggest challenge is to stay focused – to have the discipline when there are so many competing things.”
Today you have three topics to work through, and you’ll learn about UISlider while also getting some practice with UIImagePickerController, and more.
Setting up
Setting up
In project 10 you learned how to use UIImagePickerController to select and import a picture from your user's photo library. In this project, we're going to add the reverse: writing images back to the photo library. But because you're here to learn as much as possible, I'm also going to introduce you to another UIKit component, UISlider, and also a little bit of Core Image, which is Apple's high-speed image manipulation toolkit.
The project we're going to make will let users choose a picture from their photos, then manipulate it with a series of Core Image filters. Once they are happy, they can save the processed image back to their photo library.
To get started, create a new Single View App project in Xcode and name it Project13.
Designing the interface
Designing the interface
Select your Main.storyboard file to open Interface Builder, then embed the view controller inside a navigation controller.
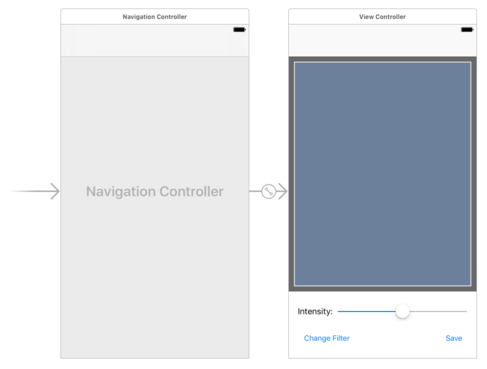
Bring up the object library, then search for "UIView" and drag a view into your controller – this is a regular view, not a view controller or a storyboard reference. If Interface Builder is already using the iPhone 8 sizing, give the new view a width of 375 and height of 470, with X:0 and Y:64. If you’re not sure, look for the words “View as: iPhone 8” at the bottom of Interface Builder – if you see something else, click it and select iPhone 8 and Portrait.
All being well, using 375x470 and X:0 Y:64 should place the view just below the navigation controller, occupying most of the screen. In the attributes inspector, give the view the background color "Dark Gray Color".
Create an image view, and place it inside the view you just created. I'd like you to indent it by 10 points on every side – i.e., width 355, height 450, X:10, Y:10. Change the image's view mode from "Scale to fill" to "Aspect Fit". Don't place any more views inside the gray view – everything else should be placed directly on the main (white) view.
That's the top part of the UI complete. For the bottom part, start by creating a label with width 72, height 21, X:16, Y:562. Give it the text "Intensity" and make it right-aligned. Now drop a slider next to it, giving it width 262, X:96, Y:558. You can't adjust the height for sliders, so leave it at the default.
Finally, place two buttons. The first button should be 120 wide and 44 high, with X:16, Y:605. Give it the title "Change Filter". The second button should be 60 wide by 44 high, with X:300, Y:605. Give it the title "Save".
In the picture below you can see how your finished layout should look.
So that's the basic layout complete, but of course we need to add Auto Layout constraints because we need it all to resize smoothly on various devices. But, you know, I'm feeling lazy – how about we make Auto Layout do the work for us this time?
Select the view controller by clicking on "View Controller" in the document outline, then go to the Editor menu and choose Resolve Auto Layout Issues > Reset To Suggested Constraints.
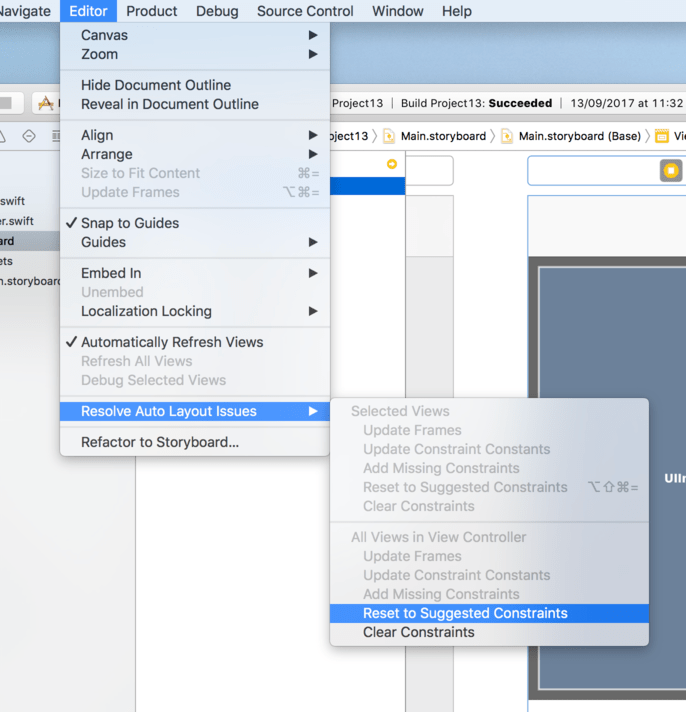
That's it! Your Auto Layout is done: Xcode just added the ideal constraints everywhere so that your interface resizes perfectly. Don't believe me? Try giving the image view a red background color (temporarily!), then launching it in any device and rotating the screen. You should see everything (including the red box) be positioned and resized correctly.
Make sure you switch the image view back to having a clear background color.
That was remarkably easy, and is another example of Apple doing a lot of hard work for you. Using Xcode to make your Auto Layout rules can be a real help, but it won't be right all the time. After all, it just takes its best guess as to your intentions. It will also frequently add more constraints than strictly necessary for the job, so use it with care.
Before we leave Interface Builder, I'd like you to add an outlet for the image view and the slider, called respectively imageView and intensity. Please also create actions from the two buttons, calling methods changeFilter() and save(). You can leave these methods with no code inside them for now.
Finally, we want the user interface to update when the slider is dragged, so please create an action from the slider. It should give you the "Value Changed" event rather than Touch Up Inside, and that's what we want. Call the action's method intensityChanged().
That's it for the storyboard, so bring up ViewController.swift and let's start coding…
Importing a picture
Importing a picture
We already have two outlets at the top of our class: one for the image view and one for the slider. We need another property, in which we will store a UIImage containing the image that the user selected. So, add this beneath the two outlets:
var currentImage: UIImage!
Our first task will be to import a photo from the user's photo library. This is almost identical to project 10, so I'm going to explain only the important bits. If you missed project 10, you should have paid heed to my warning not to skip projects!
First we need to add a button to the navigation bar that will allow users to import a photo from their library. Put these two lines into your viewDidLoad() method:
title = "YACIFP"
navigationItem.rightBarButtonItem = UIBarButtonItem(barButtonSystemItem: .add, target: self, action: #selector(importPicture))
Alright, so the first one isn't needed – it just sets the title to be YACIFP, short for "Yet Another Core Image Filters Program." (Spoiler: the App Store is full of them!) If you're feeling a bit less cynical than me, try "Instafilter" for a title instead. But what matters is the second line, because it starts the import process.
Here's the importPicture() method – it's almost identical to the import method from project 10, so again no explaining required:
@objc func importPicture() {
    let picker = UIImagePickerController()
    picker.allowsEditing = true
    picker.delegate = self
    present(picker, animated: true)
}
You should remember that the first time you use a UIImagePickerController iOS will ask the user for permission to read their photo library, which means we need to add a text string describing our intent. So, open Info.plist, select any item, click +, then choose the key name “Privacy - Photo Library Additions Usage Description”. Give it the value “We need to import photos” then press return.
Once you assign our view controller to be the image picker's delegate, you'll get warnings that we don't conform to the correct protocols. Fix that by changing the view controller's class definition to this:
class ViewController: UIViewController, UIImagePickerControllerDelegate, UINavigationControllerDelegate {
Again, this is identical to project 10.
As before, we need to implement a method for when the user selected a picture using the image picker. This code is almost verbatim from project 10, so it should all be old news to you:
func imagePickerController(_ picker: UIImagePickerController, didFinishPickingMediaWithInfo info: [UIImagePickerController.InfoKey : Any]) {
    guard let image = info[.editedImage] as? UIImage else { return }

    dismiss(animated: true)

    currentImage = image
}
There is one slight change in there, and it's where we set our currentImage image to be the one selected in the image picker. This is required so that we can have a copy of what was originally imported. Whenever the user changes filter, we need to put that original image back into the filter.
This has all been old code, so nothing too taxing. But now it's time for Core Image!