Day 60
Day 60 관련

Project 16, part one
Do you remember when the iPhone was announced? Seeing Steve Jobs show us on-device maps for the first time was incredible – after at least a decade of maps seeming like dusty old things we can safely ignore, suddenly mapping was cool again.
Suddenly we could pinch and zoom our way around the world, and with one fell swoop the idea of “getting lost” became almost vanishingly impossible. It’s no surprise, then, that Ken Jennings said “even before you understand them, your brain is drawn to maps” – they are awesome things that let us explore the world from the safety of our phone.
Today you’re going to meet a new Apple framework called MapKit, which is designed to make mapping almost instant in iOS apps. It handles fetching data and rendering, it handles scrolling and zooming, and it even handles placemarks, routes, and more – it’s incredible.
Of course, we never learn about technologies as pure theory, so we’ll be putting MapKit to work in a real app that helps show information about placemarks of our choosing.
Today you have three topics to work through, and you’ll learn about MKMapView, MKAnnotation, CLLocationCoordinate2D, and more.
Setting up
Setting up
It's time for another app project, and this time you're going to learn about MapKit: Apple's mapping framework that lets us drops pins, plan routes, and zoom around the world with just a few swipes.
Working with MapKit requires you to learn quite a few new classes, so I've tried to construct a project simple enough that we can focus on the mapping element. In this project you'll make an app that shows the locations of capital cities around the world, and when one of them is tapped you can bring up more information.
Create a new Single View App project in Xcode, naming it Project16. Now go to Interface Builder for your view controller, and embed it inside a navigation controller. Search for "map" in the object library, drop a map view into your view controller so that it occupies the full view, then use Resolve Auto Layout Issues > Add Missing Constraints so that it stays next to each edge.
Now, run your program and you should see a basic map working nicely.
Up and running with MapKit
Up and running with MapKit
The default map view works great out of the box – you can pan around, zoom in and out, and so on. If you were wondering, you need to hold down Option to trigger a virtual "pinch" gesture – just click and drag as if you were moving one finger, and the other "finger" will move in the opposite direction.
Using the assistant editor, please create an outlet for your map view called mapView. You should also set your view controller to be the delegate of the map view by Ctrl-dragging from the map view to the orange and white view controller button just above the layout area. You will also need to add import MapKit to ViewController.swift so it understands what MKMapView is.
Note: If you don’t set the map’s delegate, the rest of this project won’t work too well.
With that done, we're going to add some annotations to our map. Annotations are objects that contain a title, a subtitle and a position. The first two are both strings, the third is a new data type called CLLocationCoordinate2D, which is a structure that holds a latitude and longitude for where the annotation should be placed.
Map annotations are described not as a class, but as a protocol. This is something you haven't seen before, because so far protocols have all been about methods. But if we want to conform to the MKAnnotation protocol, which is the one we need to adopt in order to create map annotations, it states that we must have a coordinate in our annotation. That makes sense, because there's no point in having an annotation on a map if we don't know where it is. The title and subtitle are optional, but we'll provide them anyway.
Create a new file and choose iOS > Source > Cocoa Touch Class. Make it a subclass of NSObject and name it “Capital”. With map annotations, you can't use structs, and you must inherit from NSObject because it needs to be interactive with Apple's Objective-C code.
Change the contents of Capital.swift to this:
import MapKit
import UIKit

class Capital: NSObject, MKAnnotation {
    var title: String?
    var coordinate: CLLocationCoordinate2D
    var info: String

    init(title: String, coordinate: CLLocationCoordinate2D, info: String) {
        self.title = title
        self.coordinate = coordinate
        self.info = info
    }
}
There are our three properties, along with a basic initializer that just copies in the data it's given. Again, we need to use self. here because the parameters being passed in are the same name as our properties. I've added import MapKit to the file because that's where MKAnnotation and CLLocationCoordinate2D are defined.
With this custom subclass, we can create capital cities by passing in their name, coordinate and information – I'll be using the info property to hold one priceless (read: off-the-cuff, I sucked at geography) informational nugget about each city. You're welcome to do better!
Put these lines into the viewDidLoad() method of ViewController.swift:
let london = Capital(title: "London", coordinate: CLLocationCoordinate2D(latitude: 51.507222, longitude: -0.1275), info: "Home to the 2012 Summer Olympics.")
let oslo = Capital(title: "Oslo", coordinate: CLLocationCoordinate2D(latitude: 59.95, longitude: 10.75), info: "Founded over a thousand years ago.")
let paris = Capital(title: "Paris", coordinate: CLLocationCoordinate2D(latitude: 48.8567, longitude: 2.3508), info: "Often called the City of Light.")
let rome = Capital(title: "Rome", coordinate: CLLocationCoordinate2D(latitude: 41.9, longitude: 12.5), info: "Has a whole country inside it.")
let washington = Capital(title: "Washington DC", coordinate: CLLocationCoordinate2D(latitude: 38.895111, longitude: -77.036667), info: "Named after George himself.")
These Capital objects conform to the MKAnnotation protocol, which means we can send it to map view for display using the addAnnotation() method. Put this just before the end of viewDidLoad():
mapView.addAnnotation(london)
mapView.addAnnotation(oslo)
mapView.addAnnotation(paris)
mapView.addAnnotation(rome)
mapView.addAnnotation(washington)
Alternatively, you can add multiple annotations at once using the addAnnotations() method. Using this, you would replace those five lines with this:
mapView.addAnnotations([london, oslo, paris, rome, washington])
That creates an array out of the annotations and sends it in one lump to the map view.
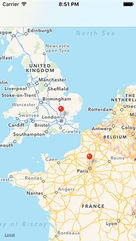
If you run your program now, you'll see pins on the map for each city, and you can tap any of them to see the city name. But where's the info property? To show more information, we need to customize the view used to show the annotations.
Annotations and accessory views: MKPinAnnotationView
Annotations and accessory views: MKPinAnnotationView
Every time the map needs to show an annotation, it calls a viewFor method on its delegate. We don't implement that method right now, so the default red pin is used with nothing special – although as you've seen it's smart enough to pull out the title for us.
Customizing an annotation view is a little bit like customizing a table view cell or collection view cell, because iOS automatically reuses annotation views to make best use of memory. If there isn't one available to reuse, we need to create one from scratch using the MKPinAnnotationView class.
Our custom annotation view is going to look a lot like the default view, with the exception that we're going to add a button that users can tap for more information. So, they tap the pin to see the city name, then tap its button to see more information. In our case, it's those fascinating facts I spent literally tens of seconds writing.
There are a couple of things you need to be careful of here. First, viewFor will be called for your annotations, but also Apple's. For example, if you enable tracking of the user's location then that's shown as an annotation and you don't want to try using it as a capital city. If an annotation is not one of yours, just return nil from the method to have Apple's default used instead.
Second, adding a button to the view isn't done using the addTarget() method you already saw in project 8. Instead, you just add the button and the map view will send a message to its delegate (us!) when it's tapped.
Here's a breakdown of what the method will do:
- If the annotation isn't from a capital city, it must return
nilso iOS uses a default view. - Define a reuse identifier. This is a string that will be used to ensure we reuse annotation views as much as possible.
- Try to dequeue an annotation view from the map view's pool of unused views.
- If it isn't able to find a reusable view, create a new one using
MKPinAnnotationViewand sets itscanShowCalloutproperty to true. This triggers the popup with the city name. - Create a new
UIButtonusing the built-in.detailDisclosuretype. This is a small blue "i" symbol with a circle around it. - If it can reuse a view, update that view to use a different annotation.
We already used Interface Builder to make our view controller the delegate for the map view, but if you want code completion to work you should also update your code to declare that the class conforms. So, in ViewController.swift, find this line:
class ViewController: UIViewController {
And change it to this:
class ViewController: UIViewController, MKMapViewDelegate {
Put this method into your view controller, watching out for my numbered comments:
func mapView(_ mapView: MKMapView, viewFor annotation: MKAnnotation) -> MKAnnotationView? {
    // 1
    guard annotation is Capital else { return nil }

    // 2
    let identifier = "Capital"

    // 3
    var annotationView = mapView.dequeueReusableAnnotationView(withIdentifier: identifier)

    if annotationView == nil {
        //4
        annotationView = MKPinAnnotationView(annotation: annotation, reuseIdentifier: identifier)
        annotationView?.canShowCallout = true

        // 5
        let btn = UIButton(type: .detailDisclosure)
        annotationView?.rightCalloutAccessoryView = btn
    } else {
        // 6
        annotationView?.annotation = annotation
    }

    return annotationView
}
You can press Cmd+R to run your app, and now if you tap on any pin you'll see a city's name as well as a button you can tap to show more information. Like I said, you don't need to use addTarget() to add an action to the button, because you'll automatically be told by the map view using a calloutAccessoryControlTapped method.
When this method is called, you'll be told what map view sent it (we only have one, so that's easy enough), what annotation view the button came from (this is useful), as well as the button that was tapped.
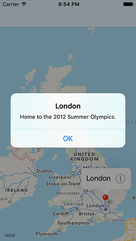
The annotation view contains a property called annotation, which will contain our Capital object. So, we can pull that out, typecast it as a Capital, then show its title and information in any way we want. The easiest for now is just to use a UIAlertController, so that's what we'll do.
Add this code to your view controller, just beneath the previous method:
func mapView(_ mapView: MKMapView, annotationView view: MKAnnotationView, calloutAccessoryControlTapped control: UIControl) {
    guard let capital = view.annotation as? Capital else { return }
    let placeName = capital.title
    let placeInfo = capital.info

    let ac = UIAlertController(title: placeName, message: placeInfo, preferredStyle: .alert)
    ac.addAction(UIAlertAction(title: "OK", style: .default))
    present(ac, animated: true)
}
With that, the project is done. We have pins in place, city names being showed when the pins are tapped, and more information popping up when requested. Perfect!