Day 17
Day 17 관련

Project 1, part two
Yesterday you completed the basics our app, but of course it’s missing one important component: it isn’t drawing any pictures! For an app called Storm Viewer this part seems rather important – as Walt Disney said, “of all our inventions for mass communication, pictures still speak the most universally understood language.”
So, today you’ll be completing project one by adding a detail screen that can load pictures, making that screen animate in when the user selects an image name, then adding some tweaks to polish up the user interface.
Today you have three topics to work through, and you’ll meet UIImageView, UIImage, UINavigationBar, and more.
Building a detail screen
Building a detail screen
At this point in our app, we have a list of pictures to choose from, but although we can tap on them nothing happens. Our next goal is to design a new screen that will be shown when the user taps any row. We’re going to make it show their selected picture full screen, and it will slide in automatically when a picture is tapped.
This task can be split into two smaller tasks. First, we need to create some new code that will host this detail screen. Second, we need to draw the user interface for this screen inside Interface Builder.
Let’s start with the easy bit: create new code to host the detail screen. From the menu bar, go to the File menu and choose New > File, and a window full of options will appear. From that list, choose iOS > Cocoa Touch Class, then click Next.
You’ll be asked to name the new screen, and also tell iOS what it should build on. Please enter “DetailViewController” for the name, and “UIViewController” for “Subclass Of”. Make sure “Also create XIB file” is deselected, then click Next and Create to add the new file.
That’s the first job done – we have a new file that will contain code for the detail screen.
The second task takes a little more thinking. Go back to Main.storyboard, and you’ll see our existing two view controllers there: that’s the navigation view controller on the left, and the table view controller on the right. We’re going to add a new view controller – a new screen – now, which will be our detail screen.
First, open the object library and find “View Controller” in there. Drag it out into the space to the right of your existing view controller. You could place it anywhere, really, but it’s nice to arrange your screens so they flow logically from left to right.
Now, if you look in the document outline you’ll see a second “View Controller scene” has appeared: one for the table view, and one for the detail view. If you’re not sure which is which, just click in the new screen – in the big white empty space that just got created – and it should select the correct scene in the document outline.
When we created our table view cell previously, we gave it an identifier so that we could load it in code. We need to do the same thing for this new screen. When you selected it a moment ago, it should have highlighted “View” in the document outline. Above that will be “View Controller” with a yellow icon next to it – please click on that to select the whole view controller now.
To give this view controller a name, go to the identity inspector by pressing Cmd+Alt+3 or by using the menu. Now enter “Detail” where it says “Storyboard ID”. That’s it: we can now refer to this view controller as “Detail” in code. While you’re there, please click the arrow next to the Class box and select “DetailViewController” so that our user interface is connected to the new code we made earlier.
Now for the interesting part: we want this screen to display the user’s selected image nice and big, so we need to use a new user interface component called UIImageView. As you should be able to tell from the name, this is a part of UIKit (hence the “UI”), and is responsible for viewing images – perfect!
Look in the object library to find Image View; you might find it easiest to use the filter box again. Click and drag the image view from the object library onto the detail view controller, then let go. Now, drag its edges so that it fills the entire view controller.
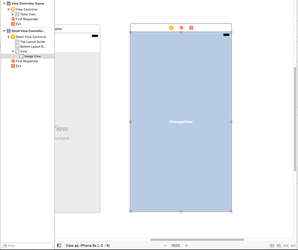
This image view has no content right now, so it's filled with a pale blue background and the word UIImageView. We won't be assigning any content to it right now, though – that's something we'll do when the program runs. Instead, we need to tell the image view how to size itself for our screen, whether that's iPhone or iPad.
This might seem strange at first, after all you just placed it to fill the view controller, and it has the same size as the view controller, so that should be it, right? Well, not quite. Think about it: there are lots of iOS devices your app might run on, all with different sizes. So, how should the image view respond when it’s being shown on a 6 Plus or perhaps even an iPad?
iOS has an answer for this. And it's a brilliant answer that in many ways works like magic to do what you want. It's called Auto Layout: it lets you define rules for how your views should be laid out, and it automatically makes sure those rules are followed.
But – and this is a big but! – it has two rules of its own, both of which must be followed by you:
- Your layout rules must be complete. That is, you can't specify only an X position for something, you must also specify a Y position. If it's been a while since you were at school, "X" is position from the left of the screen, and "Y" is position from the top of the screen.
- Your layout rules must not conflict. That is, you can't specify that a view must be 10 points away from the left edge, 10 points away from the right edge, and 1000 points wide. An iPhone 5 screen is only 320 points wide, so your layout is mathematically impossible. Auto Layout will try to recover from these problems by breaking rules until it finds a solution, but the end result is never what you want.
You can create Auto Layout rules – known as constraints – entirely inside Interface Builder, and it will warn you if you aren't following the two rules. It will even help you correct any mistakes you make by suggesting fixes. Note: the fixes it suggests might be correct, but they might not be – tread carefully!
We're going to create four constraints now: one each for the top, bottom, left and right of the image view so that it expands to fill the detail view controller regardless of its size. There are lots of ways of adding Auto Layout constraints, but the easiest way right now is to select the image view then go to the Editor menu and choose > Resolve Auto Layout Issues > Reset To Suggested Constraints.
You’ll see that option listed twice in the menu because there are two subtly different options, but in this instance it doesn’t matter which one you choose. If you prefer keyboard shortcuts, press Shift+Alt+Cmd+= to accomplish the same thing.
Visually, your layout will look pretty much identical once you've added the constraints, but there are two subtle differences. First, there's a thin blue line surrounding the UIImageView on the detail view controller, which is Interface Builder's way of showing you that the image view has a correct Auto Layout definition.
Second, in the document outline pane you'll see a new entry for "Constraints" beneath the image view. All four constraints that were added are hidden under that Constraints item, and you can expand it to view them individually if you’re curious.
With the constraints added, there's one more thing to do here before we're finished with Interface Builder, and that's to connect our new image view to some code. You see, having the image view inside the layout isn't enough – if we actually want to use the image view inside code, we need to create a property for it that's attached to the layout.
This property is like the pictures array we made previously, but it has a little bit more “interesting” Swift syntax we need to cover. Even more cunningly, it’s created using a really bizarre piece of user interface design that will send your brain for a loop if you’ve used other graphical IDEs.
Let’s dive in, and I’ll explain on the way. Xcode has a special display layout called the Assistant Editor, which splits your Xcode editor in two: the view you had before on top, and a related view at the bottom. In this case, it's going to show us Interface Builder on top, and the code for the detail view controller below.
Xcode decides what code to show based on what item is selected in Interface Builder, so make sure the image view is still selected and choose View > Assistant Editor > Show Assistant Editor from the menu. You can also use the keyboard shortcut Alt+Cmd+Return if you prefer.
Xcode can display the assistant editor as two vertical panes rather than two horizontal panes. I find the horizontal panes easiest – i.e., one above the other. You can switch between them by going to View > Assistant Editor and choosing either Assistant Editors On Right or Assistant Editors on Bottom.
Regardless of which you prefer, you should now see the detail view controller in Interface Builder in one pane, and in the other pane the source code for DetailViewController.swift. Xcode knows to load DetailViewController.swift because you changed the class for this screen to be “DetailViewController” just after you changed its storyboard ID.
Now for the bizarre piece of UI. What I want you to do is this:
- Make sure the image view is selected.
- Hold down the Ctrl key on your keyboard.
- Press your mouse button down on the image view, but hold it down – don’t release it.
- While continuing to hold down Ctrl and your mouse button, drag from the image view into your code – into the other assistant editor pane.
- As you move your mouse cursor, you should see a blue line stretch out from the image view into your code. Stretch that line so that it points between
classDetailViewController: UIViewController { and override func viewDidLoad() {. - When you’re between those two, a horizontal blue line should appear, along with a tooltip saying Insert Outlet Or Outlet Connection. When you see that, let go of both Ctrl and your mouse button. (It doesn’t matter which one you release first.) If you follow those steps, a balloon should appear with five fields: Connection, Object, Name, Type, and Storage.
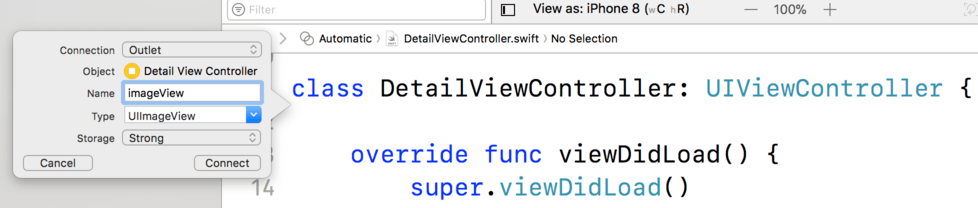
By default the options should be “Outlet” for connection, “Detail View Controller” for Object, nothing for name, “UIImageView” for type, and “Strong” for storage. If you see “Weak” for storage please change it to “Strong” – Xcode will remember that setting from now on.
Leave all of them alone except for Name – I’d like you to enter “imageView” in there. When you’ve done that click the Connect button, and Xcode will insert a line of code into DetailViewController.swift. You should see this:
class `DetailViewController`: UIViewController {
    @IBOutlet var imageView: UIImageView!

    override func viewDidLoad() {
        super.viewDidLoad()
To the left of the new line of code, in the gutter next to the line number, is a gray circle with a line around it. If you move your mouse cursor over that you’ll see the image view flash – that little circle is Xcode’s way of telling you the line of code is connected to the image view in your storyboard.
So, we Ctrl-dragged from Interface Builder straight into our Swift file, and Xcode wrote a line of code for us as a result. Some bits of that code are new, so let's break down the whole line:
@IBOutlet: This attribute is used to tell Xcode that there's a connection between this line of code and Interface Builder.var: This declares a new variable or variable property.imageView: This was the property name assigned to theUIImageView. Note the way capital letters are used: variables and constants should start with a lowercase letter, then use a capital letter at the start of any subsequent words. For example,myAwesomeVariable. This is sometimes called camel case.UIImageView!: This declares the property to be of typeUIImageView, and again we see the implicitly unwrapped optional symbol:!. This means that thatUIImageViewmay be there or it may not be there, but we're certain it definitely will be there by the time we want to use it.
If you were struggling to understand implicitly unwrapped optionals (don't worry; they are complicated!), this code might make it a bit clearer. You see, when the detail view controller is being created, its view hasn't been loaded yet – it's just some code running on the CPU.
When the basic stuff has been done (allocating enough memory to hold it all, for example), iOS goes ahead and loads the layout from the storyboard, then connects all the outlets from the storyboard to the code.
So, when the detail controller is first made, the UIImageView doesn't exist because it hasn't been created yet – but we still need to have some space for it in memory. At this point, the property is nil, or just some empty memory. But when the view gets loaded and the outlet gets connected, the UIImageView will point to a real UIImageView, not to nil, so we can start using it.
In short: it starts life as nil, then gets set to a value before we use it, so we're certain it won't ever be nil by the time we want to use it – a textbook case of implicitly unwrapped optionals. If you still don't understand implicitly unwrapped optionals, that's perfectly fine – keep on going and they'll become clear over time.
That’s our detail screen complete – we’re done with Interface Builder for now, and can return to code. This also means we’re done with the assistant editor, so you can return to the full-screen editor by going to View > Standard Editor > Show Standard Editor.
Loading images with UIImage
Loading images with UIImage
At this point we have our original table view controller full of pictures to select, plus a detail view controller in our storyboard. The next goal is to show the detail screen when any table row is tapped, and have it show the selected image.
To make this work we need to add another specially named method to ViewController. This one is called tableView(_, didSelectRowAt:), which takes an IndexPath value just like cellForRowA`t that tells us what row we’re working with. This time we need to do a bit more work:
- We need to create a property in
DetailViewControllerthat will hold the name of the image to load. - We’ll implement the
didSelectRowAtmethod so that it loads aDetailViewControllerfrom the storyboard. - Finally, we’ll fill in
viewDidLoad()insideDetailViewControllerso that it loads an image into its image view based on the name we set earlier.
Let’s solve each of those in order, starting with the first one: creating a property in DetailViewController that will hold the name of the image to load.
This property will be a string – the name of the image to load – but it needs to be an optional string because when the view controller is first created it won’t exist. We’ll be setting it straight away, but it still starts off life empty.
So, add this property to DetailViewController now, just below the existing @IBOutlet line:
var selectedImage: String?
That’s the first task done, so onto the second: implement didSelectRowAt so that it loads a DetailViewController from the storyboard.
When we created the detail view controller, you gave it the storyboard ID “Detail”, which allows us to load it from the storyboard using a method called instantiateViewController(withIdentifier:). Every view controller has a property called storyboard that is either the storyboard it was loaded from or nil. In the case of ViewController it will be Main.storyboard, which is the same storyboard that contains the detail view controller, so we’ll be loading from there.
We can break this task down into three smaller tasks, two of which are new:
- Load the detail view controller layout from our storyboard.
- Set its
selectedImageproperty to be the correct item from thepicturesarray. - Show the new view controller.
The first of those is done by calling instantiateViewController, but it has two small complexities. First, we call it on the storyboard property that we get from Apple’s UIViewController type, but it’s optional because Swift doesn’t know we came from a storyboard. So, we need to use ? just like when we were setting the text label of our cell: “try doing this, but do nothing if there was a problem.”
Second, even though instantiateViewController() will send us back a DetailViewController if everything worked correctly, Swift thinks it will return back a UIViewController because it can’t see inside the storyboard to know what’s what.
This will seem confusing if you’re new to programming, so let me try to explain using an analogy. Let’s say you want to go out on a date tonight, so you ask me to arrange a couple of tickets to an event. I go off, find tickets, then hand them to you in an envelope. I fulfilled my part of the deal: you asked for tickets, I got you tickets. But what tickets are they – tickets for a sporting event? Tickets for an opera? Train tickets? The only way for you to find out is to open the envelope and look.
Swift has the same problem: instantiateViewController() has the return type UIViewController, so as far as Swift is concerned any view controller created with it is actually a UIViewController. This causes a problem for us because we want to adjust the property we just made in DetailViewController. The solution: we need to tell Swift that what it has is not what it thinks it is.
The technical term for this is “typecasting”: asking Swift to treat a value as a different type. Swift has several ways of doing this, but we’re going to use the safest version: it effectively means, “please try to treat this as a DetailViewController, but if it fails then do nothing and move on.”
Once we have a detail view controller on our hands, we can set its selectedImage property to be equal to pictures[indexPath.row] just like we were doing in cellForRowAt – that’s the easy bit.
The third mini-step is to make the new screen show itself. You already saw that view controllers have an optional storyboard property that either contains the storyboard they were loaded from or nil. Well, they also have an optional navigationController property that contains the navigation controller they are inside if it exists, or nil otherwise.
This is perfect for us, because navigation controllers are responsible for showing screens. Sure, they provide that nice gray bar across the top that you see in lots of apps, but they are also responsible for maintaining a big stack of screens that users navigate through.
By default they contain the first view controller you created for them in the storyboard, but when new screens are created you can push them onto the navigation controller’s stack to have them slide in smoothly just like you see in Settings. As more screens are pushed on, they just keep sliding in. When users go back a screen – i.e. by tapping Back or by swiping from left to right – the navigation controller will automatically destroy the old view controller and free up its memory.
Those three mini-steps complete the new method, so it’s time for the code. Please add this method to ViewController.swift – I’ve added comments to make it easier to understand:
override func tableView(_ tableView: UITableView, didSelectRowAt indexPath: IndexPath) {
    // 1: try loading the "Detail" view controller and typecasting it to be `DetailViewController`
    if let vc = storyboard?.instantiateViewController(withIdentifier: "Detail") as? `DetailViewController` {
        // 2: success! Set its selectedImage property
        vc.selectedImage = pictures[indexPath.row]

        // 3: now push it onto the navigation controller
        navigationController?.pushViewController(vc, animated: true)
    }
}
Let’s look at the if let line a bit more closely for a moment. There are three parts of it that might fail: the storyboard property might be nil (in which case the ? will stop the rest of the line from executing), the instantiateViewController() call might fail if we had requested “Fzzzzz” or some other invalid storyboard ID, and the typecast – the as? part – also might fail, because we might have received back a view controller of a different type.
So, three things in that one line have the potential to fail. If you’ve followed all my steps correctly they won’t fail, but they have the potential to fail. That’s where if let is clever: if any of those things return nil (i.e., they fail), then the code inside the if let braces won’t execute. This guarantees your program is in a safe state before any action is taken.
There’s only one small thing left to do before you can take a look at the results: we need to make the image actually load into the image view in DetailViewController.
This new code will draw on a new data type, called UIImage. This doesn't have "View" in its name like UIImageView does, so it's not something you can view – it's not something that's actually visible to users. Instead, UIImage is the data type you'll use to load image data, such as PNG or JPEGs.
When you create a UIImage, it takes a parameter called named that lets you specify the name of the image to load. UIImage then looks for this filename in your app's bundle, and loads it. By passing in the selectedImage property here, which was sent from ViewController, this will load the image that was selected by the user.
However, we can’t use selectedImage directly. If you remember, we created it like this:
var selectedImage: String?
That ? means it might have a value or it might not, and Swift doesn’t let you use these “maybes” without checking them first. This is another opportunity for if let: we can check that selectedImage has a value, and if so pull it out for usage; otherwise, do nothing.
Add this code to viewDidLoad() inside DetailViewController, after the call to super.viewDidLoad():
if let imageToLoad = selectedImage {
    imageView.image  = UIImage(named: imageToLoad)
}
The first line is what checks and unwraps the optional in selectedImage. If for some reason selectedImage is nil (which it should never be, in theory) then the imageView.image line will never be executed. If it has a value, it will be placed into imageToLoad, then passed to UIImage and loaded.
OK, that’s it: press play or Cmd+R now to run the app and try it out! You should be able to select any of the pictures to have them slide in and displayed full screen.
Notice that we get a Back button in the navigation bar that lets us return back to ViewController. If you click and drag carefully, you’ll find you can create a swipe gesture too – click at the very left edge of the screen, then drag to the right, just as you would do with your thumb on a phone.
Final tweaks: hidesBarsOnTap, safe area margins
Final tweaks: hidesBarsOnTap, safe area margins
At this point you have a working project: you can press Cmd+R to run it, flick through the images in the table, then tap one to view it. But before this project is complete, there are several other small changes we're going to make that makes the end result a little more polished.
First, you might have noticed that all the images are being stretched to fit the screen. This isn't an accident – it's the default setting of UIImageView.
This takes just a few clicks to fix: choose Main.storyboard, select the image view in the detail view controller, then choose the attributes inspector. This is in the right-hand pane, near the top, and is the fourth of six inspectors, just to the left of the ruler icon.
If you don't fancy hunting around for it, just press Cmd+Alt+4 to bring it up. The stretching is caused by the view mode, which is a dropdown button that defaults to either “Aspect Fit” or “Aspect Fill” depending on your version of Xcode Try changing that to “Aspect Fill” to see the image scaled up to fit the available space.
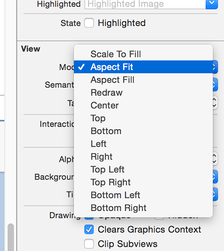
UIImageViews forces them to resize their images so they are fully visible.If you were wondering, Aspect Fit sizes the image so that it's all visible. There's also Scale to Fill, which sizes the image so that there's no space left blank by stretching it on both axes. If you use Aspect Fill, the image effectively hangs outside its view area, so you should make sure you enable Clip To Bounds to avoid the image overspilling.
The second change we're going to make is to allow users to view the images fullscreen, with no navigation bar getting in their way. There's a really easy way to make this happen, and it's a property on UINavigationController called hidesBarsOnTap. When this is set to true, the user can tap anywhere on the current view controller to hide the navigation bar, then tap again to show it.
Be warned: you need to set it carefully when working with iPhones. If we had it set on all the time then it would affect taps in the table view, which would cause havoc when the user tried to select things. So, we need to enable it when showing the detail view controller, then disable it when hiding.
You already met the method viewDidLoad(), which is called when the view controller's layout has been loaded. There are several others that get called when the view is about to be shown, when it has been shown, when it's about to go away, and when it has gone away. These are called, respectively, viewWillAppear(), viewDidAppear(), viewWillDisappear() and viewDidDisappear(). We're going to use viewWillAppear() and viewWillDisappear() to modify the hidesBarsOnTap property so that it's set to true only when the detail view controller is showing.
Open DetailViewController.swift, then add these two new methods directly below the end of the viewDidLoad() method:
override func viewWillAppear(_ animated: Bool) {
    super.viewWillAppear(animated)
    navigationController?.hidesBarsOnTap = true
}

override func viewWillDisappear(_ animated: Bool) {
    super.viewWillDisappear(animated)
    navigationController?.hidesBarsOnTap = false
}
There are some important things to note in there:
- We're using
overridefor each of these methods, because they already have defaults defined inUIViewControllerand we're asking it to use ours instead. Don't worry if you aren't sure when to use override and when not, because if you don't use it and it's required Xcode will tell you. - Both methods have a single parameter: whether the action is animated or not. We don't really care in this instance, so we ignore it.
- Both methods use the
superprefix again:super.viewWillAppear()andsuper.viewWillDisappear(). This means "tell my parent data type that these methods were called." In this instance, it means that it passes the method on toUIViewController, which may do its own processing. - We’re using the
navigationControllerproperty again, which will work fine because we were pushed onto the navigation controller stack fromViewController. We’re accessing the property using?, so if somehow we weren’t inside a navigation controller thehidesBarsOnTaplines will do nothing.
If you run the app now, you'll see that you can tap to see a picture full size, and it will no longer be stretched. While you're viewing a picture you can tap to hide the navigation bar at the top, then tap to show it again.
The third change is a small but important one. If you look at other apps that use table views and navigation controllers to display screens (again, Settings is great for this), you might notice gray arrows at the right of the table view cells. This is called a disclosure indicator, and it’s a subtle user interface hint that tapping this row will show more information.
It only takes a few clicks in Interface Builder to get this disclosure arrow in our table view. Open Main.storyboard, then click on the table view cell – that’s the one that says “Title”, directly below “Prototype Cells”. The table view contains a cell, the cell contains a content view, and the content view contains a label called “Title” so it’s easy to select the wrong thing. As a result, you’re likely to find it easiest to use the document outline to select exactly the right thing – you want to select the thing marked “Picture”, which is the reuse identifier we attached to our table view cell.
When that’s selected, you should be able go to the attributes inspector and see “Style: Basic”, “Identifier: Picture”, and so on. You will also see “Accessory: None” – please change that to “Disclosure Indicator”, which will cause the gray arrow to show.
The fourth is small but important: we’re going to place some text in the gray bar at the top. You’ve already seen that view controllers have storyboard and navigationController properties that we get from UIViewController. Well, they also have a title property that automatically gets read by navigation controller: if you provide this title, it will be displayed in the gray navigation bar at the top.
In ViewController, add this code to viewDidLoad() after the call to super.viewDidLoad():
title = "Storm Viewer"
This title is also automatically used for the “Back” button, so that users know what they are going back to.
In DetailViewController we could add something like this to viewDidLoad():
title = "View Picture"
That would work fine, but instead we’re going to use some dynamic text: we’re going to display the name of the selected picture instead.
Add this to viewDidLoad() in DetailViewController:
title = selectedImage
We don’t need to unwrap selectedImage here because both selectedImage and title are optional strings – we’re assigning one optional string to another. title is optional because it’s nil by default: view controllers have no title, thus showing no text in the navigation bar.
Large titles
This is an entirely optional change, but I wanted to introduce it to you nice and early so you can try it for yourself and see what you think.
One of Apple’s design guidelines is the use of large titles – the text that appears in the gray bar at the top of apps. The default style is small text, which is what we’ve had so far, but with a couple of lines of code we can adopt the new design.
First, add this to viewDidLoad() in ViewController.swift:
navigationController?.navigationBar.prefersLargeTitles = true
That enables large titles across our app, and you’ll see an immediate difference: “Storm Viewer” becomes much bigger, and in the detail view controller all the image titles are also big. You’ll notice the title is no longer static either – if you pull down gently you’ll see it stretches ever so slightly, and if you try scrolling up in our table view you’ll see the titles shrinks away.
Apple recommends you use large titles only when it makes sense, and that usually means only on the first screen of your app. As you’ve seen, the default behavior when enabled is to have large titles everywhere, but that’s because each new view controller that pushed onto the navigation controller stack inherits the style of its predecessor.
In this app we want “Storm Viewer” to appear big, but the detail screen to look normal. To make that happen we need to add a line of code to viewDidLoad() in DetailViewController.swift:
navigationItem.largeTitleDisplayMode = .never
That’s all it takes – the large titles should behave properly now.
Tips
Different Xcode versions create image views slightly differently. If you want to use Aspect Fill for your image, make sure Clip To Bounds is checked to avoid the image overspilling – this is enabled by default in Xcode 10.2 or later.