How to Build a Video Subtitle Generator using the Gemini API
How to Build a Video Subtitle Generator using the Gemini API 관련


In this tutorial, you'll build an AI-powered subtitle generator using Google's Gemini API. We'll create a project called “AI-Subtitle-Generator” using React for the front end and Express for the back end. Get ready for a fun and practical project.
Prerequisites
To build this project, you should know the basics of React and Express.
How to Get Your API Key
An API key acts as a unique identifier and authenticates your requests to the service. It's essential for accessing and using Gemini AI’s capabilities. This key will allow our application to communicate with Gemini and help us build our project.
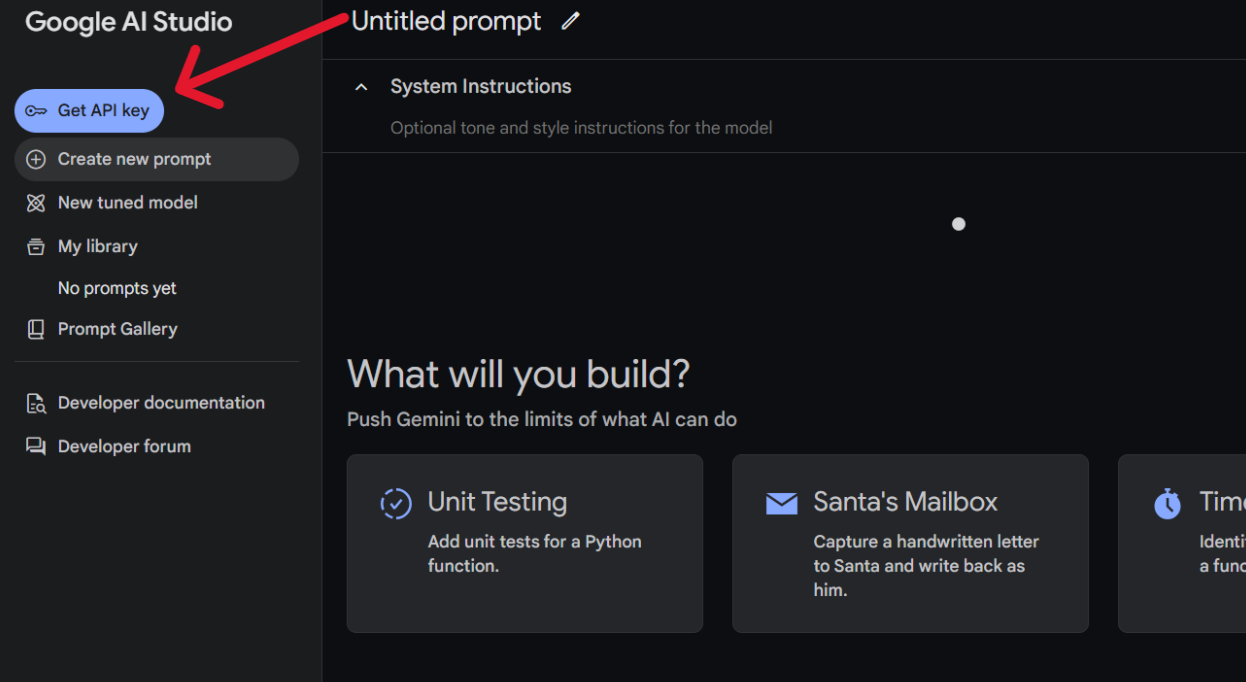
Go to Google AI Studio, then click “Get API Key”:

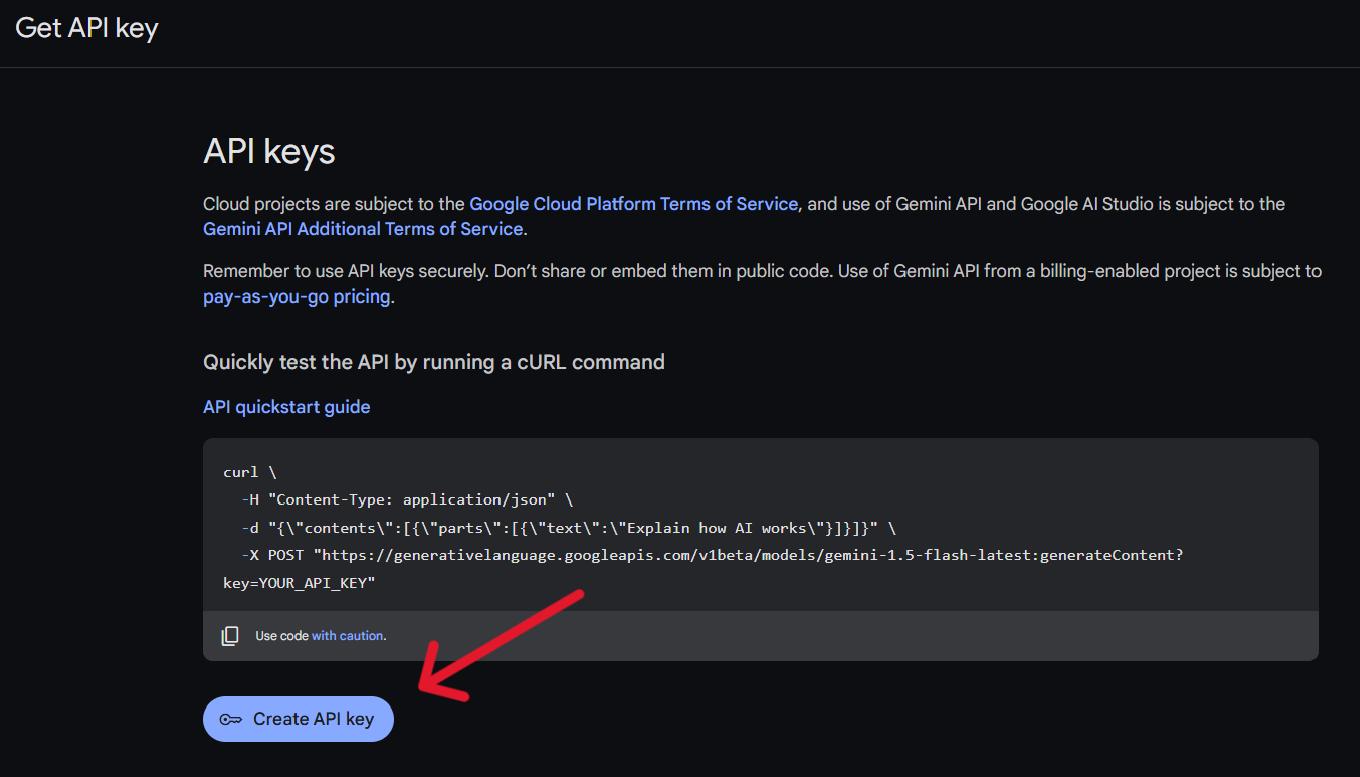
After you are redirected to the API KEY page, click “Create API Key“:

A new API KEY will be created. Then make sure you copy the key.
This is your API key. This key is used to authenticate your application's requests to the Gemini API. Each time your application sends a request to Gemini, this key must be included. Gemini uses this key to verify that the request is coming from an authorized source. Without this API key, your requests will be rejected, and you won't be able to access Gemini's services.
Project Setup
Start by creating a new folder for your project. Let's call it ai-subtitle-generator.
Inside the ai-subtitle-generator folder, create two subfolders: client and server. The client folder will contain the React frontend, and the server folder will contain the Express backend.
Front End Setup
First, we will focus on the front end and set up a basic React application.
Navigate to the client folder:
cd client
Then create a new React project using Vite. To do that, run the following command:
npm create vite@latest .
When prompted, choose “React“. Select “React + TS” or “React + JS”. In this tutorial, I will use React + TS. You can also follow along with JS.
Next, install the dependencies with this command:
npm install
Then start the development server:
npm run dev
How to Handle File Uploads in the Frontend
Now in client/src/App.tsx, add the following code:
const App = () => {
  const handleSubmit = async (e: React.FormEvent<HTMLFormElement>): Promise<void> => {
    e.preventDefault();
    try {
      const formData = new FormData(e.currentTarget);
      console.log(formData)
    } catch (error) {
      console.log(error);
    }
  };

  return (
    <div>
      <form onSubmit={handleSubmit}>
        <input type="file" accept="video/*,.mkv" name="video" />
        <input type="submit" />
      </form>
    </div>
  );
};

export default App;
In the above code, we have used an input tag that will accept the video and name it as video. This name will be appended to the FormData object.
While sending the video to the server, we need to send it as a key-value pair, where the key is a video and the value is the file data.
Why key-value pairs? Because when the server receives the request, it needs to parse the incoming chunks. After parsing, the video data will be available in req.files[key], where the key is the name we have assigned in the frontend (video in this case).
This is why we are using the FormData object. When we create a new FormData instance and pass e.target to it, all the form fields and their names will automatically be available as key-value pairs.
Server Setup
Now that we have our API key, let's set up the backend server. This server will handle video uploads from the frontend and communicate with the Gemini API for subtitle generation.
Navigate to server folder:
cd server
And initialize the project:
npm init -y
Then install the necessary packages:
npm install express dotenv cors @google/generative-ai express-fileupload nodemon
These are the back-end dependencies we’re using in this project:
express: The web framework for creating the backend API.dotenv: Loads environment variables from a.envfile.cors: Enables Cross-Origin Resource Sharing, allowing your frontend to communicate with your backend.@google/generative-ai: The Google AI library for interacting with the Gemini API.express-fileupload: Handles file uploads, making it easy to access uploaded files on the server.nodemon: Automatically restarts the server when you make changes to your code.
Set Up the Environment Variables
Now, create a file called .env. This is where you’ll manage your API keys.
API_KEY = YOUR_API_API
PORT = 3000
Update the package.json
For this project, we are using ES6 modules instead of CommonJS. To enable this, update your package.json file with the following code:
{
  "name": "server",
  "version": "1.0.0",
  "main": "index.js",
  "type": "module",       //Add "type": "module" to enable ES6 modules
  "scripts": {
    "start": "node server.js",
    "dev": "nodemon server.js"    //configure nodemon
  },
  "keywords": [],
  "author": "",
  "license": "ISC",
  "description": "",
  "dependencies": {
    "@google/generative-ai": "^0.21.0",
    "cors": "^2.8.5",
    "dotenv": "^16.4.7",
    "express": "^4.21.1",
    "express-fileupload": "^1.5.1",
    "nodemon": "^3.1.7"
  }
}
Basic Setup of Express
Create a file server.js. Now, let’s set up a basic Express application.
import express from "express";
import { configDotenv } from "dotenv";
import fileUpload from "express-fileupload";
import cors from "cors"

const app = express();

configDotenv();           //configure the env
app.use(fileUpload());    //it will parse the mutipart data
app.use(express.json());  // Enable JSON parsing for request bodies
app.use(cors())           //configure cors

app.use("/api/subs",subRoutes);  // Use routes for the "/api/subs" endpoint

app.listen(process.env.PORT, () => {   //access the PORT from the .env
  console.log("server started");
});
In this code, we create an Express app instance and then load our environment variables. This is where we keep sensitive data like API keys secure. Next, we apply middleware functions: fileUpload prepares the server to receive uploaded videos, express.json allows us to receive JSON data, and cors enables communication between our frontend and backend.
We define a route (/api/subs) that will handle all requests related to subtitle generation. The specific logic for these routes will be defined in subs.routes.js. Finally, we start the server, telling it to listen for requests on the port specified in our .env file.
Now we need to create some folders to manage the code. You can also manage the entire code in a single file, but structuring it into separate folders and managing them all that way will be easier.
This is the final folder structure for the server:
server/
├── server.js
├── controller/
│   └── subs.controller.js
├── gemini/
│   ├── gemini.config.js
├── routes/
│   └── subs.routes.js
├── uploads/
├── utils/
│   ├── fileUpload.js
│   └── genContent.js
└── .env
Note
Don’t worry about creating this folder structure now. This is just for reference. Follow along with me step by step, and we will build this structure together.
Create the Routes
Now create a routes folder and then create subs.routes.js:
import express from "express"
import { uploadFile } from "../controller/subs.controller.js"    // import the uploadFile function from the controller folder

const router = express.Router()

router.post("/",uploadFile)    // define a POST route that calls the uploadFile function

export default router     // export the router to use in the main server.js file
This code defines the routes for our server, specifically the route that handles video uploads and subtitle generation.
We create a new router instance using express.Router(). This allows us to define routes separate from our main server file, improving code organization. We define a POST route at the root path ("/") of our API endpoint. When a POST request is made to this route (which will happen when a user submits the video upload form on the frontend), the uploadFile function is called. This function will handle the actual upload and subtitle generation.
Finally, we export the router so that it can be used in our main server file (server.js) to connect this route to the main application.
Configure Gemini
Now, let's configure how our application will interact with Gemini.
Create a gemini folder and then create a new file called gemini.config.js:
import {
  GoogleGenerativeAI,
  HarmBlockThreshold,
  HarmCategory,
} from "@google/generative-ai";
import { configDotenv } from "dotenv";
configDotenv();

const genAI = new GoogleGenerativeAI(process.env.API_KEY);  // Initialize Google Generative AI with the API key

const safetySettings = [
  {
    category: HarmCategory.HARM_CATEGORY_HARASSMENT,
    threshold: HarmBlockThreshold.BLOCK_NONE,
  },
  {
    category: HarmCategory.HARM_CATEGORY_HATE_SPEECH,
    threshold: HarmBlockThreshold.BLOCK_NONE,
  },
  {
    category: HarmCategory.HARM_CATEGORY_DANGEROUS_CONTENT,
    threshold: HarmBlockThreshold.BLOCK_NONE,
  },
  {
    category: HarmCategory.HARM_CATEGORY_SEXUALLY_EXPLICIT,
    threshold: HarmBlockThreshold.BLOCK_NONE,
  },
];

const model = genAI.getGenerativeModel({
  model: "gemini-1.5-flash-001",    //choose the model
  safetySettings: safetySettings,   //optional safety settings
});

export default model;    //export the model
In the code above, the safetySettings are optional. These settings allow you to define thresholds for potentially harmful content (like hate speech, violence, or explicit material) in Gemini's output.
You can read more about Gemini’s safety settings here.
Create a Controller to Handle Endpoint Logic
Now, create a controller folder, and inside it create a file named subs.controller.js. In this file, you'll handle the endpoint logic for interacting with the Gemini model.
In server/controller/subs.controller.js, add this code:
import { fileURLToPath } from "url";
import path from "path";
import fs from "fs";

const __filename = fileURLToPath(import.meta.url);  //converts the module URL to a file path
const __dirname = path.dirname(__filename);   //get the current file directory

export const uploadFile = async (req, res) => {
  try {
    if (!req.files || !req.files.video) {   //if there is no file available, return error to the client
      return res.status(400).json({ error: "No video uploaded" });
    }

    const videoFile = req.files.video;   //access the video
    const uploadDir = path.join(__dirname, "..", "uploads");   //path to upload the video temporarily

    if (!fs.existsSync(uploadDir)) {   //check if the directory exists
      fs.mkdirSync(uploadDir);      //if not create a new one
    }

    const uploadPath = path.join(uploadDir, videoFile.name);

    await videoFile.mv(uploadPath);  //it moves the video from the buffer to the "upload" folder

    return res.status(200).json({ message:"file uploaded sucessfully" });
  } catch (error) {
    return res
      .status(500)
      .json({ error: "Internal server error: " + error.message });
  }
};
Since we are using an ES6 module, the __dirname is not available by default. The file handling mechanism is different compared to CommonJS. Because of this, we’ll use fileURLToPath to handle file paths.
We moved the file from the default temporary location which is the buffer to the uploads folder.
But the file upload process is not yet complete. We still need to send the file to Google AI File Manager, and after uploading, it will return a URI. This URI will then be passed to the model for video analysis.
How to Upload a File to the Google AI File Manager
Create a folder utils and create a file fileUpload.js. You can refer to the folder structure provided above.
import { GoogleAIFileManager, FileState } from "@google/generative-ai/server";
import { configDotenv } from "dotenv";
configDotenv();

export const fileManager = new GoogleAIFileManager(process.env.API_KEY);  //create a new GoogleAIFileManager instance

export async function fileUpload(path, videoData) {
  try {
    const uploadResponse = await fileManager.uploadFile(path, {   //give the path as an argument
      mimeType: videoData.mimetype,
      displayName: videoData.name,
    });
    const name = uploadResponse.file.name;
    let file = await fileManager.getFile(name);
    while (file.state === FileState.PROCESSING) {     //check the state of the file
      process.stdout.write(".");
      await new Promise((res) => setTimeout(res, 10000));   //check every 10 second
      file = await fileManager.getFile(name);
    }
    if (file.state === FileState.FAILED) {
      throw new Error("Video processing failed");
    }
    return file;   // return the file object, containing the upload file information and the uri
  } catch (error) {
    throw error;
  }
}
In the code above, we created a function called fileUpload that takes two arguments. These arguments will be passed from the controller function, which we'll set up later.
The fileUpload function uses the fileManager.uploadFile method to send the video to Google's servers. This method needs two arguments: the file path and an object containing metadata about the file (its MIME type and display name).
Because video processing on Google's servers takes time, we need to check the file's status. We do this using a loop that checks the file's state every 10 seconds using fileManager.getFile(). The loop continues as long as the file's state is PROCESSING. Once the state changes to either SUCCESS or FAILED, the loop stops.
The function then checks if the processing was successful. If so, it returns the file object, which contains information about the uploaded and processed video, including its URI. Otherwise, if the state is FAILED, the function throws an error.
Pass the URI to the Gemini Model
Now in the utils folder, create a file called genContent.js:
import model from "../gemini/gemini.config.js";
import { configDotenv } from "dotenv";
configDotenv();

export async function getContent(file) {
  try {
    const result = await model.generateContent([
      {
        fileData: {
          mimeType: file.mimeType,
          fileUri: file.uri,
        },
      },
      {
        text: "You need to write a subtitle for this full video, write the subtitle in the SRT format, don't write anything else other than a subtitle in the response, create accurate subtitle.",
      },
    ]);
    return result.response.text();
  } catch (error) {
    throw error;
  }
}
Import the model that we configured earlier. Create a function called getContent. The getContent function takes the file object (returned from the fileUpload function).
Pass the file URI and the mimi to the model. Then we’ll provide a prompt instructing the model to generate subtitles for the entire video in SRT format. You can also add your prompt if you want. Then return the response.
Update the subs.controller.js File
Finally, we need to update the controller file. We've created the fileUpload and getContent functions, and now we'll use them in the controller and provide the required arguments.
In the server/controller/subs.controller.js:
import { fileURLToPath } from "url";
import path from "path";
import fs from "fs";
import { fileUpload } from "../utils/fileUpload.js";
import { getContent } from "../utils/genContent.js";

const __filename = fileURLToPath(import.meta.url);
const __dirname = path.dirname(__filename);

export const uploadFile = async (req, res) => {
  try {
    if (!req.files || !req.files.video) {
      return res.status(400).json({ error: "No video uploaded" });
    }

    const videoFile = req.files.video;
    const uploadDir = path.join(__dirname, "..", "uploads");

    if (!fs.existsSync(uploadDir)) {
      fs.mkdirSync(uploadDir);
    }

    const uploadPath = path.join(uploadDir, videoFile.name);

    await videoFile.mv(uploadPath);

    const response = await fileUpload(uploadPath, req.files.video);  //we pass 'uploadPath' and the video file data to 'fileUpload'
    const genContent = await getContent(response);   //the 'response' (containing the file URI) is passed to 'getContent'

    return res.status(200).json({ subs: genContent });   //// return the generated subtitles to the client
  } catch (error) {
    console.error("Error uploading video:", error);
    return res
      .status(500)
      .json({ error: "Internal server error: " + error.message });
  }
};
With this, the backend API is complete. Now, we'll move on to updating the front end.
Update the Front End
Our frontend currently only allows users to select a video. In this section, we'll update it to send the video data to our backend for processing. The frontend will then receive the generated subtitles from the backend and initiate a download of the .srt file.
Navigate to the client folder:
cd client
Install axios. We’ll use it to handle HTTP requests.
npm install axios
In the client/src/App.tsx:
import axios from "axios";

const App = () => {
  const handleSubmit = async (e: React.FormEvent<HTMLFormElement>): Promise<void> => {
    e.preventDefault();
    try {
      const formData = new FormData(e.currentTarget);
      // sending a POST request with form data
      const response = await axios.post(
        "http://localhost:3000/api/subs/",
        formData
      );
      // creating a Blob from the server response and triggering the file download
      const blob = new Blob([response.data.subs], { type: "text/plain" });
      const link = document.createElement("a");
      link.href = URL.createObjectURL(blob);
      link.download = "subtitle.srt";
      link.click();
      link.remove();
    } catch (error) {
      console.log(error);
    }
  };

  return (
    <div>
      <form onSubmit={handleSubmit}>
        <input type="file" accept="video/*,.mkv" name="video" />
        <input type="submit" />
      </form>
    </div>
  );
};

export default App;
axios makes the POST request to your backend API endpoint (/api/subs). The server will process the video, and this might take some time.
After the server sends the generated subtitles, the frontend receives them as a response. To handle this response and allow users to download the subtitles, we'll use a Blob. A Blob (Binary Large Object) is a web API object that represents raw binary data, essentially acting like a file. In our case, the subtitles returned from the server will be converted into a Blob, which will then allow us to trigger a download in the user's browser.
Summary
In this tutorial, you learned how to build an AI-powered subtitle generator using Google's Gemini API, React, and Express. You can upload videos, send them to the Gemini API for subtitle generation, and provide the generated subtitles for download.
Conclusion
That's it! You've successfully built an AI-powered subtitle generator using the Gemini API. For quicker testing, start with shorter video clips (3-5 minutes). Longer videos might take more time to process.
Want to create a customizable video prompting application? Just add an input field to let users enter their prompts, send that prompt to the server, and use it in place of the hardcoded prompt. That's all it takes.
For more information about the Gemini API, refer to the official Gemini API Docs
You can find the full code here: AI-Subtitle-Generator (sanjayr-12/ai-subtitle-generator)
If there are any mistakes or you have any questions, contact me on LinkedIn (sanjay-r-ab6064294) or Instagram (heheheh_pet).
Thank you for reading!