
How to Automate Branch-Specific Netlify Configurations with a Bash Script: A Step-by-Step Guide
How to Automate Branch-Specific Netlify Configurations with a Bash Script: A Step-by-Step Guide 관련

When you’re working on a project with multiple environments - like staging and production - for your backend APIs and frontend deployments, you’ll want to make sure you have the correct configuration and commands for each branch in your repository.
This can be daunting in situations where multiple developers are actively working on a codebase, making changes to different branches, or managing multiple branch-specific configurations.
Like with every pull request or change pushed to a branch, you’ll need to review every line of code that’s been changed, added, or removed before deciding what gets merged or not. Configuration files in codebases are not exempt from this, making them prone to errors, as a simple change can affect your entire Continuous Integration setup.
When changes get made to the staging or production branch and a build is triggered, you’ll want to ensure that the correct resources attached to a branch are maintained. In some cases, you may need to define different redirect rules for each respective client, custom build commands, or other settings for each branch.
In this article, I’ll walk through how to manage branch-specific configurations including redirects for multiple branches automatically, using a simple bash script. I’ll also show you how to safely merge context-specific rules for your staging and production branches on Netlify.
Project Structure and Scenario
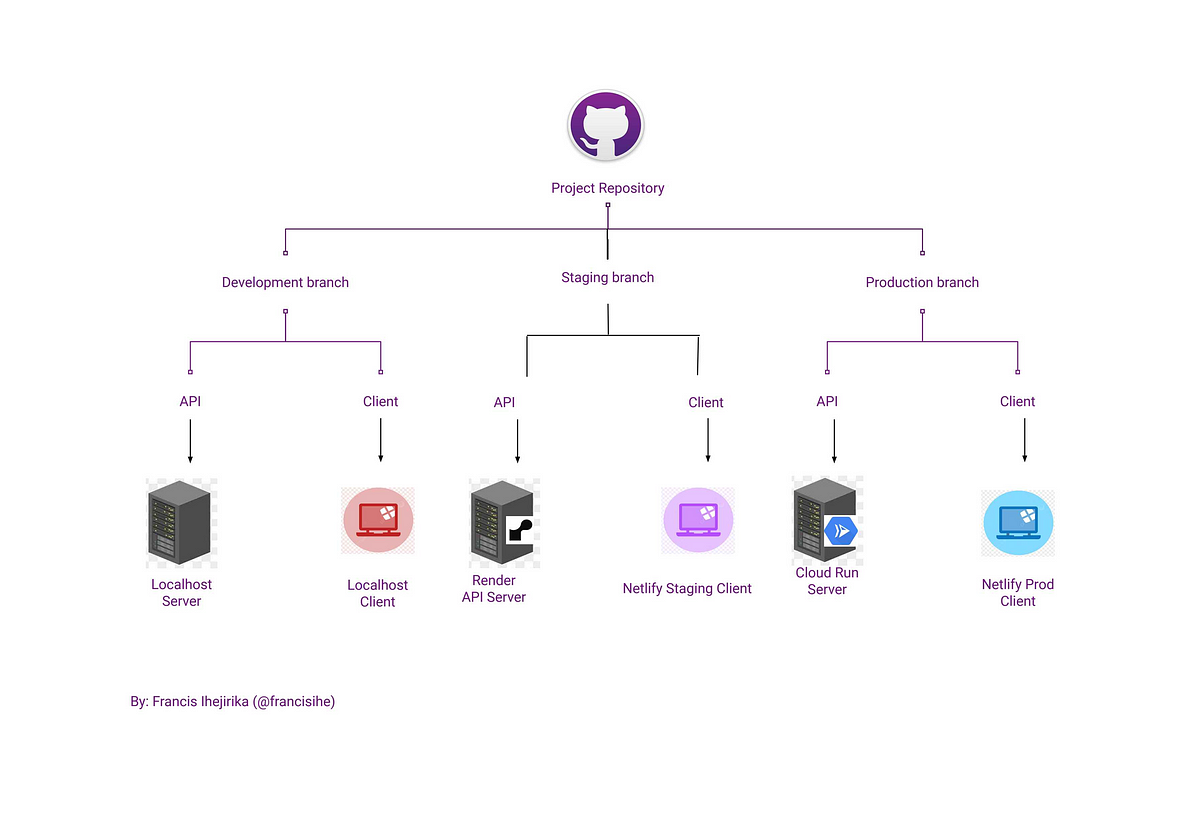
Consider a situation where you have two separate servers deployed for a project: one to serve requests to a staging environment (deployed to Render), and another to the production environment (deployed to Google Cloud Run).
You also have two separate client deployments on Netlify, each with their respective API_BASE_URLs, that are served by their respective servers as illustrated below:
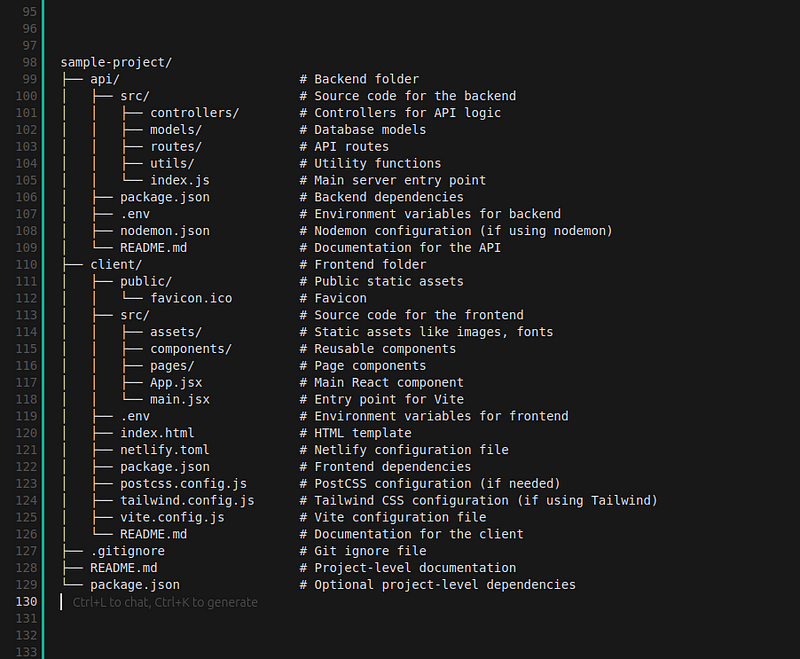
The image below is a sample-project repository, with api and client folders/directories within it. This is an overview of the structure in each of the branches outlined above. Each directory contains its own package.json file, is treated as an independent component, and can be deployed to two separate services.
In your frontend deployment for each of the clients, all your requests made to endpoints that begin with /api/v1/ are routed to the server. Other routes remain within the frontend to direct you to pages within the client. So you’re required to write the correct rules to guide your client on how to process these requests. These are called redirect rules or rewrites.
What are Redirects/Rewrites?
Redirects, or rewrites, are rules you can create to have certain URLs automatically go to a new location anywhere on the internet (source: WPengine). These are also generally known as URL forwarding and you can use them anywhere - in entire websites, sections of a website, or an entire web application.
In web applications, redirects are often utilized to determine how to process requests. Web hosting platforms such as Netlify and Vercel use them as well, giving developers the option to determine how their web applications process requests.
How Netlify Processes Redirects
Netlify has two possible ways to specify redirect rules. You can do it using the _redirects file syntax or using the netlify.toml configuration file syntax. They achieve the same goal, but the netlify.toml syntax gives you more options and capabilities.
Using the _redirects file syntax
If you opt to use the redirect syntax, you should simply create a _redirects file in the public folder of your client app, and specify the redirect rules within it. That’s as easy as it gets. Below is an example of a redirect rule within the file:

The above rule can be interpreted as:
- Send all my requests that match
/api/v1to the API URL specified, and return a 200 success status code. The asterisks (*) after/api/v1/as seen in/api/v1/*instruct it to append any other extension of the original URL to the stated API URL. For example, if you have a/api/v1/usersroute in your frontend, that request will be redirected tohttps://your-api-base-url.com/api/v1/users. The:splatseen in the API URL is simply a placeholder. - Serve all other default routes through the index.html folder. This is required to ensure that you don’t encounter broken pages when you navigate to other pages and attempt to visit the previous page using the “back” button.
Using the netlify.toml configuration file syntax
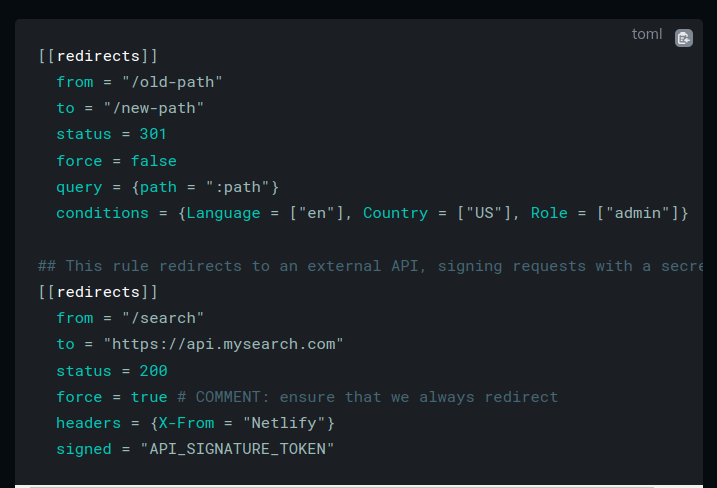
The netlify.toml configuration file gives you a lot more flexibility when specifying redirect rules, including but not limited to matching the original request route, the required destination, the preferred status code response, header rules, signatures, country restrictions, roles and more.
This is a sample netlify.toml file sourced from Netlify’s documentation:
Quick Note: using the redirects file for redirecting certain requests to our API is perfectly fine. But it can be considered a security risk adding our API URL in plain text in the redirects file if the API_BASE_URL is supposed to be private. This is because any file in the public folder is what it sounds like - public - and anyone can access it.
If the direct locations you desire to have in your app are public URLs, then feel free to utilize the _redirects file syntax. But if you prefer to have a private URL(s), utilizing a netlify.toml configuration file in combination with the environment variables is generally a better idea.
The Problem: Managing Multiple netlify.toml Files for Different Branches
When you use the netlify.toml file to define your build commands and environment-specific settings, and you make changes that are pushed to your repository and open pull requests, you have to manually ignore or edit each netlify.tomlin each branch. This eventually becomes very stressful and susceptible to errors.
In addition to this, we want to avoid having our API URLs hardcoded in either our _redirects or netlify.tomlfile within our project codebase for security reasons. We will use environment variables as provided within our Netlify UI for production and staging contexts.
To avoid the above problems, we will use a small script in our codebase to dynamically generate the correct netlify.toml files for each branch. This approach eliminates conflicts and removes the need for manual intervention when switching between branches or handling pull requests.
How to Write the Script to Automatically Create Our Configuration File(s)
Sample Netlify.toml file
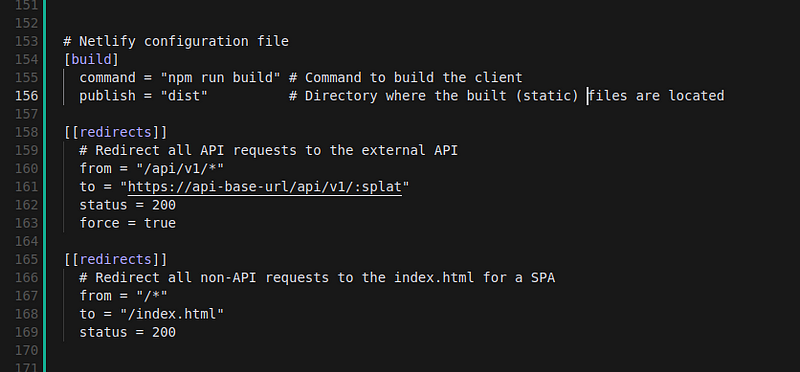
Below is a screenshot of a sample netlify.toml file we are trying to achieve for each build. You can see that all our requests that match api/v1/ in our codebase will be routed to our API.
You could have your API endpoint requests structured differently, for example /api/your-endpoint - just make sure to adjust the script accordingly. In this sample project, we use api/v1/your-endpoint as our structure.
Step 1: Create the script folder and add the script file
In the client directory, create a scripts/ directory and a configure-netlify.sh script file. You are required to do this for each branch in your repo. The content remains the same.
Open the configure-netlify.sh script file and paste the following content within it:
#!/bin/bash
# Ensure API_BASE_URL is set
if [ -z "$API_BASE_URL" ]; then
  echo "Error: API_BASE_URL environment variable is not set."
  exit 1  # Exit the script to stop the deployment
fi

echo "Using API endpoint: $API_BASE_URL"

# Define the desired Netlify configuration
NETLIFY_CONFIG="
[build]
  command = \"npm install && npm run build\"
  base = \"client\"
  publish = \"dist\"

[[redirects]]
  from = \"/api/v1/*\"
  to = \"$API_BASE_URL/:splat\"
  status = 200
  force = true

[[redirects]]
  from = \"/*\"
  to = \"/index.html\"
  status = 200
"

# Create or update the netlify.toml file
if [ ! -f "netlify.toml" ]; then
  echo "Creating netlify.toml file..."
else
  echo "Updating existing netlify.toml file..."
fi

echo "$NETLIFY_CONFIG" > netlify.toml

# Confirm successful configuration
echo "netlify.toml file has been configured successfully!"
The script does the following:
- It checks the environment variables to ensure that the
API_BASE_URLis set. If this isn’t set, it exits the build and causes it to fail. We did this to ensure that you don’t mistakenly create a successful deployment but with invalid URLs in production. - It then creates the content of the
netlify.tomlfile as shown in the sample above. If your API endpoints use a different structure fromapi/v1/your-endpoint, you can adjust the script to fit your desired structure. - It checks if there already exists a
netlify.tomlfile. If it doesn’t exist, it creates one and writes the content into it. If it exists, it updates it with the correct content during the build, using theAPI_BASE_URLset in the environment variables.
Step 2: Modify package.json to include the script command
To integrate this script with your build process, we will add a script command to the package.json file to call this script before running the actual build.
Add the configure-netlify command as follows: "configure-netlify": "bash scripts/configure-netlify.sh" within the scripts in your package.json file.
Update your build command to run the script before running the actual build: "build": "npm run configure-netlify && vite build".

Don’t forget to save these changes and push them to your remote repository.
How to Deploy Our Client To Netlify
When deploying our client to Netlify, we are given three options:
- importing an existing project (that is, a project that exists on a git repository service such as GitHub and GitLab),
- importing from a template, or
- manually deploying a static site using the Netlify drop (drag and drop) interface.
For the configuration in our repository to work as expected during our build process, you’ll need to use the option that requires importing from an existing project such as GitHub. Using the drag-and-drop interface won’t work. If you must use this, then opt for the _redirects file syntax option to define your redirects.
First deployment of your project to Netlify
When deploying your project for the first time, you are given the option of deploying only one branch initially. You can only add and specify other options, such as other branches, in subsequent deployments.
To deploy your project, take the following steps:
- Sign in to Netlify > netlify.com
- Click "Add new site" > "Import an existing project" > "Deploy with GitHub"
- Click "Configure Netlify on GitHub" > Search for your repository > Select it
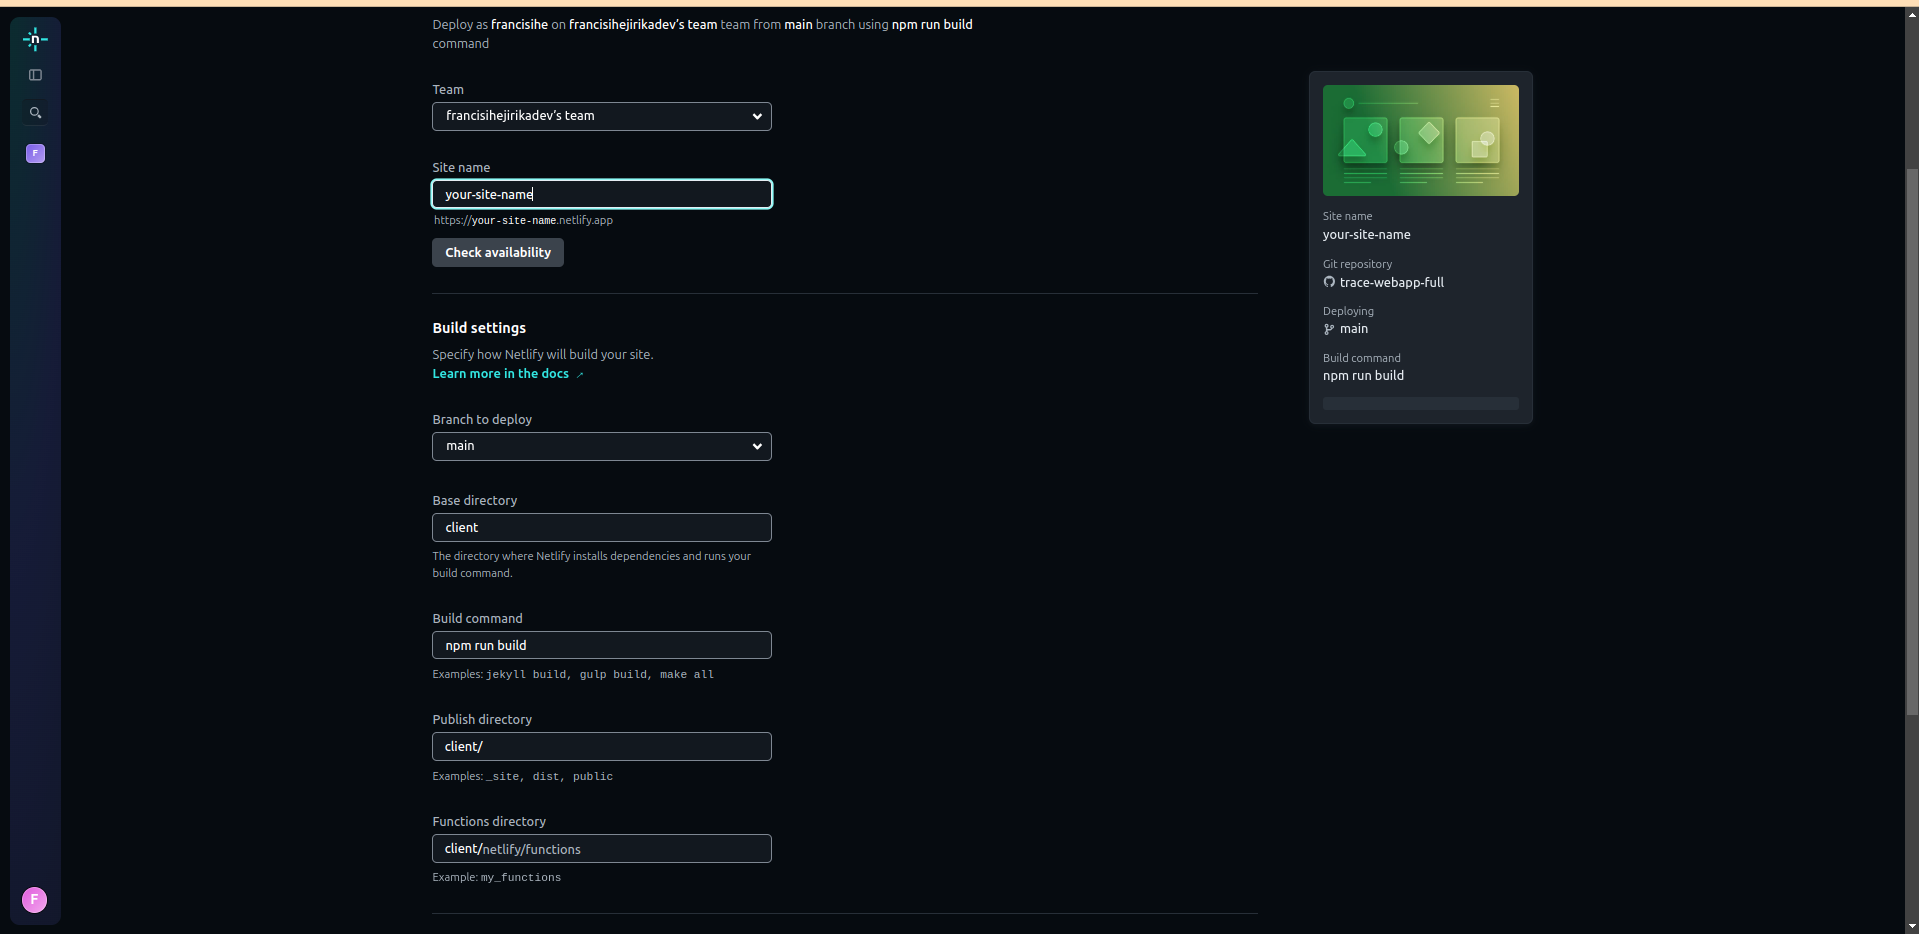
- Enter a unique site name for your project
- Configure deploy settings. Here you are required to select the preferred branch to deploy. For the initial deployment, we will deploy the
mainbranch which we use as the production branch.- Branch: main/master
- Build command:
npm run build - Publish directory:
dist(Select the directory where your static file lives. In this sample project, it’s exported into thedistdirectory. Some tools export intobuild)
- Enter the environment variables for your project. Don’t forget to enter your
API_BASE_URLfrom your server. This is an essential requirement according to the bash script. - Click "Deploy site"
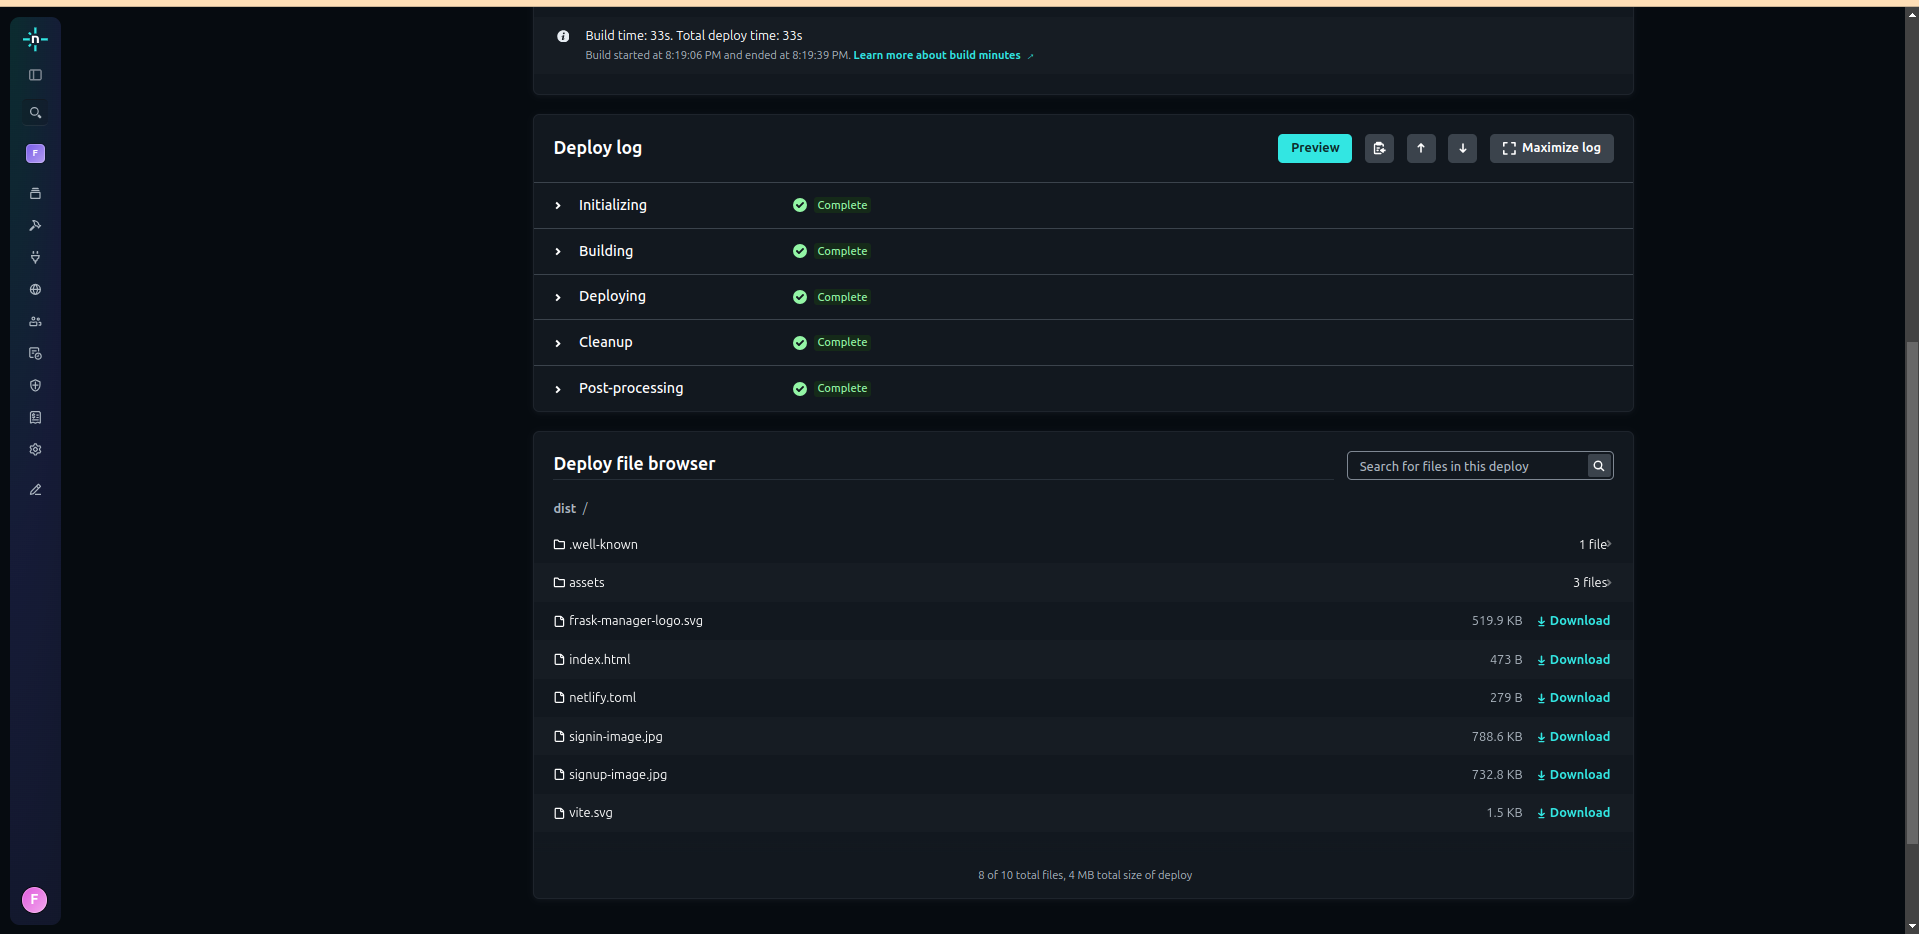
Your project should deploy correctly, and you’ll be able to see the netlify.toml configuration generated by the script by inspecting the deployment details at the bottom of the successful deployment page.
You can download this file to your local machine to see the configuration generated. It should match the sample netlify.toml file above. You can also test that it works using your generated site link.
Subsequent Deployments / How to Set Up Branch Deployments
Step 1: Set Up Environment Variables in Netlify for each branch context — production, staging, and so on
When your project has been deployed successfully, you can set up deployments for your staging branch. To edit the configurations, you’ll need to:
- Navigate to the list of your sites
- Select your successfully deployed site
- Click on “site configuration” on the left menu
- Select “environment variables” > click the “Add a variable” button.
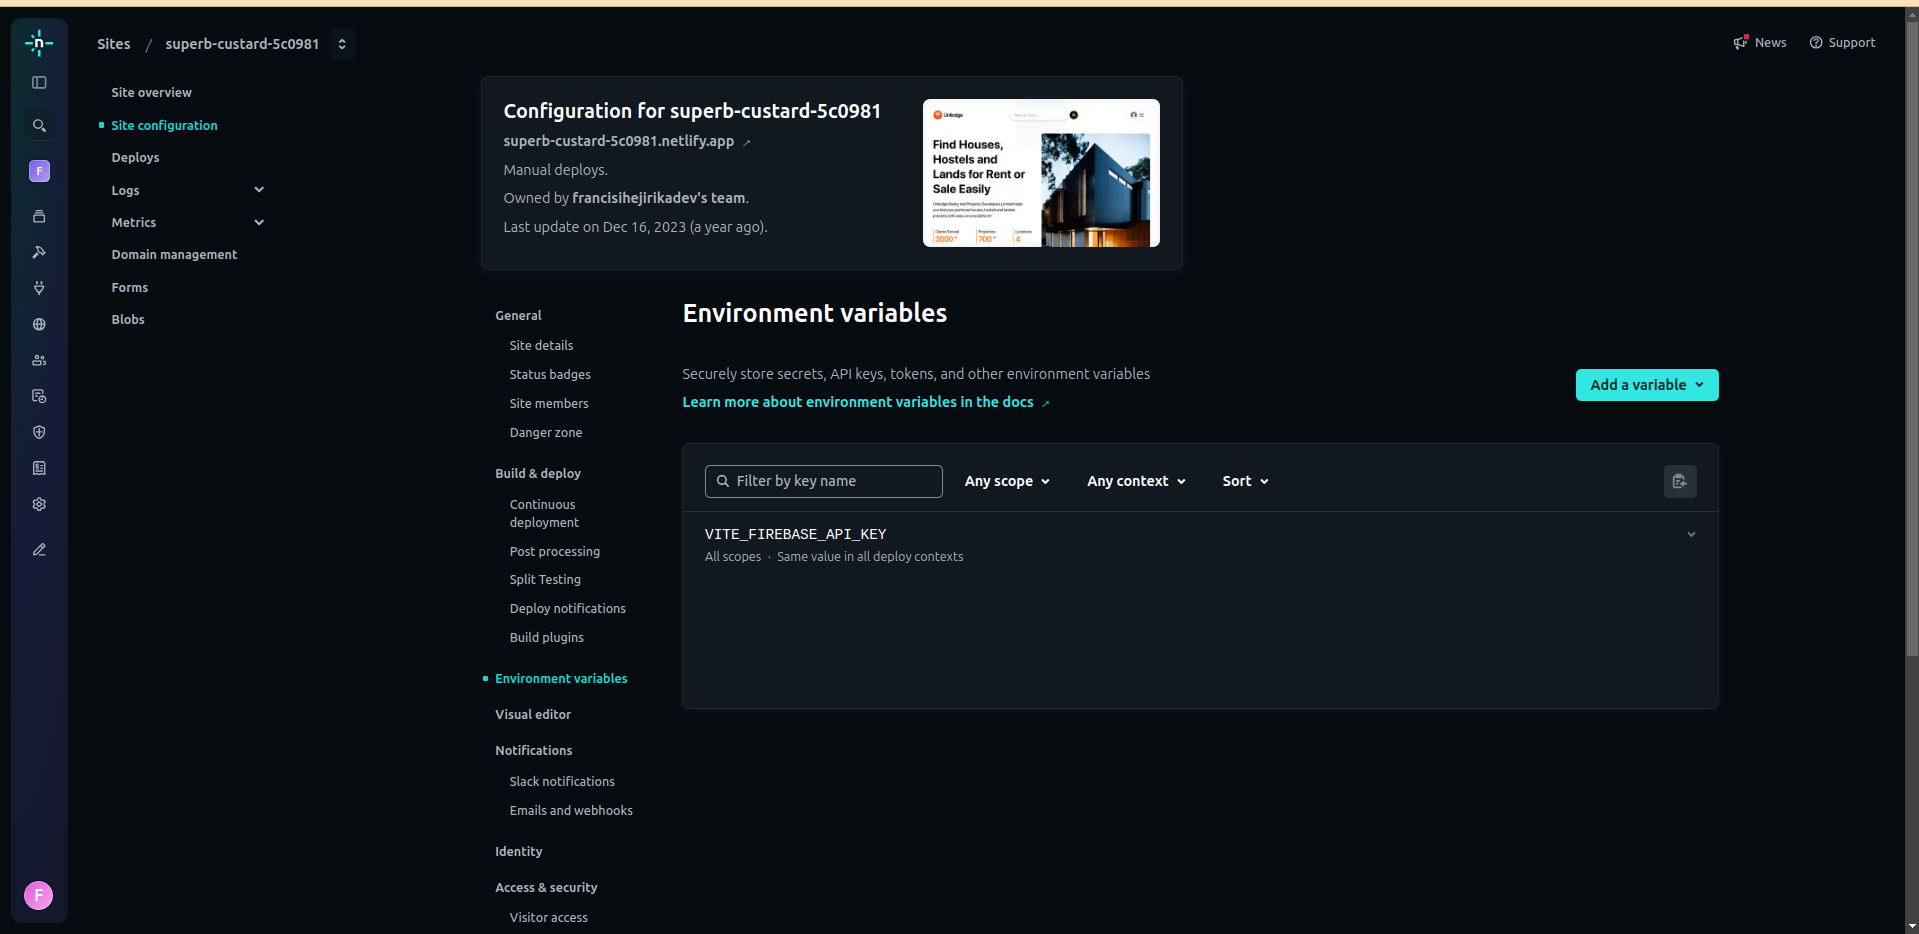
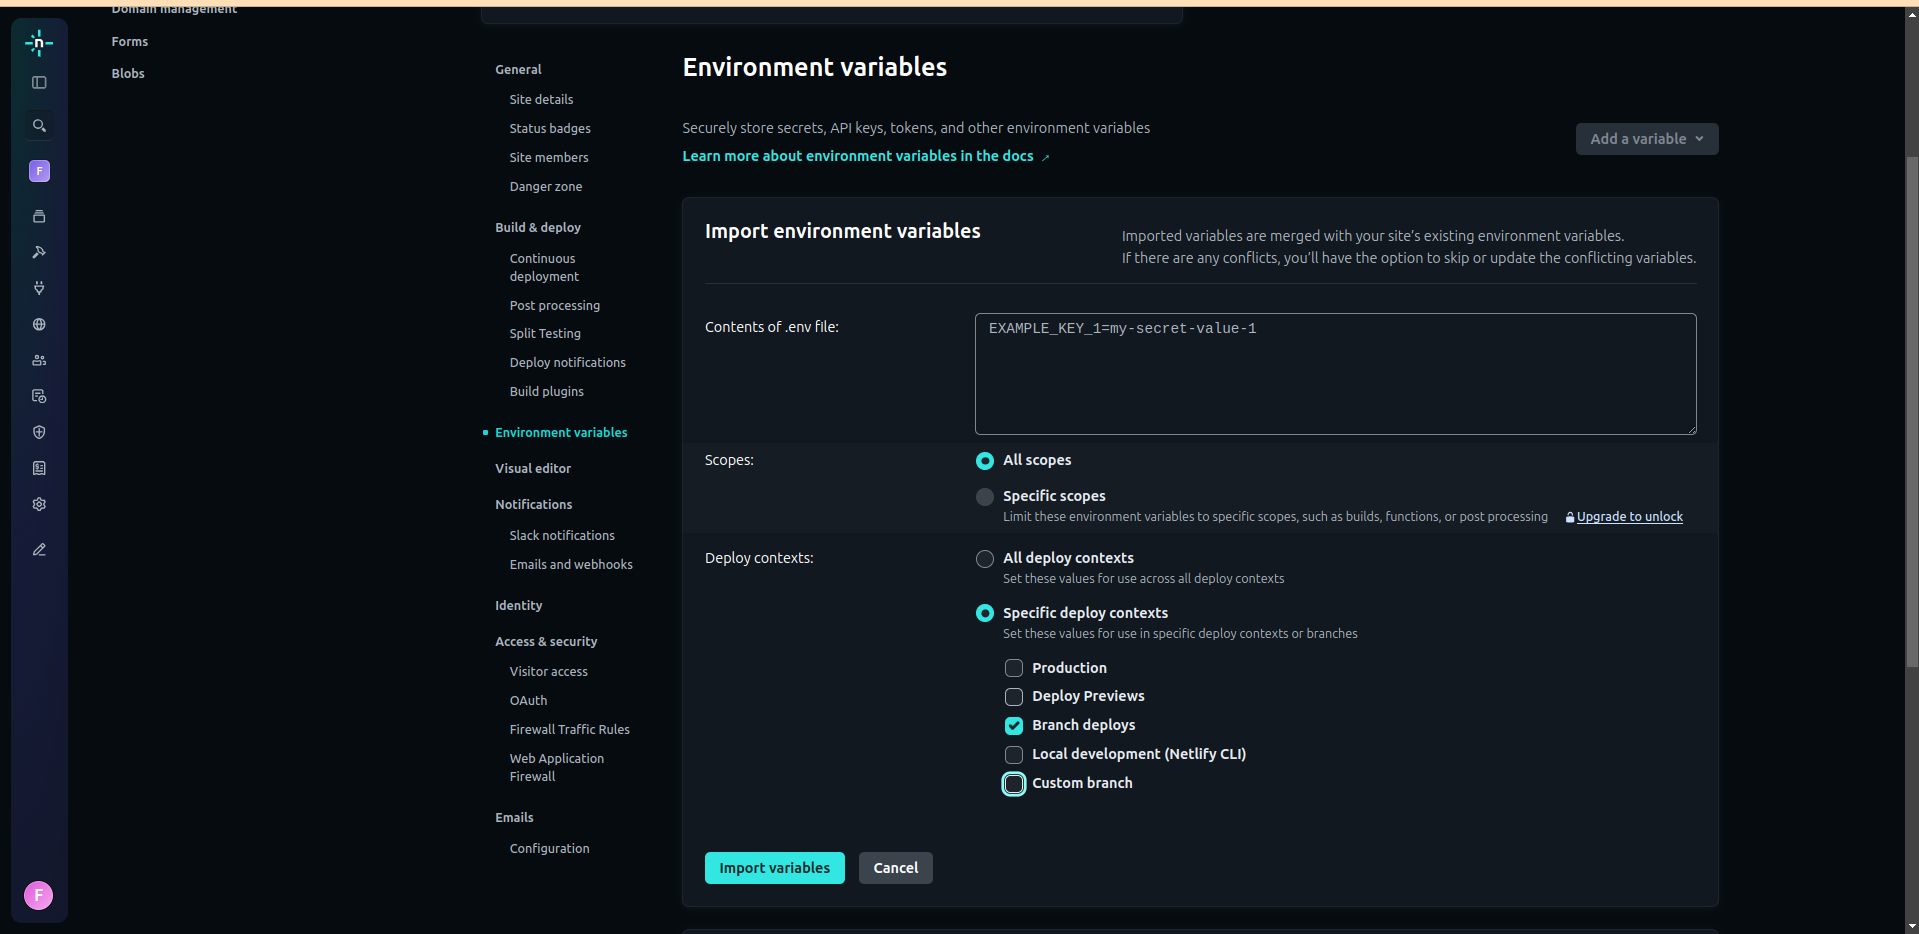
You will be given the option of adding variables individually or importing an entire .env file. You can choose either option. In the image below, I’ve selected “Import from a .env file”.

Seeing that our production site, deployed from the main branch (with the production environmental variables), has already been deployed, you’ll need to:
- Uncheck the production branch (to prevent replacing the initially deployed main branch. Be careful not to mix up your environment variables for different branches)
- Select “branch deploys”
- Copy and paste the content of your .env file in the input section
- Don’t forget to add the
API_BASE_URLenvironment variable for your staging environment
Note that in selecting branch deploys, the environment variables imported here will affect all branch deploys, apart from the production branch. You can further customize your contexts by selecting a custom branch, but that’s an entirely different approach which may require you to further customize your netlify.toml configuration file or the bash script.
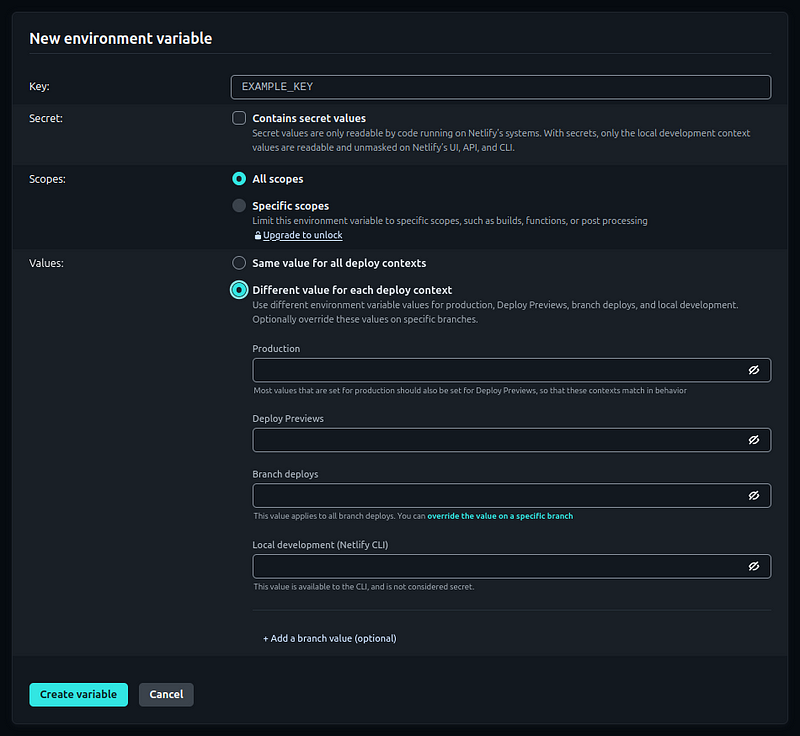
If you decide to import each environment variable individually, you are given a similar option as seen below. Ensure that you select the correct context for each branch.
DON’T USE THE SAME VALUES FOR ALL CONTEXTS. As seen in the image below, selecting “different value for each deploy context” will allow you to define the values for each one. In this case, we define the values for branch deploys. Your initially used production variable should already exist.
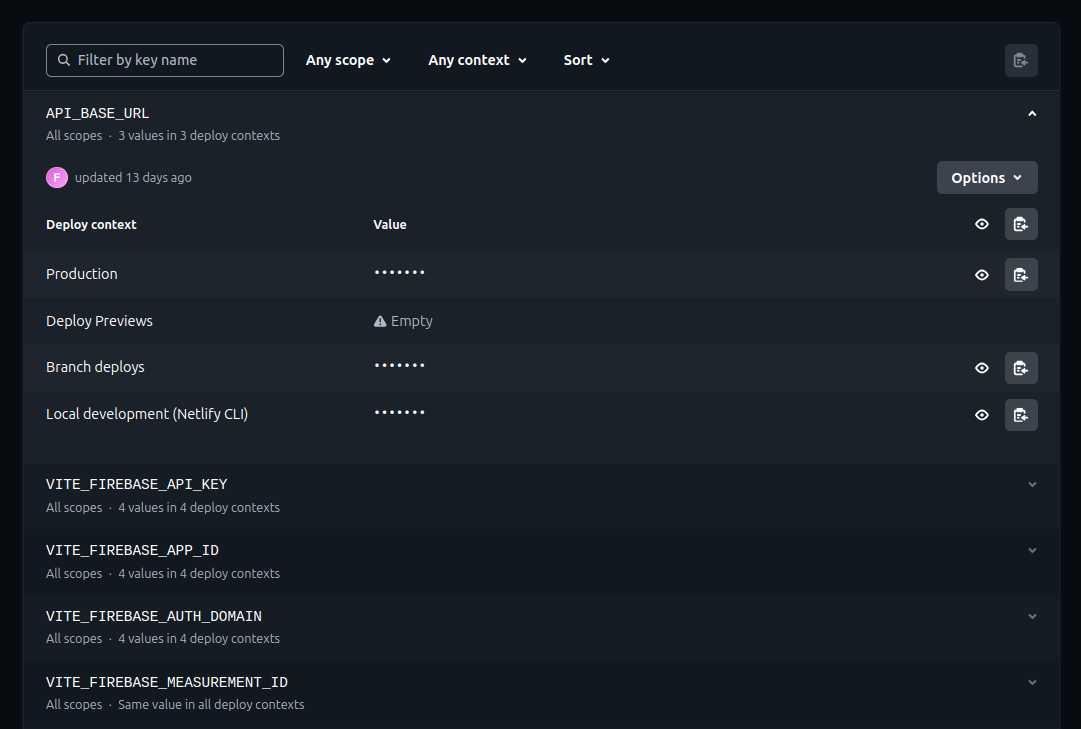
When all the variables have been imported, you can inspect them to confirm that they have been correctly imported by selecting the dropdown on the right beside each variable and inspecting their values.
Step 2: Trigger a new deploy
When all your environment variables have been imported for the different contexts - production and staging in this case - navigate to “deploys” on the left panel of your screen. Then hit the “Trigger deploy” button, clear the cache, and initiate a new deployment.

Inspect Your Deployments
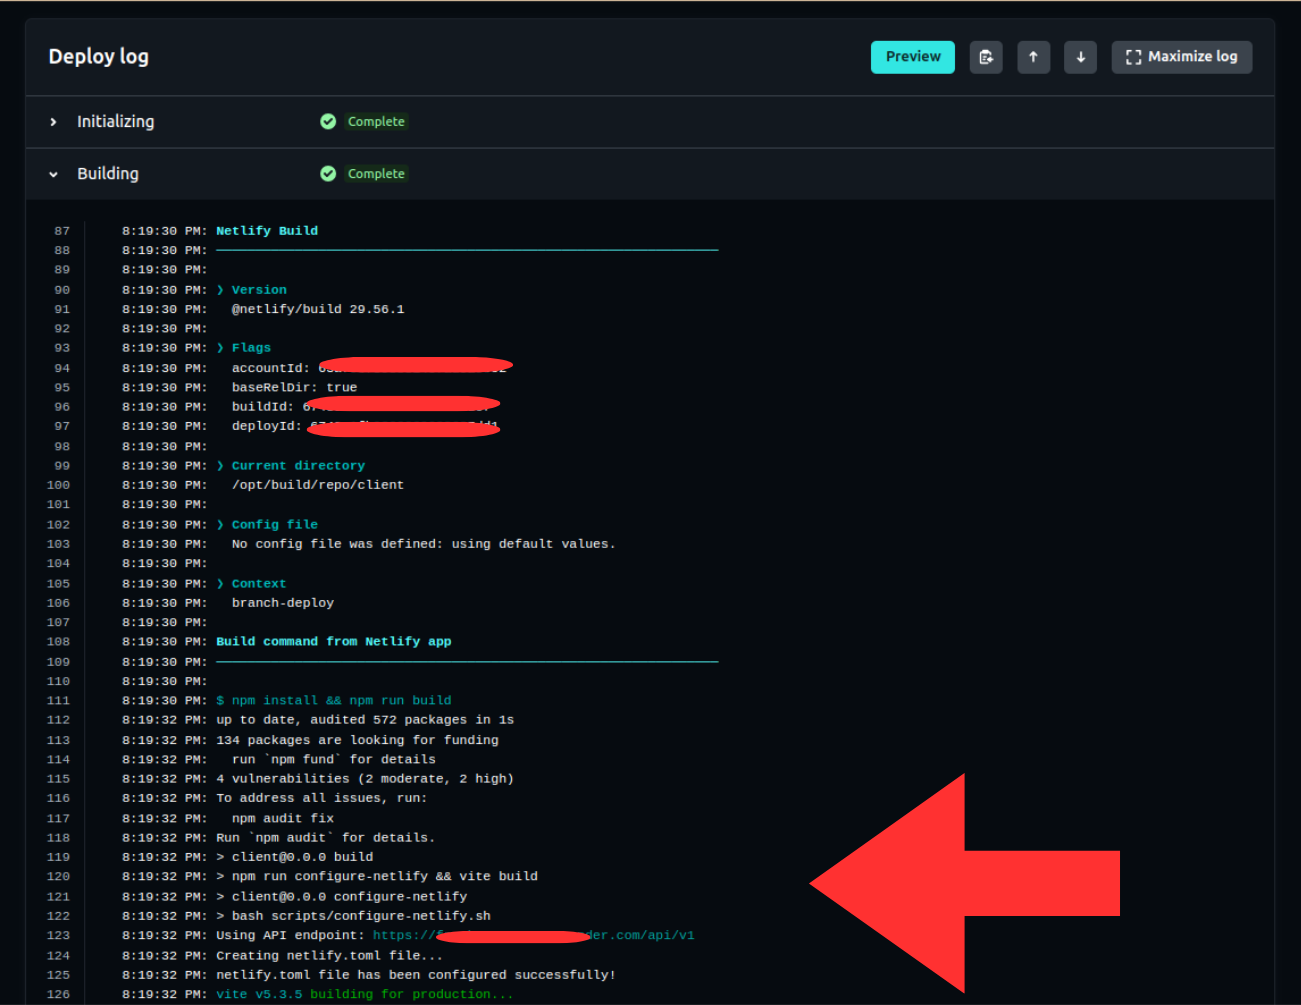
You can confirm that your script works as expected by selecting any of the deployments and selecting the building dropdown in the “Deploy log”. You will see the command run, as well as your output and API URL for that deployment, as defined by your context.
Conclusion
By following the steps in this guide, and using your script and updated commands in each branch in your repo, when you push changes then Netlify will automatically generate or update the netlify.tomlfile in each branch. This ensures that the correct configurations and environment variables for each environment are used at build time.
Your script remains the same across all the branches. This lets you focus on other code changes while your script handles the correct configuration for you safely and easily.
Push changes to any branch to see this in action.
Feel free to connect with me on X (francisihej) (@francisihej) or LinkedIn (francis-ihejirika)!