How to Create and Send Email Templates Using React Email and Resend in Next.js
How to Create and Send Email Templates Using React Email and Resend in Next.js 관련

Modern software applications often rely on email communication to engage with users. They may send authentication codes during sign in attempts, marketing emails, or newsletters, for example. This means that email notifications are typically the most common means of communication with users.
In this tutorial, you'll learn how to design stunning email templates with React Email and send them using Resend - a simple and powerful email API platform.
Prerequisites
To get the most out of this tutorial, you should have a basic understanding of React or Next.js.
We'll also make use of the following tools:
- React Email: A library that lets you create beautifully designed email templates using React components.
- Resend: A simple and powerful API platform for sending emails from your applications.
How to Build the Application with Next.js
In this section, you'll create a simple customer support application. The app will include a form for users to submit their queries, which triggers an email notification confirming that a support ticket has been created.
To get started, we'll first set up the user interface and an API endpoint.
Run the following command to create a new Next.js TypeScript project:
npx create-next-app react-email-resend
Update the app/page.tsx file to render a form that collects the customer's details, including their full name, email address, the subject of the ticket, and a detailed message describing the issue. When the form is submitted, the input data is logged to the console using the handleSubmit function.
"use client";
import support from "@/app/images/support.jpg";
import { useState } from "react";
import Image from "next/image";

export default function Page() {
    //👇🏻 input states
    const [name, setName] = useState<string>("");
    const [email, setEmail] = useState<string>("");
    const [subject, setSubject] = useState<string>("");
    const [content, setContent] = useState<string>("");

    const handleSubmit = async (e: React.FormEvent) => {
        e.preventDefault();
        //👇🏻 log the user's input
        console.log({ name, email, subject, content });
    };
return ({/** -- UI elements -- */})
}
Return the form UI elements that accept the user’s full name, email address, ticket subject, and a detailed message describing the issue.
    return (
        <main className='w-full min-h-screen flex items-center justify-between'>
                <form className='w-full' onSubmit={handleSubmit}>
                    <label htmlFor='name' className='opacity-60'>
                        Full Name
                    </label>
                    <input
                        type='text'
                        className='w-full px-4 py-3 border-[1px] mb-3 border-gray-300 rounded-sm'
                        id='name'
                        required
                        value={name}
                        onChange={(e) => setName(e.target.value)}
                    />

                    <label htmlFor='email' className='opacity-60'>
                        Email Address
                    </label>
                    <input
                        type='email'
                        className='w-full px-4 py-3 border-[1px] mb-3 border-gray-300 rounded-sm'
                        id='email'
                        value={email}
                        onChange={(e) => setEmail(e.target.value)}
                        required
                    />

                    <label htmlFor='subject' className='opacity-60'>
                        Subject
                    </label>
                    <input
                        type='text'
                        className='w-full px-4 py-3 border-[1px] mb-3 border-gray-300 rounded-sm'
                        id='subject'
                        value={subject}
                        onChange={(e) => setSubject(e.target.value)}
                        required
                    />

                    <label htmlFor='message' className='opacity-60'>
                        Message
                    </label>
                    <textarea
                        rows={7}
                        className='w-full px-4 py-3 border-[1px] mb-3 border-gray-300 rounded-sm'
                        id='message'
                        required
                        value={content}
                        onChange={(e) => setContent(e.target.value)}
                    />

                    <button className='w-full bg-blue-500 py-4 px-3 rounded-md font-bold text-blue-50'>
                        SEND MESSAGE
                    </button>
                </form>
            </div>
        </main>
    );
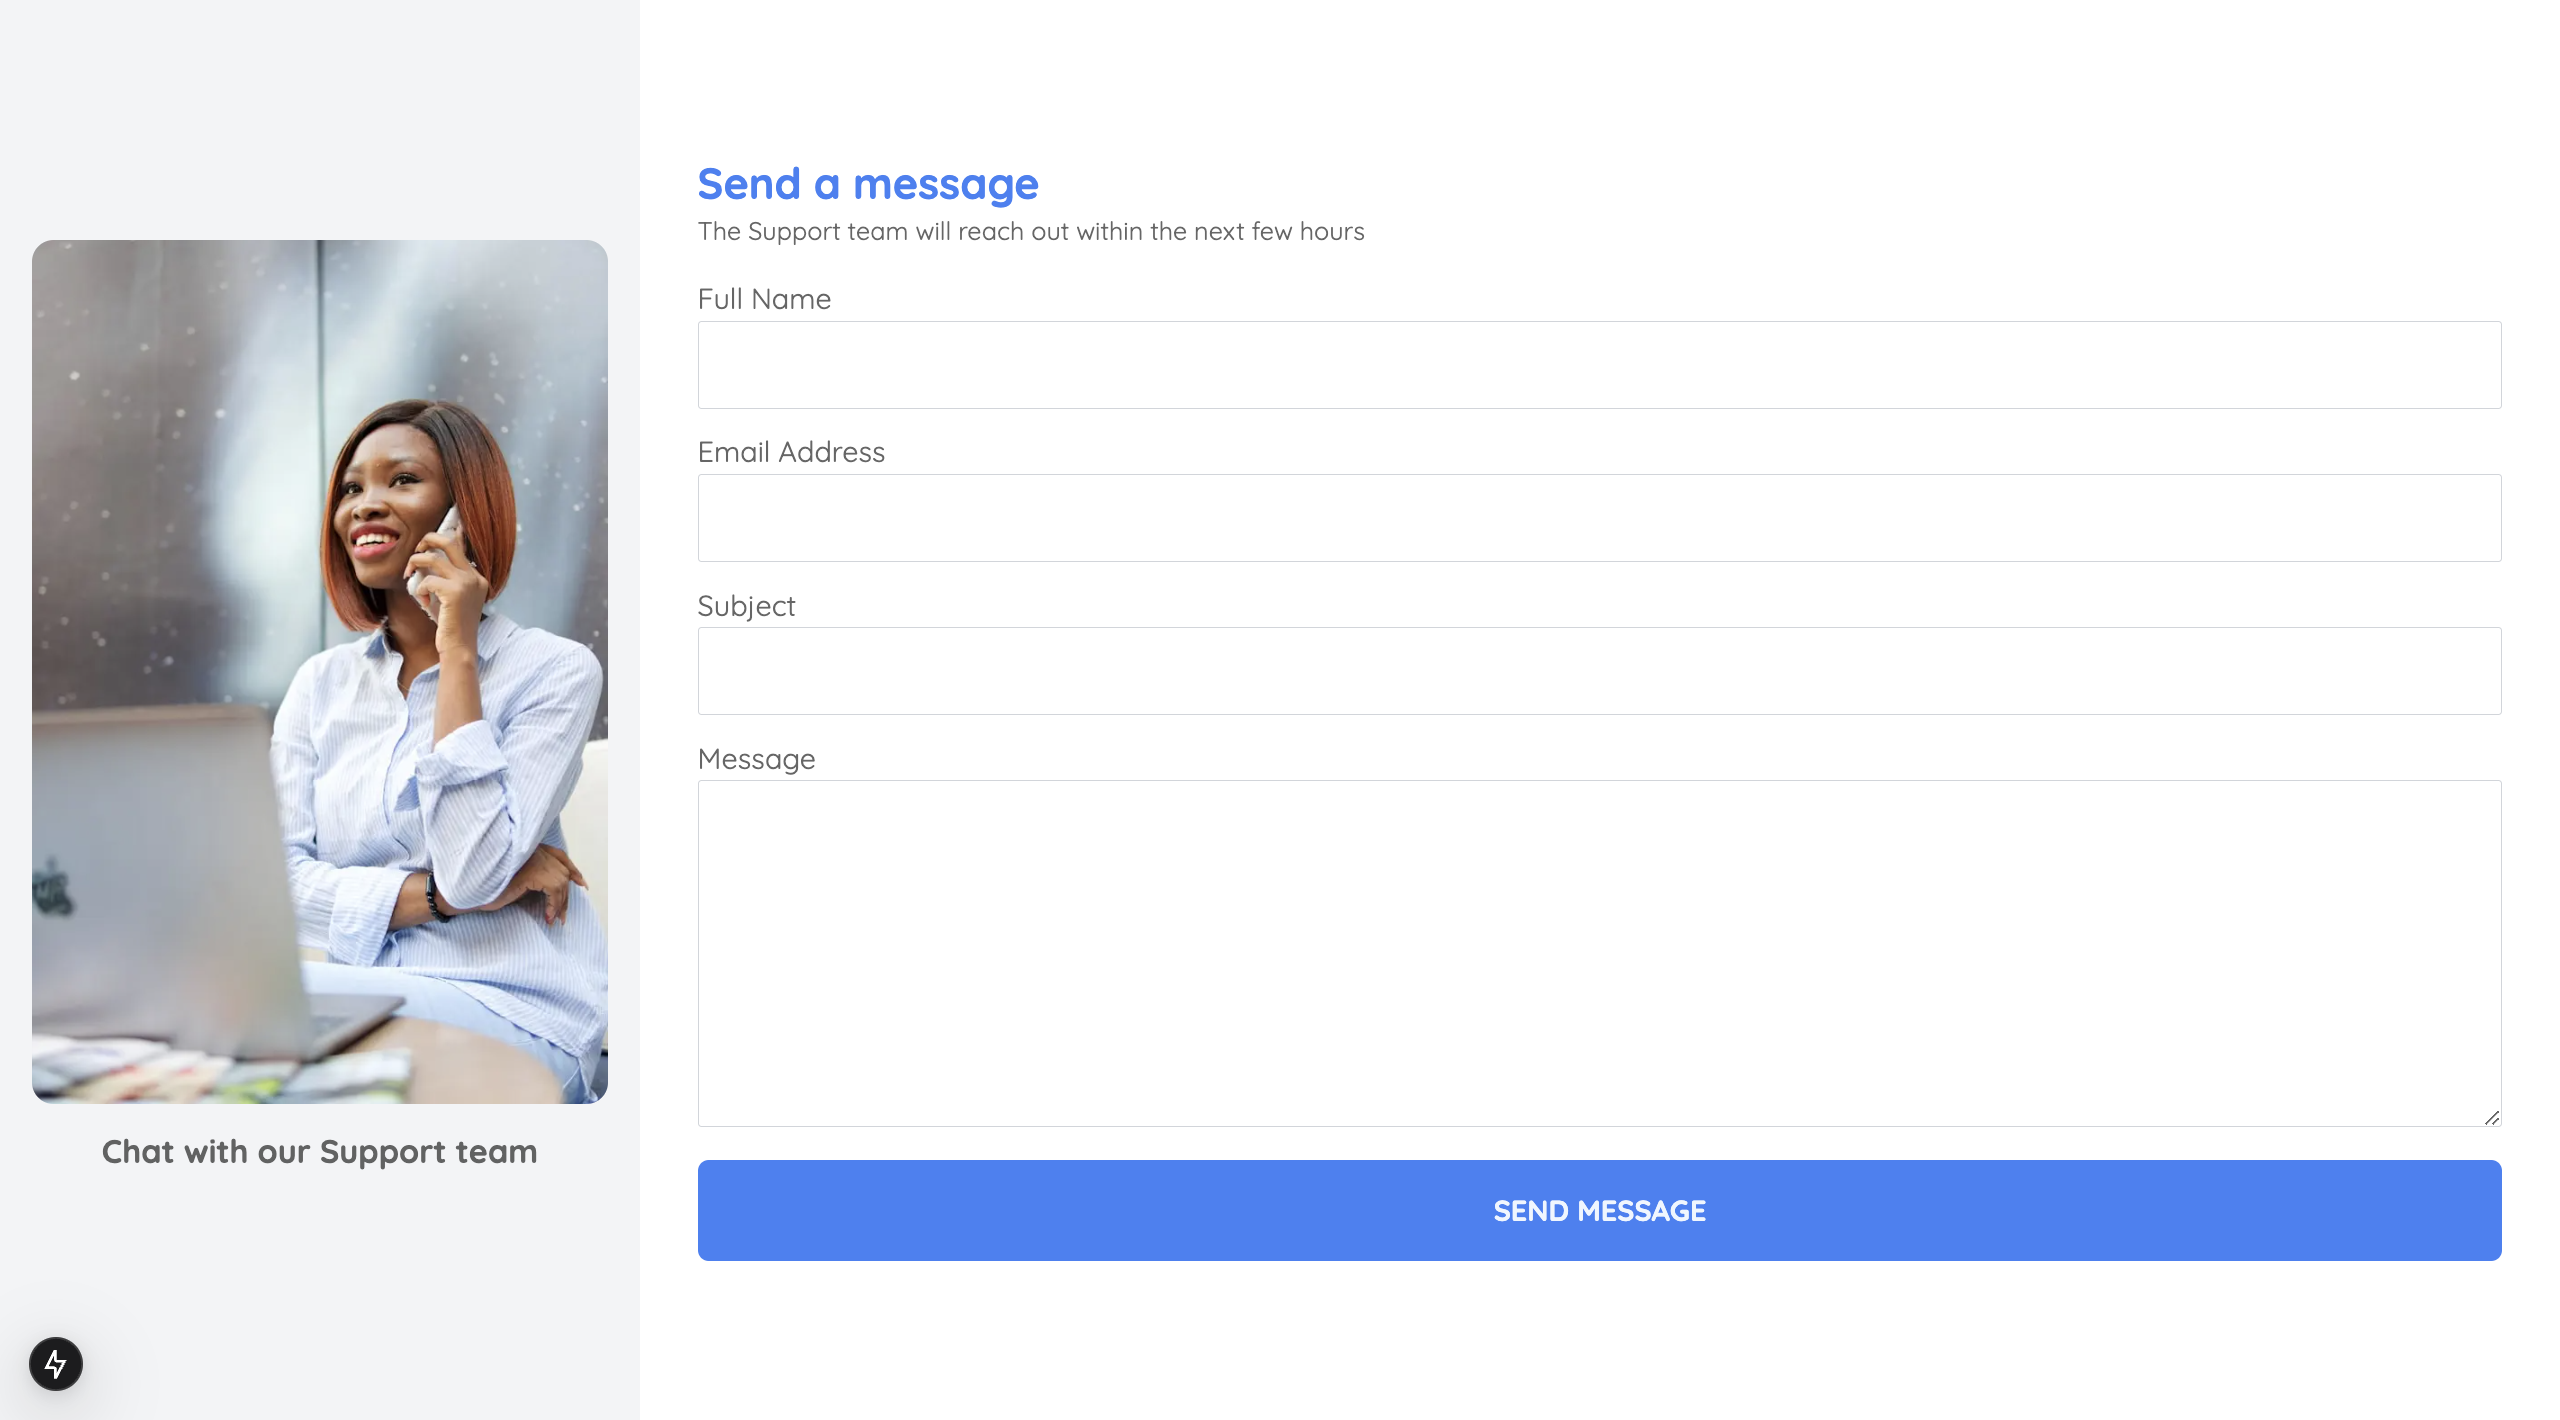
Here is the resulting page from the component:

Next, create an API endpoint (/api/route.ts) that accepts the customer’s input.
cd app
mkdir api && cd api
touch route.ts
Copy the following code into the api/route.ts file. The API endpoint logs the customer's input to the console upon receiving it.
import { NextRequest, NextResponse } from "next/server";

export async function POST(req: NextRequest) {
    const { name, email, subject, content } = await req.json();
    //👇🏻 log the contents
    console.log({ name, email, subject, content });
    return NextResponse.json({
        message: "Email sent successfully",
        data,
 });
}
Update the handleSubmit function to send the customer's data to the API endpoint and return the JSON response:
const handleSubmit = async (e: React.FormEvent) => {
    e.preventDefault();

    try {
        const response = await fetch("/api", {
            method: "POST",
            headers: {
                "Content-Type": "application/json",
            },
            body: JSON.stringify({ name, email, subject, content }),
        });
        const data = await response.json();
        alert(data.message);
    } catch (error) {
        console.error(error);
        alert("An error occurred, please try again later");
    }
    setName("");
    setEmail("");
    setSubject("");
    setContent("");
};
Congratulations! You've set up the data collection and submission. In the upcoming sections, I'll walk you through creating and sending email templates with React Email and Resend.
How to Create Email Templates using React Email
React Email lets you build and send email components using React and TypeScript. It supports multiple email clients, including Gmail, Yahoo Mail, Outlook, and Apple Mail.
React Email also provides multiple UI components that enables you to customize the email templates according to your preferred layout using React JSX/TSX components.
Install the React Email package and its components by running the code snippet below:
npm install react-email -D -E
npm install @react-email/components -E
Include this script in your package.json file. It directs React Email to where the email templates are located in your project.
  "scripts": {
    "email": "email dev --dir src/emails"
  },
One of the features of React Email is the ability to preview your email template in your browser during development, allowing you to see how it will appear in the recipient's email.
So next, create an emails folder containing a TicketCreated.tsx file within the Next.js src folder and copy the following code snippet into the file:
import * as React from "react";
import {
    Body,
    Container,
    Head,
    Heading,
    Hr,
    Html,
    Link,
    Preview,
    Text,
    Tailwind,
} from "@react-email/components";

interface TicketCreatedProps {
    username: string;
    ticketID: string;
}

const baseUrl = process.env.VERCEL_URL || "http://localhost:3000";
In the code snippet above, we imported the components necessary for building the email template.
Next, add the TicketCreated component to the file to render the email template using React Email components.
export const TicketCreated = ({ username, ticketID }: TicketCreatedProps) => {
    return (
        <Html>
            <Head />
            <Preview>Support Ticket Confirmation Email 🎉</Preview>
            <Tailwind>
                <Body className='bg-white my-auto mx-auto font-sans px-2'>
                    <Container className='border border-solid border-[#eaeaea] rounded my-[40px] mx-auto p-[20px] max-w-[465px]'>
                        <Heading className='text-black text-[24px] font-normal text-center p-0 my-[30px] mx-0'>
                            Your Ticket has been created
                        </Heading>
                        <Text className='text-black text-[14px] leading-[24px]'>
                            Hello {username},
                        </Text>
                        <Text className='text-black text-[14px] leading-[24px]'>
                            <strong>Support Ticket</strong> (
                            <Link
                                href={`${baseUrl}/ticket/${ticketID}`}
                                className='text-blue-600 no-underline'
                            >
                                {`#${ticketID}`}
                            </Link>
                            ) has been created successfully.
                        </Text>

                        <Text className='text-black text-[14px] leading-[24px]'>
                            The Support team will review your ticket and get back to you
                            shortly.
                        </Text>

                        <Hr className='border border-solid border-[#eaeaea] my-[26px] mx-0 w-full' />
                        <Text className='text-[#666666] text-[12px] leading-[24px]'>
                            This message was intended for{" "}
                            <span className='text-black'>{username}</span>. If you did not
                            create this ticket, please ignore this email.
                        </Text>
                    </Container>
                </Body>
            </Tailwind>
        </Html>
    );
};
Finally, export it and add a default values for the props:
TicketCreated.PreviewProps = {
    username: "alanturing",
    ticketID: "9083475",
} as TicketCreatedProps;

export default TicketCreated;

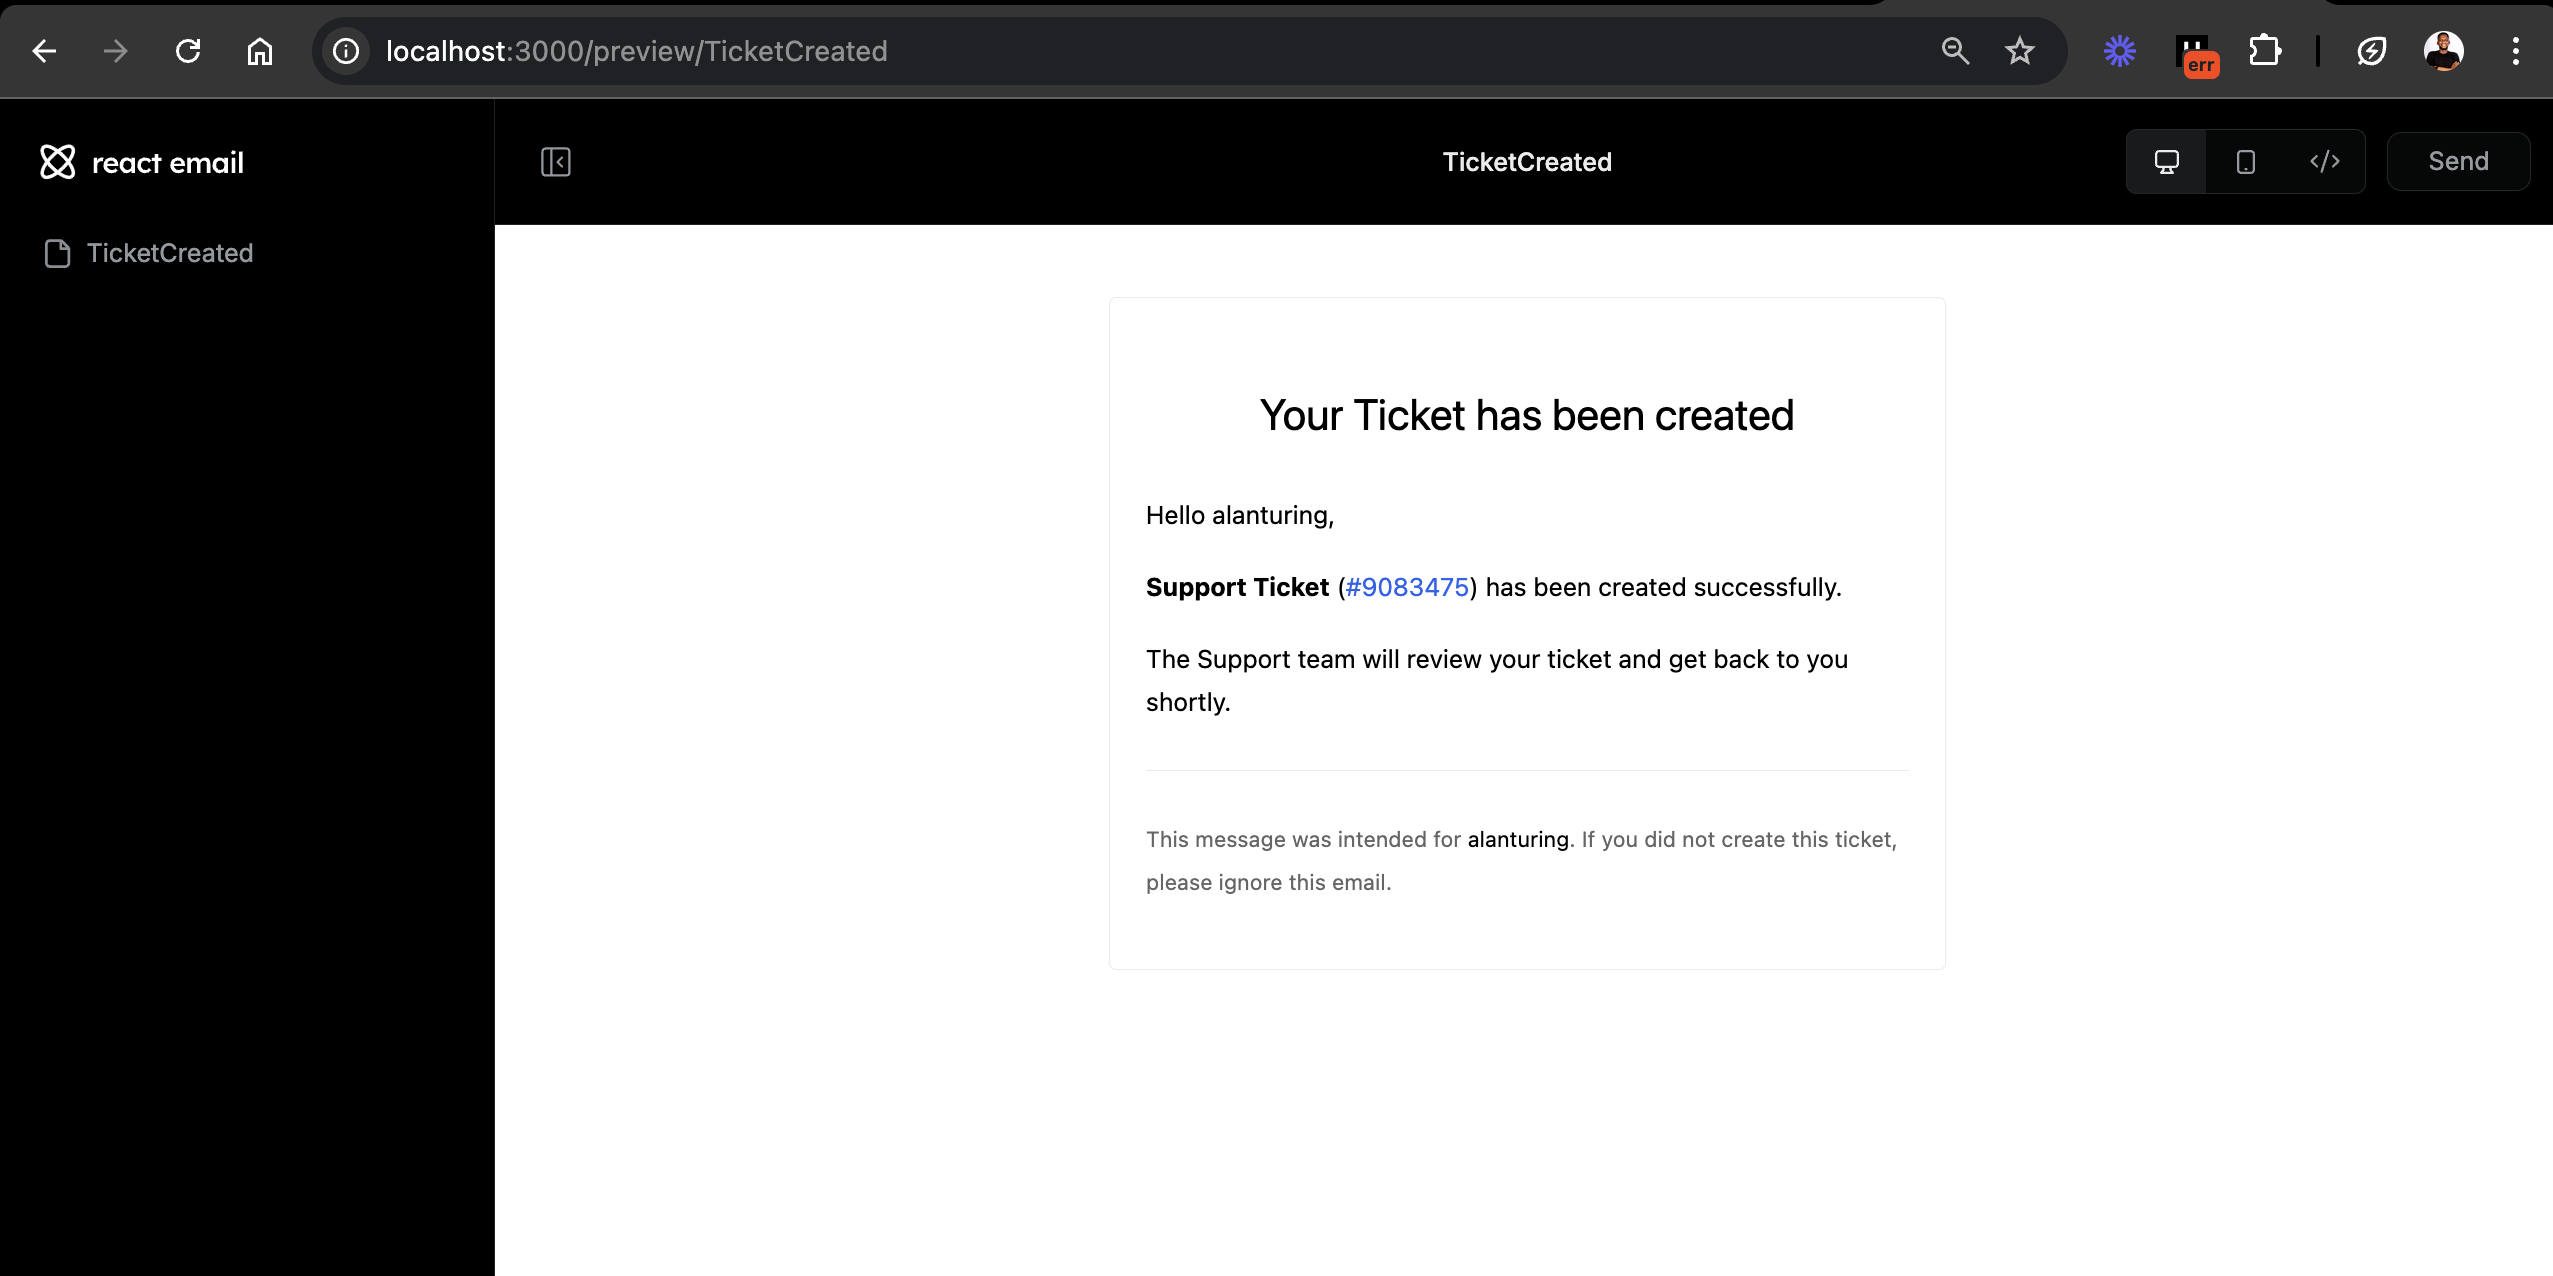
npm run email in your terminal to preview the email template.This email template notifies customers that their support ticket has been created and that someone from the support team will reach out to them.
React Email offers a variety of pre-designed email templates, making it easy to craft beautifully styled emails for different purposes. You can check out the available demo to see examples of what’s possible.
How to Send Emails with Resend
Resend is a simple email API that enables you to send emails within your software application. It supports a range of programming languages, including JavaScript (Next.js, Express, Node.js), Python, PHP, Go, and Rust, among others.
Resend and React Email can be easily integrated together since the co-founder of Resend, Bu Kinoshita (bukinoshita), is also the creator of React Email.
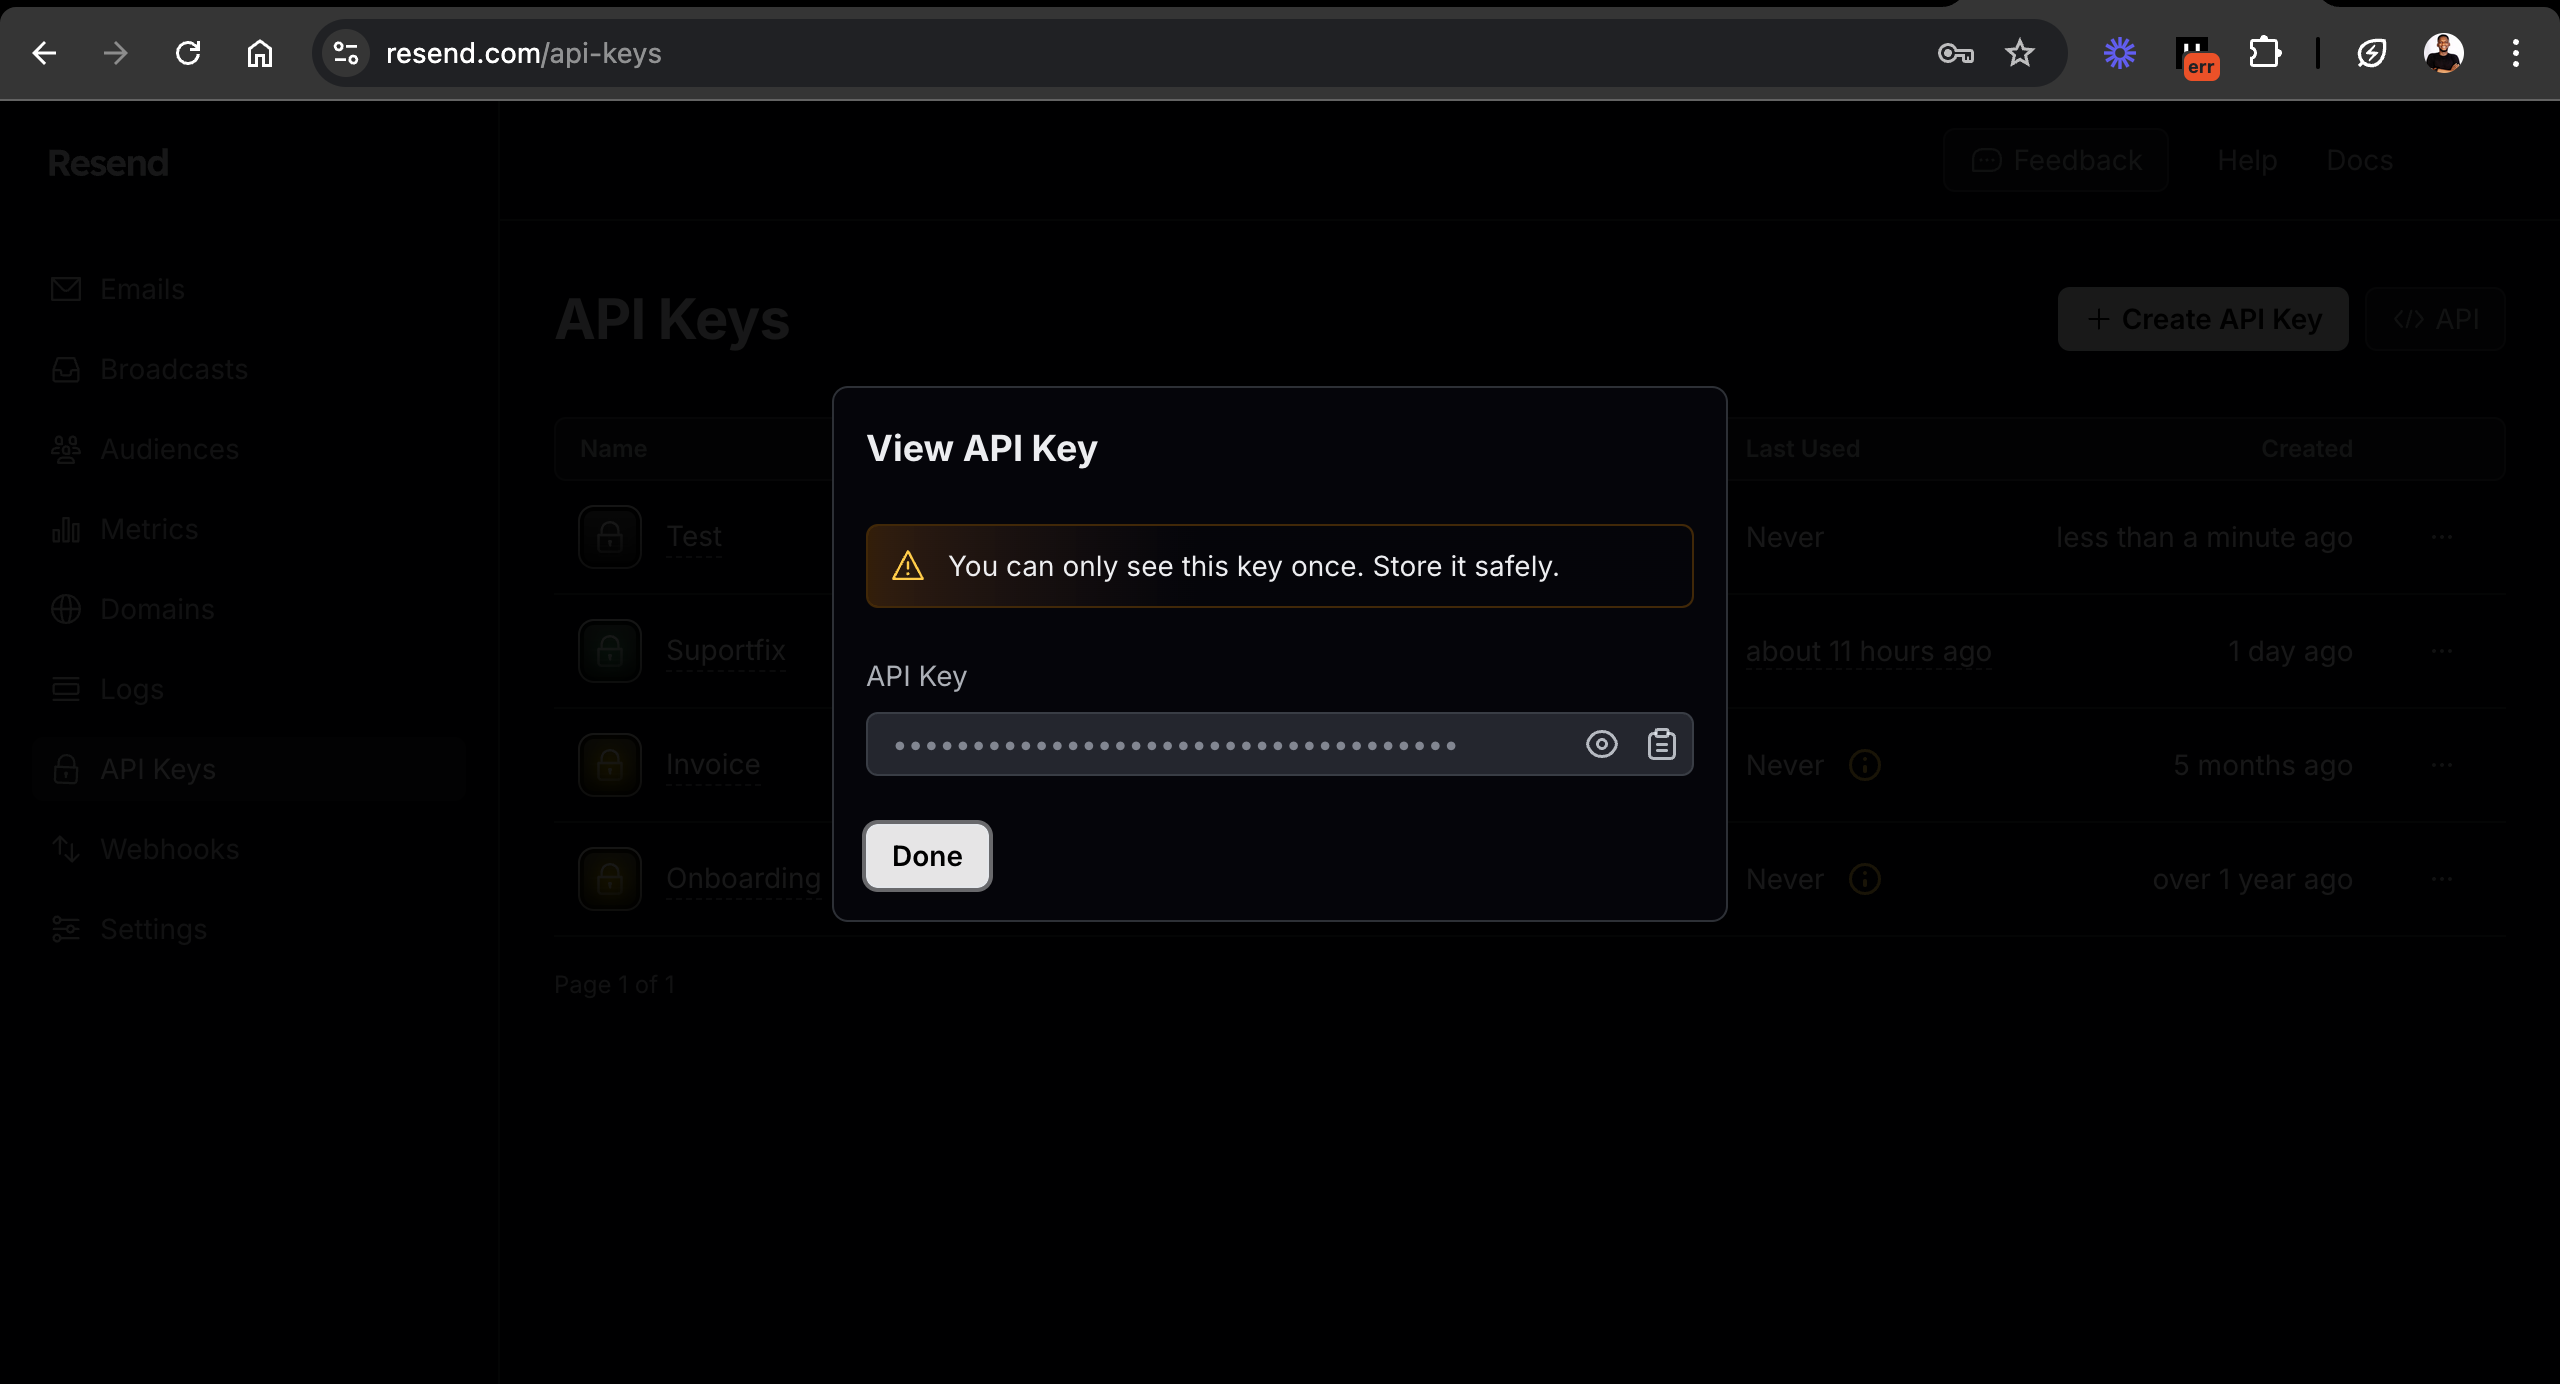
Create an account on Resend. Once you're signed in, navigate to the API keys section on your dashboard and copy your API key into a .env.local file.

RESEND_API_KEY=<RESEND_API_KEY>
Update the API endpoint to send an email using the React Email template, as shown below:
import { NextRequest, NextResponse } from "next/server";
//👇🏻 ticket ID generator function
import { v4 as generateID } from "uuid";
//👇🏻 imports the email template
import TicketCreated from "@/emails/TicketCreated";
//👇🏻 imports Resend
import { Resend } from "resend";
const resend = new Resend(process.env.RESEND_API_KEY);

export async function POST(req: NextRequest) {
    //👇🏻 accepts customer's input from frontend
    const { name, email, subject, content } = await req.json();
    //👇🏻 logs them
    console.log({ name, email, subject, content });
    //👇🏻 send an email using the email template
    const { data, error } = await resend.emails.send({
        from: "Acme <onboarding@resend.dev>",
        to: [email],
        subject: "Ticket Confirmation Email 🎉",
        react: TicketCreated({ username: name, ticketID: generateID() }),
    });

    if (error) {
        return NextResponse.json(
            { message: "Error sending email" },
            { status: 500 }
        );
    }

    return NextResponse.json({
        message: "Email sent successfully",
        data,
    });
}
Congratulations!🥳 You've completed this tutorial.
Here is a brief demo of the application:
Next Steps
In this tutorial, you learned how to create email templates with React Email and send them using Resend. Both packages enable you to integrate email communication easily within your applications.
Whether it’s simple email notifications, newsletters, or marketing campaigns, React Email and Resend offers an efficient and customizable solution to meet your needs.
Some helpful resources includes:
Thank you for reading!