How to Set Up Google Authentication in Laravel Applications
How to Set Up Google Authentication in Laravel Applications 관련

In this digital world, it’s important for your applications to have a smooth and secure authentication process. This helps improve user experience and the overall security of your apps.
Google Authentication is among the most trusted and convenient ways for users to log into a site using their Google account. And it means that they don’t have to remember yet another username and password.
Integrating Google OAuth into your Laravel application simplifies the login process, encourages user engagement, and boosts the credibility of your platform. In this tutorial, I’ll guide you through the steps of implementing Google Authentication in a Laravel application. We’ll go from setting up the Google API credentials to configuring Laravel’s Socialite package.
Prerequisites
Before you begin, make sure you have the following prerequisites:
- Laravel 11
- A Google Developer account.
- Basic knowledge of Laravel and authentication.
- Composer for managing packages
Once you have these prerequisites ready, you’re all set to dive into integrating Google Authentication into your Laravel app.
Benefits of Using Google Auth in a Laravel App
There are many benefits to this set up. A few of them are:
- Simplified integration with Socialite
- Seamless user authentication
- Improved security
- Customizable user flow
- Improved scalability
- Solid ecosystem support
- Easier maintenance
How to Set Up Laravel Google Login
Whether you’re working on a personal project or a production-ready application, following these steps will help you smoothly integrate Google Authentication. Let’s get started.
Step 1: Set up a Google Cloud project
To use Google Authentication in your Laravel application, first you need to configure a Google Cloud project. Follow these steps to set up your project:
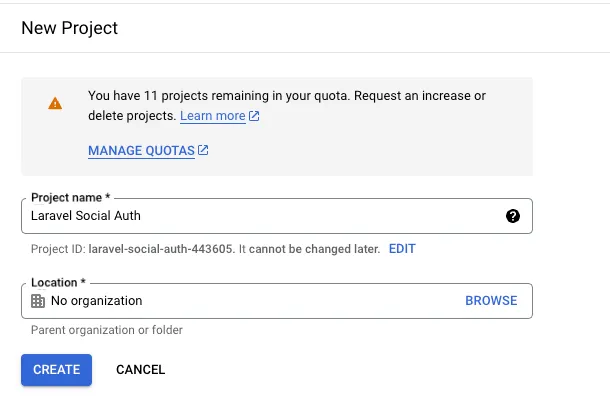
Click on the “Select a Project” dropdown in the top navigation bar. In the popup, click on “New Project” to create a new project and provide the requested details. Then click on Create project.
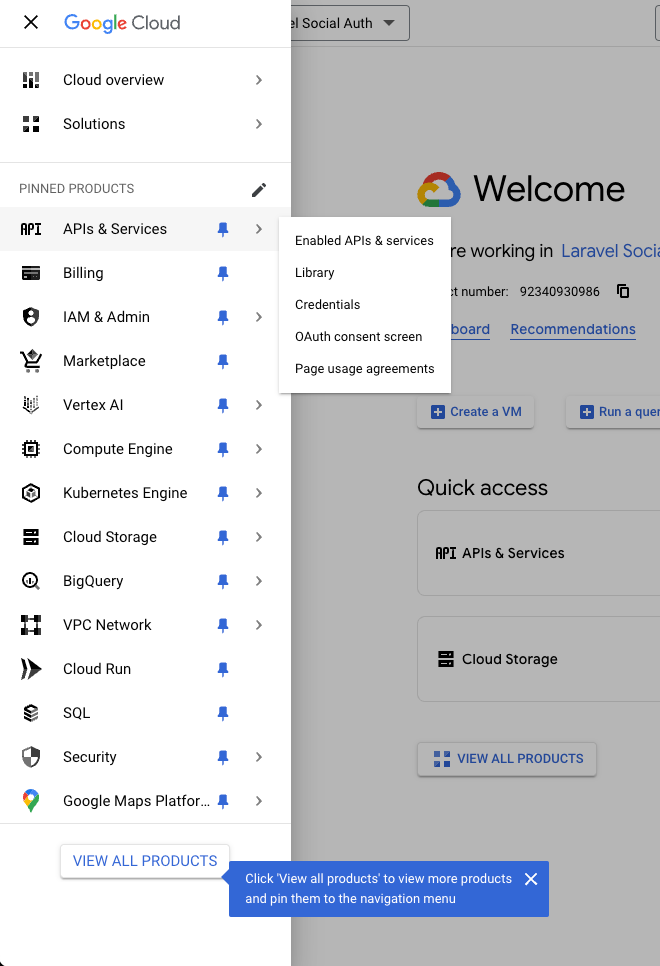
Once you create the project, open the console’s left side menu and select APIs & Services > Credentials.
On the Credentials page, click Create Credentials > OAuth Client ID.

If this is your first time creating a client ID, it will ask you to configure the consent screen. You can configure your consent screen by clicking Configure Consent Screen. If you have already configured the consent screen, you can skip this step.
- Select External if your app is for public use, or Internal if it’s limited to users within your Google Workspace organization.
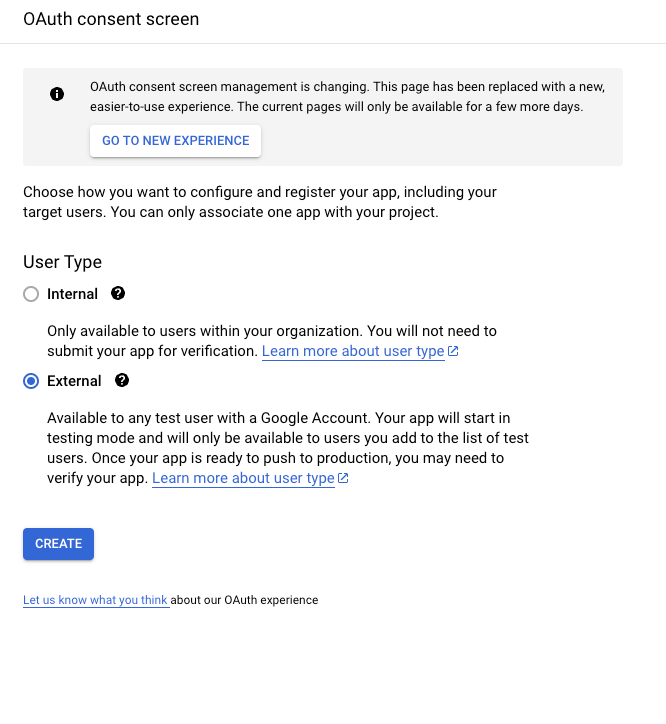
- Fill out the required details, like the app name, user support email, and any branding information. Click Save and Continue.
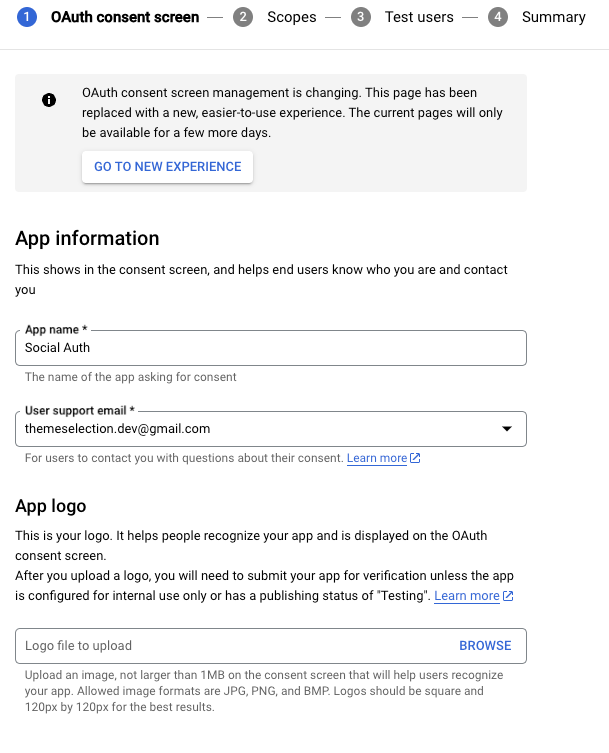
After configuring the consent screen, return to the Credentials page and select OAuth Client ID again.
Choose the Application Type as Web Application and provide a name for client credentials (for example, Laravel Social Login).
Under Authorized Redirect URIs, add the callback URL for your application:
Example:
http://your-app-url.com/callback/googleIf you're testing locally, use: http://127.0.0.1:8000/api/auth/google/callback
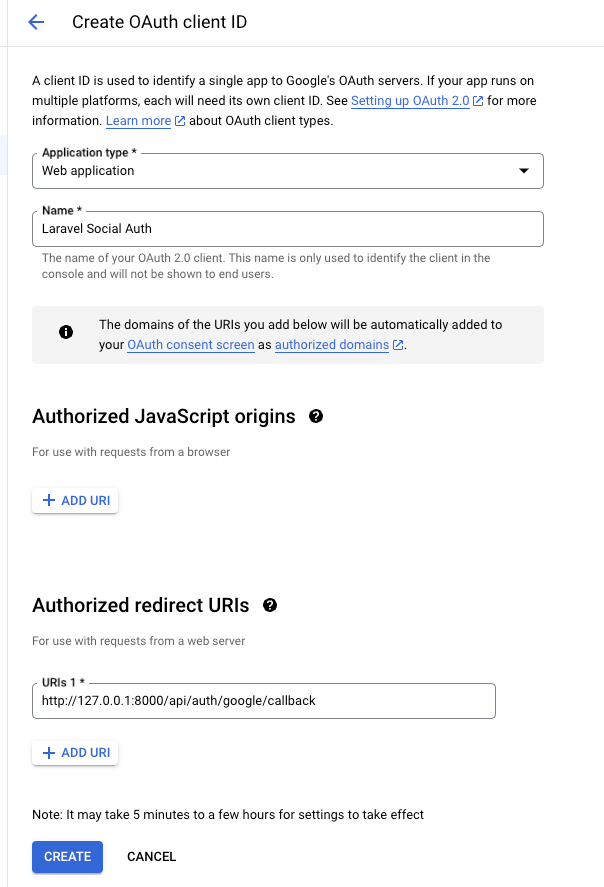
Click on Create, and Google will generate a Client ID and Client Secret for your project. Save these credentials, as they will be required in the next steps.
Step 2: Create a new Laravel project and Install the Laravel Socialite package
If you don’t have one ready, you can create a new Laravel project using the below command:
composer create-project --prefer-dist laravel/laravel social-auth-example
To integrate Google Authentication into a Laravel project, we’ll use Laravel Socialite. Socialite is a first-party Laravel package that simplifies OAuth authentication with popular services like Google, Facebook, Twitter, and more.
To install Socialite, open your terminal in the root directory of your Laravel project and run the following command:
composer require laravel/socialite
Step 3: Configure environment variables
In this step, we will configure our Laravel application to use the Google OAuth credentials that we collected in Step 1. Locate your .env file in the root directory of your project and add the following environment variables:
GOOGLE_CLIENT_ID=your-client-id
GOOGLE_CLIENT_SECRET=your-client-secret
GOOGLE_REDIRECT_URL=http://your-domain.com/auth/google/callback
Go ahead and replace all placeholders with secrets.
Let's understand each environment variable one by one:
GOOGLE_CLIENT_ID: A unique identifier for your app, provided by Google.GOOGLE_CLIENT_SECRET: A private key used by your app to authenticate itself securely with Google’s API.GOOGLE_REDIRECT_URL: The URL where Google redirects users after they log in. This should match the redirect URI you specified when creating the credentials in Step 1.
Step 4: Update the config files
To enable Laravel Socialite to use Google OAuth credentials, we need to configure the provider details in the config/services.php file.
In the services.php file, add the following configuration for the Google provider:
'google' => [
    'client_id' => env('GOOGLE_CLIENT_ID'),        // Your Google Client ID
    'client_secret' => env('GOOGLE_CLIENT_SECRET'), // Your Google Client Secret
    'redirect' => env('GOOGLE_REDIRECT_URL'),      // Your Google Redirect URL
]
Step 5: Create controllers and routes for authentication
In this step, we will create a controller to handle Google OAuth redirection and callbacks and set up the necessary routes to trigger these methods.
Run the following Artisan command to generate the GoogleAuthController controller:
php artisan make:controller GoogleAuthController
This will create a controller at app/Http/Controllers/GoogleAuthController.php.
Replace the contents of the newly created GoogleAuthController.php with the following code:
<?php

namespace App\\Http\\Controllers;

use App\\Http\\Controllers\\Controller;
use App\\Models\\User;
use Laravel\\Socialite\\Facades\\Socialite;
use Illuminate\\Support\\Facades\\Auth;
use Illuminate\\Support\\Str;
use Throwable;

class GoogleAuthController extends Controller
{
    /**
     * Redirect the user to Google’s OAuth page.
     */
    public function redirect()
    {
        return Socialite::driver('google')->redirect();
    }

    /**
     * Handle the callback from Google.
     */
    public function callback()
    {
        try {
            // Get the user information from Google
            $user = Socialite::driver('google')->user();
        } catch (Throwable $e) {
            return redirect('/')->with('error', 'Google authentication failed.');
        }

        // Check if the user already exists in the database
        $existingUser = User::where('email', $user->email)->first();

        if ($existingUser) {
            // Log the user in if they already exist
            Auth::login($existingUser);
        } else {
            // Otherwise, create a new user and log them in
            $newUser = User::updateOrCreate([
                'email' => $user->email
            ], [
                'name' => $user->name,
                'password' => bcrypt(Str::random(16)), // Set a random password
                'email_verified_at' => now()
            ]);
            Auth::login($newUser);
        }

        // Redirect the user to the dashboard or any other secure page
        return redirect('/dashboard');
    }
}
This controller contains two functions:
- Redirect: Redirects the user to Google’s OAuth Page.
- Callback: Handles the callback from Google and redirects the user to the dashboard or any other secure page.
Let’s define the routes of redirect and callback in the routes/web.php file:
use App\\Http\\Controllers\\GoogleAuthController;

// Route to redirect to Google's OAuth page
Route::get('/auth/google/redirect', [GoogleAuthController::class, 'redirect'])->name('auth.google.redirect');

// Route to handle the callback from Google
Route::get('/auth/google/callback', [GoogleAuthController::class, 'callback'])->name('auth.google.callback');
Step 6: Test Laravel Google authentication in your project.
We’ve set up Google authentication, so now it’s time to test it to make sure it works seamlessly. In this step, we’ll use a login button that redirects the user to Google’s authentication page and returns them to a protected route upon successful login.
First, we will add the following button that gives users the option to Login With Google:
<a href="{{ route('auth.google.redirect') }}" class="btn bg-blue-100 p-3 shadow-sm border rounded-md text-blue-900">
    Login with Google
</a>
For testing purposes, I have defined a protected route and a dashboard. This route will only be accessible to authenticated users. After logging in, we will redirect users to this page. Let’s define this route in web.php:
Route::get('/dashboard', function () {
    return view('dashboard');
})->middleware('auth')->name('dashboard');
Next, create a blade view file for the dashboard at resources/views/dashboard.blade.php. Here’s the contents of the dashboard:
<html>
    <head>
        <title>Dashboard</title>
    </head>

    <body>
        <h1>Dashboard</h1>
        <p>Welcome to the dashboard, {{ auth()->user()->name }}!</p>
    </body>

</html>
Here, we’re using the auth()->user() helper to display the logged-in user’s name, which is fetched from the Google account they used to sign in.
Now, Let’s try to log in.
This is the login page:

Clicking on the button will redirect you to Google’s consent screen:
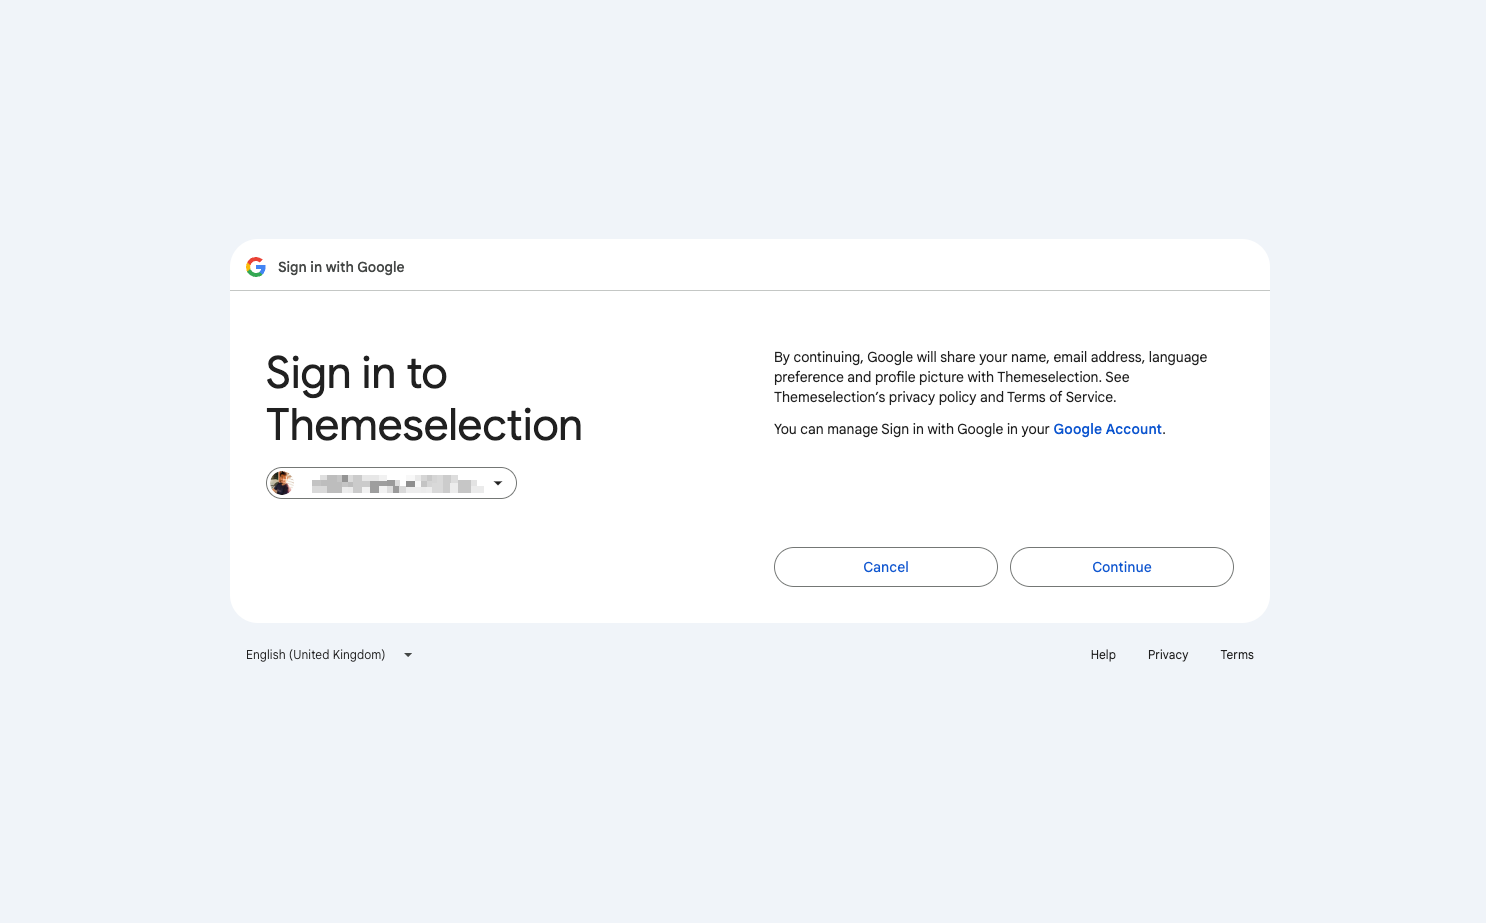
Click on the continue, and you should be logged in to the app. You will be redirected to a screen like below. You can see the welcome message with the user’s name.

That’s it! You’ve successfully implemented and tested Google Authentication in your Laravel project. Now your users can sign in using their Google accounts, enhancing both security and convenience.
To refer to the full implementation, you can find the complete source code for this project on GitHub here: Google Login Integration for Laravel - GitHub Repository
Conclusion
You’ve now set up Google authentication in your Laravel application using Socialite! You can extend this method to include other OAuth providers like Facebook, Twitter, or GitHub by adding additional configurations to the config/services.php file.
Google OAuth integration is a common feature for modern web applications, and Laravel Socialite makes it easy to implement.
In case you need more social login options like GitHub, Twitter, and Facebook, then you can consider ready-to-use Laravel SaaS boilerplates.
Most of the pre-built Laravel SaaS boilerplates offer seamless integration with popular platforms such as Google, GitHub, Facebook, and Twitter. For example, there are some premium and open source resources like:
- Laravel Starter Kit (Premium)
- Based on Tailwind CSS
- Comes with One Click Magic Link Setup
- Supports various authentication methods including the traditional email/password login
- 2FA Authentication
- SaaS Boilerplate (
miracuthbert/saas-boilerplate) (Open Source)- Single Database Multi-tenancy
- Developer Panel
- Manage Personal Access Tokens
- Laranuxt (
fumeapp/laranuxt) (Open Source)- Nuxt UI a collection of components built by the NuxtJS team, powered by Tailwind CSS
- Authentication library to assist with user sessions and logging in/out
- Example Authentication Middleware
- Laravel Vue Boilerplate (
alefesouza/laravel-vue-boilerplate) (Open Source)- WebSockets with Laravel Echo and Pusher.
- Workbox for better PWA development.
- Laravel GraphQL
Using one of these Laravel SaaS boilerplates can speed up your workflows as you don’t need to set up everything from scratch.
Special thanks to Deep Kumbhare (DeepKumbhare85), an experienced Laravel Developer and enthusiast, who has helped me with preparing this article.
I hope this article helps you with setting up Google Login with Laravel.
